Page 2 - CUSTOMER CARE AND SERVICE
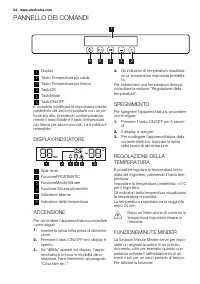
CONTENTS SAFETY INFORMATION . . . . . . . . . . . . . . . . . . . . . . . . . . . . . . . . . . . . . . . . . . . . . . . . . . . . . . . . . 3PRODUCT DESCRIPTION . . . . . . . . . . . . . . . . . . . . . . . . . . . . . . . . . . . . . . . . . . . . . . . . . . . . . . . 5CONTROL PANEL . . . . . . ...
Page 3 - SAFETY INFORMATION; GENERAL SAFETY
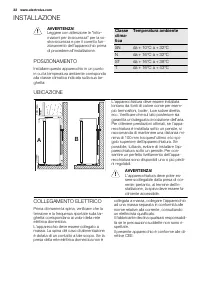
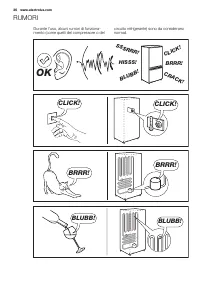
SAFETY INFORMATION In the interest of your safety and to ensurethe correct use, before installing and firstusing the appliance, read this user manualcarefully, including its hints and warnings.To avoid unnecessary mistakes and acci-dents, it is important to ensure that all peo-ple using the applianc...
Page 5 - PRODUCT DESCRIPTION
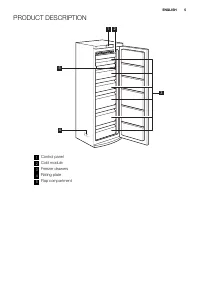
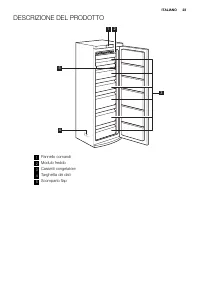
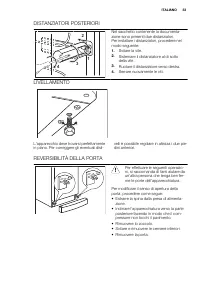
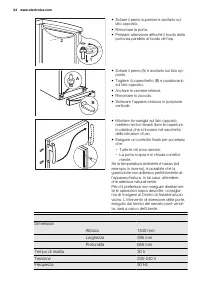
PRODUCT DESCRIPTION 1 2 4 5 3 1 Control panel 2 Cold module 3 Freezer drawers 4 Rating plate 5 Flap compartment ENGLISH 5
Page 6 - CONTROL PANEL; SWITCHING ON
CONTROL PANEL 1 2 3 4 5 6 1 Display 2 Temperature warmer button 3 Temperature colder button 4 OK button 5 Mode button 6 ON/OFF button It is possible to change predefined soundof buttons to a loudly one by pressing to-gether Mode button and Temperaturecolder button for some seconds. Change isreversib...
Page 8 - DAILY USE; STORAGE OF FROZEN FOOD
DAILY USE STORAGE OF FROZEN FOOD When first starting-up or after a period outof use, before putting the products in thecompartment let the appliance run at least2 hours.The freezer baskets ensure that it is quickand easy to find the food package youwant. If large quantities of food are to bestored, ...
Page 9 - HELPFUL HINTS AND TIPS; NORMAL OPERATING SOUNDS
HELPFUL HINTS AND TIPS NORMAL OPERATING SOUNDS • You may hear a faint gurgling and a bub- bling sound when the refrigerant is pum-ped through the coils or tubing. This iscorrect. • When the compressor is on, the refriger- ant is being pumped around and you willhear a whirring sound and a pulsatingno...
Page 10 - CARE AND CLEANING; CLEANING THE INTERIOR
CARE AND CLEANING CLEANING THE INTERIOR Before using the appliance for the first time,wash the interior and all internal accesso-ries with lukewarm water and some neutralsoap so as to remove the typical smell of abrand-new product, then dry thoroughly. Do not use detergents or abrasivepowders, as th...
Page 12 - TROUBLESHOOTING; Problem
TROUBLESHOOTING WARNING! Before troubleshooting, disconnectthe mains plug from the mainssocket.Only a qualified electrician or com-petent person must do the trouble-shooting that is not in this manual. Problem Possible cause Solution The appliancedoes not operate. The appliance is switched off. Swit...
Page 13 - upper or lower; CLOSING THE DOOR
Problem Possible cause Solution Many products are stored atthe same time. Store less products at thesame time. Products are too near toeach other. Store products so that there iscold air circulation. There is too muchfrost. Food is not wrapped correct-ly. Wrap the food correctly. The door is not clo...
Page 14 - INSTALLATION; POSITIONING; Ambient temperature; LOCATION
INSTALLATION WARNING! Read the "Safety Information" care-fully for your safety and correct op-eration of the appliance before in-stalling the appliance. POSITIONING Install this appliance at a location where theambient temperature corresponds to theclimate class indicated on the rating plate...
Page 15 - REAR SPACERS; LEVELLING
REAR SPACERS 2 4 3 1 You can find the two spacers in the bagwith documentation.Do these steps to install the spacers: 1. Release the screw. 2. Engage the spacer below the screw. 3. Turn the spacer to the right position. 4. Tighten again the screws. LEVELLING When placing the appliance ensure that it...
Page 17 - NOISES; OK
NOISES There are some sounds during normal run-ning (compressor, refrigerant circulation). BRRR! HISSS! CLICK! BLUBB! CRACK! SSSRRR! OK CLICK! CLICK! BRRR! BRRR! BLUBB! BLUBB! ENGLISH 17
Page 18 - ENVIRONMENT CONCERNS
HISSS! HISSS! SSSRRR! SSSRRR! CRACK! CRACK! ENVIRONMENT CONCERNS Recycle the materials with the symbol . Put the packaging in applicable containersto recycle it.Help protect the environment and humanhealth and to recycle waste of electrical and electronic appliances. Do not disposeappliances marked ...
Page 19 - SERVIZIO CLIENTI E MANUTENZIONE
INDICE INFORMAZIONI PER LA SICUREZZA . . . . . . . . . . . . . . . . . . . . . . . . . . . . . . . . . . . . . . . . . . . . . . 20DESCRIZIONE DEL PRODOTTO . . . . . . . . . . . . . . . . . . . . . . . . . . . . . . . . . . . . . . . . . . . . . . . . . 23PANNELLO DEI COMANDI . . . . . . . . . . . ....
Page 20 - INFORMAZIONI PER LA SICUREZZA
INFORMAZIONI PER LA SICUREZZA Per garantire un impiego corretto e sicurodell'apparecchio, prima dell'installazione edel primo utilizzo leggere con attenzione illibretto istruzioni, inclusi i suggerimenti e leavvertenze. Per evitare errori e incidenti, èimportante garantire che tutte le personeche ut...
Page 22 - TUTELA AMBIENTALE
TUTELA AMBIENTALE Questo apparecchio non contienegas che potrebbero danneggiare lostrato di ozono nel circuito refrige-rante o nei materiali isolanti. L'ap-parecchio non deve essere smaltitoassieme ai rifiuti urbani e alla spaz-zatura. La schiuma dell'isolamentocontiene gas infiammabili: lo smalti-m...
Page 23 - DESCRIZIONE DEL PRODOTTO
DESCRIZIONE DEL PRODOTTO 1 2 4 5 3 1 Pannello comandi 2 Modulo freddo 3 Cassetti congelatore 4 Targhetta dei dati 5 Scomparto flap ITALIANO 23
Page 24 - PANNELLO DEI COMANDI; ACCENSIONE
PANNELLO DEI COMANDI 1 2 3 4 5 6 1 Display 2 Tasto Temperatura più calda 3 Tasto Temperatura più fresca 4 TastoOK 5 TastoMode 6 TastoON/OFF È possibile modificare le impostazioni audiopredefinite dei tasti e impostarle con un vo-lume più alto, premendo contemporanea-mente il tasto Mode e il tasto te...
Page 25 - ALLARME PORTA APERTA
1. Premere il tasto Mode finché non ap-pare l'icona corrispondente.L'indicatore Minute Minder lampeggia.Il timer visualizza il valore impostato (30minuti) per alcuni secondi. 2. Premere il tasto Regolatore timer permodificare il valore impostato da 1 a90 minuti. 3. Premere il tasto OK per confermare...
Page 26 - UTILIZZO QUOTIDIANO; SCONGELAMENTO
UTILIZZO QUOTIDIANO CONSERVAZIONE DEISURGELATI Al primo avvio o dopo un periodo di inutiliz-zo si consiglia di lasciare in funzione l'appa-recchiatura per almeno 2 ore, prima di in-trodurre gli alimenti nel vano.I cestelli del congelatore consentono di in-dividuare rapidamente e facilmente la con-fe...
Page 27 - CONSIGLI E SUGGERIMENTI UTILI
CONSIGLI E SUGGERIMENTI UTILI RUMORI NORMALI DURANTE ILFUNZIONAMENTO • Quando il refrigerante viene pompato at- traverso le bobine o le tubazioni si puòsentire un fievole gorgoglio e un borbot-tio. Non si tratta di un'anomalia. • Quando il compressore è in funzione, viene pompato il refrigerante e s...
Page 28 - PULIZIA E CURA; PULIZIA PERIODICA
PULIZIA E CURA PULIZIA DELL'INTERNO Prima di utilizzare l'apparecchiatura per laprima volta, lavare l'interno e gli accessoricon acqua tiepida e sapone neutro per eli-minare il tipico odore dei prodotti nuovi,quindi asciugare accuratamente. Non usare detergenti corrosivi opolveri abrasive che possan...
Page 30 - RISOLUZIONE DEI PROBLEMI; Problema
RISOLUZIONE DEI PROBLEMI AVVERTENZA! Prima di eseguire la ricerca guasti,estrarre la spina dalla presa di ali-mentazione.Le operazioni di ricerca guasti, nondescritte nel presente manuale, de-vono essere eseguite esclusiva-mente da elettricisti qualificati o dapersonale competente. Problema Causa po...
Page 31 - CHIUSURA DELLA PORTA
Problema Causa possibile Soluzione La temperatura degli alimentiè troppo alta. Prima di mettere a conservaregli alimenti, lasciarli raffreddarea temperatura ambiente. Sono stati introdotti molti ali-menti contemporaneamente. Introdurre gli alimenti un pocoalla volta. I prodotti sono troppo vicinitra...
Page 32 - INSTALLAZIONE; POSIZIONAMENTO; Temperatura ambiente; UBICAZIONE
INSTALLAZIONE AVVERTENZA! Leggere con attenzione le "Infor-mazioni per la sicurezza" per la vo-stra sicurezza e per il corretto fun-zionamento dell'apparecchio primadi procedere all'installazione. POSIZIONAMENTO Installare questo apparecchio in un puntoin cui la temperatura ambiente corrispo...
Page 33 - DISTANZIATORI POSTERIORI; LIVELLAMENTO
DISTANZIATORI POSTERIORI 2 4 3 1 Nel sacchetto contenente la documenta-zione sono presenti due distanziatori.Per installare i distanziatori, procedere nelmodo seguente: 1. Svitare la vite. 2. Sistemare il distanziatore al di sottodella vite. 3. Ruotare il distanziatore verso destra. 4. Serrare nuova...
Page 36 - RUMORI
RUMORI Durante l'uso, alcuni rumori di funziona-mento (come quelli del compressore o del circuito refrigerante) sono da considerarsinormali. BRRR! HISSS! CLICK! BLUBB! CRACK! SSSRRR! OK CLICK! CLICK! BRRR! BRRR! BLUBB! BLUBB! 36 www.electrolux.com
Page 37 - CONSIDERAZIONI AMBIENTALI
HISSS! HISSS! SSSRRR! SSSRRR! CRACK! CRACK! CONSIDERAZIONI AMBIENTALI Riciclare i materiali con il simbolo . Buttare l'imballaggio negli appositicontenitori per il riciclaggio.Aiutare a proteggere l’ambiente e la saluteumana e a riciclare rifiuti derivanti daapparecchiature elettriche ed elettronich...