AEG Micro-Processor Charging Unit LW 60.0- Manuals
AEG Micro-Processor Charging Unit LW 60.0– User Manual in PDF format online.
Manuals:
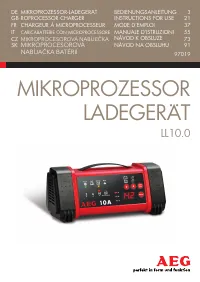
User Manual AEG Micro-Processor Charging Unit LW 60.0
Summary
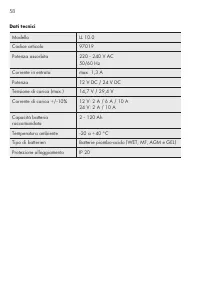
3 InhALt Einleitung . . . . . . . . . . . . . . . . . . . . . . . . . . . . . . . . . . . . . . . . . . . . . . . . . . 4 Bestimmungsgemäßer Gebrauch . . . . . . . . . . . . . . . . . . . . . . . . . . . . . . . . 5 Lieferumfang . . . . . . . . . . . . . . . . . . . . . . . . . . . . . . . . . . . ....
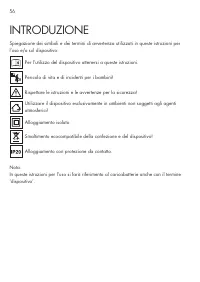
4 EInLEItUnG Erklärung der Symbole und Signalworte, die in dieser Bedienungsanleitung und/oder am Gerät verwendet werden: Beachten Sie diese Bedienungsanleitung bei der Verwendung des Geräts. Lebens- und Unfallgefahr für Kinder! Beachten Sie Warn- und Sicherheitshinweise! Gerät nur an witterungsgesc...
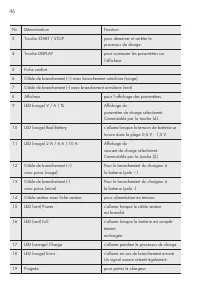
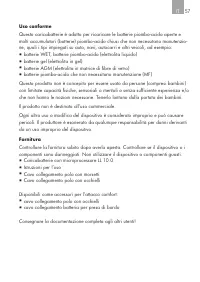
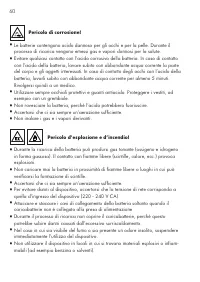
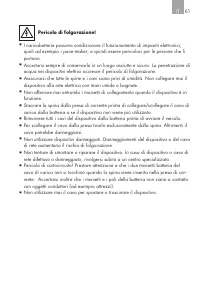
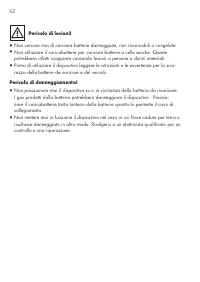
DE 7 SIChERhEIt Allgemeine Sicherheitshinweise Lesen Sie alle Sicherheitshinweise und Anweisungen. Versäumnisse bei der Einhal-tung der Sicherheitshinweise und Anweisungen können elektrischen Schlag, Brand und/oder schwere Verletzungen verursachen. Bewahren Sie alle Sicherheitshinweise und Anweisung...
DE 11 PRODUKtÜBERSICht nr. Bezeichnung Funktion 1 taste 12 V / 24 V zur Spannungswahl.Anzeige im Display (12P oder 24P)entsprechend der Auswahl. 2 taste 2 A / 6 A / 10 A zur Auswahl des Ladestroms.Anzeige mit der entsprechenden LED. 3 taste StARt / StOP zum Starten und Stoppen des Ladevorganges. V S...
DE 13 Funktionen Das Ladegerät ist mit einem Mikroprozessor (MCU - Micro-Computer-Unit) aus-gerüstet und besitzt vollautomatische Lade-, Diagnose-, Rettungs- und Wartungs-funktionen. nach der Auswahl des angeschlossenen Batterietyps (12 V oder 24 V) erkennt das Ladegerät die Batteriekapazität und de...
16 Ladevorgang beenden und Ladegerät trennen 1. Ziehen Sie immer zuerst den netzstecker aus der 230 V-netzsteckdose.2. trennen Sie das schwarze (-) Polanschlusskabel vom negativen Pol der Batterie ab. 3. trennen Sie das rote (+) Polanschlusskabel vom positiven Pol der Batterie ab. LADEPhASEn Schritt...
DE 17 Schritt 5: Absorptionsladung Die Batterie wird bei konstanter Ladeschlussspannung geladen bis kein Ladestrom mehr fließt. Schritt 6: Schwebeladung Die Ladespannung wird reduziert, der Ladevorgang ist beendet. Schritt 7: Überwachung Das Ladegerät überwacht die Batteriespannung. Sobald die Batte...
18 FEhLERSUChE Fehler/Problem Mögliche Ursache Abhilfe LED „Bad Battery“ (10) leuchtet Defekte Batterie Batterie von einer Fachwerkstatt prüfen lassen. Batterie erneuern. LED „Error“ (18) leuchtet Batterie falsch angeschlossen Ladegerät ausstecken und die Anschlüsse kontrollieren. Falsche Batteriesp...
DE 19 Fehler/Problem Mögliche Ursache Abhilfe Lange Ladedauer Bei sehr niedrigen temperaturen (unter 0 º C) wird nur mit sehr geringem Ladestrom geladen. Dadurch verlängert sich die Lade-dauer. Erwärmt sich die Batterie, wird der Ladestrom entsprechend angepasst. Batterie unter nor-malen Bedingunge...
21 GB TaBle of conTenTs Introduction 22 normal use 23 contents 23 Technical data 24 safety 25 Product overview 28 functions 30 operation 30 Before use 30 connecting the device 30 start charging 31 switching the display 31 charging time 32 completing charging and disconnecting the charger 32 charging...
22 InTroDucTIon explanation of symbols and signal words used in these operating instructions and/or the device: follow instructions when using the machine risk of bodily or fatal injury to children! follow warnings and safety instructions! only use device in locations protected from weather! Double-...
GB 25 safeTy General Safety Guidelines read all safety guidelines and instructions noncompliance with safety guidelines and instructions can cause electric shock, fire and / or serious injuryKeep all safety guidelines and instructions for future reference Warning! life-threatening danger to infants ...
28 ProDucT oVerVIeW no Description function 1 12 V / 24 V button to select the voltageThe display shows the respective selec-tion (12P or 24P) 2 2 a / 6 a / 10 a button to select the charging currentDisplayed with the respective leD V START STOP Power V A % DISPLAY 10 A Charge Full Error Bad Battery...
30 Functions The charger is equipped with a microprocessor (Mcu - Micro computer unit) and features fully automatic charging-, diagnostic-, emergency- and maintenance functions after selecting the battery type connected (12 V or 24 V) the battery charger will recognise the battery capacity and the b...
GB 33 cHarGInG PHases Step 1: Condition check The charger checks the battery condition and calculates the required charging parameters Voltage function 0 V to 05 V „error“ leD (18) lights up Incorrect connection 05 V to 15 V „Bad Battery“ leD (10) lights up Battery defective 15 V to 12 V charging wi...
GB 35 Error/Problem Possible cause Correction Battery cannot be charged no power supply, charger not plugged in Verify the charger is plugged into a 230 V mains outlet and the “Power” leD (15) is on Battery may be defective long charging time only a very low charging current is used in very low temp...
37 Table des maTières introduction 38 Utilisation conforme 39 Contenu de l’emballage 39 Caractéristiques techniques 40 sécurité 41 aperçu du produit 45 Fonctions 47 Utilisation 47 avant l’utilisation 47 brancher l’appareil 47 Commencer à charger 48 Commutation de l’affichage 49 durée de charge 49 Te...
38 iNTrodUCTioN explication des symboles et mots d’avertissements qui sont utilisés dans la présente notice d’explication et/ou sur l’appareil: lorsque vous utilisez l’appareil, veuillez vous conformer à la présente notice d’utilisation risque d’accident et danger de mort pour les enfants ! Veuillez...
FR 41 sÉCUriTÉ Consignes generales de sécurité Veuillez lire toutes les consignes de sécurité et les instructions le nonrespect des consignes de sécurité et des instructions peut provoquer un choc électrique, desbrûlures et / ou des blessures graves Conservez toutes les consignes de sécurité et des ...
Fr 45 aPerÇU dU ProdUiT Nr dénomination Fonction 1 Touche 12 V / 24 V pour la sélection de tensionindication sur l’afficheur (12P ou 24P) selon la sélection 2 Touche 2 a / 6 a / 10 a pour la sélection du courant de chargeaffichage au moyen des voyants led correspondants V START STOP Power V A % DISP...
Fr 47 Fonctions le chargeur est équipé d’un microprocesseur (mCU - micro Computer Unit) et pos-sèdent des fonctions de charge, de diagnostic, de sauvegarde et de maintenance entièrement automatiques après avoir sélectionné la batterie branchée (12 V ou 24 V), le chargeur reconnait la capacité de bat...
50 Terminer le processus de charge et débrancher le chargeur 1 débranchez toujours en premier la fiche secteur de la prise 230 V2 débranchez le câble noir (-) du pôle négatif de la batterie3 débranchez le câble rouge (+) du pôle positif de la batterie PHases de CHarGe Étape 1 : Vérification d’état l...
Fr 51 Étape 5 : Charge d’absorption la batterie est chargée sous une tension de fin de charge constante jusqu’à ce qu’aucun courant de charge ne circule Étape 6 : Charge de floating la tension de charge est réduite, le processus de charge est terminé Étape 7 : Surveillance le chargeur surveille la c...
52 aNalYse d’erreUrs Erreur/Problème Cause possible Remède le voyant led „bad battery“ (10) s’allume batterie défectueuse Faire vérifier la batterie par un atelier spécialisé remplacer la batterie le voyant led « error » (18) s’allume batterie mal raccordée/non raccordée débrancher le char-geur et v...
55 Sommario introduzione � � � � � � � � � � � � � � � � � � � � � � � � � � � � � � � � � � � � � � � � � � � � � � � 56 Uso conforme � � � � � � � � � � � � � � � � � � � � � � � � � � � � � � � � � � � � � � � � � � � � 57 Fornitura� � � � � � � � � � � � � � � � � � � � � � � � � � � � � � � � �...
56 inTroDUzione Spiegazione dei simboli e dei termini di avvertenza utilizzati in queste istruzioni per l’uso e/o sul dispositivo: Per l’utilizzo del dispositivo attenersi a queste istruzioni� Pericolo di vita e di incidenti per i bambini! rispettare le istruzioni e le avvertenze per la sicurezza! U...
iT 59 SiCUrezza Indicationi di sicurezza generali Leggere tutte le indicazioni e le istruzioni di sicurezza� omissioni nell’osservanza delle indicazioni di sicurezza e delle istruzioni possono provocare scosse elettriche, ustioni e/o gravi lesioni� Conservare per future consultazioni tutte le indica...
iT 63 DeSCrizione DeL ProDoTTo nr� Denominazione Funzione 1 Tasto 12 V / 24 V per la selezione della tensione�Visualizzazione nel display (12P o 24P) in base alla selezione effettuata� 2 Tasto 2 a / 6 a / 10 a per la selezione della corrente di carica�Visualizzazione tramite il LeD corrispon-dente� ...
IT 65 Funzioni Questo caricabatterie è provvisto di un microprocessore (mCU - micro-Computer-Unit) e di funzioni interamente automatiche di ricarica, diagnosi, recupero e manutenzione� Dopo aver selezionato il tipo di batteria collegata (12 V o 24V) il caricabatterie riconosce la capacità e lo stato...
68 FaSi Di CariCa Fase 1: verifica dello stato il caricabatterie verifica lo stato della batteria e calcola i parametri di ricarica necessari� Tensione Funzione da 0 V a 0,5 V il LeD “error” (18) si illumina� Collegamento errato� da 0,5 V a 1,5 V il LeD “Bad Battery” (10) si illumina� Difetto batter...
IT 69 Fase 7: monitoraggio il caricabatterie monitora la capacità della batteria� Se la batteria va al di sotto di 12,8 V il caricabatterie attiva un impulso di carica� La batteria viene così mantenu-ta al livello di carica più elevato possibile� FUnzioni Di SiCUrezza il caricabatterie è provvisto d...
70 anaLiSi DeGLi errori Guasto / problema Possibili cause Soluzione il LeD „Bad Battery“ (10) si illumina� Batteria difettosa Far verificare la batteria presso un centro specia-lizzato� rinnovare la batteria� il LeD “error” (18) si illumina� Batteria non collegata o collegata in modo scorretto Stacc...
72 PULizia, manUTenzione e riPa- razioni ▪ Pulire sempre i morsetti dopo la ricarica� Per evitare la corrosione, pulire i mor-setti da eventuali residui di liquido batteria� ▪ avvolgere con cura i cavi del dispositivo prima di riporlo� Ciò aiuta a evitare danneggiamenti accidentali ai cavi del dispo...
73 Obsah Úvod 74 Použití ke stanovenému účelu 75 Obsah dodávky 75 Technická data 76 Bezpečnost 77 Funkce 83 Použití 83 Před použitím 83 Připojení přístroje 83 Start nabíjení 84 Přepnutí ukazatele 85 Životnost 85 Ukončení nabíjení a odpojení nabíječky 86 Fáze nabíjení 86 Bezpečnostní funkce 87 Analýz...
74 ÚvOd Vysvětlení symbolů a signální slov, použitých v tomto návodu k obsluze nebo na přístroji: Při používání přístroje dbejte vždy na tento návod k obsluze. Nebezpečí ohrožení života a nehody pro malé děti! Dbejte na výstražná a bezpečnostní upozornění! Přístroj používat jen v místech chráněných ...
CZ 77 BEZPEČNOST Všeobecné bezpečnostní pokyny Přečtěte si bezpečnostní pokyny a pokyny pro použití. nedodržení bez - pečnostních pokynů a pokynů pro použití může způsobit zásahelektrickým proudem, vznik požáru a/nebo vážné ublížení na zdraví. Uschovejte si všechny bezpečnostní pokyny a pokyny pro p...
CZ 81 POPIS VÝROBKU Č. Název Funkce 1 Tlačítko 12 V / 24 V pro volbu napětí.Zobrazení na displeji (12P nebo 24P) podle výběru. 2 Tlačítko 2 A / 6 A / 10 A pro volbu nabíjecího proudu.Zobrazení odpovídající LED. 3 Tlačítko START / STOP pro zapnutí a ukončení nabíjení. V START STOP Power V A % DISPLAY...
CZ 83 Funkce Nabíječka je vybavena mikroprocesorem (MCU - Micro-Computer - -Unit) a funkcemi automatického nabíjení, diagnózy, záchrany a údržby baterií. Podle připojené baterie (12 V nebo 24 V) rozpozná nabíječka její kapacitu a vypočítá potřebné nabíjecí parametry (nabíjecí napětí, nabíjecí proud)...
86 Ukončení nabíjení a odpojení nabíječky 1. Vytáhněte nedříve zástrčku nabíječky ze zásuvky s napětím 230 V. 2 Odpojte černý kabel (-) od záporného pólu baterie. 3 Odpojte červený kabel (+) od kladného pólu baterie. FáZE NABíJENí Krok 1: Kontrola stavu Nabíječka kontroluje stav baterie a vypočítá p...
CZ 87 Krok 5: Absorpční nabíjení Baterie se nabíjí konstantním, koncovým nabíjecím napětím tak dlouho až se nespotřebovává žádný nabíjecí proud. Krok 6: Udržovací nabíjení Nabíjecí napětí se redukuje, nabíjení je ukončené. Krok 7: Kontrola Nabíječka kontroluje kapacitu baterie. Jakmile klesne napětí...
88 analýza POruCh Chyba/Pro - blém Možné příčina Pomoc LED „Bad Ba - ttery“ (10) svítí Vadná baterie Baterii nechat pře - zkoušet v odborné dílně. Baterii vyměnit za novou. LED „Error“ (18) svítí Baterie je nesprávně nebo není vůbec připojená Nabíječku odpojit od sítě a zkontro - lovat připojení. Zv...
92 Úvod Význam symbolov a výstražných upozornení, ktoré sú používané v tomto návode na používanie a/alebo na prístroji: Pri používaní prístroja dodržiavajte tento návod na ovládanie. Nebezpečenstvo ohrozenia života a nehody pre deti! Rešpektujte varovné a bezpečnostné pokyny! Prístroj používajte iba...
sK 95 BEZPEČNOSť Všeobecné bezpečnostné pokyny Prečítajte si bezpečnostné pokyny a pokyny pre použitie. nedodržanie bezpečnostných pokynov a pokynov pre použitie môže spôsobiť zásah elektrickým prúdom, vznik požiaru a/alebo vážne ublíženie na zdraví. Uschovajte všetky bezpečnostné pokyny a pokyny pr...
sK 99 PREHĽAD PRODUKTU Č. Označenia Funkcia 1 Tlačidlo 12 V / 24 V pre výber napätia.Zobrazenie na displeji (12P alebo 24P) príslušne k voľbe. 2 Tlačidlo 2 A / 6 A / 10 A pre výber nabíjacieho prúdu.Zobrazenie s príslušnou LED-kontrolkou. V START STOP Power V A % DISPLAY 10 A Charge Full Error Bad B...
SK 101 Č. Označenia Funkcia 18 LED-kontrolka (červená) Error svieti pri nesprávnom pripo - jení. Zároveň zaznie signálny tón. 19 Rukoväť pre uchopenie nabíjačky. Funkcie Nabíjačka je vybavená mikroprocesorom (MCU - Micro-Computer - -Unit) a má plnoautomatické funkcie nabíjania, diagnostiky, revitali...
SK 105 FáZY NABíjANIA Krok č. 1: Kontrola stavu Nabíjačka skontroluje stav batérie a vypočíta potrebné nabíjacie parametre. Napätie Funkcia 0 V až 0,5 V LED-kontrolka „Error“ (18) svieti. Nesprávne USB-pripojenie 0,5 V až 1,5 V LED-kontrolka „Bad Battery“ (10) svieti. Poškodená batéria. 1,5 V až 12 ...
106 Krok č. 6: Kolísavé nabíjanie Nabíjacie napätie je redukované, proces nabíjania ukončený. Krok č. 7: Kontrola Nabíjačka monitoruje kapacitu batérie. Len čo napätie batérie poklesne pod 12,8 V, nabíjačka vydá impulz pre nabíjanie. Stav nabitia batérie sa tak udrží na maximálne možnej úrovni. BEZP...
SK 107 ANALýZA CHýB Chyba/prob - lém Možné príčiny Riešenie LED „Bad Battery“ (10) svieti Poškodená batéria Batériu nechajte skontrolovať v odbornej dielni. LED „Error“ (18) svieti Nesprávne pripojená/nepripo - jená/batéria Nabíjačku odpojte zo siete a skontro - lujte pripojenia. Zvolené nesprávne b...
AEG Manuals
-
AEG AREH30LF
User Manual
-
AEG AREI20XLF
User Manual
-
AEG AREI20XLF S
User Manual
-
AEG FFB72746PM
User Manual
-
AEG PS254DB
User Manual
-
AEG NIK85M00AZ
User Manual
-
AEG DGE5662HB
User Manual
-
AEG DGE5962HB
User Manual
-
AEG HVB95450IB
User Manual
-
AEG PL700
User Manual
-
AEG W14120
User Manual
-
AEG DC240
User Manual
-
AEG T738A4OBC
User Manual
-
AEG T858M6OBC
User Manual
-
AEG T859M6OBC
User Manual
-
AEG T959M6ORS
User Manual
-
AEG IKE95771FB
User Manual
-
AEG AREI9XLF
User Manual
-
AEG A18SPC3
User Manual
-
AEG LF7384O4C
User Manual