Page 2 - FOR PERFECT RESULTS
2 Contents FOR PERFECT RESULTS Thank you for choosing this AEG product. We have created it to give you impeccableperformance for many years, with innovative technologies that help make life simpler –features you might not find on ordinary appliances. Please spend a few minutesreading to get the very...
Page 3 - IMPORTANT SAFETY INSTRUCTIONS; To avoid the danger of fire
3 Important safety instructions IMPORTANT SAFETY INSTRUCTIONS Important safety instructions: Read carefully andkeep for future reference To avoid the danger of fire TTh hee m miiccrro ow waavvee o ovveen n ssh ho ou ulld d n no ott b bee lleefftt u un naatttteen nd deed d d du urriin ng g o op peerr...
Page 6 - To promote trouble-free use of your oven and avoid damage
6 Important safety instructions To promote trouble-free use of your oven and avoid damage Never operate the oven when it is empty.When using a browning dish or self-heating material, always place a heat-resistantinsulator such as a porcelain plate under it to prevent damage to the turntable andturnt...
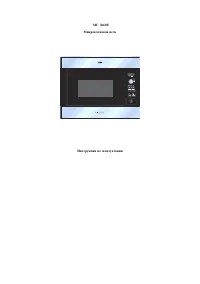
Page 7 - APPLIANCE OVERVIEW; Microwave oven & accessories
7 Appliance overview APPLIANCE OVERVIEW Microwave oven & accessories Front trimOven lampControl panelDoor opening buttonWaveguide coverOven cavitySeal packingDoor seals and sealing surfacesFixing points (4 points)Ventilation openingsOuter coverRear cabinetPower supply cord Check to make sure the...
Page 8 - BEFORE FIRST USE
8 Appliance overview & Before first use Control panel Digital display indicators Microwave Clock Cooking stages Plus/Minus AUTO COOK indicators AUTO COOK button AUTO DEFROST button POWER LEVEL button TIMER/WEIGHT knob START/QUICK button STOP button DOOR OPENING button Auto defrost bread Auto def...
Page 10 - MICROWAVE COOKING ADVICE; Microwave cooking; Child safety lock
10 Microwave cooking advice 1 1 1 1 2 2 AUTO + AUTO AUTO 1 1 1 2 MICROWAVE COOKING ADVICE Microwave cooking To cook/defrost food in a microwave oven, the microwave energy must be able to passthrough the container to penetrate the food. Therefore it is important to choose suitablecookware.Round/oval ...
Page 11 - Microwave safe cookware
11 Microwave cooking advice Cooking techniques Arrange Place the thickest parts of food towards the outside of the dish. E.g. Chicken drumsticks. Cover Use vented microwave cling film or a suitable lid. Pierce Foods with a shell, skin or membrane must be pierced in several places before cooking or r...
Page 12 - MICROWAVE OPERATION; Microwave power levels
12 Microwave operation MICROWAVE OPERATION Microwave cooking Your oven can be programmed for up to 90 minutes. The input unit of cooking time variesfrom 10 seconds to five minutes. It depends on the total length of cooking time as shownin the table. Manual defrosting For manual defrosting (without o...
Page 13 - Kitchen timer
13 Microwave operation Example: To heat soup for 2 minutes and 30 seconds on 560 W microwave power. 1. Press the power level button twice. 2. Enter the time by rotating the TIMER/WEIGHT knob clockwise/anti-clockwise until 2:30 is displayed. 3. Press the START/QUICK button. 4. Check the display: Impo...
Page 14 - Add 30 seconds; Direct Start
14 Microwave operation Add 30 seconds The START/QUICK button allows you to operate the two following functions: 1. Direct Start You can directly start cooking on 800 W/HIGH microwave power level for 30 seconds by pressing the START/QUICK button. 2. Extend the cooking time You can extend the cooking ...
Page 15 - Multiple sequence cooking; Stage 1; Stage 2
15 Microwave operation Note: To cancel PLUS / MINUS, press the power level key 3 times.If you select PLUS the display will show .If you select MINUS, the display will show . Multiple sequence cooking A sequence of 3 stages (maximum) can be programmed using MICROWAVE. Example: To cook: 5 minutes on 8...
Page 16 - Auto cook & auto defrost operation; Auto Cook
16 Microwave operation Auto cook & auto defrost operation AUTO COOK and AUTO DEFROST automatically work out the correct cooking mode and cooking time. You can choose from 6 AUTO COOK and 2 AUTO DEFROST menus. Auto Cook Example: To cook 0.3 kg of boiled potatoes. 1. Select the menu required by pr...
Page 17 - Auto Defrost
17 Microwave operation Auto Defrost Example: To defrost 0.2 kg of bread. 1. Select the menu required by pressing the AUTO DEFROST button twice. 2. Turn the TIMER/WEIGHT knob until 0.2 is displayed. 3. Press the START/QUICK button. 4. Check the display: When action is required (e.g. to turn food over...
Page 18 - PROGRAMME CHARTS; Auto cook & auto defrost charts
18 Programme charts PROGRAMME CHARTS Auto cook & auto defrost charts Auto cook Weight (increasing Button Procedure unit) / Utensils Beverage 1-4 cups • Place cup towards edge of turntable. (Tea/Coffee) 1 cup=200 ml Boiled and 0,1 - 0,8 kg (100 g) Boiled Potatoes: Peel the potatoes and cut them i...
Page 20 - Recipes for auto cook; Abbreviations used
Fish fillet with piquant sauce 20 Programme charts 0,4 kg 0,8 kg 1,2 kg 1. Place the fish fillet in a round gratin dish with the thin ends toward the centre and sprinkle with salt. 2. Spread the banana and the ready made curry sauce on the fish fillet. 3. Cover with microwave cling film and cook on ...
Page 21 - Defrosting
21 Programme charts Food/ Quantity Power Time Method Drink -g/ml- -Level- -Min- Vegetables 200 800 W 2-3 if necessary add some water, cover, stir halfway through 500 800 W 4-5 heating Meat, 1 slice* 200 800 W 3-4 thinly spread sauce over the top, cover Fish fillet* 200 800 W 2-3 cover Cake, 1 slice ...
Page 22 - RECIPES; Adapting recipes for the microwave oven
22 Recipes RECIPES All the recipes in this book are calculated on the basis of 4 servings unless otherwise stated. Adapting recipes for the microwave oven If you would like to adapt your favourite recipes for the microwave, you should takenote of the following: Shorten cooking times by a third to a ...
Page 24 - Zürich veal stew; Stuffed ham
24 Recipes Zürich veal stew 1. Cut the veal into strips.2. Grease the dish with the butter. Put the meat and onion into the dish, cover and cook. Stir once during cooking. 7-10 min. 800 W 3. Add the white wine, gravy browning and cream, stir, cover and continue cooking. Stir occasionally.4-5 min. 80...
Page 26 - REDUCED POWER LEVEL
26 Care & cleaning C CA AU UTTIIO ON N!! D DO O N NO OTT U US SEE C CO OM MM MEER RC CIIA ALL O OV VEEN N C CLLEEA AN NEER RS S,, S STTEEA AM M C CLLEEA AN NEER RS S,, A AB BR RA AS SIIV VEE,, H HA AR RS SH H C CLLEEA AN NEER RS S,, A AN NY Y TTH HA ATT C CO ON NTTA AIIN N S SO OD DIIU UM M H HY...
Page 27 - SPECIFICATIONS
27 What to do if . . . & Specifications WHAT TO DO IF . . Problem Check if . . . The microwave appliance is • The fuses in the fuse box are working. not working properly ? • There has not been a power outage.• If the fuses continue to blow, please contact a qualified electrician. The microwave m...
Page 28 - INSTALLATION; Installing the appliance
28 Installation INSTALLATION Installing the appliance 1. Remove all packaging and check carefully for any signs of damage. 2. This oven is designed to fit into a 360mm high cupboard as standard.When fitting into a 350mm high cupboard:-Unscrew and remove the 4 feet from the bottom of the oven.There a...
Page 30 - Electrical connections; IMPORTANT
30 Installation Electrical connections W WA AR RN NIIN NG G!! TTH HIIS S A AP PP PLLIIA AN NC CEE M MU US STT B BEE EEA AR RTTH HEED D TTh hee m maan nu uffaaccttu urreerr d deecclliin neess aan nyy lliiaab biilliittyy ssh ho ou ulld d tth hiiss ssaaffeettyy m meeaassu urree n no ott b bee o ob bsse...
Page 31 - ENVIRONMENTAL INFORMATION; Packaging materials
31 Environmental information ENVIRONMENTAL INFORMATION Ecologically responsible disposal of packagingmaterials and old appliances Packaging materials AEG microwave ovens require effective packaging to protect them duringtransportation. Only the minimum packaging necessary is used. Packaging material...
Page 32 - SERVICE & SPARE PARTS; CUSTOMER CARE
32 Service & spare parts SERVICE & SPARE PARTS If you wish to purchase spare parts or require an engineer, contact your local AEG Service ForceCentre by telephoning: 08445 616 616 Your telephone call will be automatically routed to the Service Force Centre covering your postcode area. For th...
Page 33 - GUARANTEE CONDITIONS; Standard guarantee conditions
33 Guarantee information GUARANTEE CONDITIONS Standard guarantee conditions We, AEG, undertake that if within 12 months of the date of the purchase this AEGappliance or any part thereof is proved to be defective by reason only of faultyworkmanship or materials, we will, at our discretion repair or r...