Page 2 - Table of Contents
EN 2 www.bora.com 5.6.1 Cooktop bore holes .............................................................18 5.6.2 Example bore holes .............................................................18 5.6.3 Fitting the control knob .......................................................18 5.7 Installing ...
Page 4 - General information; Presentation of information; WARNING SYMBOL AND SIGNAL WORD!; Results of non-compliance; Validity of the operating and
EN 4 General information www.bora.com 1 General information 1.5 Presentation of information We use standard formatting, numbering, symbols, safety instructions, terms and abbreviations so that you can work quickly and safely when using this manual. The term “appliance” is used to refer to cooktops, ...
Page 5 - Safety; People with reduced physical, sensory or; Risk of burns from hot cookware and food; General safety instructions; Packaging components are a choking hazard; This appliance is not intended for:; People with limited abilities; Children
EN 5 Safety www.bora.com 2 Safety People with reduced physical, sensory or mental capacities The appliance can be used by people with reduced physical, sensory or mental capacities or a lack of experience and/or knowledge if they are supervised or have been instructed how to use the appliance safely...
Page 6 - Faults and errors; Safety instructions for
EN 6 Safety www.bora.com CAUTION! Risk of injury from heavy lifting If not handled correctly, carrying and installing appliances can cause injury to the limbs or torso. X X If necessary, carry and install the appliance with another person. X X Use appropriate aids to prevent damage or injury. CAUTIO...
Page 7 - installation; Safety instructions – operation
EN 7 Safety www.bora.com The appliance must be suitable for the regional voltage and frequency. X X Check the information on the identification plate and in the event of deviations, do not connect the appliance. X X Conduct all work extremely attentively and conscientiously. X X Do not connect the a...
Page 8 - operation; Special safety instructions for the operation of
EN 8 Safety www.bora.com ÿ WARNING! Risk of burning from hot appliances Certain appliances and their exposed parts become hot during use (e.g. cooktops). They should be left to cool down completely after switching off. Touching hot surfaces can cause serious burns. X X Do not touch hot appliances. X...
Page 9 - Safety instructions – cleaning; Special safety instructions for cooktop cleaning; servicing and spare parts; Risk of injury or damage from improper repairs; Safety instructions –; Risk of electric shock from incorrect
EN 9 Safety www.bora.com 2.6 Safety instructions – cleaning and maintenance The appliance must be cleaned at regular intervals. Dirt can lead to damage, restriction of functions, or bothersome odours. In the worst case scenario, this can become a hazard. X X Remove dirt immediately. X X When cleanin...
Page 10 - Technical data; knob dimensions; PKI3 appliance dimensions
EN 10 Technical data www.bora.com 3 Technical data 341 14,5 31 228 52 40 7 Fig. 3.2 PKI3 appliance dimensions front view 509 15,5 410 32 Fig. 3.3 PKI3 appliance dimensions side view 3.2 BORA Professional 3.0 control knob dimensions Fig. 3.4 Control knob Ø49 Ø58 Ø76 90 22 10-40 18 Fig. 3.5 Control kn...
Page 11 - Appliance description; Control knob display; How it works; Structure
EN 11 Appliance description www.bora.com 4 Appliance description Control knob display 3 12 4 Fig. 4.3 Control knob display elements [1] Timer/egg timer indicator [2] Rear cooking zone indicator [3] Multi-function display [4] Front cooking zone indicator Control knob assignment 5 4 3 2 1 Fig. 4.4 Con...
Page 12 - Layout and size of the cooking zones; Cooktop appliance description; Display and symbols; ßp; ßp
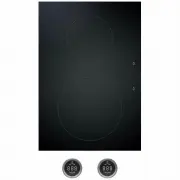
EN 12 Appliance description www.bora.com Layout and size of the cooking zones 1 4 3 2 230 165 Fig. 4.5 Layout of cooktop PKI3 and cooking zone dimensions [1] Front induction cooking zone [2] Rear induction cooking zone [3] Rear cooking zone display [4] Front cooking zone display 4.2.1 How induction ...
Page 13 - Noises; Suitable cookware
EN 13 Appliance description www.bora.com Noises The following noises may occur in the cookware when using induction cooking zones, depending on the material and the finish of the base: X O Humming may occur when using a high power level. This decreases or disappears when the power level is decreased...
Page 14 - Residual heat indicator; Childproofing feature
EN 14 Appliance description www.bora.com Residual heat indicator i While H is displayed (residual heat indicator), do not touch the cooking zone or place any heat-sensitive objects on top of it. Risk of burns and fire! After switching it off, the cooking zone remains hot. H is displayed (Residual he...
Page 15 - Installation; Assembly instructions; Checking the scope of delivery
EN 15 Installation www.bora.com 5 Installation Name Quantity Cooktop 1 Control knob 2 Operating and installation instructions 1 Cooktop mounting screws 4 Height adjustment plate set 1 Cooktop mounting straps 4 Control knob cable 2 Automatic extraction system cable 1 Special scope of delivery for gla...
Page 18 - Installing the control knob in the
EN 18 Installation www.bora.com [1] Boreholes for socket (x 2 external) [2] Bore holes for control knobs (x 5) [3] Cooktop (x 2) [4] Cooktop extractor [5] Worktop [6] Fixed front panel ≥70 ≥40 90 90 90 90 90 196 196 196 196 370 370 370 110 1 1 1 1 110 Ø50 ±0,5 3 3 1 2 4 4 3 6 5 Fig. 5.12 Drilling pa...
Page 19 - Inserting the cooktop (ports on the front); Installing the cooktops
EN 19 Installation www.bora.com 5.7.1 Installing the cooktop Inserting the cooktop (ports on the front) i When installing cooktops PKFI3 and PKI3, pay attention to the position of the cooktop display (alternatively, the cooktop can be installed rotated by 180°). 3 2 1 Fig. 5.16 Inserting the cooktop...
Page 20 - Connecting the control knobs to the cooktop; Securing the cooktop; Establishing communication and
EN 20 Installation www.bora.com 5.8.1 Connecting the control knobs i Control knobs must only be connected to the ports provided on the appliance. 1 Fig. 5.19 Back of control knob with port [1] Port on the back of the control knob X X Connect the control knobs to the appliances. Connecting the contro...
Page 21 - cooktop extractor and cooktops; Connecting the cooktop to the power supply
EN 21 Installation www.bora.com X X Connect the port on the back of the left control knob [5] to the “zone 2” port on the cooktop [1]. X X Connect the port on the back of the right control knob [4] to the “zone 1” port on the cooktop [1]. X X Using the configuration menu, set the correct allocation ...
Page 22 - Sealing the appliances; Handover to user; Basic configuration; Initial operation
EN 22 Installation www.bora.com 5.11 Function test X X Carry out a thorough function test on all appliances. X X In the event of error messages, see the “Troubleshooting” chapter in the operating instructions. 5.12 Sealing the appliances 1 Fig. 5.25 Silicone sealant for flush installation [1] Black,...
Page 23 - Functions and operation; Switching the system on and off; Switching on
EN 23 Functions and operation www.bora.com 6 Functions and operation Use double-tap commands to: X O activate the pause function Use long-press commands to: X O unlock the system X O exit the function menu Use extra-long-press commands to: X O reset the filter service life X O access the configurati...
Page 24 - Increasing the power level; Operating the cooktops; General operating instructions for cooktops
EN 24 Functions and operation www.bora.com Increasing the power level X X Turn the knob ring clockwise Reducing the power level X X Turn the knob ring anticlockwise X X If after setting a power level no suitable cookware is detected (pan size recognition) within 10 minutes, the corresponding cooking...
Page 25 - Calling up the function menu; Activating the heat retention function; Increasing or reducing the active heat retention level
EN 25 Functions and operation www.bora.com 6.4 Function menu i Every appliance offers different additional functions. These can be selected and activated via a function menu. Only the functions available for each type of appliance are shown in the corresponding function menu. Function menu on induct...
Page 26 - Setting the time and starting the timer; Changing active timers; Time lapsed
EN 26 Functions and operation www.bora.com X O The residual heat indicator H appears in the control knob display if necessary. 6.4.2 Timer function/automatic cut-off When a cooking zone is in operation, the automatic cut-off on the timer function automatically switches it off once a preset time has ...
Page 27 - Deactivating the automatic heat up function early
EN 27 Functions and operation www.bora.com 6.4.3 Automatic heat up function When the automatic heat up function is activated, the cooking zone works at full power for a certain time and is then automatically reset to the previously set level. The system automatically determines the heating time depe...
Page 28 - Cleaning and maintenance; Looking after your cooktops; Cleaning products for glass ceramic cooktops; Cleaning the cooktops
EN 28 Cleaning and maintenance www.bora.com 7 Cleaning and maintenance If the cooktop is hot: X X remove stubborn residues of plastic, aluminium foil, sugar or sweet dishes from the hot cooking zone immediately using a glass ceramic scraper to prevent burning. Heavy soiling X X Remove heavy soiling ...
Page 29 - Cleaning the control knobs; Cleaning the knob ring
EN 29 Cleaning and maintenance www.bora.com 7.4 Cleaning the control knobs 1 2 3 Fig. 7.1 [1] Knob housing [2] Touch surface [3] Knob ring Cleaning the knob ring The knob ring can only be cleaned by hand. X X Remove the knob ring from the knob housing. X X Use a cleaner and degreaser in one. X X Rin...
Page 30 - Troubleshooting
EN 30 Troubleshooting www.bora.com 8 Troubleshooting X X Observe all safety and warning information (see the Safety chapter). Operating situation Cause Remedy The cooktop cannot be switched on Knob ring missing Slot the knob ring onto the control knob. The fuse or automatic circuit breaker of the el...
Page 31 - Decommissioning, disassembly and disposal; disposal
EN 31 Decommissioning, disassembly and disposal www.bora.com 9 Decommissioning, disassembly and disposal 9.3 Environmentally-friendly disposal Disposal of transport packaging i The packaging protects the device from damage in transport. The packaging materials have been selected from environmental a...
Page 32 - BORA manufacturer’s warranty
EN 32 Warranty, technical service, spare parts, accessories www.bora.com X X Observe all safety and warning information (see the Safety chapter). 10.1 BORA manufacturer’s warranty BORA provides its end customers with a 2-year manufacturer’s warranty for its products. The end customer is entitled to ...