Page 3 - Table of Contents
EN 3 www.bora.com Table of Contents 1 General information 5 1.1 Target group ........................................................ 5 1.2 Validity ................................................................ 5 1.3 Other applicable documents ............................... 5 1.4 Data protection...
Page 4 - Cleaning and Maintenance; 0 Troubleshooting
EN 4 www.bora.com 8.2.3 Menu item E: Display and button test ............... 49 8.2.4 Menu point F: Reset to factory settings ............ 49 8.3 Gas configuration menu .................................... 49 8.3.1 Menu item P: GPU ............................................. 50 8.3.2 Menu item S: ...
Page 5 - General information; Other applicable documents; Directives; Presentation of information; Safety and warning instructions
EN 5 General information www.bora.com 1 General information 1.1 Target group These operating instructions apply to the following target groups: Target group Requirements Users The appliance can be used by children aged 8 and over as well as people with reduced physical, sensory or mental capacities ...
Page 6 - WARNING SYMBOL AND SIGNAL
EN 6 General information www.bora.com WARNING SYMBOL AND SIGNAL WORD! Type and source of danger Results of non-compliance X X Measures to minimise risk Please note: Q Q The warning symbol draws your attention to the risk. Q Q The signal word indicates the severity of that risk. Warning symbol Signal...
Page 7 - Safety; General safety instructions
EN 7 Safety www.bora.com 2 Safety 2.1 General safety instructions INFO The appliance complies with the stipulated safety requirements. The user is responsible for appliance cleaning and maintenance as well as its safe use. Improper use can lead to personal injury and damage to property. Q Q The oper...
Page 8 - Safety instructions – cooktop
EN 8 Safety www.bora.com DANGER! Risk of electric shock! Cracks, fissures or fractures in the glass ceramic panel can damage the underlying electronics. This can cause an electrical shock. X X If there are any cracks, fissures or fractures in the glass ceramic, switch the appliance off immediately. ...
Page 10 - Safety instructions – cooktop
EN 10 Safety www.bora.com 2.2.2 Special safety information for gas cooktops X X Do not use the appliance to heat the room. X X Do not use or store any flammable materials near the appliance. DANGER! Risk of explosion from gas! Gas leaks can cause explosions and serious injuries. X X Keep ignition so...
Page 11 - Safety instructions – cleaning
EN 11 Safety www.bora.com DANGER! Fire risk from flambéing! While the cooktop extractor is working, it sucks up grease from cooking. Flambéing food can cause the grease to catch fire. X X Clean the cooktop extractor regularly. X X Never work with a naked flame while the cooktop extractor is running....
Page 12 - INFO
EN 12 Safety www.bora.com INFO A damaged mains cable must be replaced by another suitable mains cable. This may only be done by an authorised member of the After Sales Service team. 2.6 Use as intended The appliance cannot be used at altitudes above 2000 m (metres above sea level).Information on gas...
Page 13 - Energy labelling
EN 13 Energy labelling www.bora.com 3 Energy labelling Product description BORA Classic cooktop extractor CKA2 Operating mode Exhaust air Energy consumption Value EN standard Annual energy consumption (AEC hood ) 30.7 kWh/a 61591 Energy efficiency class A+ 61591 Flow volume Fluid dynamic efficiency ...
Page 14 - Appliance description; principle
EN 14 Appliance description www.bora.com 4 Appliance description Observe all safety and warning information during operation (see Safety chapter). 4.1 BORA Classic 2.0 system X X Always use the latest system software to operate the BORA Classic 2.0 system. INFO The latest software is available free ...
Page 16 - ßp
EN 16 Appliance description www.bora.com 4.1.4 Colour concept INFO Fundamentally, all fan setting ranges are shown in blue and all cooking zone setting ranges are shown in red in the operating panel. Other colours are used for functions and messages. List of all colour indicators: Indicator Fan (coo...
Page 17 - Exhaust mode; Cooktop extractor
EN 17 Appliance description www.bora.com 4.2.2 Installation variations Depending on what you opted for when purchasing, the cooktop extractor can be operated as an exhaust air or an recirculating air version. Exhaust mode The air suctioned away is purified by the grease filter and expelled into the ...
Page 18 - F 1 L t
EN 18 Appliance description www.bora.com 4.2.3 Overview of features and functions Features CKA2 Automatic fan detection 3 Electronic power adjustment 3 Interface communication 3 Compact grease filter unit 3 Functions Automatic after-run 3 Power setting 3 Automatic extractor function 3 Filter service...
Page 19 - Overview of features and functions
EN 19 Appliance description www.bora.com 4.3.1 Model description Model Long description CKFI BORA Classic surface induction glass ceramic cooktop with 2 cooking zones CKI BORA Classic induction glass ceramic cooktop with 2 cooking zones CKIW BORA Classic induction glass ceramic wokCKCH BORA Classic ...
Page 20 - Cooktop CKI; Cooktop CKFI
EN 20 Appliance description www.bora.com Cooktop CKI 1 2 Fig. 4.8 BORA Classic cooktop CKI 1 2 Ø 165 Ø 230 Fig. 4.9 Size of the cooking zones [1] Induction front cooking zone (zone 1) 2300 W (power setting 3680 W) [2] Induction rear cooking zone (zone 2) 1400 W (power setting 2200 W) 4.3.3 Structure...
Page 21 - Cooktop CKCH
EN 21 Appliance description www.bora.com Cooktop CKCH 1 2 Fig. 4.12 BORA Classic cooktop CKCH 1 2 Ø 120 Ø 180 Ø 215 Fig. 4.13 Size of the cooking zones [1] Hyper front cooking zone (zone 1) 2100 W (power setting 3000 W) [2] 2-ring rear cooking zone (zone 2) 600 W (2-ring connection 1600 W) Cooktop C...
Page 22 - Cooktop CKG; Cooktop CKCB
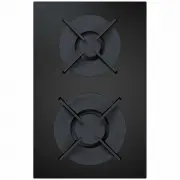
EN 22 Appliance description www.bora.com Cooktop CKG 1 3 4 2 Fig. 4.16 BORA Classic gas glass ceramic cooktop CKG 1 2 Ø140 Ø200 Ø240 Ø180 Fig. 4.17 Size of the cooking zones [1] High-power front burner 3000 W [2] Normal rear burner 2000 W [3] Pan support rear [4] Pan support front Cooktop CKCB 1 3 2...
Page 23 - Power levels; Suitable cookware; Cooktop CKT
EN 23 Appliance description www.bora.com Power levels The high power output of induction cooktops results in the very quick heating up of cookware. A slight adjustment is needed in comparison to conventional cooking systems when selecting the power level in order to avoid burning food. Activity Powe...
Page 24 - Power setting on cooktop CKCH; Noises
EN 24 Appliance description www.bora.com Power levels Activity Power level Melting of butter and chocolate, breaking up gelatine 1 Keeping sauces and soups warm, soaking rice 1 – 3 Cooking potatoes, pasta, soups, ragouts, steaming fruit, vegetables and fish, defrosting food 2 – 6 Frying in coated pa...
Page 29 - Initial operation; Basic configuration; C o n F; Carrying out the basic configuration
EN 29 Initial operation www.bora.com 5 Initial operation Special requirements for initial operation of gas cooktop CKG: INFO Minimum requirement for operating gas cooktop CKG: system software 03.00 (or higher) X X If necessary, retrieve the installed software version (see Menu chapter, Retrieving th...
Page 30 - F t Y; Select the filter type; F A n; Fan configuration
EN 30 Initial operation www.bora.com Starting fan configuration Fig. 5.3 Starting fan configuration display X X Touch the slider Q Q Fan configuration is started. Q Q During fan configuration the slider interface and the fan symbol will flash. INFO When fan configuration is complete, the display wil...
Page 31 - Operation; General and specific operating; Special operating instructions for the
EN 31 Operation www.bora.com 6 Operation X X Observe all safety and warning information during operation (see Safety chapter). INFO The cooktops on the BORA Classic 2.0 system can only be operated in conjunction with cooktop extractor CKA2. INFO The cooktop extractor must only be operated when the g...
Page 33 - Operating the system
EN 33 Operation www.bora.com Fig. 6.1 Standard display after switching on INFO The menu button does not appear after switching on if there is still residual heat in one of the cooking zones. INFO When the childproofing feature is active, the lock button lights up after system start. The standard dis...
Page 34 - Operating the cooktop extractor
EN 34 Operation www.bora.com 6.3.7 Short-time timer (egg timer) Activating the egg timer X X Tap the egg timer button Q Q The time appears in the 7-segment display above the sliders in hours, minutes and seconds ( 0 : 0 0 : 0 0 ). Q Q The system changes to colour mode “beige”. Q Q The cooking zones ...
Page 35 - early; Operating the cooktops
EN 35 Operation www.bora.com Activating the automatic extractor function for a cooking session X X Tap the fan button . Q Q The fan symbol lights up blue. Q Q An animation appears on the slider. Q Q A appears in the 7-segment display. 6.4.4 Switching the fan off X X Swipe downwards to power level 0....
Page 36 - Power-level adjustment on the Tepan; Power-level adjustment on cooktops CKFI,
EN 36 Operation www.bora.com Reducing the power level X X Tap the required cooking zone X X Swipe downwards to the required power level or X X tap until the required power level is reached or X X tap a lower position on the slider or X X long press on (power level is decreased in threes: ... 6, 3, 0...
Page 37 - CKCH and CKCB
EN 37 Operation www.bora.com Time lapsed Q Q When the heat up time has lapsed, the previously set continuous cooking level will be activated. Q Q The heat-up symbol will no longer be displayed. 6.5.5 Power setting INFO If a cooking zone on one of the cooktops is operated on the power setting, the se...
Page 39 - stainless steel grill CKT
EN 39 Operation www.bora.com 6.5.10 Cooking zone timer INFO The timer function can be used for each cooking zone. Several timers can be activated at the same time (multi-timer). INFO When the bridging function is active, the timer is adopted for both cooking zones. Activating the timer X X Tap on a ...
Page 41 - Menu; How to use the menu; Calling up the menu
EN 41 Menu www.bora.com 7 Menu INFO Below you will find explanations on how to use the menu and a description of all menu items that can be accessed by the end customer. INFO You will find a separate description of the menu items required for the basic configuration during initial operation in the I...
Page 42 - Standard menu items
EN 42 Menu www.bora.com Fig. 7.2 Menu item 1: Volume of the acoustic signals Setting the acoustic signal volume: X X Swipe upwards or downwards until the required volume is reached or X X tap or until the required volume is reached X X Confirm and save the setting. 7.3.2 Menu item 2: Childproofing f...
Page 43 - Duration of the cleaning lock; Duration of the automatic after-run; Automatic extractor control
EN 43 Menu www.bora.com 7.3.4 Menu item 4: Duration of the cleaning lock (wipe function) Fig. 7.5 Menu item 4: Duration of the cleaning lock Setting the duration of the cleaning lock X X Swipe to obtain the required duration (5–30 s) or X X tap or until the required duration is reached X X Confirm a...
Page 44 - System software update; Retrieving the software version; Retrieving the hardware version
EN 44 Menu www.bora.com Q Q The current hardware version of the appliances is displayed after 2 seconds. 7.3.8 Menu item 8: System software update INFO A system software update may be necessary for troubleshooting. INFO The latest software for the BORA Classic 2.0 system is available on the BORA web...
Page 45 - Show the recirculation filter service; o F t; Data export
EN 45 Menu www.bora.com Start data export Fig. 7.11 Menu item 9: Data export X X Insert the formatted USB stick into the USB port. X X Tap the slider Q Q Data export is initiated. Q Q The indicator for the first part of the export process flashes. INFO If the data export is completed without errors,...
Page 46 - Show filter type, change filter type
EN 46 Menu www.bora.com Fig. 7.13 Menu item B: Show filter type, change filter type and reset filter service life X X Tap a slider segment Q Q The filter type is selected and the filter service life reset. Q Q The new remaining service life of the recirculation filter is then shown. Fig. 7.12 Menu i...
Page 47 - Extended menu; Calling up the extended menu
EN 47 Extended menu www.bora.com 8 Extended menu (Access code required) INFO BORA distribution partners and retailers have the option of extending the menu and unlocking further menu items. This extended menu can only be called up with the corresponding access rights by entering an access code. INFO...
Page 48 - Extended menu items
EN 48 Extended menu www.bora.com 8.2.2 Menu item D: Demo mode The system can be set to demo mode, which includes all operating functions, but the heating function of the cooktops is deactivated. INFO The demo mode always simulates the following cooktop combination: left = CKFI right = CKCH INFO Cook...
Page 49 - settings; Gas configuration menu
EN 49 Extended menu www.bora.com 8.2.3 Menu item E: Display and button test INFO The display and button test checks that all LEDs in the operating panel are working. Fig. 8.4 Menu item E: Display and button test Activating the display and button test: X X Tap the slider zone Q Q All touch control an...
Page 52 - Cleaning and; Looking after your appliances; Removing the air inlet nozzle
EN 52 Cleaning and Maintenance www.bora.com 9 Cleaning and Maintenance X X Observe all safety and warning information (see the Safety chapter). X X Follow the enclosed manufacturer’s information. X X When conducting scheduled cleaning and maintenance, ensure that the cooktop and cooktop extractor ar...
Page 54 - Cleaning the cooktops; Cleaning Tepan stainless steel grill
EN 54 Cleaning and Maintenance www.bora.com QQ A description of how to replace the activated carbon filter can be found in its operating instructions. XX Reset the filter service indicator (see the Menu chapter, point 7 . 3 .11). 9.4 Cleaning the cooktops 9.4.1 Cleaning glass ceramic (CKFI, CKI, CKI...
Page 55 - cooktop CKG; Cleaning the gas burner parts
EN 55 Cleaning and Maintenance www.bora.com X X Remove the remaining dirt and water with a clean cloth. X X Dry the cooktop with a clean cloth. Any changes in colour or small scratches are not damage to the cooktops. They do not affect the functionality of the cooktop or the stability of the stainle...
Page 57 - 0 Troubleshooting
EN 57 Troubleshooting www.bora.com 10 Troubleshooting X X Observe all safety and warning information (see the Safety chapter). Operating situation Cause Remedy System The system won’t switch on (Power button not visible) The fuse or automatic circuit breaker of the electrical wiring system in the ap...
Page 58 - E H E A t
EN 58 Troubleshooting www.bora.com Operating situation Cause Remedy Cooktops The cooktop is displayed but both cooking zone displays show an error E and an error code is shown in the multi- function display (e.g. E 5 4 7 ) No power supply at the cooktop Have a specialist electrician inspect the cook...
Page 60 - BORA manufacturer’s warranty
EN 60 Warranty, technical service, spare parts, accessories www.bora.com 11 Warranty, technical service, spare parts, accessories X X Observe all safety and warning information (see the Safety chapter). 11.1 BORA manufacturer’s warranty BORA provides its end customers with a 2-year manufacturer’s wa...
Page 63 - 3 Identification plates
EN 63 Identification plates www.bora.com 13 Identification plates INFO On this page you can see the exact classification of your installed appliances. Not all of the spaces reserved for stickers need to contain an identification plate. X X Upon completing installation, affix the identification plate...