Page 2 - PRODUCT REGISTRATION; SAFETY INFORMATION
Page 2 Thank you for purchasing our BLACK+DECKER product. This easy-to-use manual will guide you in getting the best use of your portable dehumidifier. Remember to record the model and serial numbers. They are on a label on the rear. Staple your receipt to your manual. You will need it to obtain war...
Page 3 - IMPORTANT SAFETY INSTRUCTIONS; SAVE THESE INSTRUCTIONS; HOUSEHOLD USE ONLY; CAUTION
Page 3 SAFETY INFORMATION IMPORTANT SAFETY INSTRUCTIONS 1. Always place the unit on a level surface strong enough to support the unit with a full bucket of water 2. Never use or store gasoline or other flammable vapor or liquid near this unit 3. Minimum installation clearance: 11.8 inches around the...
Page 4 - ELECTRICAL REQUIREMENTS
Page 4 SAFETY INFORMATION GROUNDING INSTRUCTIONS ELECTRICAL REQUIREMENTS The electrical requirements are a 115 volt 60 Hz, dehumidifier only, 15 amp. It is recommended that a separate circuit serving only the product be provided. The product is equipped with a 3-wire cord having a 3-prong grounding ...
Page 6 - CONTROL PANEL
Page 6 CONTROL PANEL Clean Filter LED Indicator Timer ON LED Indicator Pump LED Indicator (Model BDT50PWTB) SET UP & USE High Fan Speed LED Indicator Continuous Drain LED Indicator Digital Humidistat Display Filter Button Fan Speed Button Pump Button (Model BDT50PWTB) Timer Button Increase Room ...
Page 7 - INSTALLATION GUIDE
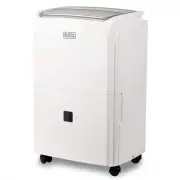
Page 7 INSTALLATION GUIDE When you open the box, you should have received: Portable dehumidifier User Guide Castors (4) Continuous Drain Kit If you purchased a model with a pump (BDT50PWTB) there will be an additional pump drain kit To Install Castors: 1. For the 20 pint model (BDT20WTB) and the 30 ...
Page 8 - BEFORE FIRST OPERATION
Page 8 BEFORE FIRST OPERATION 1. Grip each side of the bucket and pull to remove the bucket from the dehumidifier (Fig. 4). 2. Check inside the bucket to make sure the float system is in the correct position. If not, place the float in the correct position (Fig. 5). 3. Re-insert the bucket once you ...
Page 9 - OPERATION INSTRUCTIONS; TIMER FUNCTION
OPERATION INSTRUCTIONS NOTE: Unit may shut off automatically during 24 hour period if collection bucket is full (see below). If continuous drainage mode is utilized, and drain hose is connected, the unit will operate continuously (see page 12). 1. Press the POWER button once to turn the unit on. Pre...
Page 11 - FILTER CLEANING; AUTOMATIC DEFROST
Page 11 FILTER CLEANING When the filter needs to be cleaned, the filter indicator light will come on (after approximately 250 hours of use). Remove the filter from the back of the unit by using your thumbs to press down on the filter tabs directly above the filter. Clean the filter with warm, soapy ...
Page 12 - CONTINUOUS DRAINAGE
Page 12 Page 12 CONTINUOUS DRAINAGE Water can be automatically emptied by attaching the clear hose (included) or a standard garden hose (not included) to the drain port on the back of the dehumidifier. This will allow the unit to run continuously (depending on the selected humidity level) without ha...
Page 14 - INTERNAL PUMP MODE
Page 14 SET UP & USE INTERNAL PUMP MODE The internal pump allows the unit to operate without having to empty the bucket and requires the installation of the included pump drain hose kit. To install the kit, remove the drain cap on the back of the unit (see Fig. 6 on page 12). Insert the included...
Page 15 - GENERAL INFORMATION
Page 15 SET UP & USE GENERAL INFORMATION Recommended humidity levels: 30%-50% (Too dry, less than 15%, too humid, greater than 50%) During operation, it is normal for the exhaust coming from the side of the dehumidifier to be warm. Caused by preliminary factory testing, there may also be a small...
Page 16 - CARE AND CLEANING GUIDE; STORING FOR EXTENDED PERIOD OR TRANSPORTING THE UNIT
Page 16 CARE & CLEANING CARE AND CLEANING GUIDE NOTE: Make sure power is off and power cord is not plugged into electrical outlet prior to performing and cleaning to the unit The water collection bucket should be cleaned every few weeks to prevent the growth of mold, mildew and bacteria. Use a m...
Page 17 - IMPORTANT; DO NOT RETURN THIS PRODUCT TO THE STORE; If you have a problem with this product, please contact the
Page 17 TROUBLESHOOTING & WARRANTY BEFORE YOU CALL FOR SERVICE IF THE APPLIANCE FAILS TO OPERATE: A) Check to make sure that the heater/fan is plugged in securely. If it is not, remove the plug from the outlet, wait 10 seconds and plug it in again securely. B) Check for a blown circuit fuse or a...
Page 18 - TROUBLESHOOTING & WARRANTY
Page 18 TROUBLESHOOTING & WARRANTY Troubleshoot your problem by using the chart below. If the dehumidifier still does not work properly, contact W Appliance Co. customer service center or the nearest authorized service center. Customers must never troubleshoot internal components. TROUBLE POSSIB...
Page 23 - MANUEL D'INSTRUCTIONS; DÉSHUMIDIFICATEUR PORTABLE; CONSERVEZ CE MANUEL POUR FUTURE RÉFÉRENCE.
Page 23 MANUEL D'INSTRUCTIONS DÉSHUMIDIFICATEUR PORTABLE Merci d'avoir choisi BLACK + DECKER! VEUILLEZ LIRE AVANT DE RETOURNER CE PRODUIT POUR QUELQUE RAISON. Si vous avez une question ou rencontrez un problème avec votre achat BLACK + DECKER, visitez le site Web www.blackanddecker.com/instantanswer...
Page 24 - ENREGISTREMENT DU PRODUIT; INFORMATION DE SÉCURITÉ
Page 24 Merci d’avoir acheté notre produit BLACK + DECKER. Ce manuel facile à utiliser vous guidera dans la meilleure utilisation de votre déshumidificateur portable. N'oubliez pas d'enregistrer les numéros de modèle et de série. Ils sont sur une étiquette à l'arrière. Agrafez votre reçu à votre man...
Page 25 - CONSIGNES DE SÉCURITÉ IMPORTANTES; CONSERVEZ CES INSTRUCTIONS; USAGE DOMESTIQUE SEULEMENT; ATTENTION; ATTENTION
Page 25 Page 25 INFORMATION DE SÉCURITÉ CONSIGNES DE SÉCURITÉ IMPORTANTES 1. Placez toujours l’appareil sur une surface plane suffisamment solide pour le soutenir avec un seau rempli d’eau. 2. Ne jamais utiliser ou stocker d'essence ou d'autres liquides ou vapeurs inflammables à proximité de cet app...
Page 26 - EXIGENCES ÉLECTRIQUES; CORDON D'ALIMENTATION
Page 26 INFORMATION DE SÉCURITÉ INSTRUCTIONS DE MISE À LA TERRE EXIGENCES ÉLECTRIQUES LES exigences électriques sont pour un déshumidificateur de 115 volts, 60 Hz, 15 ampères seulement. Il est recommandé de prévoir un circuit séparé servant uniquement le produit. Le produit est équipé d’un cordon à ...
Page 29 - INSTALLATION ET UTILISATION
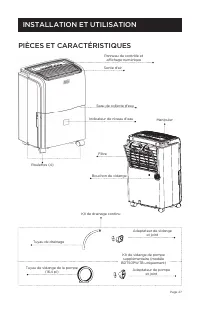
Page 29 GUIDE D'INSTALLATION Lorsque vous ouvrez la boîte, vous devriez avoir reçu: Déshumidificateur portable Guide Utilisateur Roulettes (4) Kit De Drainage Continu Si vous avez acheté un modèle avec une pompe (BDT50PWTB), il y aura un supplément kit de vidange de pompe Pour Installer Des Roulette...
Page 30 - Correcte
Page 30 AVANT LA PREMIÈRE OPÉRATION 1. Saisissez chaque côté du seau et tirez pour le retirer du déshumidificateur (Fig. 4). 2. Vérifiez à l'intérieur du seau pour vous assurer que le système de flotteurs est dans la bonne position. Sinon, placez le flotteur dans la bonne position (fig. 5). 3. Réins...
Page 31 - INSTRUCTIONS D'UTILISATION; FONCTION MINUTERIE
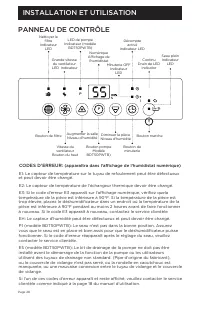
Page 31 INSTRUCTIONS D'UTILISATION REMARQUE: L'unité peut s'éteindre automatiquement pendant 24 heures si le seau de collecte est plein (voir ci-dessous). Si le mode de drainage continu est utilisé et que le tuyau d'évacuation est connecté, l'unité fonctionnera en continu (voir page 12). 1. Appuyez ...
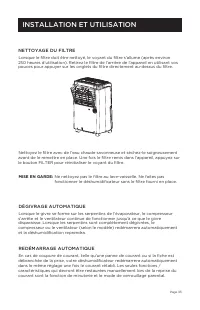
Page 33 - NETTOYAGE DU FILTRE; DÉGIVRAGE AUTOMATIQUE
Page 33 NETTOYAGE DU FILTRE Lorsque le filtre doit être nettoyé, le voyant du filtre s’allume (après environ 250 heures d’utilisation). Retirez le filtre de l’arrière de l’appareil en utilisant vos pouces pour appuyer sur les onglets du filtre directement au-dessus du filtre. Nettoyez le filtre avec...
Page 34 - DRAINAGE CONTINU
Page 34 DRAINAGE CONTINU L'eau peut être vidée automatiquement en raccordant le tuyau transparent (fourni) ou un tuyau d'arrosage standard (non fourni) à l'orifice de vidange situé à l'arrière du déshumidificateur. Cela permettra à l'unité de fonctionner en continu (en fonction du niveau d'humidité ...
Page 36 - MODE POMPE INTERNE
Page 36 INSTALLATION ET UTILISATION MODE POMPE INTERNE La pompe interne permet à l'unité de fonctionner sans avoir à vider le seau et nécessite l'installation du kit de tuyau de vidange de pompe inclus. Pour installer le kit, retirez le bouchon de vidange situé à l'arrière de l'appareil (voir Fig. 6...
Page 37 - RENSEIGNEMENTS GÉNÉRAUX
Page 37 INSTALLATION ET UTILISATION RENSEIGNEMENTS GÉNÉRAUX Niveaux d'humidité recommandés: 30% à 50% (trop sec, moins de 15%, trop humide, plus de 50%) Pendant le fonctionnement, il est normal que les gaz d’échappement venant du côté du déshumidificateur soient chauds. Des essais préliminaires en u...
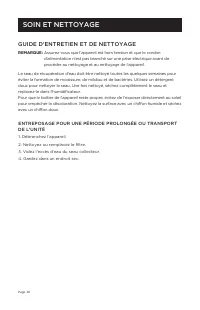
Page 38 - SOIN ET NETTOYAGE; GUIDE D'ENTRETIEN ET DE NETTOYAGE; ENTREPOSAGE POUR UNE PÉRIODE PROLONGÉE OU TRANSPORT
Page 38 SOIN ET NETTOYAGE GUIDE D'ENTRETIEN ET DE NETTOYAGE REMARQUE: Assurez-vous que l’appareil est hors tension et que le cordon d’alimentation n’est pas branché sur une prise électrique avant de procéder au nettoyage et au nettoyage de l’appareil. Le seau de récupération d'eau doit être nettoyé ...
Page 39 - NOTE IMPORTANTE; NE PAS RETOURNER CE PRODUIT AU MAGASIN.; Si vous rencontrez un problème avec ce produit, veuillez
Page 39 DÉPANNAGE ET GARANTIE AVANT D'APPELER POUR LE SERVICE SI L’APPAREIL NE FONCTIONNE PAS: A) Assurez-vous que la chauffrette / le ventilateur est correctement branché. Si ce n'est pas le cas, débranchez la fiche de la prise, attendez 10 secondes et rebranchez-la correctement. B) Recherchez un f...
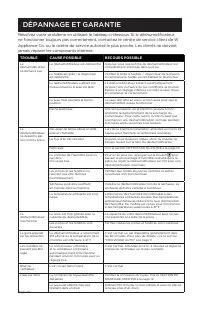
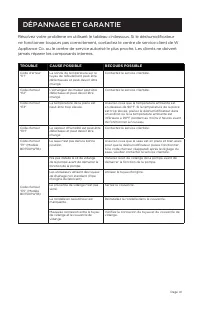
Page 40 - DÉPANNAGE ET GARANTIE
Page 40 DÉPANNAGE ET GARANTIE Résolvez votre problème en utilisant le tableau ci-dessous. Si le déshumidificateur ne fonctionne toujours pas correctement, contactez le centre de service client de W Appliance Co. ou le centre de service autorisé le plus proche. Les clients ne doivent jamais réparer l...
Page 45 - MANUAL DE INSTRUCCIONES; DESHUMIDIFICADOR PORTÁTIL; POR FAVOR, LEA ESTE MANUAL ANTES DE DEVOLVER
Page 45 MANUAL DE INSTRUCCIONES DESHUMIDIFICADOR PORTÁTIL ¡Gracias por elegir BLACK+DECKER! POR FAVOR, LEA ESTE MANUAL ANTES DE DEVOLVER ESTE PRODUCTO POR CUALQUIER MOTIVO. Si no puede encontrar la respuesta o no tiene acceso a Internet, llame al 844-299-0879 desde 10:30 a.m. a 6:30 p.m. EST, de lun...
Page 46 - REGISTRO DEL PRODUCTO; INFORMACIÓN DE SEGURIDAD
Page 46 Gracias por comprar nuestro producto BLACK+DECKER. Este manual fácil de usar le guiará para hacer el mejor uso de su deshumidificador portátil. Recuerde anotar el número de modelo y los números de serie. Se encuentran en una etiqueta en la parte posterior del producto. Grape el recibo de com...
Page 47 - GUARDE ESTAS INSTRUCCIONES; ÚNICAMENTE USO DOMÉSTICO; PELIGRO; PRECAUCIÓN; ADVERTENCIA
Page 47 Page 47 INFORMACIÓN DE SEGURIDAD INSTRUCCIONES IMPORTANTES DE SEGURIDAD 1. Coloque siempre la unidad en una superficie nivelada lo suficientemente fuerte como para sostenerla con el balde lleno de agua. 2. Nunca use ni almacene gasolina u otro vapor o líquido inflamable cerca de esta unidad....
Page 48 - REQUERIMIENTOS ELÉCTRICOS; CABLE DE ALIMENTACIÓN
Page 48 INFORMACIÓN DE SEGURIDAD INSTRUCCIONES DE PUESTA A TIERRA REQUERIMIENTOS ELÉCTRICOS 115 volt a 60 Hz, solamente CA (corriente alterna), 15 A. Se recomienda que se utilice un circuito de alimentación independiente exclusivo para el aparato. El producto está equipado con un cable de 3 hilos co...
Page 51 - GUÍA DE INSTALACIÓN; CONFIGURACIÓN Y USO
Page 51 GUÍA DE INSTALACIÓN Cuando abra la caja, debería encontrar: Deshumidificador portátil Guía del usuario Ruedas (4) Kit de drenaje continuo Si compró un modelo con una bomba (BDT50PWTB) habrá un kit de drenaje continuo. Para instalar las ruedas: 1. Para el modelo de 20 pintas (9,5 L) (BDT20WT ...
Page 52 - CORRECTO
Page 52 ANTES DE LA PRIMERA OPERACIÓN 1. Sujete cada lado del cubo y tire para sacarlo del deshumidificador (fig. 4). 2. Mire dentro del cubo para asegurarse de que el sistema de flotación esté en la posición correcta. De lo contrario, coloque el flotador en la posición correcta (fig. 5). 3. Vuelva ...
Page 53 - INSTRUCCIONES DE OPERACIÓN; FUNCIÓN DE TEMPORIZADOR
Page 53 INSTRUCCIONES DE OPERACIÓN NOTA: La unidad puede apagarse automáticamente durante un período de 24 horas si el cubo de recolección está lleno (ver más abajo). Si se utiliza el modo de drenaje continuo y la manguera de drenaje está conectada, la unidad funcionará continuamente (consulte la pá...
Page 55 - LIMPIEZA DEL FILTRO; DESCONGELAMIENTO AUTOMÁTICO
Page 55 LIMPIEZA DEL FILTRO Cuando sea necesario limpiar el filtro, la luz indicadora del filtro se encenderá (después de aproximadamente 250 horas de uso). Retire el filtro de la parte posterior de la unidad con los pulgares para presionar las pestañas del filtro directamente encima de este. Limpie...
Page 56 - DRENAJE CONTINUO
Page 56 DRENAJE CONTINUO El agua se puede vaciar automáticamente conectando la manguera transparente (incluida) o una manguera de jardín estándar (no incluida) al puerto de drenaje en la parte posterior del deshumidificador. Esto permitirá que la unidad funcione continuamente (dependiendo del nivel ...
Page 58 - MODO DE BOMBA INTERNA
Page 58 CONFIGURACIÓN Y USO MODO DE BOMBA INTERNA La bomba interna permite que la unidad funcione sin tener que vaciar el cubo y requiere la instalación del kit de manguera de drenaje de la bomba que se incluye con el deshumidificador. Para instalar el kit, retire la tapa de drenaje en la parte post...
Page 59 - INFORMACIÓN GENERAL
Page 59 CONFIGURACIÓN Y USO INFORMACIÓN GENERAL Niveles de humedad recomendados: 30 % - 50 % (Demasiado seco, menos del 15 %, demasiado húmedo, más del 50 %) Durante el funcionamiento, es normal que el escape que sale del costado del deshumidificador esté caliente. Debido a las pruebas preliminares ...
Page 60 - CUIDADO Y LIMPIEZA; GUÍA DE CUIDADO Y LIMPIEZA; ALMACENAMIENTO POR PERÍODO EXTENDIDO O TRANSPORTE DE
Page 60 CUIDADO Y LIMPIEZA GUÍA DE CUIDADO Y LIMPIEZA NOTA: Asegúrese de que la alimentación esté apagada y que el cable de alimentación no esté enchufado a una toma de corriente eléctrica antes de realizar y limpiar la unidad. El cubo de recolección de agua debe limpiarse cada pocas semanas para ev...
Page 61 - IMPORTANTE; NO DEVUELVA ESTE PRODUCTO A LA TIENDA.; Si tiene un problema con este producto, comuníquese con el
Page 61 SOLUCIÓN DE PROBLEMAS Y GARANTÍA ANTES DE LLAMAR AL SERVICIO TÉCNICO SI EL APARATO NO FUNCIONA: A) Verifique para asegurarse de que el electrodoméstico esté enchufado de forma segura. De lo contrario, retire el enchufe de la toma, espere 10 segundos y conéctelo nuevamente de forma segura. B)...
Page 62 - SOLUCIÓN DE PROBLEMAS Y GARANTÍA
Page 62 SOLUCIÓN DE PROBLEMAS Y GARANTÍA Intente solucionar su problema mediante el siguiente cuadro. Si la unidad aún no funciona correctamente, comuníquese con el centro de servicio al cliente de W Appliance Co. o con el centro de servicio autorizado más cercano. Los clientes no deben nunca intent...
Page 66 - Printed in China
Page 66 BLACK & DECKER, BLACK+DECKER, the BLACK & DECKER and BLACK+DECKER logos and product names and the orange and black color scheme are trademarks of The Black & Decker Corporation, used under license. All rights reserved.Product in this box may differ slightly from that pictured. Do...