Page 4 - WARNINGS; ed technician. DO NOT attempt to adjust,; DO NOT install this range outdoors.; To avoid risk of property damage, personal; re or explosion may; - Do not store or use gasoline or other
4 / Warnings WARNINGS To ensure proper and safe operation, the applian-ce must be properly installed and grounded by a quali fi ed technician. DO NOT attempt to adjust, repair, service, or replace any part of your applian-ce unless it is speci fi cally recommended in this manual. All other servicing...
Page 5 - WARNING
5 / Warnings WARNING : Cancer and Reproductiv Harm- www.P65Warnings.ca.gov .
Page 6 - • DO NOT remove permanently a; Room ventilation; DATA RATING LABEL
6 / Data rating label / Before installation The data rating label shows the model and serial number of the rangetop. It is located under the rangetop (see fi g.) and on the cover page of this manual. • DO NOT remove permanently a ffi xed labels, warnings, or plates from product. This may void the warr...
Page 7 - Select Hood and Blower Models:; VENTILATION PREPARATION
7 This rangetop will best perform when installed with Bertazzoni exhaust hoods. These hoods have been designed to work in conjunction with the Bertazzoni range and have the same fi nish for a perfect look. Before installation of the exhaust hood, consult lo-cal or regional building and installation ...
Page 8 - Cabinet Preparation
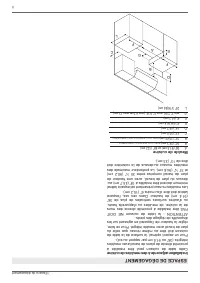
8 / Speci fi cations - Cabinet Cabinet Preparation 1. To ensure professional results, the cabinet and countertop openings should be prepared by a quali fi ed cabinet worker. 2. The clearances shown in fi gure are required. 3. The electrical supply must be located in an area that is accessible withou...
Page 9 - CLEARENCES DIMENSIONS; Installation adjacent to kitchen cabinets; fl; Cabinet
9 / Clearence dimensions CLEARENCES DIMENSIONS Installation adjacent to kitchen cabinets This range may be installed directly adjacent to existing countertop high cabinets (36” or 91.5 cm from the fl oor). For the best look, the worktop should be level with the cabinet countertop. This can be accomp...
Page 10 - ELECTRICAL; Electrical grounding; Caution; INSTALLATION REQUIREMENTS; installation area for the connection; Voltage
10 / Installation requirements / Electrical connection ELECTRICAL A properly-grounded horizontally- mounted electri-cal receptacle should be installed no higher than 27” (68.6 cm) above the fl oor, no less than 2” (5 cm) and no more than 15” (38,1 cm) from the leftside (facing product).Check all loc...
Page 11 - WIRING DIAGRAM; INDUCTI; CO; gv
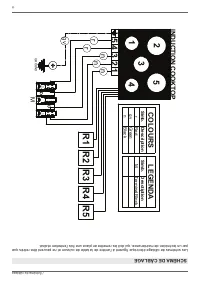
11 / Wiring diagram WIRING DIAGRAM The electric wiring diagrams and schematics are attached behind the rangetop, and should not be removed except by a service technician, then replaced after service. L2 L1 M GRO UND 1 2 3 4 5 54321 INDUCTI O N CO O K TO P R1 R2 R3 R4 R5 S im b . D e scr ip ti o n S ...
Page 12 - INSTALLATION
12 / Installation APPLIANCE INSTALLATIONUnpacking the rangetop • Remove all packing materials from theshipping pallet but leave the adhesive-backedfoam layer over brushed-metal surfaces toprotect it from scratches until the range isinstalled in its fi nalposition. Only the fi lm on the side panels s...
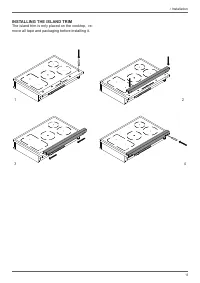
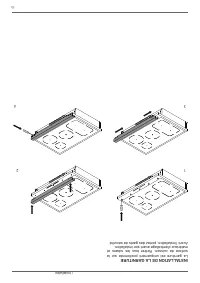
Page 13 - INSTALLING THE ISLAND TRIM
13 INSTALLING THE ISLAND TRIM The island trim is only placed on the cooktop, re-move all tape and packaging before installing it. / Installation 1 2 3 4
Page 14 - A quali; BERTAZZONI SERVICE; *Can be found on data plate
14 INSTALLATION CHECKLIST FINAL PREPARATION A quali fi ed installer should carry out the following checks: Island trim or Backguard attached accor-ding to instruction Clearance to cabinet surfaces as manu-facturer’s guidelineProper ground connection • Before using the rangetop, remove anyprotective ...
Page 15 - INDUCTION RANGETOP
Page 16 - re, electric shock, personal injury or damage; To Prevent Fire or Smoke Damage; IMPORTANT INSTRUCTION
16 WARNINGS Warning and Important Safety Instructions ap-pearing in this manual are not meant to cover all possible conditions and situations that may occur. Common sense, caution, and care must be exer-cised when installing, maintaining, or operating the appliance. Read and follow all instructions ...
Page 17 - Recommended Utensils
17 • DO NOT heat unopened food containers,build up of pressure may cause the containerto explode and result in injury. • NEVER wear garments made of fl ammable material or loose fi tting or long-sleeved apparel while cooking. Clothing may ignite orcatch utensil handles. • Use Only Dry Potholders - M...
Page 18 - Cleaning Safety; Turn; ect other vented; Electrical shock hazard; Heating element
18 WARNINGS WORKTOP AND KNOBS LAYOUT Cleaning Safety • Turn o ff all controls and wait for appliance parts to cool before touching or cleaning them.DO NOT touch the induction areas until theyhave had su ffi cient time to cool. • Clean the range with caution. Avoid steamburns; DO NOT use a wet sponge or...
Page 19 - INDUCTION COOKTOP; COOKING WITH INDUCTION
19 / Induction cooktop INDUCTION COOKTOP COOKING WITH INDUCTION Underneath each cooking zone there is a coil cal-led an inductor. The inductor generates a variable magnetic fi eld using electric power. When a pan is placed inside this magnetic fi eld, the highfrequen- cy current radiates directly on...
Page 20 - - Détection récipient de cuisson
20 Surface de cuisson à induction L - Fonction « Child lock » (sécurité enfants) En cas d'inutilisation, la surface de cuisson peut être « verrouillée » pour éviter que des enfants ne l'allument accidentellement. Avec les zones de cuisson éteintes, tourner simultanément les boutons des zones 1 et 2 ...
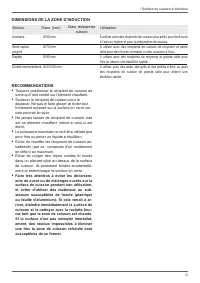
Page 21 - Brûleur; DIMENSIONS DE LA ZONE D'INDUCTION; cuisson; RECOMMANDATIONS; Éviter de chau
21 / Surface de cuisson à induction Brûleur DIMENSIONS DE LA ZONE D'INDUCTION Diam. (mm) Diam. récipient de cuisson Utilisation Auxiliaire Semi-rapide(et grill)Rapide Double interne/externe Ø 50 mm Ø 70 mm Ø 95 mm Ø 43/140 mm À utiliser avec des récipients de cuisson plus petits pour faire cuire à l...
Page 22 - KEEPING YOUR BERTAZZONI CLEAN; Burn hazard; DO; Cleaning painted surfaces
22 KEEPING YOUR BERTAZZONI CLEAN Burn hazard Make sure the heating elements are turned o ff and allowed to cool completely before any clea-ning and/or maintenance operation. Things to avoid: • Do not use a steam cleaner to clean therangetop: the steam could reach electricalcomponents and cause a shor...
Page 23 - TROUBLESHOOTING
23 You are also welcome to call our toll free Cu-stomer Service line to troubleshoot any issue with your Bertazzoni: If located in the USA866 905 0010https://us.bertazzoni.com/more/support If located in CANADA800 561 7265https://ca.bertazzoni.com/more/support Make sure to keep the following informat...
Page 24 - TWO YEAR LIMITED WARRANTY STATEMENT
24 WHAT THIS LIMITED WARRANTY COVERS: The Warranty coverage provided by Bertazz-ni SpA (“Bertazzoni”) in this statement applies exclusively to the original Bertazzoni appliance (“Product”) sold to the consumer (“Purchaser”) by an authorized Bertazzoni dealer/distributor/retai-ler, purchased and inst...
Page 29 - DÉCLARA TION DE GARANTIE LIMITÉE DE DEUX
24 COUVERTURE DE LA PRÉSENTE GARANTIE LIMITÉE La garantie fournie par Bertazzoni S.p.A. (« Bertazzoni ») à travers le présent document s’applique exclusivement à l’appareil Bertazzoni d’origine (« Produit ») vendu au client (« Acheteur ») par un distributeur , revendeur ou détaillant autorisé par Be...
Page 30 - RÉSOLUTION DES PROBLÈMES
23 Vous pouvez appeler le numéro vert de notre Service clients pour résoudre tout problème lié à votre cuisinière Bertazzoni : En cas d’installation aux États-Unis 866 905 0010 https://us.bertazzoni.com/more/support En cas d’installation au CANADA 800 561 7265 https://ca.bertazzoni.com/more/support ...
Page 31 - NE P AS utiliser de laine d’acier; Nettoyage des surfaces peintes; NETTOY
22 Risque de brûlure S’assurer que les éléments chau ff ants sont éteints et ont complètement refroidi avant d’e ff ectuer toute opération de nettoyage et/ou d’entretien. Actions à ne pas faire : • N’utilisez pas de nettoyeur vapeur pour nettoyer la cuisinière : la vapeur pourrait entrer en contact av...
Page 33 - -Détection récipient de cuisson
20 Surface de cuisson à induction L - Fonction « Child lock » (sécurité enfants) En cas d'inutilisation, la surface de cuisson peut être « verrouillée » pour éviter que des enfants ne l'allument accidentellement. Avec les zones de cuisson éteintes, tourner simultanément les boutons des zones 1 et 2 ...
Page 34 - SURFACE DE CUISSON À INDUCTION; LA CUISSON À INDUCTION
19 Surface de cuisson à induction SURFACE DE CUISSON À INDUCTION LA CUISSON À INDUCTION Sous chaque zone de cuisson se trouve une bobine, appelée inducteur . L'inducteur génère un champ magnétique variable qui utilise de l'électricité. Lorsqu'un récipient de cuisson est placé à l'intérieur de ce cha...
Page 35 - Sécurité lors du nettoyage; A VERTISSEMENT; Élément à induction avant gauche
18 A VE R TI S SE M EN T S SURFACE DE CUISSON ET BOUT ONS etc., ne doivent jamais être utilisés sur la table de cuisson • Le placement des grands pots de bouillon doit être décalé lorsqu’il est utilisé sur le plan de la table de cuisson. • Utilisez la bonne taille de casserole - Cet appareil est équ...
Page 36 - Ustensiles recommandés; Les ustensiles de cuisson, comme les
17 • Ne JAMAIS laisser une opération de cuisson en surface sans surveillance, notamment en cas de cuisson à haute température ou de friture. Les températures excessives génèrent des fumées et des projections graisseuses peuvent s’en fl ammer. Nettoyer les projections de graisse dès que possible. NE ...
Page 37 - Si les informations dans ce manuel ne sont; Pour prévenir les incendies ou les; Sécurité des enfants; INSTRUCTIONS IMPORT ANTES
16 A VE R TI S SE M EN T S Les avertissements et les consignes de sécurité contenus dans ce manuel ne couvrent pas toutes les situations et conditions susceptibles de survenir. Procéder avec bon sens et attention et avec le plus grand soin lors de l’installation, de l’entretien ou de l’utilisation d...
Page 40 - La garniture est uniquement positionnée sur la
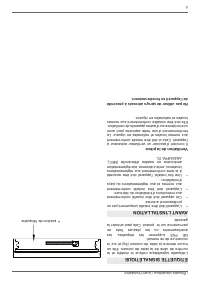
13 INST ALLA TION DE LA GARNITURE La garniture est uniquement positionnée sur la surface de cuisson. Retirer tous les rubans et matériaux d'emballage avant son installation. Avant l’installation, portez des gants de sécurité. / Installation 1 2 3 4
Page 41 - INST ALLA
12 / Installation INST ALLA TION DE L'APP AREIL Déballage de la table de cuisson • Retirer tous les matériaux d'emballage de la paletted'expédition sans toucher à la mousse postérieure adhésive sur les surfaces en métal brossé, a fi n de protéger la table de cucisson des rayures jusqu'à son installa...
Page 42 - SCHÉMA DE CÂBLAGE; Les schémas de câblage électrique; URS
1 1 / Schéma de câblage SCHÉMA DE CÂBLAGE Les schémas de câblage électrique fi gurent à l'arrière de la table de cuisson et ne peuvent être retirés que par un technicien de maintenance, qui doit les remettre en place une fois l'entretien réalisé. L2 L1 M GRO UND 1 2 3 4 5 54321 INDUCTI O N CO O K TO...
Page 43 - ÉLECTRICITÉ; Attention; CONDITIONS D'INST ALLA; zone réservée au branchement
10 / Conditions d'installation / Raccordement électrique ÉLECTRICITÉ Une prise électrique montée horizontalement et correctement mise à la terre doit être installée à une hauteur maximale de 27” (68.6 cm) et minimale de 2” (5 cm) par rapport au sol, et à une distance maximale de 15” (38.1 cm) par ra...
Page 44 - ESP ACE DE DÉGAGEMENT; Installation adjacente à des meubles de cuisine
9 / Espace de dégagement ESP ACE DE DÉGAGEMENT Installation adjacente à des meubles de cuisine Cette table de cuisson peut être installée à proximité directe de plans de travail avec meubles intégrés (36” ou 91,5 cm par rapport au sol). Pour un aspect optimal, la surface de la table de cuisson doit ...
Page 45 - Préparation du Meuble de cuisine
8 / Spéci fi cations Préparation du Meuble de cuisine 1.Pour assurer des résultats professionnels, les ouvertures d’armoire et de comptoir devraient être préparées par un technicien quali fi é d’armoire. 2.Les autorisations indiquées dans la fi gure sont nécessaires. 3.L ’alimentation en électricité...
Page 46 - PRÉP ARA
7 Cette table de cucisson a un fonctionnement optimal en cas d'installation avec une hotte d'extraction Bertazzoni. Ces hottes, conçues pour être associées à la gamme Bertazzoni, o ff rent un aspect impeccable grâce à leur fi nition identique. Avant d'installer la hotte d'extraction, consulter les rè...
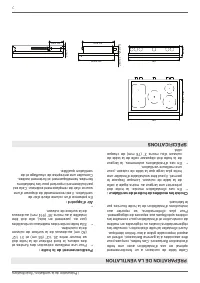
Page 47 - Ventilation de la pièce; Ne pas utiliser de sprays aérosols à proximité; ALLA TION
6 / Étiquette signalétique / A vant l'installation L’étiquette signalétique indique le modèle et le numéro de série de la table de cuisson. Elle se trouve derriere la table de cuisson ( fi g) et sur la couverture de ce manuel. NE P AS supprimer les étiquettes, les avertissements ou les plaques fi xé...
Page 48 - Cancer et Troubles de l’appareil repro-
5 / Avertissements A VERTISSEMENT : Cancer et Troubles de l’appareil repro- ducteur- www.P65W arnings.ca.gov .
Page 49 - A VERTISSEMENTS
4 / Avertissements A VERTISSEMENTS Pour un fonctionnement correct et en toute sécurité, l'appareil doit être correctement installé et mis à la terre par un technicien quali fi é. NE P AS tenter de régler , réparer , réviser ou remplacer un composant de l'appareil à moins que le présent manuel ne le ...
Page 51 - UTILISA TION
2 / Table des matières T ABLE DES MA TIÈRES INST ALLA TION A VERTISSEMENTS ____________________________________________________________ ÉTIQUETTE SIGNALÉTIQUE _____________________________________________________ A VANT L'INST ALLA TION ________________________________________________________ PRÉP A...
Page 52 - LCF
1 BERT AZZONI MANUEL D'INST ALLA TION ET D’UTILISA TION T ABLE DE CUISSON À INDUCTION 3100768 WWW.BER T AZZONI.COM LCF