Page 2 - INDICE
2 IT / Indice INDICE AVVERTENZE __________________________ _________________________________________ RESPONSABILITÀ DEL PRODUTTORE _____________________________________________ TUTELA DELL’AMBIENTE ________________________________________________________ IMBALLI IN PLASTICA _________________________...
Page 3 - DALLA SCRIVANIA DEL PRESIDENTE; Spero che sia di tuo completo gradimento!
3 IT / Dalla scrivania del presidente DALLA SCRIVANIA DEL PRESIDENTE Gentile Cliente, grazie per aver scelto per la tua casa la qualità degli elettrodomestici Bertazzoni. E’ dal lontano 1882 che la mia famiglia costruisce cucine e si è dunque conquistata una solida reputazione per l’eccellenza della...
Page 4 - AVVERTENZE; RESPONSABILITA’ DEL PRODUTTORE; Pericolo di soff ocamento; TARGHETTA DI IDENTIFICAZIONE
4 IT / Avvertenze AVVERTENZE LEGGERE IL LIBRETTO D’ISTRUZIONI PRIMA DI INSTALLARE ED UTILIZZARE L’APPARECCHIO. Queste istruzioni sono valide solamente per i paesi di destinazione i cui simboli di identifi cazione fi gurano sulla copertina del libretto istruzione e sull’etichetta dell’apparecchio.Il co...
Page 5 - AVVERTENZE GENERALI DI SICUREZZA
5 IT / Avvertenze AVVERTENZE AVVERTENZE GENERALI DI SICUREZZA • Questo apparecchio e le sue parti accessibili diventano molto calde durante l’uso. • Non toccare gli elementi riscaldanti durantel’uso. • Tenere lontani i bambini inferiori agli 8 anni se non continuamente sorvegliati. • I bambini non d...
Page 6 - MANUALE TECNICO PER L’INSTALLATORE
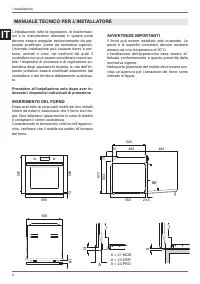
6 IT / Installazione L’installazione, tutte le regolazioni, le trasformazi-oni e le manutenzioni elencate in questa parte devono essere eseguite esclusivamente da per-sonale qualifi cato (come da normativa vigente). Un’errata installazione può causare danni a per-sone, animali o cose, nei confronti d...
Page 8 - FISSAGGIO FORNO
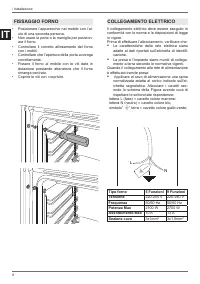
8 IT / Installazione • Posizionare l’apparecchio nel mobile con l’ai-uto di una seconda persona. • Non usare la porta o la maniglia per posizion-are il forno. • Controllare il corretto allineamento del fornocon i mobili. • Controllare che l’apertura della porta avvengacorrettamente. • Fissare il for...
Page 9 - SOSTITUZIONE DEI COMPONENTI; MANUTENZIONE
9 IT • Il cavo di alimentazione deve essere posizion-ato in modo che non sia appoggato al posteri-ore del forno, che non sia a contatto con borditaglienti e che non raggiunga in nessun puntouna temperatura di 90°C. • Non utilizzare per il collegamento riduzioni,adattatori o derivatori in quanto potr...
Page 11 - Calore dall’alto e dal basso.; USO
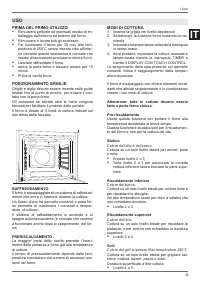
11 IT PRIMA DEL PRIMO UTILIZZO • Rimuovere pellicole ed eventuali residui di im-ballaggio dall’interno ed esterno del forno. • Rimuovere e lavare tutti gli accessori. • Far funzionare il forno per 30 min. alla tem-peratura di 250°C senza inserire cibo all’inter-no (durante questa operazione è normal...
Page 13 - Pietanze
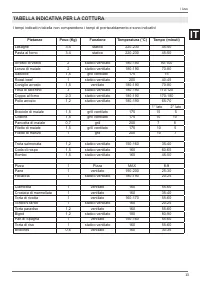
13 IT / Uso TABELLA INDICATIVA PER LA COTTURA TABELLA INDICATIVA PER LA COTTURA Pietanze Peso (Kg) Funzione Temperatura (°C) Tempo (minuti) Lasagne 3-4 statico 220-230 45-50 Pasta al forno 3-4 statico 220-230 45-50 Arrosto di vitello 2 statico ventilato 180-190 90-100 Lonza di maiale 2 statico venti...
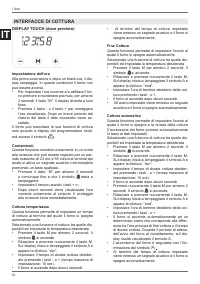
Page 14 - in; Cottura temporizzata; INTERFACCE DI COTTURA
14 IT / Uso DISPLAY TOUCH (dove previsto) Impostazione dell’ora Alla prima accensione o dopo un black-out, il dis-play lampeggia. In queste condizioni il forno non può essere acceso.• Per impostare l’ora corrente e/o abilitare il for-no premere e mantenere premuto, per almeno2 secondi, il tasto “M”....
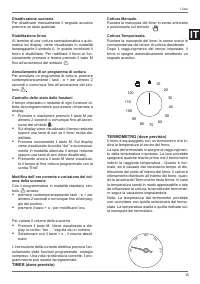
Page 15 - Per variare il volume della suoneria; Cottura Temporizzata.
15 IT / Uso Disattivazione suoneria Per disattivare manualmente il segnale acustico premere un tasto qualsiasi. Riabilitazione forno AI termine di una cottura semiautomatica o auto-matica sul display, viene visualizzato in modalità lampeggiante il simbolo A. In queste condizioni il forno è disabilit...
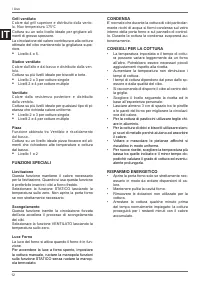
Page 16 - GUIDE TELESCOPICHE; Rimozione guide telescopiche; FUNZIONE GIRARROSTO
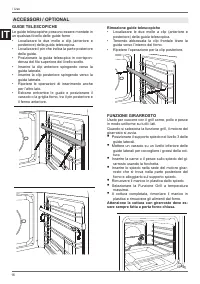
16 IT GUIDE TELESCOPICHE Le guide telescopiche possono essere montate in un qualsiasi livello delle guide forno• Localizzare le due molle a clip (anteriore e posteriore) della guida telescopica. • Localizzare il pin che indica la parte posterioredella guida. • Posizionare la guida telesopica in corr...
Page 17 - Pulire con panno umido.; PULIZIA DELL’APPARECCHIO
17 IT / Pulizia /Malfunzionamenti Prima di eff ettuare qualsiasi operazione di pulizia, attendere che tutte le parti si siano raff reddate e scollegare il forno dalla rete elettrica.Una cura scrupolosa del forno contribuisce a mantenerlo a lungo in buone condizioni. Pulizia delle parti smaltate o vern...
Page 18 - SEMPLICI MANUTENZIONI; RIMOZIONE GUIDE LATERALI
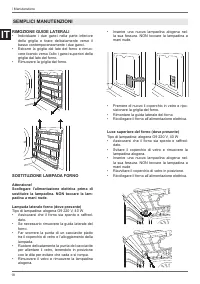
18 IT SEMPLICI MANUTENZIONI RIMOZIONE GUIDE LATERALI • Individuare i due ganci nella parte inferiore della griglia e tirare delicatamente verso il basso contemporaneamente i due ganci. • Estrarre la griglia dal lato del forno e rimuo- vere tirando verso l’alto i ganci superiori della griglia dal lat...
Page 19 - PULIZIA VETRI INTERNI PORTA FORNO; Aprire completamente la porta forno.
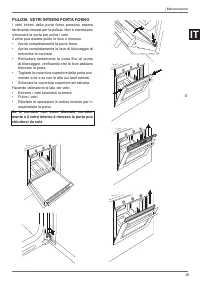
19 IT PULIZIA VETRI INTERNI PORTA FORNO I vetri interni della porta forno possono essere facilmente rimossi per la pulizia. Non è necessario rimuovere la porta per pulire i vetri.il vetro può essere pulito in loco o rimosso.• Aprire completamente la porta forno. • Aprire completamente le leve di blo...
Page 20 - GARANZIA; GARANZIA E SERVIZIO CLIENTI:; MALFUNZIONAMENTO
20 IT GARANZIA Il forno non funziona Al forno arriva corrente? controllare l’interruttore o il fusibile. La manopola non rimane in posizione. La clip della manopola è rotta, chiamare l’assistenza per la sostituzione. Il cibo è troppo cotto Con una funzione ventilata ricordarsi di diminuire la temper...
Page 21 - BUILT-IN ELECTRIC OVENS
EN BERTAZZONI INSTALLATION AND USER MANUAL BUILT-IN ELECTRIC OVENS 3100399 WWW.BERTAZZONI.COM
Page 22 - CONTENTS
2 EN / Contents CONTENTS INTRODUCTION AND WARNINGS __________________________________________________ MANUFACTURER LIABILITY _____________________________________________________ ENVIRONMENTAL PROTECTION __________________________________________________ PLASTIC PACKAGING ___________________________...
Page 23 - FROM THE DESK OF OUR PRESIDENT
3 EN / From the desk of our president FROM THE DESK OF OUR PRESIDENT Dear new owner of a Bertazzoni appliance,I want to thank you for choosing one of our beautiful products for your home. My family started manufacturing kitchen appliances in Italy in 1882, building a reputation for quality of engine...
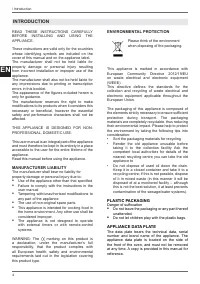
Page 24 - INTRODUCTION; MANUFACTURER LIABILITY; Use of the appliance other than that specifi ed; ENVIRONMENTAL PROTECTION; Sort the packaging materials for recycling; PLASTIC PACKAGING; Danger of suff ocation; APPLIANCE DATA PLATE
4 EN / Introduction INTRODUCTION READ THESE INSTRUCTIONS CAREFULLY BEFORE INSTALLING AND USING THE APPLIANCE. These instructions are valid only for the countries whose identifying symbols are included on the cover of this manual and on the appliance label.The manufacturer shall not be held liable fo...
Page 25 - GENERAL SAFETY INSTRUCTIONS
5 EN / Introduction INTRODUCTION GENERAL SAFETY INSTRUCTIONS • WARNING: Accessible parts may becomevery hot during use. Young children should bekept away. • Never touch the heating elements during use. • Keep children at a safe distance unless theyare constantly supervised. • Children must not play ...
Page 26 - TECHNICAL INSTALLATION INSTRUCTIONS
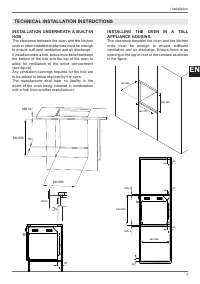
6 EN / Installation The installation, adjustments, transformations and maintenance listed in this section must only be performed by qualifi ed technicians (in accordance with applicable legislation). Incorrect installation can cause property damage and injury to people or pets; the manufacturer shall...
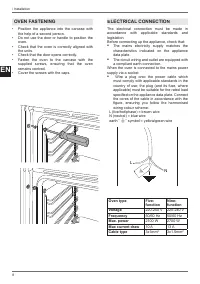
Page 28 - Oven type; OVEN FASTENING
8 EN / Installation • Position the appliance into the carcase with the help of a second person. • Do not use the door or handle to position the oven. • Check that the oven is correctly aligned with the units. • Check that the door opens correctly.• Fasten the oven to the carcase with the supplied sc...
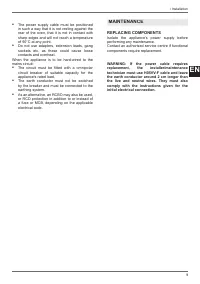
Page 29 - REPLACING COMPONENTS; the; MAINTENANCE
9 EN • The power supply cable must be positioned in such a way that it is not resting against the rear of the oven, that it is not in contact with sharp edges and will not reach a temperature of 90°C at any point. • Do not use adapters, extension leads, gang sockets etc. as these could cause loose c...
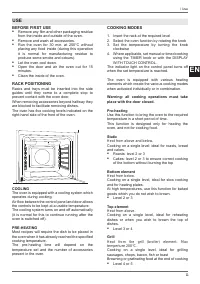
Page 31 - BEFORE FIRST USE; Remove and wash all accessories.; RACK POSITIONING; COOLING; COOKING MODES; clockwise; Static; Heat from above and below.; Bottom element; USE
11 EN BEFORE FIRST USE • Remove any fi lm and other packaging residue from the inside and outside of the oven. • Remove and wash all accessories. • Run the oven for 30 min. at 250°C without placing any food inside (during this operation it is normal for manufacturing residue to produce some smoke and...
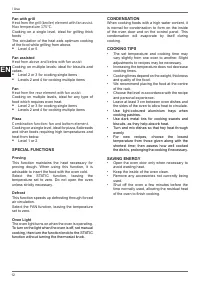
Page 32 - SPECIAL FUNCTIONS; • Use light-coloured aluminium trays when; SAVING ENERGY
12 EN / Use Fan with grill Heat from the grill (broiler) element with fan assist. Max temperature 175°C. Cooking on a single level, ideal for grilling thick foodsThe circulation of the heat aids optimum cooking of the food while grilling from above. • Level 4 or 5 Fan assisted Heat from above and be...
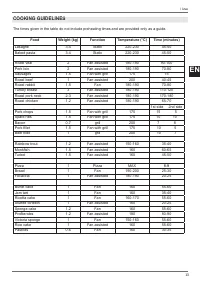
Page 33 - Food
13 EN / Use COOKING GUIDELINES COOKING GUIDELINES Food Weight (kg) Function Temperature (°C) Time (minutes) Lasagne 3-4 Static 220-230 45-50 Baked pasta 3-4 Static 220-230 45-50 Roast veal 2 Fan assisted 180-190 90-100 Pork loin 2 Fan assisted 180-190 70-80 Sausages 1.5 Fan with grill 175 15 Roast b...
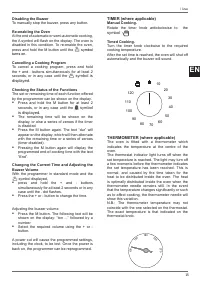
Page 34 - TOUCHSCREEN DISPLAY (where; Setting the time; symbol; Timed Cooking; symbol will be displayed when the; COOKING INTERFACES
14 EN / Use TOUCHSCREEN DISPLAY (where applicable) Setting the time When the oven is fi rst switched on, or after a black-out, the display will fl ash. The oven cannot be turned on in this condition.• To set the current time and/or enable the oven, press and hold the “M” button for at least 2 seconds....
Page 35 - Disabling the Buzzer; To manually stop the buzzer, press any button.; Re-enabling the Oven; Cancelling a Cooking Program; symbol is; Checking the Status of the Functions; With the programmer in standard mode and the
15 EN / Use Disabling the Buzzer To manually stop the buzzer, press any button. Re-enabling the Oven At the end of automatic or semi-automatic cooking, the A symbol will fl ash on the display. The oven is disabled in this condition. To re-enable the oven, press and hold the M button until the symbol ...
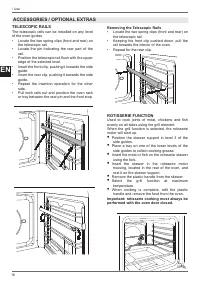
Page 36 - TELESCOPIC RAILS; Removing the Telescopic Rails; ROTISSERIE FUNCTION; ACCESSORIES / OPTIONAL EXTRAS
16 EN TELESCOPIC RAILS The telescopic rails can be installed on any level of the oven guides• Locate the two spring clips (front and rear) on the telescopic rail. • Locate the pin indicating the rear part of the rail. • Position the telescopic rail fl ush with the upper edge of the selected level. • ...
Page 37 - Wipe with a damp cloth.; CLEANING THE APPLIANCE
17 EN / Cleaning / Troubleshooting Before performing any cleaning operation, wait for all parts to cool down and isolate the oven from the electrical supply.Scrupulous care of your oven will help keep it in excellent condition for many years to come. Cleaning enamelled or painted parts: To maintain ...
Page 38 - BASIC MAINTENANCE; REMOVING THE SIDE GUIDES
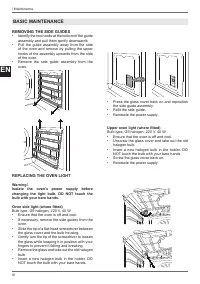
18 EN BASIC MAINTENANCE REMOVING THE SIDE GUIDES • Identify the two hooks at the bottom of the guide assembly and pull them gently downwards. • Pull the guide assembly away from the side of the oven and remove by pulling the upper hooks of the assembly upwards from the side of the oven. • Remove the...
Page 39 - CLEANING THE INTERNAL DOOR GLASS; that the levers have blocked the door.
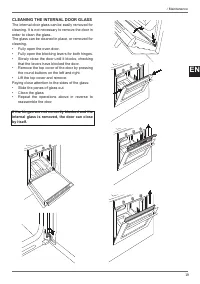
19 EN CLEANING THE INTERNAL DOOR GLASS The internal door glass can be easily removed for cleaning. It is not necessary to remove the door in order to clean the glass.The glass can be cleaned in place, or removed for cleaning.• Fully open the oven door.• Fully open the blocking levers for both hinges...
Page 40 - WARRANTY; WARRANTY AND CUSTOMER SERVICE:; TROUBLESHOOTING
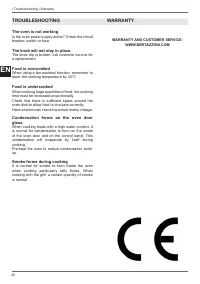
20 EN WARRANTY The oven is not working Is the oven power supply active? Check the circuit breaker, switch or fuse. The knob will not stay in place. The knob clip is broken: call customer service for a replacement. Food is overcooked When using a fan-assisted function, remember to lower the cooking t...
Page 41 - FOURS ENCASTRABLES ÉLECTRIQUES
1 FR BERTAZZONI INSTRUCTIONS D’INSTALLATION ET D’UTILISATION FOURS ENCASTRABLES ÉLECTRIQUES 3100399 WWW.BERTAZZONI.COM
Page 42 - TABLE DES MATIÈRES
2 FR / Table des matières TABLE DES MATIÈRES AVERTISSEMENTS ______________________________________________________________ RESPONSABILITÉ DU FABRICANT ________________________________________________ PROTECTION DE L’ENVIRONNEMENT ______________________________________________ EMBALLAGES EN PLASTIQUE...
Page 43 - MESSAGE DU PRÉSIDENT; Paolo Bertazzoni
3 FR / Message du Président MESSAGE DU PRÉSIDENT Cher nouveau propriétaire d’un produit Bertazzoni,Je tiens à vous remercier d’avoir choisi l’un de nos magnifi ques produits pour votre habitation. Ma famille s’est lancée dans la fabrication d’équipements de cuisine en Italie en 1882, se bâtissant ain...
Page 44 - AVERTISSEMENTS; VEILLER; RESPONSABILITÉ DU FABRICANT; l’utilisation de pièces détachées non d’origine.; PROTECTION DE L’ENVIRONNEMENT; Risque d’étouff ement; PLAQUE D’IDENTIFICATION
4 FR / Avertissements AVERTISSEMENTS VEILLER À LIRE LES PRÉSENTES INSTRUCTIONS AVANT D’INSTALLER ET D’UTILISER L’APPAREIL. Les présentes instructions sont valables uniquement dans les pays auxquels elles sont destinées, dont les symboles d’identifi cation fi gurent sur la couverture du manuel d’instru...
Page 45 - CONSIGNES GÉNÉRALES DE SÉCURITÉ
5 FR / Avertissements AVERTISSEMENTS CONSIGNES GÉNÉRALES DE SÉCURITÉ • L’appareil et ses parties accessibles deviennent très chauds pendant l’utilisation. • Ne pas toucher les éléments chauff antspendant l’utilisation. • Ne pas laisser d’enfants de moins de 8 ans à proximité de l’appareil à moins qu’...
Page 46 - MANUEL TECHNIQUE POUR L’INSTALLATEUR
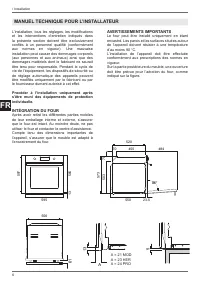
6 FR / Installation L’installation, tous les réglages, les modifi cations et les interventions d’entretien indiqués dans la présente section doivent être exclusivement confi és à un personnel qualifi é (conformément aux normes en vigueur). Une mauvaise installation peut causer des dommages corporels (a...
Page 48 - FIXATION DU FOUR
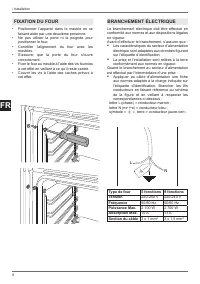
8 FR / Installation • Positionner l’appareil dans le meuble en sefaisant aider par une deuxième personne. • Ne pas utiliser la porte ni la poignée pourpositionner le four. • Contrôler l’alignement du four avec lesmeubles. • S’assurer que la porte du four s’ouvrecorrectement. • Fixer le four au meubl...
Page 49 - REMPLACEMENT DES COMPOSANTS; ENTRETIEN
9 FR • Le câble électrique doit être positionné desorte qu’il ne soit pas en appui sur la partiepostérieure du four ni en contact avec desbords coupants et qu’il n’atteigne à hauteurd’aucun point une température de 90 °C. • Pour le branchement, ne pas utiliser deréductions, d’adaptateurs ni de dériv...
Page 51 - AVANT LA PREMIÈRE UTILISATION; Retirer et laver tous les accessoires.; POSITIONNEMENT DES GRILLES; Régler la température en tournant le bouton dans; UTILISATION
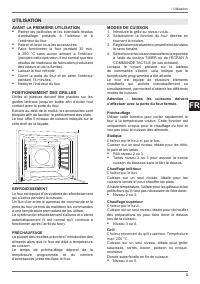
11 FR AVANT LA PREMIÈRE UTILISATION • Retirer les pellicules et les éventuels résidus d’emballage présents à l’intérieur et à l’extérieur du four. • Retirer et laver tous les accessoires. • Faire fonctionner le four pendant 30 min. à 250 °C sans aucun aliment à l’intérieur (pendant cette opération, ...
Page 52 - FONCTIONS SPÉCIALES; Veiller à ce que l’intérieur du four reste propre.
12 FR / Utilisation Grill ventilé Chaleur provenant du grill supérieur, distribuée par le ventilateur. Température max. 175 °C. Cuisson sur un seul niveau, idéale pour griller des pièces épaisses.La circulation de la chaleur contribue à la cuisson optimale des aliments tout en gratinant la partie su...
Page 53 - Préparations
13 FR / Utilisation TABLEAU INDICATIF POUR LA CUISSON TABLEAU INDICATIF POUR LA CUISSON Préparations Poids (kg) Fonction Température (°C) Temps (minutes) Lasagnes 3 - 4 Statique 220 - 230 45 - 50 Pâtes au four 3 - 4 Statique 220 - 230 45 - 50 Rôti de veau 2 Statique ventilé 180 - 190 90 - 100 Longe ...
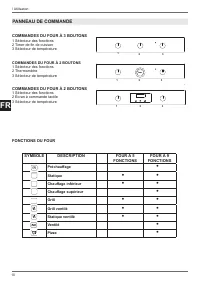
Page 54 - INTERFACES DE CUISSON
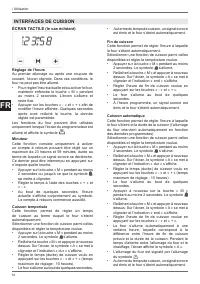
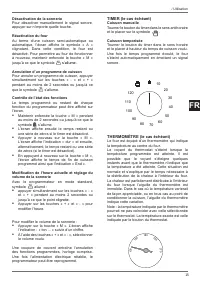
14 FR / Utilisation ÉCRAN TACTILE (le cas échéant) Réglage de l’heure Au premier allumage ou après une coupure de courant, l’écran clignote. Dans ces conditions, le four ne peut pas être allumé.• Pour régler l’heure actuelle et/ou activer le four, maintenir enfoncée la touche « M » pendant au moins ...
Page 56 - GUIDES TÉLESCOPIQUES; Retrait des guides télescopiques; FONCTION TOURNEBROCHE; ACCESSOIRES / OPTIONS
16 FR GUIDES TÉLESCOPIQUES Les guides télescopiques peuvent être montés à hauteur de tout niveau du four prévu à cet eff et.• Localiser les deux ressorts à clip (avant etarrière) du guide télescopique. • Localiser la broche indiquant la partie arrièredu guide. • Positionner le guide télescopique à ha...
Page 57 - Nettoyer le joint avec un chiff on humide.; NETTOYAGE DE L’APPAREIL
17 FR / Nettoyage / Dysfonctionnements Avant d’eff ectuer toute opération de nettoyage, attendre que toutes les parties aient refroidi et débrancher le four du secteur d’alimentation électrique.Un entretien minutieux du four contribue à le maintenir durablement en bon état. Nettoyage des parties émai...
Page 58 - OPÉRATIONS D’ENTRETIEN COURANT; RETRAIT DES GUIDES LATÉRAUX
18 FR OPÉRATIONS D’ENTRETIEN COURANT RETRAIT DES GUIDES LATÉRAUX • Localiser les deux crochets sur la partieinférieure de la grille et, délicatement, les tirertous deux simultanément vers le bas. • Extraire la grille du côté du four puis libérer,en les soulevant, les crochets supérieurs dela grille....
Page 59 - • Refermer lentement la porte du four jusqu’au
19 FR NETTOYAGE DES VERRES INTÉRIEURS DE LA PORTE DU FOUR Les verres intérieurs de la porte du four peuvent être facilement retirés afi n de procéder à leur nettoyage. Pour nettoyer les verres, il n’est pas nécessaire de démonter la porte. Le verre peut être nettoyé directement ou bien retiré.• Ouvri...
Page 60 - GARANTIE; GARANTIE ET SERVICE CLIENTS :; DYSFONCTIONNEMENT
20 FR GARANTIE Le four ne fonctionne pas. Le four est-il alimenté en électricité ? Contrôler l’interrupteur ou le fusible. Le bouton ne reste pas en position. Le clip du bouton est cassé : contacter le service d’assistance pour le remplacer. L’aliment est trop cuit. Lorsqu’une fonction ventilée est ...
Page 61 - HORNOS ELÉCTRICOS EMPOTRABLES
1 ES BERTAZZONI INSTRUCCIONES DE INSTALACIÓN Y USO HORNOS ELÉCTRICOS EMPOTRABLES 3100399 WWW.BERTAZZONI.COM
Page 62 - ÍNDICE
2 ES / Índice ÍNDICE ADVERTENCIAS ________________________________________________________________ RESPONSABILIDAD DEL FABRICANTE ____________________________________________ PROTECCIÓN DEL MEDIO AMBIENTE _____________________________________________ EMBALAJES DE PLÁSTICO ___________________________...
Page 63 - UNAS PALABRAS DEL PRESIDENTE
3 ES / Unas palabras del presidente UNAS PALABRAS DEL PRESIDENTE Estimado propietario de un nuevo aparato Bertazzoni,Deseamos darle las gracias por haber escogido uno de nuestros estupendos productos para su hogar. Mi familia comenzó la fabricación de aparatos de cocina en Italia en 1882, forjándose...
Page 64 - ADVERTENCIAS; RESPONSABILIDAD DEL FABRICANTE; un uso del aparato distinto al previsto; PROTECCIÓN DEL MEDIO AMBIENTE
4 ES / Advertencias ADVERTENCIAS LEA EL MANUAL DE INSTRUCCIONES ANTES DE INSTALAR Y UTILIZAR EL APARATO. Estas instrucciones son válidas exclusivamente para los países de destino cuyos símbolos de identifi cación fi guran en la portada del manual de instrucciones y en la etiqueta del aparato.El fabric...
Page 66 - MANUAL TÉCNICO PARA EL INSTALADOR
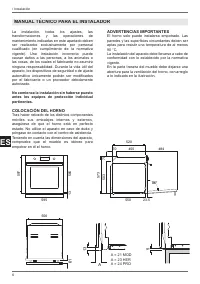
6 ES / Instalación La instalación, todos los ajustes, las transformaciones y las operaciones de mantenimiento indicadas en este apartado deben ser realizados exclusivamente por personal cualifi cado (en cumplimiento de la normativa vigente). Una instalación incorrecta puede causar daños a las persona...
Page 67 - INSTALACIÓN EN UNA COLUMNA
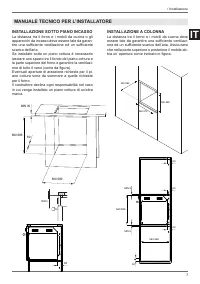
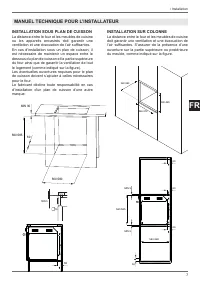
7 ES / Instalación INSTALACIÓN BAJO UNA PLACA DE COCCIÓN La distancia entre el horno y los muebles de cocina o los aparatos empotrables adyacentes debe ser sufi ciente para garantizar una adecuada ventilación y evacuación del aire.Si se instala bajo una placa de cocción, es necesario dejar un espacio...
Page 68 - Cubra los tornillos con los cubretornillos.; Tipo de horno; FIJACIÓN DEL HORNO
8 ES / Instalación • Coloque el aparato en el mueble con la ayudade una segunda persona. • No use la puerta o el asidero para colocar elhorno. • Compruebe la correcta alineación del hornocon los muebles. • Compruebe que la puerta se abre y se cierracorrectamente. • Fije el horno al mueble con los to...
Page 69 - SUSTITUCIÓN DE COMPONENTES; MANTENIMIENTO
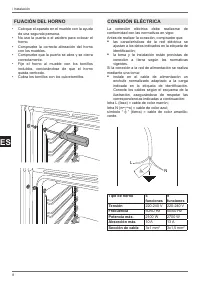
9 ES • El cable de alimentación debe colocarse de forma que no apoye en la parte trasera del horno, que no esté en contacto con bordes cortantes y que no alcance en ningún punto una temperatura de 90 °C. • No utilice para la conexión reducciones, adaptadores o derivadores, ya que podrían provocar fa...
Page 71 - Calor por arriba y por abajo.
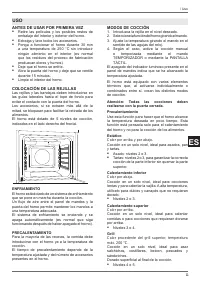
11 ES ANTES DE USAR POR PRIMERA VEZ • Retire las películas y los posibles restos de embalaje del interior y exterior del horno. • Extraiga y lave todos los accesorios. • Ponga a funcionar el horno durante 30 min a una temperatura de 250 °C sin introducir ningún alimento en el interior (es normal que...
Page 72 - • Para la cocción de pastas, utilice bandejas; AHORRO ENERGÉTICO
12 ES / Uso Grill ventilado Calor procedente del grill superior y distribuido por el ventilador, temperatura máx. 175 °C. Cocción en un solo nivel, ideal para asar alimentos de gran grosor.La circulación del calor contribuye a la cocción adecuada del alimento, manteniendo el dorado superior. • Nivel...
Page 73 - Plato
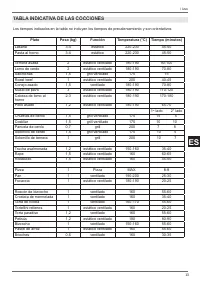
13 ES / Uso TABLA INDICATIVA DE LAS COCCIONES TABLA INDICATIVA DE LAS COCCIONES Plato Peso (kg) Función Temperatura (°C) Tiempo (minutos) Lasaña 3-4 estático 220-230 45-50 Pasta al horno 3-4 estático 220-230 45-50 Ternera asada 2 estático ventilado 180-190 90-100 Lomo de cerdo 2 estático ventilado 1...
Page 74 - INTERFACES DE COCCIÓN
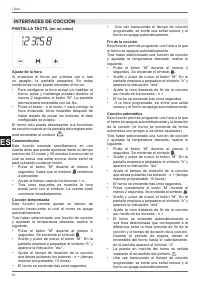
14 ES / Uso PANTALLA TÁCTIL (en su caso) Ajuste de la hora Al encender el horno por primera vez o tras un apagón, la pantalla parpadea. En estas condiciones no se puede encender el horno.• Para confi gurar la hora actual y/o habilitar el horno, pulse y mantenga pulsado durante al menos 2 segundos el ...
Page 76 - GUÍAS TELESCÓPICAS; Extracción de las guías telescópicas; FUNCIÓN ASADOR; ACCESORIOS
16 ES GUÍAS TELESCÓPICAS Las guías telescópicas pueden montarse en cualquier nivel de las guías del horno.• Localice los dos clips de resorte (delantero y trasero) de la guía telescópica. • Localice la espiga que indica la parte trasera de la guía. • Coloque la guía telescópica junto al alambre supe...
Page 77 - Límpiela con una paño húmedo.; LIMPIEZA DEL APARATO
17 ES / Limpieza / Fallos de funcionamiento Antes de realizar cualquier operación de limpieza, espere a que todos los componentes se hayan enfriado y desconecte el horno de la red eléctrica.Una limpieza escrupulosa del horno contribuye a mantenerlo en buenas condiciones durante mucho tiempo. Limpiez...
Page 78 - OPERACIONES DE MANTENIMIENTO QUE PUEDE REALIZAR USTED MISMO; DESMONTAJE DE LAS GUÍAS LATERALES
18 ES OPERACIONES DE MANTENIMIENTO QUE PUEDE REALIZAR USTED MISMO DESMONTAJE DE LAS GUÍAS LATERALES • Localice los dos ganchos de la parte inferior de la rejilla y tire delicadamente hacia abajo de ambos ganchos al mismo tiempo. • Separe la rejilla del lateral del horno y termine de quitarla tirando...
Page 79 - • Cierre lentamente la puerta hasta el punto de
19 ES LIMPIEZA DE LOS CRISTALES INTERNOS DE LA PUERTA DEL HORNO Los cristales internos de la puerta del horno se pueden retirar fácilmente para limpiarlos. No es necesario quitar la puerta para limpiar los cristales.El cristal se puede limpiar colocado en la puerta o quitado de la misma.• Abra compl...
Page 80 - GARANTÍA; GARANTÍA Y ATENCIÓN AL CLIENTE:; FALLO DE FUNCIONAMIENTO
20 ES GARANTÍA El horno no funciona. ¿Llega corriente al horno? Compruebe el interruptor o el fusible. El mando no permanece en su sitio. El clip del mando está roto; llame a la asistencia técnica para sustituirlo. Los alimentos están demasiado cocinados. Al usar una función ventilada, recuerde baja...