Page 2 - ii; Copyright © 2021 ASUSTeK COMPUTER INC. All Rights Reserved.
ii First Edition January 2021 Copyright © 2021 ASUSTeK COMPUTER INC. All Rights Reserved. No part of this manual, including the products and software described in it, may be reproduced, transmitted, transcribed, stored in a retrieval system, or translated into any language in any form or by any mean...
Page 3 - iii; Contents; Chapter 1: Product introduction; How to reconfigure; Specifications summary
iii Contents Contents ...................................................................................................... iiiNotices ......................................................................................................... ivSafety information ........................................
Page 4 - iv; Notices; Federal Communications Commission Statement; void the user’s authority to operate this equipment.; ENERGY STAR complied product; save money and protect the environment through energy efficient
iv Notices Federal Communications Commission Statement This device complies with Part 15 of the FCC Rules. Operation is subject to the following two conditions:• This device may not cause harmful interference, and• This device must accept any interference received including interference that may cau...
Page 5 - Canadian Department of Communications Statement; Réglement sur le matériel brouiller du Canada.
v NOTE: Energy Star is NOT supported on FreeDOS and Linux-based operating system. Canadian Department of Communications Statement This digital apparatus does not exceed the Class B limits for radio noise emissions from digital apparatus set out in the Radio Interference Regulations of the Canadian D...
Page 6 - Safety information; AEEE yönetmeliğine uygundur
vi Safety information • Before setting up the monitor, carefully read all the documentation that came with the package. • To prevent fire or shock hazard, never expose the monitor to rain or moisture. • Never try to open the monitor cabinet. The dangerous high voltages inside the monitor may result ...
Page 7 - vii; The following symptoms are normal with the monitor:; Conventions used in this guide
vii Care & Cleaning • Before you lift or reposition your monitor, it is better to disconnect the cables and power cord. Follow the correct lifting techniques when positioning the monitor. When lifting or carrying the monitor, grasp the edges of the monitor. Do not lift the display by the stand o...
Page 8 - viii; A third-party certification according to ISO 14024; Say hello; This product is a better choice; . It meets all the criteria in TCO Certified,; Where to find more information; The ASUS websites worldwide provide updated information on ASUS; Optional documentation; Takeback Services; information in different region.; Product information for EU energy label
viii A third-party certification according to ISO 14024 Say hello to a more sustainable product IT products are associated with a wide range of sustainability risks throughout their life cycle. Human rights violations are common in the factories. Harmful substances are used both in products and thei...
Page 9 - ix
ix A third-party certification according to ISO 14024 Say hello to a more sustainable product IT products are associated with a wide range of sustainability risks throughout their life cycle. Human rights violations are common in the factories. Harmful substances are used both in products and their ...
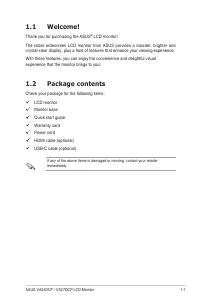
Page 11 - ASUS VA24DCP / VA27DCP LCD Monitor; Thank you for purchasing the ASUS; Package contents; Check your package for the following items:
1-1 ASUS VA24DCP / VA27DCP LCD Monitor 1.1 Welcome! Thank you for purchasing the ASUS ® LCD monitor! The latest widescreen LCD monitor from ASUS provides a broader, brighter and crystal-clear display, plus a host of features that enhance your viewing experience. With these features, you can enjoy th...
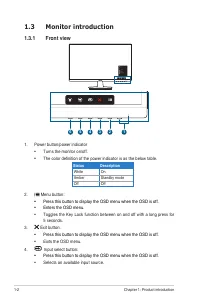
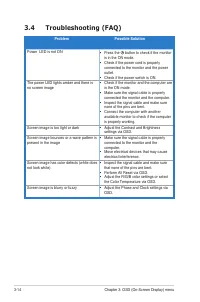
Page 12 - Monitor introduction; Front view; The color definition of the power indicator is as the below table.; Status; Press this button to display the OSD menu when the OSD is off.
1-2 Chapter 1: Product introduction 1.3 Monitor introduction 1.3.1 Front view 1 2 3 4 5 6 Menu Close Input Select Brightness Blue Light Filter 1. Power button/power indicator • Turns the monitor on/off. • The color definition of the power indicator is as the below table. Status Description White On ...
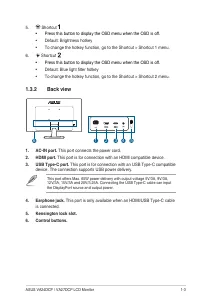
Page 13 - Back view; the DisplayPort source and output power.
1-3 ASUS VA24DCP / VA27DCP LCD Monitor 5. Shortcut • Press this button to display the OSD menu when the OSD is off. • Default: Brightness hotkey • To change the hotkey function, go to the Shortcut > Shortcut 1 menu. 6. Shortcut • Press this button to display the OSD menu when the OSD is off. • De...
Page 14 - Chapter 1: Product introduction
Page 15 - Assembling the monitor arm/base; Fix the base to the arm by rotating the base until it fits into place.; damage to the monitor.
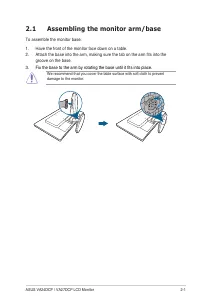
2-1 ASUS VA24DCP / VA27DCP LCD Monitor 2.1 Assembling the monitor arm/base To assemble the monitor base:1. Have the front of the monitor face down on a table.2. Attach the base into the arm, making sure the tab on the arm fits into the groove on the base. 3. Fix the base to the arm by rotating the b...
Page 16 - Detaching the arm/base; Figure 1
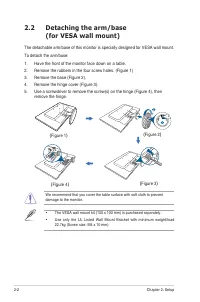
2-2 Chapter 2: Setup 2.2 Detaching the arm/base (for VESA wall mount) The detachable arm/base of this monitor is specially designed for VESA wall mount. To detach the arm/base:1. Have the front of the monitor face down on a table.2. Remove the rubbers in the four screw holes. (Figure 1)3. Remove the...
Page 17 - Adjusting the monitor
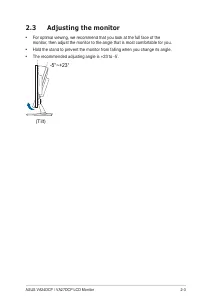
2-3 ASUS VA24DCP / VA27DCP LCD Monitor 2.3 Adjusting the monitor • For optimal viewing, we recommend that you look at the full face of the monitor, then adjust the monitor to the angle that is most comfortable for you. • Hold the stand to prevent the monitor from falling when you change its angle. •...
Page 18 - Connecting the cables; Connect the cables as the following instructions:; • To connect the power cord; : Connect one end of the power cord securely to; • To use the earphone:; connect the end with plug type to the monitor’s line out; Input Select item in the OSD menu.; Turning on the monitor
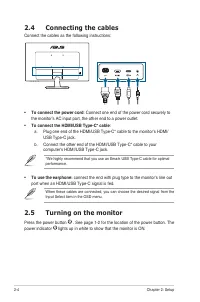
2-4 Chapter 2: Setup 2.4 Connecting the cables Connect the cables as the following instructions: • To connect the power cord : Connect one end of the power cord securely to the monitor’s AC input port, the other end to a power outlet. • To connect the HDMI/USB Type-C* cable : a. Plug one end of the ...
Page 20 - Standard Mode; Standard Mode meets Energy Star; sRGB Mode
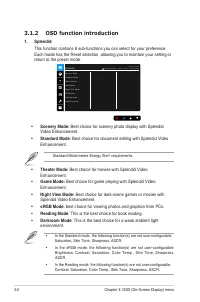
3-2 Chapter 3: OSD (On-Screen Display) menu 3.1.2 OSD function introduction 1. Splendid This function contains 8 sub-functions you can select for your preference. Each mode has the Reset selection, allowing you to maintain your setting or return to the preset mode. A S U S V A 2 4 D S t a n d a r d ...
Page 21 - Please refer to the following to alleviate eye strains:
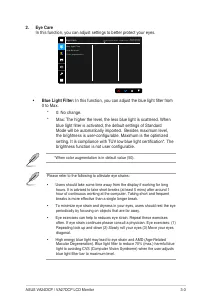
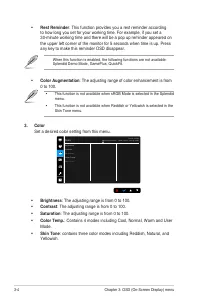
3-3 ASUS VA24DCP / VA27DCP LCD Monitor 2. Eye Care In this function, you can adjust settings to better protect your eyes. A S U S V A 2 4 D S t a n d a r d M o d e H D M I 1 9 2 0 x 1 0 8 0 @ 6 0 H z B l u e L i g h t F i l t e r R e s t R e m i n d e r C o l o r A u g m e n t a t i o n Eye Care • B...
Page 23 - Set the image related setting from this menu.; Sharpness; : Adjusts the response time of the monitor.; Aspect Control; : Enhances the outline of the displayed picture and generates; ASCR; contact the GPU manufactures.
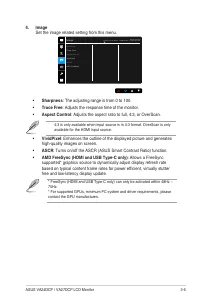
3-5 ASUS VA24DCP / VA27DCP LCD Monitor 4. Image Set the image related setting from this menu. S h a r p n e s s T r a c e F r e e A s p e c t C o n t r o l V i v i d P i x e l A S C R A M D F r e e S y n c Image A S U S V A 2 4 D S t a n d a r d M o d e H D M I 1 9 2 0 x 1 0 8 0 @ 6 0 H z • Sharpnes...
Page 24 - Volume
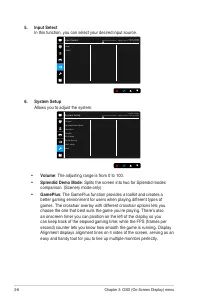
3-6 Chapter 3: OSD (On-Screen Display) menu 5. Input Select In this function, you can select your desired input source. A S U S V A 2 4 D S t a n d a r d M o d e H D M I 1 9 2 0 x 1 0 8 0 @ 6 0 H z H D M I U S B - C Input Select 6. System Setup Allows you to adjust the system. A S U S V A 2 4 D S t ...
Page 25 - You can have a preview of the document or photo layout; Alignment; : This facilitates designers and users to organize
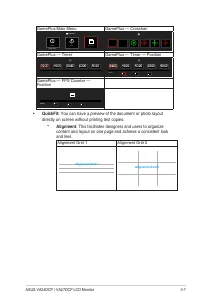
3-7 ASUS VA24DCP / VA27DCP LCD Monitor GamePlus Main Menu GamePlus — Crosshair GamePlus Timer Crosshair (Practice Mode) FPS Counter FPS GamePlus — Timer GamePlus — Timer — Position Position GamePlus — FPS Counter — Position Position FPS • QuickFit: You can have a preview of the document or photo lay...
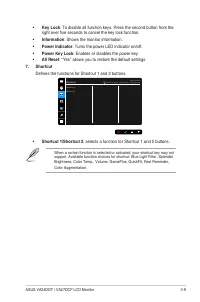
Page 27 - : To disable all function keys. Press the second button from the; : selects a function for Shortcut 1 and 2 buttons.
3-9 ASUS VA24DCP / VA27DCP LCD Monitor • Key Lock : To disable all function keys. Press the second button from the right over five seconds to cancel the key lock function. • Information : Shows the monitor information. • Power Indicator : Turns the power LED indicator on/off. • Power Key Lock : Enab...
Page 29 - Accessories; *Specifications are subject to change without notice.
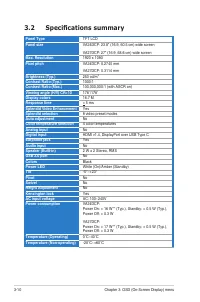
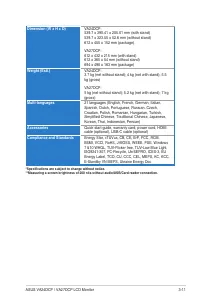
3-11 ASUS VA24DCP / VA27DCP LCD Monitor Dimension (W x H x D) VA24DCP: 539.7 x 390.41 x 205.01 mm (with stand) 539.7 x 323.55 x 52.6 mm (without stand) 612 x 455 x 152 mm (package) VA27DCP: 612 x 432 x 215 mm (with stand) 612 x 365 x 54 mm (without stand) 694 x 498 x 163 mm (package) Weight (Esti.) ...
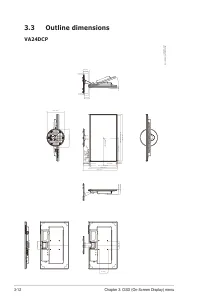
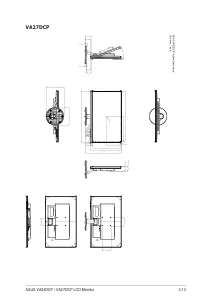
Page 30 - Outline dimensions
3-12 Chapter 3: OSD (On-Screen Display) menu 3.3 Outline dimensions VA24DCP 539.7 [21.25] 323.55 [12.74] 527.04 [20.75]-Active Area 263.52 [10.37] 6.33 [0.25] 296.46 [11.67]-Active Area 20.76 [0.82] 390.41 [15.37] 1.5 [0.06] 46.846 [1.84] 17 [0.67] 17 [0.67] 17 [0.67] 17 [0.67] 17 [0.67] 205.01 [8.0...
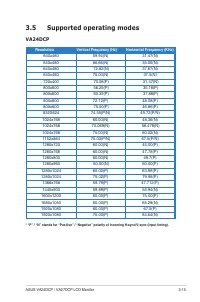
Page 33 - Supported operating modes; Resolution
3-15 ASUS VA24DCP / VA27DCP LCD Monitor 3.5 Supported operating modes VA24DCP Resolution Vertical Frequency (Hz) Horizontal Frequency (KHz) 640x480 59.94(N) 31.47(N) 640x480 66.66(N) 35.00(N) 640x480 72.82(N) 37.87(N) 640x480 75.00(N) 37.5(N) 720x400 70.08(P) 31.47(N) 800x600 56.25(P) 35.16(P) 800x6...
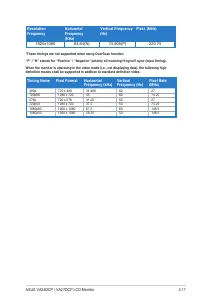
Page 35 - *These timings are not supported when using OverScan function.
3-17 ASUS VA24DCP / VA27DCP LCD Monitor Resolution Frequency Horizontal Frequency (KHz) Vertical Frequency (Hz) Pixel. (MHz) 1920x1080 84.64(N) 74.905(P) 220.75 *These timings are not supported when using OverScan function. “P” / “N” stands for “Positive” / “Negative” polarity of incoming H-sync/V-s...