Page 2 - EN; Manual; Pictograms used; Important information
EN Manual EN 3 - EN 35 Pictograms used Important information Tip
Page 3 - TABLE OF CONTENTS
EN 3 TABLE OF CONTENTS Your touch control gas-induction hob Introduction 4 Description 5 Induction zone operation 6 Wok burner operation 7 Safety Temperature safety induction zones 8 Cooking time limiter 8 Induction use Induction cooking 9 Operation of the touch-sensitive buttons 9 How induction wor...
Page 4 - Introduction; YOUR TOUCH CONTROL GAS-INDUCTION HOB
EN 4 Introduction This hob has been designed for the real lover of cooking. The hob consists of a gas wok burner and induction cooking zones. Cooking on an induction hob has a number of advantages. It is easy, because the hob reacts quickly and can also be set to a very low power level. Because, mor...
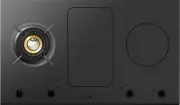
Page 5 - Description
EN 5 Description 1. Wok burner (gas) 2. Bridge induction zone3. Induction zone4. Wok burner operation5. Bridge induction zone front middle operation6. Pause button/key button7. Bridge induction zone rear middle operation8. Right induction zone operation9. Pause button10. Pause indicator11. Child loc...
Page 6 - Induction zone operation
EN 6 Induction zone operation YOUR TOUCH CONTROL GAS-INDUCTION HOB 1. Induction menu functions2. Slide control (12 settings)3. Settings indicator4. Boost indicator5. Time reduce button6. Time increase button7. Timer/kitchen timer8. Minutes indicator9. Kitchen timer button/timer button10. Kitchen tim...
Page 7 - Wok burner operation
EN 7 YOUR TOUCH CONTROL GAS-INDUCTION HOB Wok burner operation 1. Menu functions burner wok burner programs2. Slide control (12 settings)3. Settings indicator4. Searing setting ‘XL’ indicator5. Time reduce button6. Time increase button7. Timer/kitchen timer8. Minutes indicator9. Kitchen timer button...
Page 8 - SAFETY
EN 8 Read the separate safety instructions before use! Temperature safety induction zones • Each induction zone is equipped with a sensor. This sensor measures the temperature of the base of the pan and the sections of the hob. This facility prevents overheating (for example through a pan boiling dr...
Page 9 - INDUCTION USE; Induction cooking; Induction cooking is fast; • To start with, you will be surprised by the speed of induction; The power level adjusts itself; • In induction cooking, only the zone on which the pan is placed; Operation of the touch-sensitive buttons
EN 9 INDUCTION USE Induction cooking Induction cooking is fast • To start with, you will be surprised by the speed of induction cooking. Especially at higher settings, foods and liquids will come to the boil very rapidly. It is best not to leave pans unattended to avoid them boiling over or boiling ...
Page 10 - How induction works
EN 10 INDUCTION USE How induction works A magnetic field is generated in the appliance. By placing a pan with an iron base on a cooking zone, a current is induced in the pan base. This induced current generates heat in the base of the pan. Easy The electronic controls are accurate and easy to set. O...
Page 11 - Pans; Pans for induction cooking
EN 11 Ventilator makes sounds The appliance is fitted with a ventilator in order to increase the lifespan of electronic components. If you use the appliance intensively, the ventilator will be switched on and you will hear a humming sound. The ventilator can also make sounds after you have switched ...
Page 12 - • high power level settings may cause the base of the pan to warp.; Pan diameter
EN 12 Please note! Be careful with thin enamelled sheet steel pans:• the enamel may come loose from the steel at high settings if the pan boils dry; • high power level settings may cause the base of the pan to warp. Please note! Never use pans with a misshapen base. A hollow or rounded base can inte...
Page 13 - • Always ensure that the flames remain under the pan. A lot of energy; Wok ring; wok ring; WOK BURNER USE
EN 13 Pans Pans • Always ensure that the flames remain under the pan. A lot of energy is lost when flames burn around the outside of the pan. The handles could also become too hot. • Do not use pans with a base diameter smaller than 12 cm. Smaller pans are not as stable. Wok ring The wok ring suppli...
Page 14 - Wok burner position; position distributor
EN 14 Wok burner position Place the wok burner in the correct way. Placing the wok burner parts incorrectly can result in a poorly functioning burner.1. Place the burner distributor (2) in the burner housing (1).2. Use the positioning notches to place the inner ring (3) on the burner distributor (2)...
Page 15 - OPERATION; Eco standby mode; Switching the hob to the eco standby mode; • Press the key button briefly.; Standby mode; Switching the hob from the eco standby mode to the standby mode; The red light next to the key button flashes slowly.
EN 15 OPERATION Eco standby mode In the eco standby mode the hob is switched off and it uses as little energy as possible. The hob can also be switched to the eco standby mode from the standby mode and when cooking zones are still active. Switching the hob to the eco standby mode • Press the key but...
Page 16 - Child lock; Switching on the childproof lock; • Press the key button for 2 seconds.; Pause; Switching the hob to pause mode; • Press the pause button once.
EN 16 Child lock Your induction hob is equipped with a childproof lock that lets you lock the appliance. It prevents unintended switching on of the cooking zones. Switching on the childproof lock • Press the key button for 2 seconds. A double audio signal will be heard. All buttons are now inactive,...
Page 17 - Recognising a mode; The eco standby mode; The red arrow pointing upwards lights up and the time increases.
EN 17 • If you press the pause button again within 5 minutes, the paused cooking processes will resume. A double audio signal will be heard, the hob resumes the settings as they were set before the pause. • If you do not undertake any further action within 5 minutes: All active cooking zones will sw...
Page 18 - Switching on the kitchen timer; Switching the audio signal on and off; the kitchen timer alarm and the audio signal for error
EN 18 Switching on the kitchen timer • Press the timer/cooking timer button of the cooking zone once. • Press the + or - button to switch from the timer function to the kitchen timer function. After that you can set the desired cooking time with the + button. Then you can change the set time with th...
Page 19 - Switching on and power setting; A single audio signal sounds.; INDUCTION OPERATION
EN 19 Switching on and power setting 1. Press the key button. A single audio signal sounds. 2. Place a pan in the middle of a cooking zone. The APd registers a pan and a flashing ‘-’ appears in the display. If you don’t do anything else, the cooking zone will switch off automatically after 10 second...
Page 20 - Switching on ‘boost’; ‘12’ and ‘boost’ appear in the display.; Switching off ‘boost’; ‘Boost’ has been switched on, the display shows setting 12 and ‘boost’.; Two cooking zones behind each other; • The two cooking zones which are behind each other affect each
EN 20 Residual heat indicator After use, the cooking zone used may stay hot for several minutes. As long as the cooking zone is still hot, an ‘H’ will be visible in the display. Boost You can use the ‘boost’ function to cook at the highest power level during a short period of time (max 10 minutes). ...
Page 21 - Bridge induction; Switching on the Bridge function
EN 21 Bridge induction The Bridge induction zones can be linked to each other. This creates 1 large zone that can be used, for example, for a large fish pan or various pans on the same power.• If the Bridge induction zones are linked, they cannot be set to boost and the menu functions cannot be used...
Page 22 - Switching off; Switching off one cooking zone; You will hear a single audio signal and the slider dims.; Switching off all cooking zones; Automatic cooking programs; To set an automatic program; The cooking zone is switched on.
EN 22 Switching off Switching off one cooking zone Press the on/off button of the cooking zone you want to switch off. You will hear a single audio signal and the slider dims. • If all cooking zones have been switched off in this way, the hob will automatically be in the standby mode (also refer to ...
Page 24 - Cooking settings; Use ‘boost’ and settings 11 and 12 to:
EN 24 Cooking settings Because the settings depend on the quantity and composition of the pan and its contents, the table below is intended as a guideline only. Use ‘boost’ and settings 11 and 12 to: • bring food or liquid to the boil quickly;• ‘shrink’ greens; • heat oil and fat;• bring a pressure ...
Page 25 - Use settings 1 to 3 to:
EN 25 Use settings 1 to 3 to: • simmer bouillon;• poach;• keep warm; • stew meats;• simmer vegetables;• melt chocolate;• melt cheese. INDUCTION OPERATION
Page 26 - Ignition and adjustment; Residual heat indicator; Setting a burner setting; WOK BURNER OPERATION
EN 26 Ignition and adjustment 1. Place the pan in the middle of a cooking grid.2. Press the key button. A single audio signal sounds. 3. Press the on/off button of the wok burner. The burner will light and will heat at setting 5. Setting 5 will appear in the display and you will hear a single audio ...
Page 28 - MAINTENANCE; Cleaning glass top; Daily cleaning
EN 28 MAINTENANCE Cleaning glass top Tip! Activate the child lock before cleaning the hob. Daily cleaning • Although food spills cannot burn into the glass, we nevertheless recommend you clean the hob immediately after use. • For daily cleaning, a damp cloth with a mild cleaning agent is best.• Dry ...
Page 29 - Cleaning wok burner elements; Brass wok burner parts
EN 29 MAINTENANCE Cleaning wok burner elements Please note! Burner parts should not be cleaned in the dishwasher. Dishwasher detergents can corrode burner parts! Persistent stains on enamel (pan supports, burner caps) Persistent stains can best be removed with a fluid detergent or a plastic scouring...
Page 30 - FAULTS; General; Please note; The hob is cooling down.
EN 30 FAULTS General If you notice a crack in the glass top (however small), switch off the hob immediately, unplug the hob, and close off the gas supply. Then contact the Service Department. Troubleshooting table If your hob does not work properly, it does not always mean that it is defective. Make...
Page 31 - Symptom
EN 31 FAULTS Symptom Possible cause Solution A cooking zone suddenly stops working and you hear a signal. The preset time has ended. Switch off the signal by pressing the - or + button on the timer. The hob is not working and nothing appears in the display. There is no power supply due to a defectiv...
Page 33 - Ceramic glass plate broken.
EN 33 Symptom Possible cause Solution Ceramic glass plate broken. Close the gas main switch and pull the plug out of the socket. Contact your installer. Please note! Do not throw a broken ceramic glass plate in the glass recycling bin, but take it to the municipality’s waste recycling centre. Other ...
Page 34 - TECHNICAL DATA
EN 34 TECHNICAL DATA Information according regulation (EU) 66/2014 Measurements according EN60350-2 / EN 30-2-1 Model identification HIG1944MF HIG1944MB Type of hob Gas-induction hob Gas-induction hob Number of electric cooking zones and/or areas 3 3 Heating technology Induction cooking zones and co...
Page 35 - ENVIRONMENT; Disposal of the appliance and packaging; Declaration of Conformity
EN 35 ENVIRONMENT Disposal of the appliance and packaging Sustainable materials have been used during manufacture of this appliance. This appliance must be disposed of responsibly at the end of its service life. The government can provide you with information about this. The appliance packaging is r...