Page 2 - Introduction; Read the manual thorougly before using the appliance and store it; YOUR INDUCTION HOB
GB 4 Introduction This hob has been designed for the real lover of cooking. Cooking on an induction hob has a number of advantages. It is easy, because the hob reacts quickly and can also be set to a very low power level. Because, moreover, it can also be set to a high power level, it can bring dish...
Page 3 - Control panel
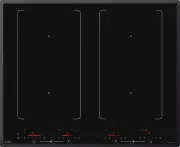
GB 5 Control panel 1. Pause indicator 2. Pause button 3. Childproof lock/Eco stand-by button 4. Childproof lock indicator/Eco stand-by indicator 5. Level indicator in cubes 6. On/off button 7. Reduce the power quickly 8. Reduce the power 9. Cooking zone indicator 10. Increase the power 11. Increase ...
Page 4 - Description
GB 6 Description Hi1683g Hi1983g YOUR INDUCTION HOB 1. Adaptive zone 180 x 220 mm 3,7kW (zones that can be connected) 2. Cooking zone Ø260 5,5 kW (double ring) 1 1 1 2 1
Page 5 - SAFETY
GB 7 What you should pay attention to • Induction cooking is extremely safe. Various safety devices have been incorporated in the hob such as a residual heat indicator and a cooking time limiter. There are nevertheless a number of precautions you should take. • ASKO cannot be held liable for damage ...
Page 7 - For users with heart pacemakers and active implants; Temperature safety; Setting
GB 9 • A cooking zone can remain hot for several minutes after use. Avoid touching the hot areas during this time. For users with heart pacemakers and active implants • The functioning of the hob conforms to current electromagnetic interference standards and thus is in total compliance with legal re...
Page 8 - USE; Using the touch controls; Induction cooking is fast
GB 10 USE Using the touch controls The touch controls may take some getting used to if you are used to other (rotary) controls. Place your fingertip flat on the control to achieve the best results. You do not have to apply any pressure. The touch sensors only react to the light pressure of a fingert...
Page 9 - How does induction work
GB 11 USE How does induction work A magnetic field is generated in the appliance. By placing a pan with an iron base on a cooking zone, a current is induced in the pan base. This induced current generates heat in the base of the pan. Easy The electronic controls are accurate and easy to set. On the ...
Page 10 - Pans
GB 12 • If the pan base is made from layers of different material (i.e sandwich base), it might emit a crackling sound. The fan is making noise To enlarge the lifespan of the electronics, the appliance is equiped with a fan. If you use the appliance intense, the fan is activated to cool down the app...
Page 12 - Switching on the hob and setting the power; You will hear a single beep.; Tips; Residual warmth indicator; OPERATION
GB 14 Switching on the hob and setting the power The cooking zones have 12 levels. Beside it there is a level ‘boost’. 1. Put a pan on a cooking zone. 2. Press the child lock button. You will hear a single beep. 3. Press the on/off button of the cooking zone concerned. A flashing ‘-’ appears in the ...
Page 13 - Boost; Switching on ‘boost’; Level 12 and ‘boost’ appear in the display.; Switching off ‘boost’; ‘Boost’ has been switched on, the display shows level 12 and ‘boost’.; Two cooking zones one in front of the other
GB 15 Boost You can use the ‘boost’ function to cook at the highest power level during a short period of time (max.10 minutes). After the maximum boost time the power will be reduced to setting 12. Switching on ‘boost’ 1. Put a pan on a cooking zone. 2. Press the >> button immediately after yo...
Page 14 - How to bridge the adaptive induction zones; Use a (fish) pan where at least one of the centre/middle positions of; Activating the bridge mode; Switching off; Switching off one cooking zone
GB 16 OPERATION How to bridge the adaptive induction zones The adaptive induction zones can be bridged. Both zones in the front and the back will have the same settings after activating this function (they are now connected; one big zone for a large cooking pan). • If the adaptive zones are bridged,...
Page 15 - Switching off all cooking zones; lock button will blink very slowly.; Switching the hob from the eco stand-by mode to the standy-by; A single beep will be heard. All lights on the hob are off.; Did you know that; A will hear a single beep. The eco stand-by mode is active, the red
GB 17 Switching off all cooking zones Press the child lock button to switch off all the cooking zones at the same time. You will hear a beep. The red childproof lock indicator next to the child lock button will blink very slowly. • The induction hob is now in eco stand-by mode (see also ‘eco stand-b...
Page 16 - Child lock; Switching on the child lock; Pause
GB 18 From the eco stand-by mode you can’t immediately start cooking. To be able to, the hob first needs to be switched to the stand-by mode. Did you know that After 30 minutes in the stand-by mode the hob will automatically switch to the eco stand-by mode to prevent unnecessary energy consumption. ...
Page 17 - Switching the hob to the pause mode; Recognizing a mode; The eco stand-by mode
GB 19 Switching the hob to the pause mode • Press the pause button once. You will hear a double beep, the settings change into a lower setting and the red light next to the pause button flashes. ▷ Any set timers/kitchen timers stop. All cooking zones are automatically changed to a lower setting. ▷ A...
Page 18 - Timer / Kitchen timer; The timer function; The display of the timer lights up and you’ll see three zeroes
GB 20 OPERATION Timer / Kitchen timer The timer/alarmclock button of each cooking zone has two functions: The timer function The kitchen timer function This function can be recognized by the red small arrow pointing up. This function can be recognized by the red small arrow pointing down. The time i...
Page 20 - Switching on and off the beep; The beep is now switched off for all button operations, except for
GB 22 Switching on and off the beep 1. Press the on/off button on the far left twice. 2. Press and hold the << button and the + button simultaneously until you hear a beep. The beep is now switched off for all button operations, except for the pause button and the child lock button. Note: the ...
Page 21 - Automatic cooking programs; To set an automatic program; The cooking zone is switched on.; Attention
GB 23 OPERATION Automatic cooking programs Your hob is fitted with 6 automatic cooking programs. You can set any end time of an automatic cooking program with the aid of the kitchen timer function (refer to page 21). The cooking programs are based on regular quantities. The tables are meant as a gui...
Page 23 - Simmering function; Thicker dishes have to be stirred every 15 minutes. The maximum; Function for keeping warm; ture of 70 °C - 75 °C. The setting for keeping warm works best with a
GB 25 Simmering function The temperature of the dish is constantly kept near the boiling point (90 °C - 95 °C). The simmer setting works best with a lid on the pan. Thicker dishes have to be stirred every 15 minutes. The maximum simmering time is 8 hours, unless a shorter time has been set with the ...
Page 25 - Healthy cooking; Burning point of different types of oil
GB 27 Grill function* The grill setting provides the optimal grilling temperature. A beep can be heard when the pan has reached its temperature. Dish Number of people Quantity Pan Zone Meat, fi sh, vegetables 1 - 2 100 - 200 g Grill pan / plate Ø 145 2 - 3 200 - 300 g Grill pan / plate Ø 180 3 - 4 3...
Page 26 - Cooking settings; Use setting ‘boost’ and setting 12 to:
GB 28 Cooking settings Because the settings depend on the quantity and composition of the contents of the pan, the table below is intended as a guideline only. Use setting ‘boost’ and setting 12 to: • bring the food or liquid to the boil quickly; • ‘shrink’ greens; • heat oil and fat; • bring a pres...
Page 27 - Cleaning; Tip; MAINTENANCE
GB 29 Cleaning Tip Set the child lock before you start cleaning the hob. Daily cleaning • Although food spills cannot burn into the glass, we nevertheless recommend you to clean the hob immediately after use. • Best for daily cleaning is a damp cloth with a mild cleaning agent. • Dry with kitchen pa...
Page 28 - General; If you notice a crack in the glass top (however small), switch the hob; Troubleshooting table; the points mentioned below.; Symptom; The preset time has ended.; TROUBLESHOOTING
GB 30 General If you notice a crack in the glass top (however small), switch the hob off immediately, unplug the hob, turn off the (automatic) fuse switch(es) in the meter cupboard or, in the event of a permanent connection, set the switch in the power supply lead to zero.) Contact the service depar...
Page 30 - What you need to consider; Safety instructions for the installation; INSTALLATION
GB 32 What you need to consider Safety instructions for the installation • The connection must comply with national and local regulations. • The appliance must always be earthed. • This appliance must be connected by a qualified person and comply with the local AS/NZS regulations. • For the connecti...
Page 31 - Clearance; Check that there is enough clearance.
GB 33 • Faulty parts may only be replaced by original Asko parts. Only those parts are guaranteed by Asko to meet the safety requirements. • If the connecting cable is damaged, it may only be replaced by the manufacturer, the manufacturer’s service organisation or equivalently qualified persons, in ...
Page 32 - If the hob is wider than the cupboard, with a worktop less than 46 mm
GB 34 Installation dimensions The dimensions and recesses are shown in the illustrations beneath. If the hob is wider than the cupboard, with a worktop less than 46 mm thick, saw a cut-out in both sides of the cupboard, so the appliance is detached from the cupboard. Y Y X 600 Installation dimension...
Page 33 - Ventilation
GB 35 INSTALLATION Ventilation The electronics in the appliance need cooling. The appliance will automatically switch off if there is insufficient air circulation. There are ventilation openings on the underside of the appliance. It must be possible for cool air to be drawn in through these openings...
Page 34 - Electrical connection; Connection for hob Hi1983g:
GB 36 INSTALLATION Electrical connection Common connections: • 3 phases with 1 neutral connection (3 1N, 400 V ~ / 50 Hz): ▷ The voltage between the phases and the neutral is 230 V ~. The voltage between the phases is 400 V ~. Fit a connecting bridge between connecting points 4-5. Phase 3 carries no...
Page 35 - Building in
GB 37 INSTALLATION Building in Check that the cabinet and the cut-out meet the dimension and ventilation requirement Threat the sawn ends of wooden or synthetic worktops with sealing varnish if necessary, to prevent moisture causing the worktop to swell. Lay the hob upside down on the worktop. Fit t...
Page 36 - Technical details; Hob type
GB 38 INSTALLATION Technical details This appliance complies with all relevant CE directives. Hob type Hi1683g Hi1983g Induction x x Connection 230V - 50Hz 230V - 50Hz Phases 2 3 Maximum capacity cooking zones Middle left 5,5 kW (Ø260) Front left 3,7 kW (180x220) 3,7 kW (180x220) Rear left 3,7 kW (1...
Page 37 - ENVIRONMENTAL ASPECTS; Disposal of packaging and appliance; Declaration of conformity
GB 39 ENVIRONMENTAL ASPECTS Disposal of packaging and appliance In the manufacturing of this appliance durable materials were used. Make sure to dispose of this equipment responsibly at the end of its lifecycle. Ask the authorities for more information regarding this. The appliance packaging is recy...