Page 3 - Preface
Preface Thank you for choosing our gas cooktop. To use this appliance correctly and prevent any potential risk, read these instructions before using the appliance. Keep these instructions in a place where you can find them easily.If you are unsure of any of the information contained in these instruc...
Page 4 - contents; Instructions for use and maintenance
contents Preface Instructions for use and maintenance Safety Warning Safety Instructions Installation Child and People Safety During Use Cleaning and Service 8 Environmental Information Description of the appliance How to Use the appliance Safety and Energy saving advice Cleaning and Maintenance Tec...
Page 5 - afety nstructions; Caution; Danger; The following marks are used in the Instruction Manual
afety nstructions Danger/Warning Caution Neglect of this mark may result in minor personal injury or property damage. Caution No Access No Fire Tool Must Do Danger - Do not turn on the light. - Do not switch on/off any electrical appliance and do not touch any electric plug. - Do not use a telephone...
Page 6 - nstallation; Warning
nstallation Warning accordance with regulations in force and only used in a well ventilated space. gas and electrical supply complies with the type stated on the rating plate. o not use this appliance as a space heater. must be installed in such a way that they do not touch any parts or the applianc...
Page 8 - uring se
uring se Warning Never leave the appliance unattended when cooking. Burner panel is not designed to operate from an external timer or separate remote control system. Ŷ2QO\XVHWKHDSSOLDQFHIRUSUHSDULQJ food. LQ contact with water. Do not operate this appliance with wet hands. Ŷ'RQRWXVHWKLVDSSOLDQFHLILW...
Page 11 - escription of the appliance
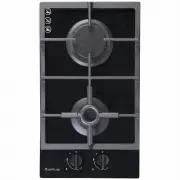
escription of the appliance Model n 520*300*90 Dimension (W*D*H) Ignition device Gas Connection Electric supply Burner Feature Continuous Ignition Type 220-240Vac, 2W Top Plate Glass 50Hz-60Hz, G1/2 thread tianless teel . h Mini Wok (1), Auxiliary (1) CAGH32B CAGH32X
Page 12 - ow to se the appliance; ccessories
A ow to se the appliance ccessories escription of the appliance Black circle: gas off Large flame: maximum setting Small flame: minimum setting Automatic ignition with flame failure safety device 1 Bracket (2 ) Sponge (2 ) Pressure regulator (1) (2 ) Pressure joint(1) Screw (2 ) Elbow (1) Instructio...
Page 15 - leaning and aintenance; DQVXSSRUW&RQWUROKDQGOHV; RSSODWH
leaning and aintenance oft cloth eutral etergent ylon rush Edible il brasive etergent Thinner en ene etal rush cidic lkali Ŷ7DNHRIIWKH3DQVXSSRUWŶ&OHDQWKHVHDQGWKHFRQWUROKDQGOHVZLWKDGDPSFORWKZDVKLQJXSOLTXLGDQGZDUP water. For stubbon soiling, soak beforehand. Ŷ'U\HYHU\WKLQJZLWKDFOHDQVRIWFORWK 3DQVX...
Page 16 - ULSOH&URZQEXUQHUVDVIROORZV
leaning and aintenance 2 1 2 3 3 4 4 5 7 6 6 7 5 .Place the flame spreader on to the burner cup so that the ignition device and the flame supervision device e tend through their respective holes in the flamespreader.The flame spreader must click into place correctly. .Position the burner lid , , ont...
Page 17 - Warnings; sing instructions
Warnings sing instructions Ŷ'RQRWPRGLI\WKLVDSSOLDQFHŶ7KLVDSSOLDQFHPXVWEHLQVWDOOHGE\DQDXWKRULVHGWHFKQLFLDQRU LQVWDOOHU Ŷ3ULRUWRLQVWDOODWLRQHQVXUHWKDWWKHORFDOGLVWULEXWLRQFRQGLWLRQV QDWXUHRIWKHJDVDQGJDVSUHVVXUHDQGWKHDGMXVWPHQWRIWKH DSSOLDQFHDUHFRPSDWLEOH Ŷ7KHDGMXVWPHQWFRQGLWLRQVIRUWKLVDSSOLDQFHDUHVWDWH...
Page 18 - ositioning; This a
P ositioning The edges of the hob must be a minimum distance of mm from side walls and mm from rear wall. 700 mm between the highest point of the hob surface (including the burners) and the underside of any horizontal surface directly above it. mm between the hob surfaces, providing that the undersi...
Page 19 - nstalling the appliance; S onge
I nstalling the appliance S onge Bottom view The thickness of the sponge is The width of the sponge is of the screws.There are one set of screw holes in each corner of the hob (H) . Slightly tighten a screw (C) through the bracket (B) so that the bracket is attached to the hob, but so that you can s...
Page 20 - as onnection
as onnection K eep away from inflammable materials around appliance. Before work, put on gloves. CAUTION Cool off the appliance for a while right after using appliance for your safety because you can get burners by high temperature from the appliances. c Turn off power for safety and appliance prote...
Page 23 - as pecification
as pecification 11.8MJ/h 4.3MJ/h 0.97 / / 0.58 1.60 / / 0.93 Universal LP Gas 2.75kPa 1 1
Page 24 - lectrical onnection
E lectrical onnection - Green/yellow = Earth - Blue = Neutral - Brown = Live This appliance is designed to be connected to a electricity supply. Ŷ 7KHZLUHZKLFKLVFRORXUHGJUHHQDQG\HOORZPXVWEHFRQQHFWHG WRWKHWHUPLQDOZKLFKLVPDUNHGZLWKWKHOHWWHU(RUE\WKHHDUWK V\PERO ʄ:,5 When the power cord is damaged it mu...
Page 25 - d ustment of minimum le el of the flame.
as adjustment 1 2 Injector Control handle TapSealing ring Remove the pan support, Burner lid and Flame spreader. Unscrew the injector using a 7mm box spanner and replace it with the stipulated injector for new gas supply. Carefully reassemble the all components. After injectors are replaced, it is a...
Page 26 - rouble shooting
T rouble shooting ot ignited o park. heck the electricity supply. adly ignited The gas supply is closed. The ignition plug is contaminated with alien substance. oise made when combusted and ignited lame goes out when in use. ellow lame ifferent gas is used. heck the gas used. nstable lame as mell ip...
Page 27 - Warranty Card
Warranty Card Worldwide Appliances Pty Limited A.B.N. 45868077422O ffi ce: 48-50 Moore Street, Leichhardt N.S.W 2040 Post:Locked Bag 3000, Annandale, N.S.W 2038 P: 1300 694 583WARRANTY REGISTRATION Your ongoing satisfaction with your artusi product is important to us. We ask that you complete the en...
Page 28 - continued
4 Please complete and send to ARTUSI at: REPLY PAID 83617 LEICHHARDT NSW 2040 Last Name: First Name: Address: State: Postcode: Email: Home Phone: Mobile: Purchase Date: / / (Please attach proof of purchase to validate warranty) MODEL NUMBER SERIAL NUMBER (if you cannot locate the serial number pleas...