AEG 10698 - User Manual
AEG 10698 – User Manual, read for free online in PDF format. We hope this helps you resolve any issues you may have. If you have further questions, please contact us through the contact form.


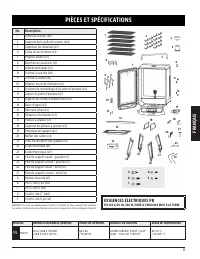
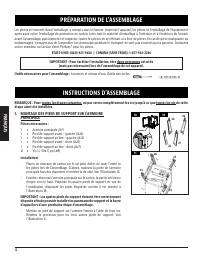
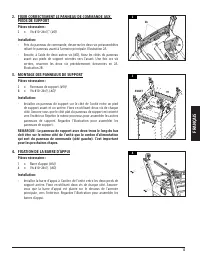
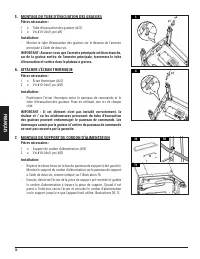
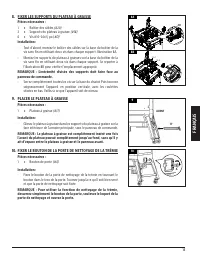
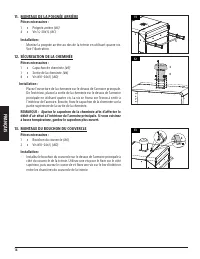
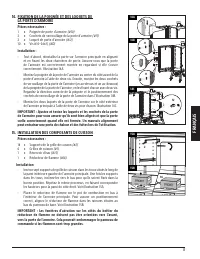
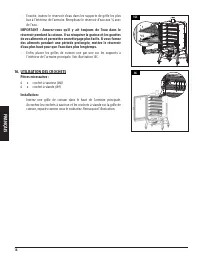
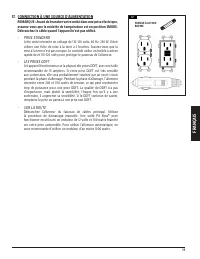
Table of Contents:
- Page 2 – ENGLISH; TABLE OF CONTENTS; COPYRIGHT NOTICE; Dansons; Customer Care
- Page 3 – PB; PB – ELECTRIC REQUIREMENTS
- Page 4 – ASSEMBLY INSTRUCTIONS; MOUNTING THE SUPPORT LEGS TO MAIN CABINET; IMPORTANT: The four support legs must be arranged correctly to be; ASSEMBLY PREPARATION; Tools required for assembly:
- Page 5 – SECURING THE CONTROL BOARD TO SUPPORT LEGS; NOTE: The support panel with two holes along the bottom should; SECURING THE SUPPORT BAR; IMPORTANT: Ensure there is a good seal to the main cabinet, as grease
- Page 6 – ATTACHING THE HEAT SHIELD; from the grease exhaust tube may cause damage to the control board.; MOUNTING THE POWER CORD BRACKET; NOTE: The diveted end of the brackets should face the control board.
- Page 7 – PLACING THE GREASE TRAY
- Page 8 – INSTALLING THE COOKING COMPONENTS; IMPORTANT: Fine tune and test the cabinet door latches and hooks to
- Page 9 – CONNECTING TO A POWER SOURCE; STANDARD OUTLET
- Page 10 – FRANÇAIS; TABLE DES MATIÈRES; AVIS SUR LES DROITS D’AUTEUR; Service client
- Page 11 – PIÈCES ET SPÉCIFICATIONS; EXIGENCES ÉLECTRIQUES PB
- Page 12 – PRÉPARATION DE L’ASSEMBLAGE; Outils nécessaires pour l’assemblage :; INSTRUCTIONS D’ASSEMBLAGE; étape aient été installées.; MONTAGE DES PIEDS DE SUPPORT SUR L'ARMOIRE; IMPORTANT : Les quatre pieds de support doivent être correctement
- Page 13 – FIXER CORRECTEMENT LE PANNEAU DE COMMANDE AUX; REMARQUE : Le panneau de support avec deux trous le long du bas
- Page 14 – MONTAGE DU TUBE D'ÉVACUATION DES GRAISSES
- Page 15 – FIXER LES SUPPORTS DU PLATEAU À GRAISSE
- Page 16 – MONTAGE DE LA POIGNÉE ARRIÈRE; SÉCURISATION DE LA CHEMINÉE; REMARQUE : Ajustez le capuchon de la cheminée afin d'affecter le; MONTAGE DU BOUCHON DU COUVERCLE; Installation
- Page 17 – FIXATION DE LA POIGNÉE ET DES LOQUETS DE; scelle correctement quand elle est fermée. Un mauvais alignement; INSTALLATION DES COMPOSANTS DE CUISSON; IMPORTANT : Les fenêtres d'aération sur les côtés du boîtier du
- Page 18 – des aliments pendant une période prolongée, mettez le réservoir; UTILISATION DES CROCHETS
- Page 19 – CONNECTION À UNE SOURCE D'ALIMENTATION; REMARQUE : Avant de brancher votre unité dans une prise électrique,; PRISE STANDARD
- Page 20 – NE RETOURNEZ PAS LE PRODUIT AU MAGASIN; IMPORTANT; DO NOT RETURN PRODUCT TO STORE
5005166
MODEL / MODÈLE : PBV7P1
PART / PIÈCE : 10698, 10843
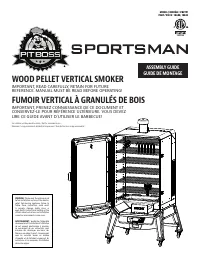
WOOD PELLET VERTICAL SMOKER
IMPORTANT, READ CAREFULLY, RETAIN FOR FUTURE
REFERENCE. MANUAL MUST BE READ BEFORE OPERATING!
FUMOIR VERTICAL À GRANULÉS DE BOIS
IMPORTANT, PRENEZ CONNAISSANCE DE CE DOCUMENT ET
CONSERVEZ-LE POUR RÉFÉRENCE ULTÉRIEURE. VOUS DEVEZ
LIRE CE GUIDE AVANT D’UTILISER LE BARBECUE!
For outdoor and household use only. Not for commercial use.
Réservé à l'usage extérieur et résidentiel uniquement. Non destiné à un usage commercial.
WARNING:
Please read the entire manual
before installation and use of this electric,
pellet fuel-burning appliance. Failure to
follow these instructions could result
in property damage, bodily injury or
even death. Contact local building or fire
officials about restrictions and installation
inspection requirements in your area.
AVERTISSEMENT :
Veuillez lire l’intégralité
du manuel avant l’installation et l’utilisation
de cet appareil électronique à granules.
Le non-respect de ces instructions peut
entraîner des dommages aux biens, des
blessures ou même la mort. Communiquez
avec les autorités locales en matière
d’incendie et de bâtiment concernant les
restrictions et les exigences d’installation
dans votre région.
ASSEMBLY GUIDE
GUIDE DE MONTAGE
"Loading the manual" means you need to wait until the file loads and becomes available for online reading. Some manuals are very large, and the time they take to appear depends on your internet speed.
Other Manuals for AEG 10698
Summary
ENGLISH 2 TABLE OF CONTENTS Parts & Specs ...................................................................... 3Assembly Preparation ...................................................... 4Assembly Instructions Mounting The Support Legs To Main Cabinet ....................... 4 Securing The Co...
ENGLISH 3 PARTS & SPECS MODEL UNIT ASSEMBLCD (WXHXD) UNIT WEIGHT COOKING AREA TEMPERATURE RANGE PB PBV7P1 734 X 1,468 X 709 MM / 28.8 X 57.8 X 27.9 IN 64.3 KG / 141.09 LB CUBIC COOKING: 0.16 M³ / 5.6 FT³ TOTAL - 11,715 CM² / 1,815 SQ. IN. 65-215°C / 150-420°F Part# Description 1 Cooking Grids (x...
ENGLISH 4 ASSEMBLY INSTRUCTIONS IMPORTANT: It is advised to read each step entirely before starting assembly on instructions. Do not tighten screws completely until all screws for that step have been installed, or unless otherwise mentioned. 1. MOUNTING THE SUPPORT LEGS TO MAIN CABINET Parts Require...