Page 3 - iii; Information for Your Safety and; Turning the product off before cleaning
iii Information for Your Safety and Comfort Read these instructions carefully. Keep this document for future reference. Follow all warnings and instructions marked on the product. Turning the product off before cleaning Unplug this product from the wall outlet before cleaning. Do not use liquid clea...
Page 4 - iv; Using electrical power
iv • To avoid damage of internal components and to prevent battery leakage, do not place the product on a vibrating surface. • Never use it under sporting, exercising, or any vibrating environment which will probably cause unexpected short current or damage rotor devices or lamp. Using electrical po...
Page 7 - vii; Caution for Listening; Disposal instructions
vii Caution for Listening To protect your hearing, follow these instructions. • Increase the volume gradually until you can hear clearly and comfortably. • Do not increase the volume level after your ears have adjusted. • Do not listen to music at high volumes for extended periods. • Do not increase...
Page 8 - viii; First Thing First; Usage Notes; Precautions
viii First Thing First Usage Notes Do : • Turn off the product before cleaning. • Use a soft cloth moistened with mild detergent to clean the display housing. • Disconnect the power plug from AC outlet if the product is not being used for a long period of time. Don't : • Block the slots and openings...
Page 9 - Contents
Information for Your Safety and Comfort iii First Thing First viii Usage Notes viii Precautions viii Introduction 1 Product Features 1 Package Overview 2 Projector Overview 3 Projector Outlook 3 Control Panel 4 Remote Control Layout 5 Getting Started 7 Connecting the Projector 7 Turning the Projecto...
Page 10 - Appendices; Troubleshooting; Regulations and safety notices
Appendices 31 Troubleshooting 31 LED & Alarm Definition Listing 35 Ceiling Mount Installation 36 Specifications 39 Compatibility Modes 42 Regulations and safety notices 46
Page 11 - Introduction; Product Features
1 Eng lis h Introduction Product Features This product is a single-chip DLP ® projector, including the following outstanding features: • DLP ® technology • Enables projecting 3D content via DLP Link Technology: Blu-Ray 3D supported • One-touch "3D" button on remote control allows quick and e...
Page 12 - English; Package Overview
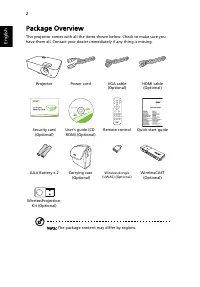
2 English Package Overview This projector comes with all the items shown below. Check to make sure you have them all. Contact your dealer immediately if any thing is missing. Note: The package content may differ by regions. Projector Power cord VGA cable (Optional) HDMI cable (Optional) Security car...
Page 13 - Projector Overview; Projector Outlook; Rear side
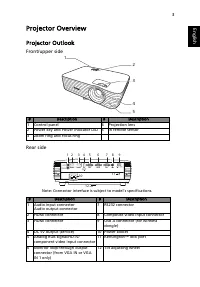
3 Eng lis h Projector Overview Projector Outlook Front/upper side Rear side # Description # Description 1 Control panel 4 Projection lens 2 Power key and Power indicator LED 5 IR remote sensor 3 Zoom ring and Focus ring # Description # Description 1 Audio input connectorAudio output connector 7 RS23...
Page 14 - Control Panel
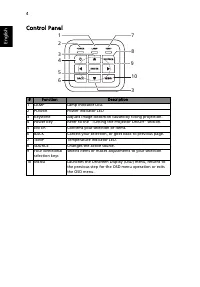
4 English Control Panel # Function Description 1 LAMP Lamp indicator LED. 2 POWER Power indicator LED 3 Keystone Adjusts image distortion caused by tilting projection. 4 Power key Refer to the "Turning the Projector On/Off" section. 5 ENTER Confirms your selection of items. 6 BACK Cancels yo...
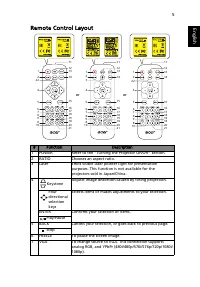
Page 15 - Remote Control Layout
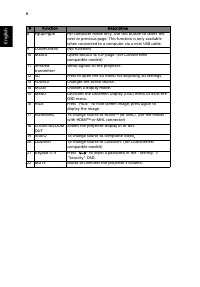
5 Eng lis h Remote Control Layout # Function Description 1 POWER Refer to the "Turning the Projector On/Off" section. 2 RATIO Chooses an aspect ratio. 3 Laser Emits visible laser pointer light for presentation purposes. This function is not available for the projectors sold in Japan/China. 4...
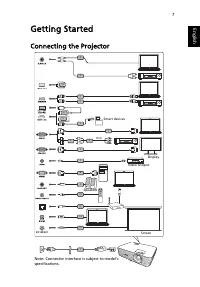
Page 17 - Getting Started; Connecting the Projector
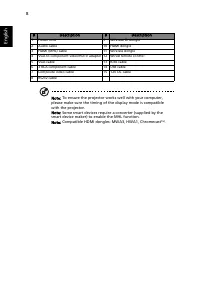
7 Eng lis h Getting Started Connecting the Projector 1 R L HDTV adapter RCA 4 6 2 2 9 3 3 3 10 12 13 5 5 8 7 2 15 14 11 Video Output Display Speakers Smart devices Note: Connector interface is subject to model's specifications. Screen
Page 19 - Turning the Projector On/Off; Turning On the Projector
9 Eng lis h Turning the Projector On/Off Turning On the Projector 1 Ensure that the power cord and signal cable are securely connected. The Power LED will light red. 2 Turn on the projector by pressing (POWER) on the control panel or remote control, and the Power indicator LED will turn blue. 3 Turn...
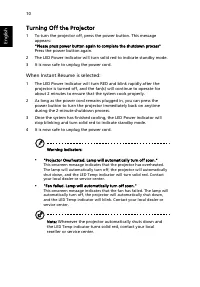
Page 20 - Turning Off the Projector; When Instant Resume is selected:
10 English Turning Off the Projector 1 To turn the projector off, press the power button. This message appears: "Please press power button again to complete the shutdown process" Press the power button again. 2 The LED Power indicator will turn solid red to indicate standby mode. 3 It is now...
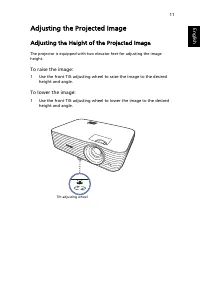
Page 21 - Adjusting the Projected Image; Adjusting the Height of the Projected Image
11 Eng lis h Adjusting the Projected Image Adjusting the Height of the Projected Image The projector is equipped with two elevator feet for adjusting the image height. To raise the image: 1 Use the front Tilt adjusting wheel to raise the image to the desired height and angle. To lower the image: 1 U...
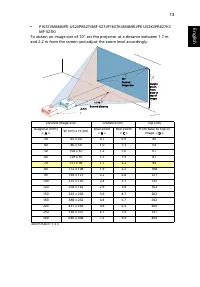
Page 22 - How to Get a Preferred Image Size by Adjusting
12 English How to Get a Preferred Image Size by Adjusting Distance and Zoom The table below shows how to achieve a desired image size by adjusting either the position or the zoom ring. • P1557i/M459i/PE-F52i/N349i/AF630i/PR527i/MF-427i/H6555BDi/E357Di/HE-807i/GM527i/H6542BDi+/VH-427i/H6543BDi/H6543Z...
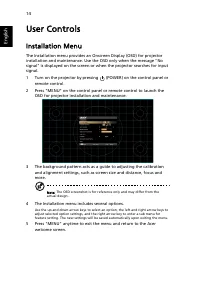
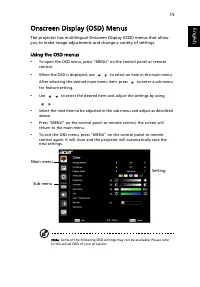
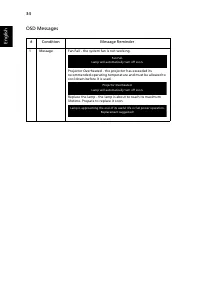
Page 24 - User Controls; Installation Menu
14 English User Controls Installation Menu The Installation menu provides an Onscreen Display (OSD) for projector installation and maintenance. Use the OSD only when the message "No signal" is displayed on the screen or when the projector searches for input signal. 1 Turn on the projector by...
Page 26 - Color
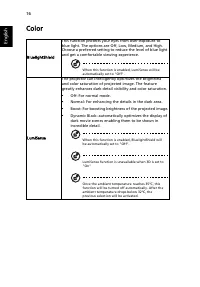
16 English Color BluelightShield This function protects your eyes from over-exposure to blue light. The options are Off, Low, Medium, and High. Choose a preferred setting to reduce the level of blue light and get a comfortable viewing experience. When this function is enabled, LumiSense will be auto...
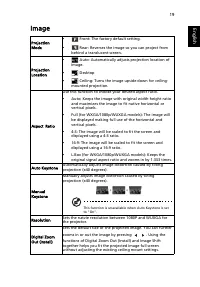
Page 29 - Image
19 Eng lis h Image Projection Mode • Front: The factory default setting. • Rear: Reverses the image so you can project from behind a translucent screen. Projection Location • Auto: Automatically adjusts projection location of image. • Desktop • Ceiling: Turns the image upside down for ceiling- mount...
Page 31 - Setting
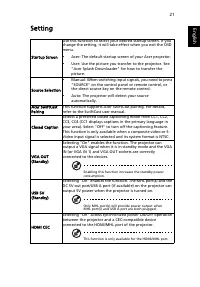
21 Eng lis h Setting Startup Screen Use this function to select your desired startup screen. If you change the setting, it will take effect when you exit the OSD menu. • Acer: The default startup screen of your Acer projector. • User: Use the picture you transfer to the projector. See "Acer Spla...
Page 34 - Management
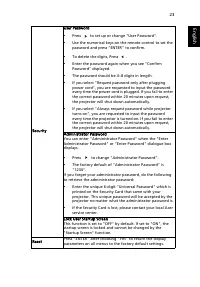
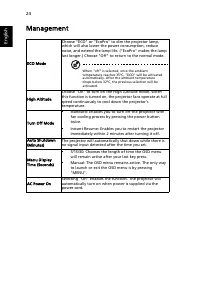
24 English Management ECO Mode Choose "ECO" or "EcoPro" to dim the projector lamp, which will also lower the power consumption, reduce noise, and extend the lamp life. ("EcoPro" makes the lamp last longer.) Choose "Off" to return to the normal mode. When "off"...
Page 35 - Audio
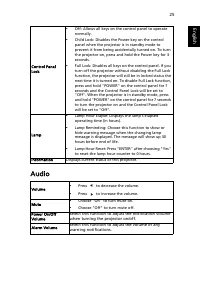
25 Eng lis h Audio Control Panel Lock • Off: Allows all keys on the control panel to operate normally. • Child Lock: Disables the Power key on the control panel when the projector is in standby mode to prevent it from being accidentally turned on. To turn the projector on, press and hold the Power k...
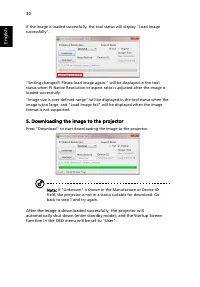
Page 38 - Acer Splash Downloader; System Requirements; Using the Acer Splash Downloader; Entering download mode
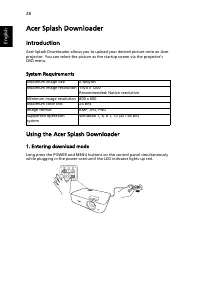
28 English Acer Splash Downloader Introduction Acer Splash Downloader allows you to upload your desired picture onto an Acer projector. You can select the picture as the startup screen via the projector’s OSD menu. System Requirements Using the Acer Splash Downloader 1. Entering download mode Long p...
Page 39 - Executing the Acer Splash Downloader tool on the computer
29 Eng lis h 2. Connecting the computer to the projector Use an USB cable to connect the computer and the projector. 3. Executing the Acer Splash Downloader tool on the computer If the projector is not properly connecting to the computer, below message will be displayed. If the projector successfull...
Page 41 - Image Problems and Solutions
31 Eng lis h Appendices Troubleshooting If you experience a problem with your Acer projector, refer to the following troubleshooting guide. If the problem persists, please contact your local reseller or service center. Image Problems and Solutions # Problem Solution 1 No image appears onscreen • Mak...
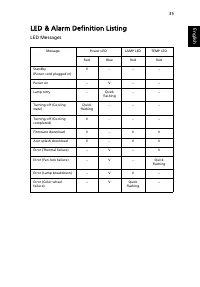
Page 45 - LED & Alarm Definition Listing; LED Messages
35 Eng lis h LED & Alarm Definition Listing LED Messages Message Power LED LAMP LED TEMP LED Red Blue Red Red Standby(Power cord plugged in) V -- -- -- Power on -- V -- -- Lamp retry -- Quick flashing -- -- Turning off (Cooling state) Quick flashing -- -- -- Turning off (Cooling completed) V -- ...
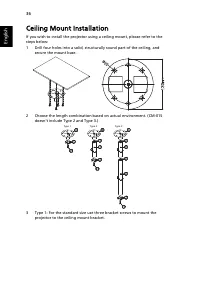
Page 46 - Ceiling Mount Installation
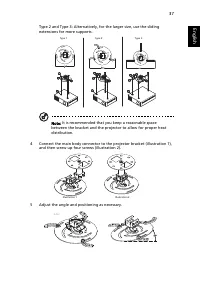
36 English Ceiling Mount Installation If you wish to install the projector using a ceiling mount, please refer to the steps below:1 Drill four holes into a solid, structurally sound part of the ceiling, and secure the mount base. 2 Choose the length combination based on actual environment. (CM-01S d...
Page 49 - Specifications
39 Eng lis h Specifications The specifications below are subject to change without notice. For final specs, please refer to Acer's marketing documentation. Projection system DLP ™ Computer compatibility Refer to the "Compatibility Modes" section for more information. Video compatibility NTSC...
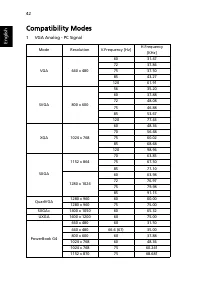
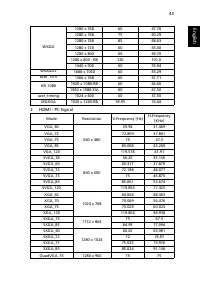
Page 52 - Compatibility Modes; VGA Analog - PC Signal
42 English Compatibility Modes 1 VGA Analog - PC Signal Mode Resolution V.Frequency [Hz] H.Frequency [KHz] VGA 640 x 480 60 31.47 72 37.86 75 37.50 85 43.27 120 61.91 SVGA 800 x 600 56 35.20 60 37.88 72 48.08 75 46.88 85 53.67 120 77.43 XGA 1024 x 768 60 48.36 70 56.48 75 60.02 85 68.68 120 98.96 SX...
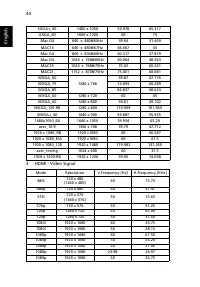
Page 55 - YPbPr Signal
45 Eng lis h 4 YPbPr Signal 5 Video, S-Video Signal Mode Resolution V.Frequency [Hz] H.Frequency [KHz] 480i 720 x 480 59.94 15.73 480p 720 x 480 59.94 31.47 576i 720 x 576 50.00 15.63 576p 720 x 576 50.00 31.25 720p 1280 x 720 60.00 45.00 720p 1280 x 720 50.00 37.50 1080i 1920 x 1080 60.00 33.75 108...
Page 57 - Remarque à l'intention des utilisateurs canadiens
47 Eng lish Eng lis h Remarque à l'intention des utilisateurs canadiens Cet appareil numérique de la classe B est conforme a la norme NMB-003 du Canada.Compliant with Russian/Ukraine/Belarus/Morocco regulatory certification Radio device regulatory notice Note: The regulatory information below is for...
Page 58 - EU Declaration of Conformity
48 English EU Declaration of Conformity We, Acer Incorporated 8F, 88, Sec. 1, Xintai 5th Rd., Xizhi, New Taipei City 221, Taiwan And, Acer Italy s.r.l Viale delle Industrie 1/A, 20020 Arese (MI), ItalyTel: +39-02-939-921, Fax: +39-02-9399-2913www.acer.it Product: DLP Projector Trade Name: Acer Model...


 Acer 3Y, On-site, 4h, 24x7, ARxxx User Manual
 Acer 7 Manual
 Acer 65PE Manual
 Acer 200 Manual
 Acer 273X User Manual
 Acer 300P Manual
 Acer 365 Manual
 Acer 370 series Manual
 Acer 500GB User Manual
 Acer 501 Manual
 Acer 505 Manual