Page 4 - TABLE OF CONTENTS
IMPORTANT SAFETY INSTRUCTIONS 1 ISLAND RANGE HOOD INSTALLATION 4 DESIGNER ISLAND RANGE HOOD INSTALLATION 8 ISLAND CROWNSOUND ® INSTALLATION 12 REMOTE BLOWER INSTALLATION 14 BUTTON/CONTROL PANEL OPERATION 16 HOW TO CHANGE PARTS 17 TROUBLESHOOTING AND FAQ 28 WARRANTY 35 TABLE OF CONTENTS
Page 5 - TO REDUCE THE RISK OF FIRE, ELECTRIC SHOCK, OR INJURY TO PERSONS:; SAFETY INSTRUCTIONS
11 Gener al Safet y WARNING This is the safety alert symbol. This symbol alerts you to potential hazards that can hurt you and others. All safety messages will follow the safety alert symbol. READ ALL INSTRUCTIONS BEFORE INSTALLING AND OPERATING THIS APPLIANCE. • The installation instructions in thi...
Page 6 - • Ducted range hoods MUST ALWAYS be vented to the outdoors or in some
22 Gener al Safet y • Ducted range hoods MUST ALWAYS be vented to the outdoors or in some instances converted to recirculate the air. All our range hoods come with a transition piece with a built-in damper. Some existing installations may already have an external damper. Please consult an HVAC or in...
Page 7 - and meet industry standards and regulations.
33 Gener al Safet y • All ZLINE range hoods are ETL listed, ensuring all parts were tested for safety and meet industry standards and regulations. NOTE: This ensures all included metal ducting pieces were tested for safety and are flame retardant. • Always turn the range hood ON when cooking at high...
Page 8 - Installation Tutorial Video; ISLAND HOOD INSTALLATION
4 30”-36” 36” Height 26” - max 3 9” Installation Tutorial Video 4 Island Hood Installation ISLAND HOOD INSTALLATION
Page 9 - Island Hood Installation
5 Please unpack your range hood when it is delivered and inspect to ensure all parts are included.1. Main Hood with All Lights and Button Banks Pre-Installed 2. Chimney3. Transition Piece (for 6” or 8”)4. Baffle Filters 5. Packet of Screws and Anchors6. Top Mounting Bracket7. Grease Cup Screw: F Scr...
Page 10 - Attach the transition piece and ducting to top of the hood.
66 Island Hood Installation The recommended height to install your hood is 30˝ minimum and 36˝ maximum above the cooktop. For Outdoor (304 Series) hood installation, the unit must be installed at a minimum of 36˝ and a maximum of 42” above the grill. 1. Locate the center above the stove where the ho...
Page 12 - DESIGNER ISLAND HOOD INSTALLATION
8 30”-36” 36” Height Max 36” Installation Tutorial Video 8 Designer Island Hood Installation DESIGNER ISLAND HOOD INSTALLATION
Page 13 - Designer Hood Installation
9 Please unpack your range hood when it is delivered and inspect to ensure all parts are included. 1. Main Hood with All Lights and Button Banks Pre-Installed 2. Chimney3. Transition Piece (for 6” or 8”)4. Baffle Filters 5. Packet of Screws and Anchors6. Crown Molding Bracket7. Crown Molding8. Greas...
Page 14 - Designer Island Hood Installation
10 The recommended height to install your hood is 30˝ minimum and 36˝ maximum above the cooktop. For Outdoor (304 Series) hood installation, the unit must be installed at a minimum of 36˝ and a maximum of 42” above the grill. 1. Locate the center above the stove where the hood is to be installed. En...
Page 15 - Figure 4
11 6. Slide chimney pieces over the angle iron on the hood. Pull the electrical plug to the top of the chimney sections. Figure 4 7. Lift the hood to attach the angle iron to the ceiling bracket. Use screws provided to attach. 8. Make your electrical and ducting connections. Use solid ducting made o...
Page 16 - ELECTRIC POWER RATING; ISLAND CROWNSOUND
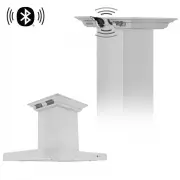
12 12 Island Cr ownSound ® d Installation ELECTRIC POWER RATING Frequency: 110V/50 HzPower: 10W 1. Attach crown molding bracket to ceiling using hardware provided. Figure 1 2. Attach ducting and electrical connections. Plug the speakers into an outlet behind the chimney. When the connection is succe...
Page 17 - Figure 3
13 13 Island Cr ownSound ® Installation 3. Extend the chimney up to the transformer. Slide the crown molding onto the crown bracket and secure into place. The crown should cover the gap. Ensure that it installs properly and is level. Figure 3 4. Open the phone’s Bluetooth settings and find “ZLINE Au...
Page 18 - Remote Blower Installation; The remote blower must be kept inside; REMOTE BLOWER INSTALLATION
14 14 Remote Blower Installation When installing your new remote blower type range hood, if so optioned, use the following instructions. Make certain to connect the electrical cord to the hood and plug the blower motor in to test the unit. 1. Run duct work into the area that you will install the rem...
Page 20 - Button functions; Adjusting the timer function:; Adjusting the timer function:; ation; OPERATION
16 Button functions Button Control Panel Operational Manual ! ! ! Power Power-Off Delay Low Speed Medium 1 Speed Light High SpeedMedium 2 Speed Blower Speed Indicator Power: Turn ON/OFF the range hood and activate power-off delay timer. Light: Turn ON/OFF (Some models will have bright, dim, and OFF ...
Page 21 - Changing th; CHANGING PARTS
17 17 HOW TO CHANGE OUT THE BUTTON PANEL 1. Remove baffle/aluminum filters. 2. Locate back of button panel. 3. Remove screws from each side of the button panel. 4. Disconnect button panel from cord connecting to circuit board. NOTE: Never work on or clean the range hood while power is ON. Always unp...
Page 23 - Replacing Light Bulbs; REPLACING THE LIGHT BULBS IN YOUR RANGE HOOD
19 19 Replacing Light Bulbs REPLACING THE LIGHT BULBS IN YOUR RANGE HOOD 1. Remove baffles. 2. Squeeze the old LED light casting out until it falls out of the socket.3. Disconnect the plug wires from the light wire.4. Reconnect the LED plug into the light wire.5. Press light assembly into the socket...
Page 24 - Changing Baffle Filter; PROFESSIONAL SERIES BAFFLE FILTER CHANGE; Edges on the baffle filters and baffle channels may be
20 20 Changing Baffle Filter s PROFESSIONAL SERIES BAFFLE FILTER CHANGE Covering Models 696, 697, and KECOM. Professional series hoods are equipped with 2 removable dishwasher safe baffle channels that the baffle filters rest in. To install the channels, place inside the hood, right under the front ...
Page 25 - BAFFLE FILTER; Release
21 21 Changing Baffle Filter s BAFFLE FILTER If your range hood has baffle filters with a knob, to remove the filter from the hood, pull back towards the wall and then tilt the knob side of the baffle filter downward. Release CHANGING PARTS
Page 27 - Replacing Char
23 23 REPLACE OR CHANGE CHARCOAL FILTERS: It is recommended to direct vent the hood whenever possible. If your situation does not allow for a direct vent install, carbon filters are available to recirculate the air through your hood. Filter Support Screws 1. Remove the stainless steel or aluminum fi...
Page 28 - the unit or switch the electrical breaker to the off position.; Slide into place
24 24 Changing th e Grease Cup HOW TO CLEAN, INSTALL, OR REPLACE THE GREASE CUP: A removable grease cup is provided to catch any excess grease at the bottom of the motor. Remove it every 2 to 3 months, wash it, then re-install it. NOTE: Never work on or clean the range hood while power is ON. Always...
Page 29 - REPLACE OR CHANGE TRANSFORMER:
25 25 Changing th e T ransformer REPLACE OR CHANGE TRANSFORMER: 1. Remove the screws from the transformer.2. Remove the two connections to the lights.3. Remove the two wired connections from the circuit board (you must remove the circuit board cover). 4. Install the new connections from your new tra...
Page 30 - SINGLE MOTOR ELECTRICAL DIAGRAM; Single Motor Electrical Diagr
26 SINGLE MOTOR ELECTRICAL DIAGRAM ground ground 26 Single Motor Electrical Diagr am CHANGING PARTS
Page 31 - Double Motor Electrical Diagr
27 DUAL MOTOR ELECTRICAL DIAGRAM ground ground ground 27 Double Motor Electrical Diagr am CHANGING PARTS
Page 32 - The height of your range hood should be between 30 ̋ to 36 ̋ above your; TROUBLESHOOTING
28 28 Troublesh ooting Where are ZLINE products manufactured? All ZLINE products are manufactured in ZLINE facilities overseas, including: Germany, Italy, and China. Are ZLINE range hoods considered type 1 or type 2? Type 1 - Range hoods that are used with appliances that produce grease and smoke. A...
Page 33 - How loud is the range hood?
29 29 Tr oublesh ooting How loud is the range hood? A sone is measure of loudness, the higher the sone rating, the louder the sound of the hood. The sound of one sone is comparable to that of a quiet refrigerator. Keep in mind that other factors such as the size of the blowers can affect the loudnes...
Page 34 - What type of motor is in the range hoods?
30 30 Troublesh ooting What type of motor is in the range hoods? Our hoods have a squirrel cage motor. Is the width of my range hoods description, the actual size? No, the actual size of the range hood will be slightly less than the generic description of the range hood. For instance: a 30˝ range ho...
Page 35 - My hood is operating, but the air is moving slower than normal.
31 31 Tr oublesh ooting My hood is operating, but the air is moving slower than normal. Check the filter for buildup and clean or replace it if needed. If the difficulty still persists, check for obstructions in the ductwork. A common obstruction is buildup in the roof or wall cap, such as: bird nes...
Page 36 - My range hood will not operate.
32 32 Troublesh ooting My range hood will not operate. 1. Check that there is power to the range hood. The most common issue is that the circuit breaker is off or the fuse has blown. 2. Make sure the speed has been selected at the range hood controls.3. Turn off the power to the range hood and check...
Page 37 - My range hood is not pulling.
33 33 Tr oublesh ooting My range hood is not pulling. • Was the unit plugged in and was the fan checked before installation?• What distance is the hood mounted above the cook top? • Indoor (30”-36”), outdoor (36”-42”) • Is the range hood width the correct size for the cook top?• Outdoor units should...
Page 38 - Noisy Motor
34 34 Troublesh ooting Noisy Motor • Were the fan speeds checked fan speeds prior to installation?• Is the ducting clear?• Check to make sure motor is attached to housing• Is the backdraft damper on the transition piece functioning properly? Does it open when the hood is engaged? • If it is stuck, i...
Page 39 - WARRANTY; COVERAGE
WARRANTY COVERAGE ZLINE Kitchen and Bath range hood parts will be warrantied for three years from the original purchase date for the original purchaser of the product. ZLINE will provide free-of-charge, non-consumable replacement parts for the components that failed due to manufacturing defects. Add...