XPOWER AP-1500D - User Manual
XPOWER AP-1500D Air Purifier – User Manual, read for free online in PDF format. We hope this helps you resolve any issues you may have. If you have further questions, please contact us through the contact form.


Table of Contents:
- Page 2 – Safety Instructions
- Page 3 – Parts Description; Machine
- Page 6 – Installation and Operation Guide; Zero Setting
- Page 7 – Installing the Handle
- Page 11 – Transportation; User Maintenance Instructions
- Page 12 – REAR VIEW
- Page 14 – Filter storage
- Page 15 – Troubleshooting Guide; Maintenance
- Page 16 – Technical Specification; Machine Specification
- Page 17 – Filter Specification
- Page 19 – label or the packaging.
- Page 20 – Read and save these instructions
Air Scrubber Owner's Manual
Model:
AP-1500D Series, AP-1800D Series, AP-2500D Series
(115V~, 60Hz)
Read and save these instructions
Index: NA-1-A40
Edition: 1.3.Final
www.xpower.com | 1-(855)-855-8868 | [email protected]
"Loading the manual" means you need to wait until the file loads and becomes available for online reading. Some manuals are very large, and the time they take to appear depends on your internet speed.
Summary
English - 2 Safety Instructions WARNING - READ AND SAVE THIS INSTRUCTIONS BEFORE USING THIS PRODUCT. The user of electrical products may create hazards that include, but are not limited to injury, fire, electrical shock. Failure to follow these instructions may damage and/or impair its operation and...
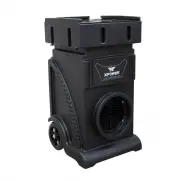
English - 3 12 7 8 9 10 11 12 13 16 17 18 19 20 21 22 6 23 24 25 26 29 30 31 32 33 34 35 4 5 3 27 28 14 15 Parts Description Machine
English - 6 Installation and Operation Guide Remove Filter Package (If Any) Zero Setting Pressure Gauge 0 10 0 200 300 40 0 50 0 0 Remove the packages of the filter before the first useage. • The accuracy of the pressure gauge might be affected by transportation. • Before the first usage, you should...