Page 2 - Table of Contents; PAGE
2 Table of Contents PAGE Important Safety Precautions 3 - 6 Technical Information 7 Control Panel / Dishwasher Parts 8 Installation Instructions 9 - 12 Using the dishwasher 13 - 16 Loading the dishwasher 16 - 17 Starting a Program 18 - 21 Maintenance and Cleaning 22 Caring for the dishwasher 23 Trou...
Page 3 - Important Safety Precautions; READ ALL INSTRUCTIONS BEFORE USING THE APPLIANCE; Do not tamper with controls.
3 Important Safety Precautions READ ALL INSTRUCTIONS BEFORE USING THE APPLIANCE For your safety, the information in this manual must be followed to minimize the risk of fire, explosion, electric shock, and to prevent property damage, personal injury, or death. PROPER INSTALLATION AND MAINTENANCE Thi...
Page 5 - Make sure the power plug is clean before usage.
5 Important Safety Precautions READ ALL INSTRUCTIONS BEFORE USING THE APPLIANCE EXTENSION CORD Because of potential safety hazards, it is strongly recommended that you do not use an extension cord with this ap-pliance. However, if you must use an extension cord, it is absolutely necessary that it be...
Page 6 - Keep the power cord away from heated surfaces.
6 Important Safety Precautions READ ALL INSTRUCTIONS BEFORE USING THE APPLIANCE OTHER GENERAL SAFETY PRECAUTIONS READ AND SAVE THESE INSTRUCTIONS Keep the power cord away from heated surfaces. Transport the appliance in an upright position only. Close the appliance door when not in use. Plac...
Page 7 - Technical Information; TECHNICAL DAT A; H x
7 Technical Information TECHNICAL DAT A MODEL: CDW-6831WES Voltage 120V / 60Hz Water Pressure 0.04—1.0MPa Hot water connection Max 140 °F Total Amps 5.7A Heater 5.0A Phase Single Cycles 6 standard programs Net Weight 44 lbs Gro ss Weight 53 lbs Unit Dimensions 17.25” H x 19.75” D X 21.75” W (32” whe...
Page 8 - program
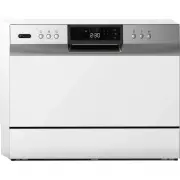
8 Control Panel Dishwasher Parts 1 Cup Shelf 3 Detergent Dispenser 5 Filter Assembly 7 Silverware Basket 9 Rinse Aid Dispenser 11 Dishwasher Door 13 Inlet pipe connector 2 Basket 4 Control Panel 6 Door Hook and Lock Hole 8 Spray Arms 10 Door Seal 12 Power Cord 14 Drain pipe connector 1 2 3 8 9 10 11...
Page 9 - Installation Instructions
9 Installation Instructions Unpacking the Dishwasher Use at least two people to move and install the dishwasher to prevent back and other types of injuries. Carefully remove the packaging materi-als. Remove any shipping tape and glue from your dishwasher before using. Do not use sharp instruments, r...
Page 10 - Water Connection; The; Back View
10 Installation Instructions Water Connection Your dishwasher comes equipped with a 'quick connect' assembly (includes : inlet and drain hose). The faucet adapter must be installed on the faucet before you can connect the dishwasher. The adapter is included inside your dishwasher. The faucet adapter...
Page 11 - Important; while empty; FAUCET WASHER; the
11 Installation Instructions Important 1. Once you open the water supply line, (even if it is closed immediately thereafter), the inlet hose will be pres-surized.2. To relieve water pressure from inside the inlet hose, (make sure the water line (faucet) is closed): press andhold the red pressure rel...
Page 12 - preferred
12 CHECK BEFORE FIRST USE The following things should be checked before starting the dishwasher. 1. The dishwasher is level. 2. The inlet valve is open. 3. There is no leakage at the connections. 4. The power is switched on. 5. The inlet and drain hoses are not knotted to prevent restrictions. 6. Al...
Page 13 - Using the dishwasher; A. Function of Detergent; than a
13 Using the dishwasher A. Function of Detergent Proper Use of Detergent Detergents with chemical ingredients are necessary to remove dirt, crush dirt and transport it out of the dish-washer. Use only detergent specifically made for use in dishwashers. Keep your detergent fresh and dry. Do not put p...
Page 14 - WASHING; B. Fill the Rinse Aid Dispenser; on the; you are
14 Using the dishwasher Amount of Detergent to Use Fill the detergent dispenser with detergent. Close the lid and press until it locks in place. The marking indicates the dosing levels, as illustrated on right. A - dispenser can load 5g detergent (open cup) B - dispenser can load 15g detergent C - d...
Page 15 - Filling the Rinse Aid Dispenser; spilled; Adjusting Rinse Aid; Rinse Aid indicator
15 Using the dishwasher Filling the Rinse Aid Dispenser 1 - To open the dispenser, turn the cap to the "open" (left) arrow and lift it out. 2 - Pour the rinse aid into the dispenser, being careful not to overfill. 3 - Replace the cap by inserting it aligned with "open" arrow and turn...
Page 16 - or safe; ITEMS THAT ARE NOT SUITABLE FOR; are; Attention before or after loading the Dishwasher Baskets; particles; C. Check the Water Temperature; can be checked using; Loading the Dishwasher
16 Using the dishwasher • Consider buying utensils which are identified as dishwasher-proof or safe • Use a mild detergent • To prevent damage, do not take glass and silverware out of the dishwasher immediately after the programhas ended ITEMS THAT ARE NOT SUITABLE FOR THE DISHWASHER Recommendation ...
Page 17 - Plate racks of basket
17 Loading the Dishwasher A properly loaded dishwasher is key for optimal performance. Overfilling or 'messy' loading of the dishwasher can reduce the efficiency. This counter-top dish-washer is optimized for holding 6 place settings. Refer to the arrangement below for optimal loading. Position the ...
Page 18 - Starting a Program; Wash Cycle Table; and delicate items
18 Starting a Program Wash Cycle Table 1. Pull out the basket and load the dishwasher. 2. Ensure the unit is connected to the power supply. 3. Ensure the water supply is turned on to full pressure. 4. Fill with detergent and rinse aid. 5. Close the door and press the Power button to turn on the dish...
Page 19 - Changing the Program; is opened while in operation; Additional Cycle Functions; Extra Drying; Extra Cleaning
19 Starting a Program Changing the Program To change the washing program, press and hold the program button for more than three seconds and the dish-washer will be go into stand-by. You can modify the washing program to the desired cycle setting. If t he door is opened while in operation , the unit ...
Page 20 - indicator
20 Timer Function The timer function mode enables a delayed switch ON of the dishwasher. The timer (hours) is adjustable between 1-24 hours. With the dishwasher is off, add recommended amount of detergent in the detergent dispenser (liquid or pot deter-gent recommended). Set the desired time delay O...
Page 21 - At the End of the Wash Cycle; alarm; Forget to Add a Dish; Wait 30 seconds for; Rinse Aid Warning Light
21 Starting a Program At the End of the Wash Cycle When the washing cycle has finished, the buzzer alarm will sound for 8 seconds. Turn off the dishwasher using the ON/OFF button, shut off the water supply and open the door of the dishwasher. Wait a few minutes before unloading the dishwasher to avo...
Page 22 - Maintenance and Cleaning; The entire filter assembly should be cleaned once a week.
22 Maintenance and Cleaning Filter System The filter system consists of a coarse filter (A), fine filter (B) and a main filter (C). Coarse filter A Larger items, such as pieces of bone or glass, that could block the drain are trapped in the coarse filter. To remove the items caught by the filter, ge...
Page 23 - Caring for the Dishwasher; can be cleaned
23 Caring for the Dishwasher • The control panel can be cleaned by using a lightly dampened cloth and dry thoroughly. • The exterior can be cleaned us ing an appliance polish wax. • Never use sharp objects, scouring pads or harsh cleaners on any part of the dishwasher. Cleaning The Door To clean the...
Page 24 - Troubleshooting Tips
24 Troubleshooting Tips Many common upright dishwasher problems are easily resolved. Try the troubleshooting suggestions below to see if the problems can be resolved before having to contact the service department. Technical problems Problem Possible Causes What To Do Dishwasher does not start Fuse ...
Page 25 - ERROR CODES
25 Troubleshooting Tips Unsatisfactory washing result Problem Possible Causes What To Do The dishes are not clean The dishes were not loaded cor-rectly. See notes in " Loading the Dishwasher Baskets ". The program was not long enough. Select a more intensive program. See" Wash Cycle Tabl...
Page 26 - ONE YEAR LIMITED WARRANTY; THIS WARRANTY DOES NOT COVER:; Support
26 ONE YEAR LIMITED WARRANTY This WHYNTER product is warranted to the original owner, purchased from an authorized Whynter dealer within the 48 U.S. continental states, for one year from the original purchase date against de-fects in material and workmanship under normal residential usage. Should yo...