Whirlpool WMC30516HV - Installation Manual
Whirlpool WMC30516HV Microwave – Installation Manual, read for free online in PDF format. We hope this helps you resolve any issues you may have. If you have further questions, please contact us through the contact form.
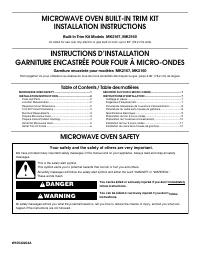


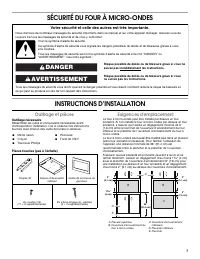
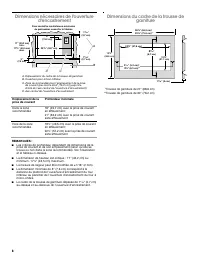
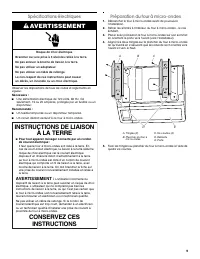
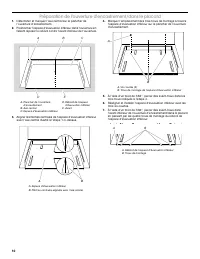
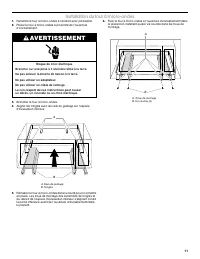
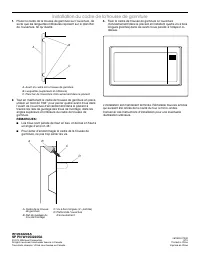
Table of Contents:
- Page 2 – INSTALLATION INSTRUCTIONS; Tools and Parts; Tools Needed; Location Requirements; Receptacle Location
- Page 3 – Prepare Microwave Oven; Align the two rails on the microwave oven bottom, as shown,; Secure the rails to the microwave oven bottom using four; WARNING; GROUNDING INSTRUCTIONS
- Page 4 – Prepare Cutout/Cabinet Opening; Align the center arrows on the bottom duct with the centerline; Mark the three mounting holes through the bottom duct onto
- Page 5 – Install the Microwave Oven; Slide the microwave oven back and into place. The mounting; Electrical Shock Hazard
- Page 6 – Install Trim Kit Frame; Position trim kit frame over the opening so that the lower tabs
- Page 7 – Outillage et pièces; Outillage nécessaire; Exigences d'emplacement; Votre sécurité et celle des autres est très importante.; AVERTISSEMENT
- Page 8 – Dimensions nécessaires de l'ouverture; Dimensions du cadre de la trousse de; Profondeur minimale
- Page 9 – Spécifications électriques; Préparation du four à micro-ondes; Débrancher le four à micro-ondes avant de poursuivre; Risque de choc électrique; INSTRUCTIONS DE LIAISON; L’utilisation incorrecte du
- Page 10 – Déterminer et marquer l’axe central sur le plancher de; Marquer l'emplacement des trois trous de montage à travers
- Page 11 – Installation du four à micro-ondes; Réinsérer le four à micro-ondes dans la cavité pour le remettre
- Page 12 – Installation du cadre de la trousse de garniture; Placer le cadre de la trousse de garniture sur l'ouverture, de
MICROWAVE OVEN BUILT-IN TRIM KIT
INSTALLATION INSTRUCTIONS
Built-In Trim Kit Models MK2167, MK2160
UL listed for use over any electric or gas built-in oven, up to 30" (76.2 cm) wide
INSTRUCTIONS D’INSTALLATION
GARNITURE ENCASTRÉE POUR FOUR À MICRO-ONDES
Garniture encastrée pour modèles MK2167, MK2160
Homologation UL pour utilisation au-dessus de tous les fours encastrés électriques ou gaz, jusqu’à 30" (76,2 cm) de largeur
MICROWAVE OVEN SAFETY
Table of Contents / Table des matières
MICROWAVE OVEN SAFETY ...................................................1
INSTALLATION INSTRUCTIONS..............................................2
Tools and Parts .......................................................................2
Location Requirements ...........................................................2
Required Cutout Dimensions ..................................................2
Trim Kit Frame Dimensions .....................................................3
Electrical Requirements ..........................................................3
Prepare Microwave Oven........................................................3
Prepare Cutout/Cabinet Opening ...........................................4
Install the Microwave Oven .....................................................5
Install Trim Kit Frame ..............................................................6
SÉCURITÉ DU FOUR À MICRO-ONDES ........................................... 7
INSTRUCTIONS D’INSTALLATION .................................................... 7
Outillage et pièces ............................................................................. 7
Exigences d'emplacement ................................................................ 7
Dimensions nécessaires de l'ouverture d'encastrement.................. 8
Dimensions du cadre de la trousse de garniture .............................. 8
Spécifications électriques ................................................................. 9
Préparation du four à micro-ondes ................................................... 9
Préparation de l'ouverture d'encastrement .................................... 10
Installation du four à micro-ondes .................................................. 11
Installation du cadre de la trousse de garniture ............................. 12
W10532204A
You can be killed or seriously injured if you don't immediately
You
can be killed or seriously injured if you don't follow
All safety messages will tell you what the potential hazard is, tell you how to reduce the chance of injury, and tell you what can
happen if the instructions are not followed.
Your safety and the safety of others are very important.
We have provided many important safety messages in this manual and on your appliance. Always read and obey all safety
messages.
This is the safety alert symbol.
This symbol alerts you to potential hazards that can kill or hurt you and others.
All safety messages will follow the safety alert symbol and either the word “DANGER” or “WARNING.”
These words mean:
follow instructions.
instructions.
DANGER
WARNING
"Loading the manual" means you need to wait until the file loads and becomes available for online reading. Some manuals are very large, and the time they take to appear depends on your internet speed.
Was this manual helpful?
About this manual
- Brand
- Whirlpool
- Model
- WMC30516HV
- Document type
- Installation Manual
- Category
- Microwave
- Language(s)
- English, French
- Pages
- 12
- File size
- 278.6 KB
- Format
Other Manuals for Whirlpool WMC30516HV
Summary
2 INSTALLATION INSTRUCTIONS Tools and Parts Tools Needed Gather the required tools and parts before starting installation. Read and follow the instructions provided with any tools listed here. Parts Supplied (not shown to scale Location Requirements The microwave oven may be installed over a built-i...
3 Trim Kit Frame Dimensions * 27" (68.6 cm) trim kit ** 30" (76.2 cm) trim kit Electrical Requirements Observe all governing codes and ordinances.Required: ■ A 120 volt, 60 Hz, AC only, 15- or 20-amp electrical supply with a fuse or circuit breaker. Recommended: ■ A time-delay fuse or time-d...
4 Prepare Cutout/Cabinet Opening 1. On the cutout floor, find and mark the centerline.2. Place the bottom duct in the opening, with the flange resting against the bottom front facing of the opening. 3. Align the center arrows on the bottom duct with the centerline drawn in Step 1 above. 4. Mark the ...
Ask a question
Related manuals
Popular Whirlpool Microwaves
More Whirlpool Microwaves models
 Whirlpool WMC20005YB User Manual
 Whirlpool WMC20005YD User Manual
 Whirlpool WMC20005YW User Manual
 Whirlpool WMC30309LB User Manual
 Whirlpool WMC30309LS User Manual
 Whirlpool WMC30311LD User Manual
 Whirlpool WMC30516HZ User Manual
 Whirlpool WMC50522HZ User Manual
 Whirlpool WMCS7022PB Manual
 Whirlpool WMCS7022PZ User Manual
 Whirlpool WMCS7024PZ User Manual
 Whirlpool WMH31017HB User Manual