Whirlpool WED6120HW - User Manual
Whirlpool WED6120HW Dryer – User Manual, read for free online in PDF format. We hope this helps you resolve any issues you may have. If you have further questions, please contact us through the contact form.


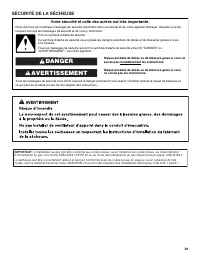
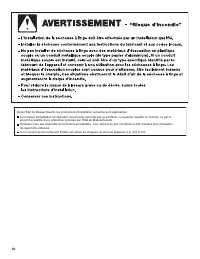
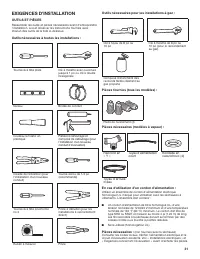
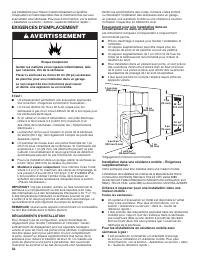
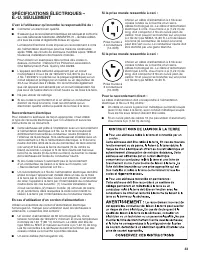
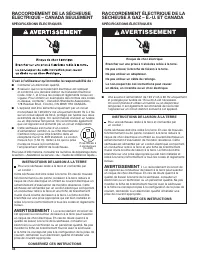
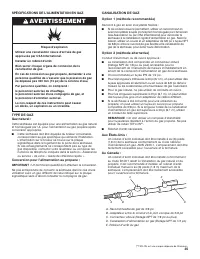
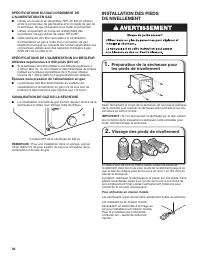
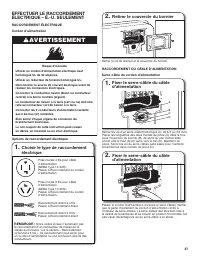
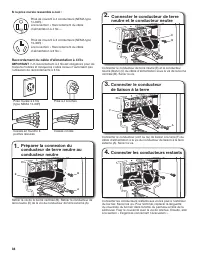
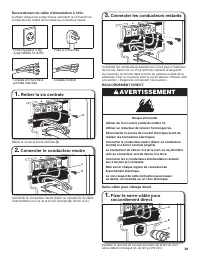

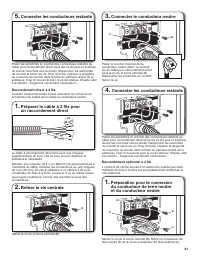
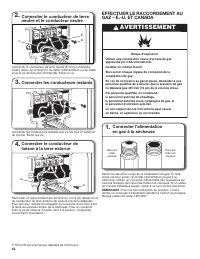
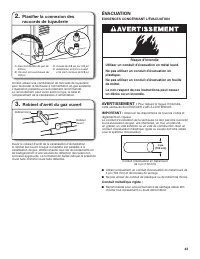
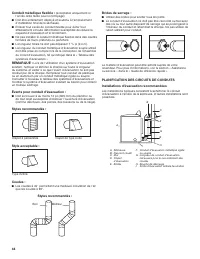
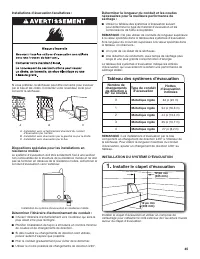
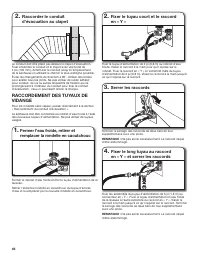
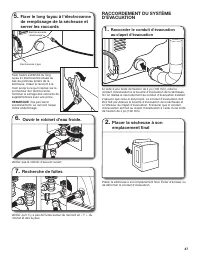
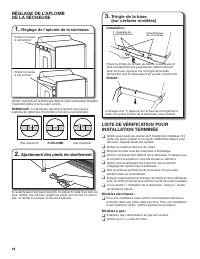
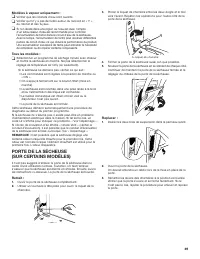
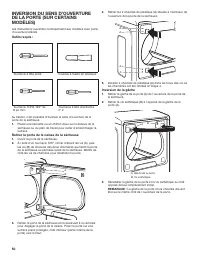
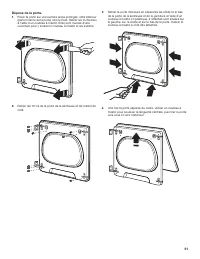
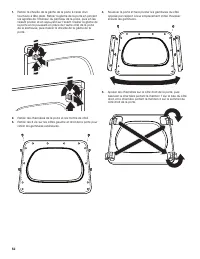
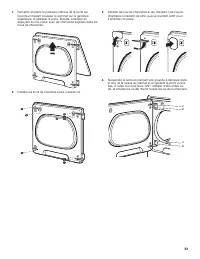
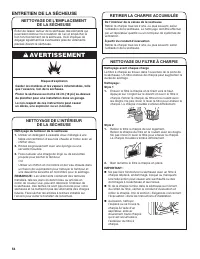
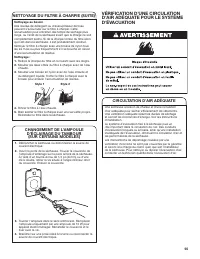
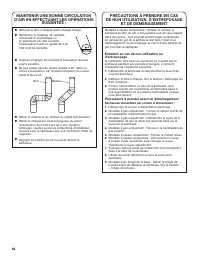
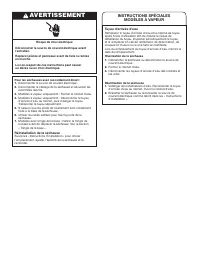


Table of Contents:
- Page 2 – DRYER SAFETY; Your safety and the safety of others are very important.; DANGER
- Page 4 – INSTALLATION REQUIREMENTS; TOOLS AND PARTS; connector; If using a power supply cord:
- Page 5 – LOCATION REQUIREMENTS; Explosion Hazard
- Page 6 – ELECTRICAL REQUIREMENTS -
- Page 7 – GROUNDING INSTRUCTIONS; GAS DRYER POWER HOOKUP -; WARNING; GROUNDING INSTRUCTIONS
- Page 8 – GAS SUPPLY REQUIREMENTS; Propane Gas Conversion:
- Page 9 – DRYER GAS PIPE; INSTALL LEVELING LEGS; Prepare dryer for leveling legs; MAKE ELECTRICAL CONNECTION -; Electrical Connection Options; Choose electrical connection type
- Page 10 – -wire Power Supply Cord Connection; Spade terminals with
- Page 11 – -wire Power Supply Cord Connection
- Page 12 – DIRECT WIRE CONNECTION; Direct Wire Strain Relief
- Page 13 – -wire Direct Wire Connection
- Page 14 – Optional 3-wire Connection
- Page 15 – CANADA; Connect gas supply to dryer; Plan pipe fitting connection
- Page 16 – VENTING; VENTING REQUIREMENTS
- Page 17 – Vent System Chart
- Page 18 – INSTALL VENT SYSTEM; CONNECT INLET HOSES
- Page 19 – Turn on cold water faucet; CONNECT VENT; Connect vent to exhaust outlet; Move dryer to final location
- Page 20 – LEVEL DRYER; Level Dryer; Adjust leveling legs
- Page 21 – COMPLETE INSTALLATION CHECKLIST
- Page 23 – Remove the door assembly
- Page 26 – DRYER CARE; CLEANING THE DRYER LOCATION; CLEANING THE DRYER INTERIOR; CLEANING THE LINT SCREEN
- Page 27 – CHANGING THE DRUM LIGHT; GOOD AIR FLOW
- Page 28 – Reinstalling the Dryer; SPECIAL INSTRUCTIONS; Water Inlet Hose
- Page 29 – SÉCURITÉ DE LA SÉCHEUSE; Votre sécurité et celle des autres est très importante.; AVERTISSEMENT
- Page 31 – EXIGENCES D’INSTALLATION; OUTILS ET PIÈCES
- Page 32 – EXIGENCES D’EMPLACEMENT
- Page 33 – SPÉCIFICATIONS ÉLECTRIQUES –
- Page 34 – SPÉCIFICATIONS ÉLECTRIQUES; INSTRUCTIONS DE LIAISON À LA TERRE
- Page 35 – SPÉCIFICATIONS DE L’ALIMENTATION EN GAZ; Conversion pour l’alimentation au propane :
- Page 36 – Préparation de la sécheuse pour
- Page 37 – EFFECTUER LE RACCORDEMENT; RACCORDEMENT ÉLECTRIQUE; Options de raccordement électrique
- Page 38 – Raccordement du câble d’alimentation à 4 fils
- Page 39 – Raccordement du câble d’alimentation à 3 fils; Prise murale à 3 fils; Retirer la vis centrale; RACCORDEMENT DIRECT; Serre-câble pour câblage direct; Fixer le serre-câble pour
- Page 42 – EFFECTUER LE RACCORDEMENT AU
- Page 43 – Robinet d’arrêt du gaz ouvert; ÉVACUATION; EXIGENCES CONCERNANT L’ÉVACUATION
- Page 45 – Tableau des systèmes d’évacuation; Installer le clapet d’évacuation
- Page 47 – RACCORDEMENT DU SYSTÈME
- Page 48 – Réglage de l’aplomb de la sécheuse; Ajustement des pieds de nivellement; LISTE DE VÉRIFICATION POUR; Modèles électriques :
- Page 49 – PORTE DE LA SÉCHEUSE
- Page 50 – Retirer la porte de la caisse de la sécheuse
- Page 54 – ENTRETIEN DE LA SÉCHEUSE
- Page 55 – CHANGEMENT DE L’AMPOULE; VÉRIFICATION D’UNE CIRCULATION; CIRCULTATION D’AIR ADÉQUATE
- Page 56 – PRÉCAUTIONS À PRENDRE EN CAS; Entretien en cas de non-utilisation ou
- Page 57 – Réinstallation de la sécheuse; INSTRUCTIONS SPÉCIALES; Tuyau d’arrivée d’eau
- Page 58 – SEGURIDAD DE LA SECADORA; Su seguridad y la seguridad de los demás es muy importante.; ADVERTENCIA
- Page 60 – REQUISITOS DE INSTALACIÓN; HERRAMIENTAS Y PIEZAS
- Page 61 – REQUISITOS DE UBICACIÓN; ESPACIOS LIBRES PARA LA INSTALACIÓN
- Page 62 – REQUISITOS ELÉCTRICOS –
- Page 63 – Si hace la conexión con cableado directo:; INSTRUCCIONES PARA LA CONEXIÓN A TIERRA; CONEXIÓN PARA SECADORA; REQUISITOS ELÉCTRICOS; Es su responsabilidad:
- Page 64 – CONEXIÓN DE ENERGÍA DE LA; REQUISITOS DEL SUMINISTRO DE GAS
- Page 66 – CÓMO HACER LA CONEXIÓN DEL; Opciones para la conexión eléctrica; Seleccione el tipo de conexión
- Page 67 – Conexión con cable de suministro eléctrico de 4 hilos
- Page 68 – Conexión con cable de suministro eléctrico de 3 hilos
- Page 70 – Conexión por cable directo de 3 hilos
- Page 71 – Conexión opcional de 3 cables
- Page 72 – CONEXIÓN DEL SUMINISTRO DE GAS -; Conecte la línea de suministro; Abra la válvula de cierre
- Page 73 – VENTILACIÓN
- Page 74 – Cuadro del sistema de ventilación
- Page 75 – INSTALACIÓN DEL SISTEMA DE VENTILACIÓN; CONECTE LAS MANGUERAS
- Page 76 – CONEXIÓN DEL DUCTO DE ESCAPE
- Page 77 – NIVELE LA SECADORA; Nivele la secadora; Regule las patas niveladoras; LISTA DE CONTROL DE LA
- Page 78 – Solo para los modelos con vapor:; PUERTA DE LA SECADORA
- Page 79 – INVERSIÓN DE LA PUERTA; Herramientas necesarias:
- Page 80 – Quite el ensamblaje de la puerta
- Page 83 – CUIDADO DE LA SECADORA; LIMPIEZA DEL LUGAR DONDE; LIMPIEZA DEL INTERIOR DE LA SECADORA; LIMPIEZA DEL FILTRO DE PELUSA
- Page 84 – CAMBIO DE LA LUZ DEL TAMBOR; REVISE QUE EL SISTEMA DE; BUEN FLUJO DE AIRE
- Page 85 – Cuidado durante la falta de uso o el
- Page 86 – Cómo volver a instalar la secadora; INSTRUCCIONES ESPECIALES; Manguera de entrada de agua
- Page 87 – NOTES
W11268643A
Dryer Installation and
Care Instructions
Manual
Manuel d’instructions
concernant l’installation
et l’entretien de la
sécheuse
Manual de instrucciones
de instalación
y cuidado de la
secadora
Para obtener acceso a las "Instrucciones de instalación” en español, o para obtener información
adicional acerca de su producto, visite:
www.whirlpool.com
.
Tenga listo su número de modelo completo. Puede encontrar el número de modelo
y de serie dentro de la cavidad superior de la puerta.
DRYER SAFETY .............................................. 2
INSTALLATION REQUIREMENTS .................. 4
Tools and parts ........................................... 4
LOCATION REQUIREMENTS ......................... 5
Installation clearances ............................... 5
ELECTRICAL REQUIREMENTS -
U.S.A. ONLY .................................................... 6
ELECTRIC DRYER POWER HOOKUP-
CANADA ONLY ................................................ 7
Electrical requirements .............................. 7
GAS DRYER POWER HOOKUP -
U.S.A. AND CANADA ...................................... 7
Electrical requirements .............................. 7
Gas supply requirements ........................... 8
Gas type ...................................................... 8
Gas supply line ........................................... 8
Gas supply connection requirements ....... 8
Burner input requirements ........................ 8
Dryer gas pipe............................................. 9
INSTALL LEVELING LEGS .............................. 9
MAKE ELECTRICAL CONNECTION -
U.S.A. ONLY .................................................... 9
Electrical Connection ................................. 9
Power Supply Cord Connection .............. 10
Direct Wire Connection ............................ 12
MAKE GAS CONNECTION -
U.S.A. AND CANADA .................................... 15
VENTING ........................................................ 16
Venting Requirements .............................. 16
Plan Vent System ...................................... 17
Install vent system.................................... 18
CONNECT INLET HOSES ............................. 18
CONNECT VENT ........................................... 19
LEVEL DRYER ............................................... 20
COMPLETE INSTALLATION CHECKLIST ... 21
DRYER DOOR ............................................... 21
REVERSE DOOR SWING .............................. 22
DRYER CARE ................................................ 26
CHECK YOUR VENT SYSTEM FOR
GOOD AIR FLOW .......................................... 27
SÉCURITÉ DE LA SÉCHEUSE ..................... 29
EXIGENCES D’INSTALLATION .................... 31
Outils et pièces ......................................... 31
EXIGENCES D’EMPLACEMENT .................. 32
Dégagements d’installation ..................... 32
SPÉCIFICATIONS ÉLECTRIQUES –
É.-U. SEULEMENT ........................................ 33
RACCORDEMENT DE LA SÉCHEUSE
ÉLECTRIQUE – CANADA SEULEMENT ...... 34
Spécifications électriques ....................... 34
RACCORDEMENT ÉLECTRIQUE DE LA
SÉCHEUSE À GAZ – É.-U. ET CANADA ...... 34
Spécifications électriques ....................... 34
SPÉCIFICATIONS DE L’ALIMENTATION
EN GAZ .......................................................... 35
Type de gaz ............................................... 35
Canalisation de gaz .................................. 35
Spécifications du raccordement
de l’alimentation en gaz ........................... 36
Spécifications de l’alimentation
du brûleur .................................................. 36
Canalisation de gaz de la sécheuse ....... 36
INSTALLATION DES PIEDS
DE NIVELLEMENT ........................................ 36
EFFECTUER LE RACCORDEMENT
ÉLECTRIQUE – É.-U. SEULEMENT ............. 37
Raccordement électrique ........................ 37
Raccordement du câble
d’alimentation ........................................... 37
Raccordement direct ............................... 39
EFFECTUER LE RACCORDEMENT
AU GAZ – É.-U. ET CANADA ........................ 42
ÉVACUATION ................................................ 43
Exigences concernant l’évacuation ........ 43
Planification des circuits de conduits .... 44
Installation du système d’évacuation ..... 45
RACCORDEMENT DES TUYAUX
DE VIDANGE ................................................. 46
RACCORDEMENT DU SYSTÈME
D’ÉVACUATION ............................................. 47
RÉGLAGE DE L’APLOMB
DE LA SÉCHEUSE ........................................ 48
LISTE DE VÉRIFICATION POUR
INSTALLATION TERMINÉE .......................... 48
PORTE DE LA SÉCHEUSE ........................... 49
INVERSION DU SENS D’OUVERTURE
DE LA PORTE ................................................ 50
ENTRETIEN DE LA SÉCHEUSE ................... 54
VÉRIFICATION D’UNE CIRCULATION
D’AIR ADÉQUATE POUR LE SYSTÈME
D’ÉVACUATION ............................................. 55
SEGURIDAD DE LA SECADORA ................. 58
REQUISITOS DE INSTALACIÓN .................. 60
Herramientas y piezas ............................. 60
REQUISITOS DE UBICACIÓN ...................... 61
Espacios libres para la instalación ......... 61
REQUISITOS ELÉCTRICOS –
EE. UU. EE. UU. ............................................ 62
CONEXIÓN PARA SECADORA ELÉCTRICA –
SOLAMENTE EN CANADÁ ........................... 63
Requisitos eléctricos ............................... 63
CONEXIÓN DE ENERGÍA DE LA SECADORA
A GAS - EE. UU. Y CANADÁ ........................ 64
Requisitos eléctricos ............................... 64
Requisitos del suministro de gas ............ 64
Tipo de gas................................................ 64
Línea de suministro de gas ..................... 65
Requisitos para la conexión
del suministro de gas ............................... 65
Requisitos de entrada del quemador ..... 65
Tubo de gas de la secadora .................... 65
INSTALACIÓN DE LAS PATAS
NIVELADORAS .............................................. 66
CÓMO HACER LA CONEXIÓN
DEL SUMINISTRO ELÉCTRICO –
SOLO EN EE. UU. ......................................... 66
Conexión eléctrica ................................... 66
Conexión por cable de suministro
eléctrico..................................................... 67
Conexión por cable directo ..................... 69
CONEXIÓN DEL SUMINISTRO DE GAS -
EE. UU. Y CANADÁ ....................................... 72
VENTILACIÓN ............................................... 73
Requisitos de ventilación ........................ 73
Planificación del sistema
de ventilación ............................................ 74
Instalación del sistema de ventilación ... 75
CONECTE LAS MANGUERAS
DE ENTRADA ................................................ 75
CONEXIÓN DEL DUCTO DE ESCAPE......... 76
NIVELE LA SECADORA ................................ 77
LISTA DE CONTROL DE LA INSTALACIÓN
TERMINADA .................................................. 77
PUERTA DE LA SECADORA ........................ 78
INVERSIÓN DE LA PUERTA ......................... 79
CUIDADO DE LA SECADORA ...................... 83
Table of Contents
Table des matières
Índice
"Loading the manual" means you need to wait until the file loads and becomes available for online reading. Some manuals are very large, and the time they take to appear depends on your internet speed.
Other Manuals for Whirlpool WED6120HW
Summary
2 DRYER SAFETY You can be killed or seriously injured if you don't immediately You can be killed or seriously injured if you don't follow All safety messages will tell you what the potential hazard is, tell you how to reduce the chance of injury, and tell you what canhappen if the instructions are n...
4 INSTALLATION REQUIREMENTS TOOLS AND PARTS Gather the required tools and parts before starting installation. Read and follow the instructions provided with any tools listed here. Tools needed for all installations: Flat-blade screwdriver Adjustable wrench that opens to 1" or hex-head socket wre...
5 LOCATION REQUIREMENTS Explosion Hazard Keep flammable materials and vapors, such as gasoline, away from dryer.Place dryer at least 18 inches (46 cm) above the floor for a garage installation.Failure to do so can result in death, explosion, or fire. You will need: ■ A location allowing for proper e...