Page 2 - failure to adhere to this manual.; IMPORTANT INFORMATION THAT MAY IMPACT YOUR; Subject to change without notice.; CUSTOMER CARE AND SERVICE
2 www.westinghouse.com.au / www.westinghouse.co.nz Adherence to the directions for use in this manual is extremely important for health and safety. Failure to strictly adhere to the requirements in this manual may result in personal injury, property damage and affect your ability to make a claim und...
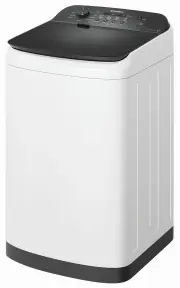
Page 8 - Front Feet; PRODUCT DESCRIPTION
8 www.westinghouse.com.au / www.westinghouse.co.nz Control Panel Lid Cabinet Front Feet Levelling Adjustable : Right & Left Mains Cable Water Inlet Hose Outlet Hose/Drain Hose (See installation instructions sheet to fit & position drain hose) Rear Feet (Fixed) Old inlet hose should be discha...
Page 10 - Auto sensing water level
10 www.westinghouse.com.au / www.westinghouse.co.nz Power Failure Recovery When there is power failure while the machine is washing or rinsing or spinning. The machine tries to save the settings at which stage the machine is doing and then when the power returns back the machine will start washing f...
Page 11 - Control Panel Description
11 B C D E K J G I H F A Soak A Program knob H Display B Water Level button I Delay End button C Temp button J Soak option ** D Rinse button K Child safety lock option ** E Spin button F Power button G Start/Pause button 3. CONTROL PANEL 3.1 Control Panel Description two combination buttons, press a...
Page 13 - Program Options Compatibility
13 Program Option Delay End Soak Spin Extra Dirty 120 Fast 20 Daily 45 Full Load 60 Dirty 90 High Mid Low No Spin Rinse Extr a Regular Fast (F R Temp Hot Warm Normal Cold Delicate Gym Ware Eco Save Bedding Machine Clean Rinse & Spin Spin Water Level Auto Full Medium Low Remark Default option Ava...
Page 15 - Spin Button
15 Delay End ( ) Button Before you start the program, this option makes it possible to define the end of the washing program from minimum of 1 hour to maximum of 20 hours. After selecting Delay End time, press Start/Pause button to start the program. Machine will then countdown and update time on th...
Page 16 - Buzzer; To set “Child Lock” option:; Bleach
16 www.westinghouse.com.au / www.westinghouse.co.nz This setting permits you to either enable or disable the buzzer at the end of the program. As an example, you might wish to disable this buzzer when you start a wash when going to bed, so that when the wash finishes approximately 1 hour later, it w...
Page 17 - Starting Your Washing
17 When loading the clothes into your washing machine, there are four things to remember: Clothes must be loaded evenly around the agitator. For best results load small items first, followed by large items. 1. 1. Clothes must not be wrapped around the agitator. 2. The washing machine must not be ove...
Page 18 - Add Fabric Softener
18 www.westinghouse.com.au / www.westinghouse.co.nz Do not use gelatinous or thick liquid detergents. NOTE: When you use the liquid detergent - Residues of softener and water may remain in the cup. It is recommended to clean the cup regularly to remove any residue. Mix softener with an equal amount ...
Page 19 - NOTE; Setting a Program
19 1. Press Power ( ) EXWWRQ , turn the program selector to the required program. The relevant light will light up. - Your washing machine is now in STAND-BY-MODE and ready to wash your clothes. - The buzzer will sound. - Once you select a program, the program selected will stay at that position for...
Page 20 - At The End Of The Program
20 www.westinghouse.com.au / www.westinghouse.co.nz The appliance stops automatically.The display will show “ ” and flashing with 3 consecutive long beeps. -- - - - Remove the laundry from the appliance. Make sure that the washing tub is empty.Keep the lid ajar, to prevent the mildew and odours. Pre...
Page 22 - Stain Removers
22 www.westinghouse.com.au / www.westinghouse.co.nz If you use pre-treatment sprays or stain removers, apply them to the clothing well away from your washing machine. Pre-treatment sprays and stain remover can damage plastic components on your washing machine. WARNING! Don’t use the wrong type of de...
Page 23 - Ball point pen and glue:
23 If you use pre-treatment sprays or stain removers, apply them to the clothing well away from your washing machine. Pre-treatment sprays and stain remover can damage plastic components on your washing machine. WARNING! Don’t use the wrong type of detergent. You must use a low sudsing detergent des...
Page 24 - INTERNATIONAL WASH CODE SYMBOLS; How to clean the lint filter:
24 www.westinghouse.com.au / www.westinghouse.co.nz 23 ENGLISH These symbols appear on fabric labels, in order to help you choose the best way to treat your laundry. Bleach in cold water DO NOT bleach Bleaching Hand wash Max. wash temperature 95 °C Hot iron max. 200 °C Dry cleaning in all solvents D...
Page 25 - What To Do After You Have
25 The dispenser needs to be cleaned regularly, preferably after each wash. Inspect the dispenser after each wash to see if there is any residue of detergent. Your washing machine will give you long and trouble-free service, if you follow the instructions in this section. These instructions show you...
Page 26 - To clean the water inlet filters:; Cleaning The Drawer
26 www.westinghouse.com.au / www.westinghouse.co.nz Having removed the drawer, use a small brush to clean the recess, ensuring that all washing powder residue is removed from the upper and lower part of the recess. Replace the drawer and run the rinse program without any clothes in the drum. Remove ...
Page 28 - Possible Failures
28 www.westinghouse.com.au / www.westinghouse.co.nz 29 ENGLISH DO NOT call for service until you have checked the points listed below.If you call for service and there is nothing wrong with your washing machine, you will have to pay for the service call. You will have to pay even when your washing m...
Page 30 - Troubleshooting Fault Displays
30 www.westinghouse.com.au / www.westinghouse.co.nz Description Display Code Customer action (Summary) Make sure both wall taps are on and hose filters are not blocked. Press “Start/Pause” to re-start wash.If problem remains, call Service. If the water is pouring onto the floor, turn OFF wall taps. ...
Page 32 - Yellowing Or Greying Clothes
32 www.westinghouse.com.au / www.westinghouse.co.nz Problem Possible causes What to do Greyness Yellowing ONLY use low sudsing, front load washer detergent in this machine, such as Cold Power for Front Loaders and High Efficiency Top Loaders or detergent labelled “Matic”. Incorrect wash times and us...
Page 37 - Electrical Connection
37 Position drain hose by adjusting the free length of hose to suit your installation. Please refer to the installation instruction sheet, for more information. Shift hose clamp to here Squeeze spring hose clamp Insert / Shift 1. 2. 3. This machine is designed to operate on a 220 - 240 V, single-pha...
Page 38 - ENVIRONMENT CONCERNS; Packaging Materials
38 www.westinghouse.com.au / www.westinghouse.co.nz The materials marked with the symbol are recyclable. >PE<=polyethylene >PS<=polystyrene >PP<=polypropyleneThis means that they can be recycled by disposing them properly in appropriate collection containers. To save water, energy ...