Westinghouse WHC643BD - User Manual
Westinghouse WHC643BD Hob – User Manual, read for free online in PDF format. We hope this helps you resolve any issues you may have. If you have further questions, please contact us through the contact form.


Table of Contents:
- Page 2 – CONGRATULATIONS
- Page 3 – PRODUCT DESCRIPTION; Cooking surface layout
- Page 4 – Control panel layout - WHC633BD; Heat setting displays; OptiHeat control (3 step residual heat indicator); WARNING
- Page 5 – OPERATING INSTRUCTIONS; Touch
- Page 7 – HELPFUL HINTS AND TIPS; Activating the light; CARE AND CLEANING; Changing the automatic mode; IMPORTANT; Rangehoods with the Hob2Hood function; Ceramic Cooktop Cleaning; • If the deposit is minimal, simply wipe off with a dry
- Page 8 – TROUBLESHOOTING; TECHNICAL DATA; ENVIRONMENTAL TIPS; ENVIRONMENT; Disposal; Energy saving
- Page 9 – INSTALLATION INSTRUCTIONS; Electrical Connection; Connection cable; Sticking on the seal; ASSEMBLY
- Page 10 – Warranty; AUSTRALIA; NEW ZEALAND
USER MANUAL
CERAMIC COOKTOPS
WHC633BD, WHC643BD,
WHC933BD, WHC943BD
"Loading the manual" means you need to wait until the file loads and becomes available for online reading. Some manuals are very large, and the time they take to appear depends on your internet speed.
Summary
2 3 CONTENTS SAFETY Dear customer, Congratulations on the purchase of your new cooktop. Before you use the cooktop, we recommend that you read through the whole user manual which provides the description of the cooktop and its functions. To avoid the risks that are always present when you use an ele...
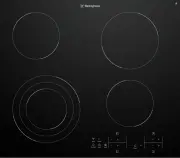
4 5 PRODUCT DESCRIPTION PRODUCT DESCRIPTION PRODUCT DESCRIPTION Cooking surface layout WHC633BD WHC943BD WHC643BD WHC933BD 1 Single cooking zone 1800W 2 Single cooking zone 1200W 3 Multi cooking zone 1600/3000W 4 Control panel 1 Single cooking zone 1200W 2 Single cooking zone 1200W 3 Multi cooking z...
6 7 PRODUCT DESCRIPTION PRODUCT DESCRIPTION PRODUCT DESCRIPTION (CONTINUED) Control panel layout - WHC633BD Control panel layout - WHC933BD Control panel layout - WHC643BD & WHC943BD Use the sensor fields to operate the appliance. The displays, indicators and sounds tell which functions operate....