Page 2 - CONTENTS; WELCOME 3; To purchase accessories for your tool, visit
2 CONTENTS WELCOME 3 Introduction ..................................................................................................... 3Specifications ................................................................................................... 3 SAFETY 4 General Safety Rules ...................
Page 3 - INTRODUCTION; safety for both yourself and others.; SPECIFICATIONS
INTRODUCTION Thanks for purchasing the WEN Table Saw. We know you are excited to put your tool to work, but first, please take a moment to read through the manual. Safe operation of this tool requires that you read and understand this operator’s manual and all the labels affixed to the tool. This ma...
Page 4 - GENERAL SAFETY RULES; WORK AREA SAFETY
GENERAL SAFETY RULES 4 WORK AREA SAFETY 1. Keep work area clean and well lit. Cluttered or dark areas invite accidents. 2. Do not operate power tools in explosive atmo- spheres, such as in the presence of flammable liquids, gases or dust. Power tools create sparks which may ig- nite the dust or fume...
Page 5 - POWER TOOL USE AND CARE
GENERAL SAFETY RULES 5 POWER TOOL USE AND CARE 1. Do not force the power tool. Use the correct power tool for your application. The correct power tool will do the job better and safer at the rate for which it was de- signed. 2. Do not use the power tool if the switch does not turn it on and off. Any...
Page 6 - SPECIFIC RULES FOR YOUR TABLE SAW
TABLE SAW SAFETY 1. Never place your hands in the vicinity of, or in line with, the saw blade.2. Always wear ANSI Z87.1 approved eye protection, as well as hearing protection and respiratory protection.3. Avoid kickback. Keep the blade sharp and the rip fence parallel to the saw blade. Make sure the...
Page 8 - KICKBACK CAUSES AND RELATED WARNINGS
8 SPECIFIC RULES FOR YOUR TABLE SAW WARNING! Do not operate the power tool until you have read and understood the following instructions and the warning labels. 6. Never use a damaged or cut push stick. It may break causing your hand to slip into the saw blade.7. Do not perform any operation freehan...
Page 9 - TABLE SAW OPERATION WARNINGS
9 SPECIFIC RULES FOR YOUR TABLE SAW WARNING! Do not operate the power tool until you have read and understood the following instructions and the warning labels. 10. When restarting the saw with the saw blade in the workpiece, center the saw blade in the kerf so that the saw teeth are not engaged in ...
Page 10 - ELECTRICAL INFORMATION; GUIDELINES AND RECOMMENDATIONS FOR EXTENSION CORDS
10 AMPERAGE REQUIRED GAUGE FOR EXTENSION CORDS 25 ft. 50 ft. 100 ft. 150 ft. 15A 14 gauge 12 gauge Not Recommended Not Recommended ELECTRICAL INFORMATION 1. EXAMINE EXTENSION CORD BEFORE USE. Make sure your extension cord is properly wired and in good con- dition. Always replace a damaged extension ...
Page 11 - UNPACKING; PACKING LIST; UNPACKING & PACKING LIST
11 UNPACKING With the help of a friend or trustworthy foe, carefully remove the table saw from the packaging. Make sure to take out all contents and accessories. Do not discard the packaging until everything is removed. Check the packing list below to make sure you have all of the parts and accessor...
Page 12 - KNOW YOUR TABLE SAW; TOOL PURPOSE
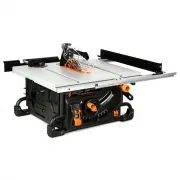
KNOW YOUR TABLE SAW 12 TOOL PURPOSE Make smooth, straight cuts easily with your WEN Table Saw. Refer to the following diagrams to become familiar- ized with all the parts and controls of your table saw. The components will be referred to later in the manual for assembly and operation instructions. 1...
Page 13 - INSTALLING THE FENCE; ASSEMBLY
13 INSTALLING THE FENCE NOTE: The fence is shipped in its storage position on the left side of the saw.1. Loosen the lock knob (Fig. 2 - 1), then remove the fence assembly (Fig. 2 - 2).2. Install the fence locking knob (Fig. 3 - 1) (found in the hardware bag) on the front rail.3. Place the fence on ...
Page 14 - INSTALLING THE TABLE EXTENSION
INSTALLING THE TABLE EXTENSION 1. Use a Phillips-head screwdriver (not included) to attach the table extension rods (Fig. 5 - 1) to the table extension (Fig. 5 - 2) with the M6x10 screws and 6mm washers.2. Loosen both knobs (Fig. 6 - 1) on the rear side of the saw and insert the extension rods into ...
Page 15 - INSTALLING THE BLADE GUARD
15 INSTALLING THE BLADE GUARD ASSEMBLY WARNING! Disconnect the machine from the power source before performing the following steps. 1. Remove the table insert (Fig. 8 - 1) by turning the lock knob (Fig. 8 - 2) 1/4 turn. Lift the insert out of the table (Fig. 9 - 1).2. Loosen the height adjustment lo...
Page 16 - DUST COLLECTION; SWITCH ASSEMBLY; OPERATION
DUST COLLECTION 1. Attach a 2½” dust hose (not included) to the dust port (Fig. 13 - 1).2. Secure the hose with a hose clamp (not included). Make sure the hose is attached to the dust port tightly. CAUTION: Always use dust collection when operating the machine. It's safer, less messy, gives better c...
Page 18 - MITER GAUGE; REAR EXTENSION
MITER GAUGE The miter gauge can be positioned on either side of the blade, as shown in Fig. 21. To change the angle, loosen the knob on the gauge (Fig. 22 - 1) and set it to the desired angle, then tighten the knob. REAR EXTENSION When ripping longer workpieces, the rear extension (Fig. 23 - 1) can ...
Page 19 - REPLACING THE SAW BLADE; Arbor Lock
19 1. Remove the blade guard assembly. See page 11.2. Raise the blade all the way up, and remove the table insert.3. Push the arbor lock (Fig. 24) in and rotate the blade until it locks in place. This will prevent the blade from turning.4. While holding the arbor lock (Fig. 25 - 1), use the in- clud...
Page 20 - CROSSCUTTING
CROSSCUTTING Crosscutting is to cut a workpiece across its main grain or its width. Follow the steps below to make a cross cut. OPERATION Fig. 27 WARNING! Serious injury can be caused by kickback. Kickback can occur when tension is created between a workpiece sitting against the fence and the blade....
Page 21 - BEVEL CROSSCUTTING; DO NOT
21 OPERATION Fig. 28 WARNING! Disconnect the machine from the power source before performing the following steps. BEVEL CROSSCUTTING Bevel Crosscutting is to cut a workpiece across its main grain or its width with an angle other than 0°. The operation is the same as crosscutting except with an angle...
Page 22 - BEVEL RIPPING
OPERATION Fig. 29 WARNING! Disconnect the machine from the power source before performing the following steps. BEVEL RIPPING Bevel ripping is to cut a workpiece along its main grain or its length with an angle other than 0. This operation is same as ripping, except that the rip cut is at an angle. F...
Page 23 - MITERING; BEVEL MITERING
23 OPERATION MITERING A miter cut is the same operation as crosscut except the miter gauge is set at an angle other than 90°.1. Remove the fence. 2. Set the blade at 0 bevel angle (see page 17, "BEVELING THE BLADE").3. Set the miter gauge at the desired angle (see page 18, " MITER GAUGE&...
Page 24 - DADO CUTTING
OPERATION NON-THROUGH CUTTING (CONT.) 7. Slowly push the workpiece through the blade with the push stick (included), push blocks (not included), and/or feather board (not included) until the workpiece is pushed completely past the blade.8. Turn off the table saw, allow the blade to come to a complet...
Page 25 - ADJUSTMENTS; RIVING KNIFE & SAW BLADE ALIGNMENT; Top Alignment
25 ADJUSTMENTS RIVING KNIFE & SAW BLADE ALIGNMENT WARNING! Disconnect the machine from the power source before performing the following steps. The riving knife and saw blade alignment has been adjusted at the factory. In most cases, there should not be ad- justments needed. However, the riving k...
Page 26 - FENCE AND SAW BLADE ALIGNMENT
ADJUSTMENTS RIVING KNIFE & SAW BLADE ALIGNMENT (CONT.) 13. Reinstall the table insert.14. Reinstall the blade guard assembly. FENCE AND SAW BLADE ALIGNMENT WARNING! Disconnect the machine from the power source before performing the following steps. 1. Remove the blade guard (See "INSTALLING ...
Page 27 - MITER GAUGE SLOT AND BLADE ALIGNMENT
27 ADJUSTMENTS MITER GAUGE SLOT AND BLADE ALIGNMENT For the best results, the miter slot should be adjusted parallel to the blade. This is done at the factory, but if it is not exactly parallel, fol- low the steps below to reduce the risk of kickback. WARNING! Disconnect the machine from the power s...
Page 28 - BEVEL STOP ADJUSTMENT
ADJUSTMENTS BEVEL STOP ADJUSTMENT The bevel stops have been set at the factory, and should not require adjustments. However, if your cuts are noticeably inaccurate, follow the steps below to adjust the bevel. WARNING! Disconnect the machine from the power source before performing the following steps...
Page 29 - LEVELING TABLE INSERT
29 ADJUSTMENTS LEVELING TABLE INSERT The table insert must sit flush with the table in order to provide a smooth surface to slide the finished workpiece on. To check and adjust the table insert, follow the steps below. WARNING! Disconnect the machine from the power source before performing the follo...
Page 30 - MAINTENANCE
ROUTINE INSPECTION Before each use, inspect the general condition of the tool. If any of these following conditions exist, do not use until parts are replaced or the sharpener is properly repaired. Check for: • Loose hardware, • Misalignment or binding of moving parts, • Damaged cord/electrical wiri...
Page 31 - STORAGE; Accessory Storage
31 MAINTENANCE STORAGE 1. Store the tool in a clean and dry place away from the reach of chil- dren. Store in temperatures between 41° to 86°F.2. Cover the table saw in order to protect it from dust and moisture. It is preferable to store it in its original packaging with the instruction manual. Acc...
Page 32 - TROUBLESHOOTING GUIDE
TROUBLESHOOTING GUIDE WARNING! Stop using the tool immediately if any of the following problems occur. Repairs and replacements should only be performed by an authorized technician. For any questions, please contact our customer service at 1-(800) 232-1195 , M-F 8-5 CST or email us at [email protect...
Page 33 - EXPLODED VIEW & PARTS LIST
33 EXPLODED VIEW & PARTS LIST NOTE: Not all parts may be available for purchase. Parts and accessories that wear down over the course of normal use are not covered under the warranty.
Page 34 - Description
EXPLODED VIEW & PARTS LIST No. Part No. Description Qty. 1 TT1015-001ASM Blade Guard Assembly 1 2 TT1015-002ASM Fence Assembly 1 3 TT1015-003 Table Insert Assembly 1 4 Table Insert Locking Knob 1 5 6mm Wavy Washer 1 6 6mm Flat Washer 1 7 Lock Nut, M5 1 8 Front Rail 1 9 Fence Scale Pointer 1 10 P...
Page 38 - NOTES