Page 2 - ENGLISH; COMPONENTS; INSTALL THE FREE VOSKER APP
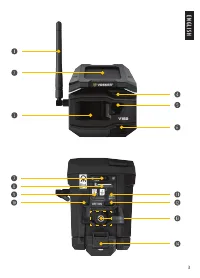
ENGLISH 2 COMPONENTS q Cellular Antenna w Solar Panel e Motion Dectector r DELAY Light t Lens y Night Vision LEDs u Control Panel Compartment i Micro SIM Card o MicroSD Card a Micro-USB Port s STATUS Light d OFF/ON Switch f 1/4"-20 Tripod Mount g Battery Compartment CHARGING THE LITHIUM BATTERY ...
Page 4 - INSERT THE MEMORY CARD
ENGLISH 4 Install the free app 1. Make sure you have a data package with either your smartphone or tablet or a Wi-Fi connection. 2. To install the app, you can either: • Get it on Google Play TM (Google Play is a trademark of Google Inc.) • Download on the app Store TM (App Store is a trademark of A...
Page 5 - ACTIVATE YOUR CAMERA
ENGLISH 5 ACTIVATE YOUR CAMERA 1. Start the VOSKER app and select “Activate a new camera”.2. Select the model V150.3. Open the case at the back of the camera. • Scan the barcode from the camera. 4. Choose the type of surveillance you are going to do with your VOSKER security camera. 5. Enter your pe...
Page 6 - START THE CAMERA
ENGLISH 6 START THE CAMERA 1. Turn On the camera (OFF/ON switch). 2. The camera will search for a signal and the “status light” will flash green. 3. The “status light” will continuously be lit and will appear in one of the following three colors: • Red: no signal.• Orange: fair signal.• Green: good ...
Page 7 - INSTALLATION OF THE CAMERA
ENGLISH 7 IF THE “STATUS LIGHT” IS RED AFTER STEP 3, WE RECOMMEND TRYING THE FOLLOWING OPTIONS TO IMPROVE THE SIGNAL: • Turn off your camera and turn it on again.• Try positioning the antenna at a different angle.• Move your camera. Note that the “Status light” signal on a V150 might not be equal to...
Page 8 - DISPOSAL; ONLY USE ORIGINAL SPARE PARTS AND ACCESSORIES.
ENGLISH 8 PRO-TIPS: Solar panel & internal rechargeable battery • You need at least 50% of the solar panel cleared for maximum performance. • If the power of the battery pack becomes insufficient (around 25 - 30%), the camera will enter Deep Sleep Mode. In this mode, your camera will no longer t...
Page 9 - MAXIMUM TRANSMISSION POWER:; THIS DEVICE COMPLIES WITH PART 15 OF THE FCC RULES.
ENGLISH 9 FREQUENCY FREQUENCY RANGE: 800/850/900/1900/2100 MHz MAXIMUM TRANSMISSION POWER: FREQUENCY MAX. GSM850 33 DBM ± 2 DB EGSM900 33 DBM ± 2 DB DCS1800 30 DBM ± 2 DB PCS1900 30 DBM ± 2 DB GSM850 (8-PSK) 27 DBM ± 3 DB EGSM900 (8-PSK) 27 DBM ± 3 DB DCS1800 (8-PSK) 26 DBM ± 3 DB PCS1900 (8-PSK) 26...
Page 10 - WARRANTY; THANK YOU FOR CHOOSING
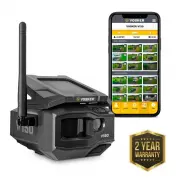
ENGLISH 10 WARRANTY Sit back & relax as this VOSKER cameras are covered by the “Know you’re covered” 2-year warranty. We strive on offering all customers a positive, user-friendly experience that will have a lasting impression. FAQ, user manual & latest firmware available at: www.vosker.com ...
Page 11 - GUIDE DE DÉMARRAGE RAPIDE
GUIDE DE DÉMARRAGE RAPIDE Besoin d’aide ? Demandez l’assistance de nos experts via le clavardage en direct depuis votre application VOSKER.
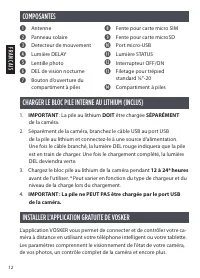
Page 12 - ANÇAIS; COMPOSANTES; INSTALLER L’APPLICATION GRATUITE DE VOSKER
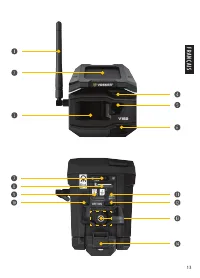
FR ANÇAIS 12 COMPOSANTES q Antenne w Panneau solaire e Detecteur de mouvement r Lumière DELAY t Lentille photo y DEL de vision nocturne u Bouton d’ouverture du compartiment à piles i Fente pour carte micro SIM o Fente pour carte microSD a Port micro-USB s Lumière STATUS d Interrupteur OFF/ON f Filet...
Page 14 - INSÉRER LA CARTE MÉMOIRE
FR ANÇAIS 14 Installez l’application gratuite 1. Assurez-vous d’avoir un forfait de données, soit avec votre téléphone intelligent, et/ou votre tablette, soit avec une connexion Wi-Fi. 2. Pour installer l’application, vous pouvez : • La télécharger dans Google Play TM (Google Play est une marque dép...
Page 15 - ACTIVER VOTRE CAMÉRA
FR ANÇAIS 15 ACTIVER VOTRE CAMÉRA 1. Démarrez l’application VOSKER et sélectionnez « Activer une nouvelle caméra ». 2. Sélectionnez le modèle V150.3. Ouvrez le compartiment à l’arrière de la caméra. • Numérisez le code barres de la caméra. 4. Choisissez le type de surveillance que vous allez faire a...
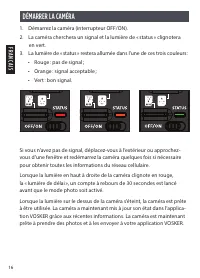
Page 16 - DÉMARRER LA CAMÉRA
FR ANÇAIS 16 DÉMARRER LA CAMÉRA 1. Démarrez la caméra (interrupteur OFF/ON).2. La caméra cherchera un signal et la lumière de « status » clignotera en vert. 3. La lumière de « status » restera allumée dans l’une de ces trois couleurs : • Rouge : pas de signal ; • Orange : signal acceptable ; • Vert ...
Page 17 - INSTALLATION DE LA CAMÉRA
FR ANÇAIS 17 SI LA LUMIÈRE DE « STATUS » EST ROUGE APRÈS L’ÉTAPE 3, NOUS VOUS RECOMMANDONS D’ESSAYER LES OPTIONS SUIVANTES POUR AMÉLIORER LE SIGNAL : • Éteignez votre caméra et rallumez-la ; • Essayez de positionner l’antenne dans un autre angle ;• Déplacez votre caméra. Notez que le signal de la lu...
Page 18 - ÉLIMINATION; N’UTILISEZ QUE DES PIÈCES DE RECHANGE ET ACCESSOIRES D’ORIGINE.
FR ANÇAIS 18 ASTUCES : Panneau solaire et pile rechargeable interne • Au moins 50 % du panneau solaire doit être dégagé pour une performance optimale. • Si la puissance du bloc pile devient insuffisante (autour de 30 %), la caméra s’éteindra. Une fois la pile suffisamment rechargée par le panneau so...
Page 19 - GAMME FRÉQUENTIELLE :; CET APPAREIL EST CONFORME À LA SECTION 15
FR ANÇAIS 19 FRÉQUENCE GAMME FRÉQUENTIELLE : 800/850/900/1900/2100 MHz PUISSANCE D’ÉMISSION MAXIMALE : FRÉQUENCE MAX. GSM850 33 DBM ± 2 DB EGSM900 33 DBM ± 2 DB DCS1800 30 DBM ± 2 DB PCS1900 30 DBM ± 2 DB GSM850 (8-PSK) 27 DBM ± 3 DB EGSM900 (8-PSK) 27 DBM ± 3 DB DCS1800 (8-PSK) 26 DBM ± 3 DB PCS190...
Page 20 - GARANTIE; MERCI DE CHOISIR VOSKER
GARANTIE Détendez-vous, vous êtes couvert. Cette caméra est couverte par notre garantie « Vous êtes couverts » d’une durée de 2 ans. Nous nous efforçons d’offrir à tous nos clients une expérience positive et un service hors pair. Manuel d’utilisation, mise à jour de logiciel & FAQ disponibles su...