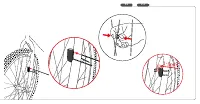
Page 2 - screw
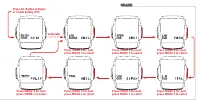
Page 7 - automatic
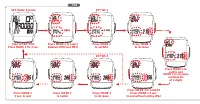
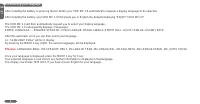
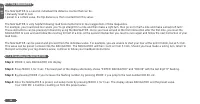
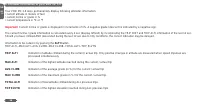
P7 Press MODE 2 for next press MODE 1 to select Press AC-Button to Beginor install battery (P6) • • • • • • • automatic Press MODE 2 for next press MODE 1 to select Press MODE 2 for next press MODE 1 to select Press MODE 2 for next press MODE 1 to select Press MODE 2 for next press MODE 1 to select ...
Page 13 - Press MODE 1; Set ODOMETER; Press MODE 2
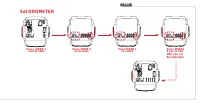
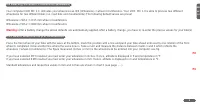
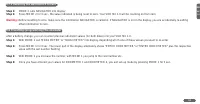
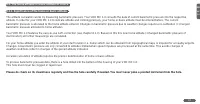
P14 Press MODE 1 3sec.to start Press MODE1 3 sec. to end after you set the odometer Set ODOMETER Press MODE 2 to increase Press MODE 1 to switch •••••••••• • • • • • • •
Page 14 - BIKE CHECK
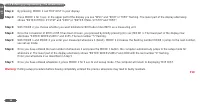
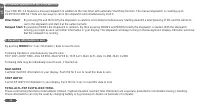
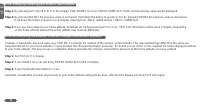
P15 Press any button BIKE CHECK disappears The service icon will remain flashing. Another 50 km/35 mi. Then the service interval icon will also disappear BIKE CHECK
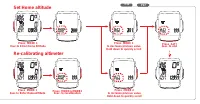
Page 16 - Correction of actual altitude
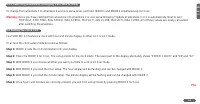
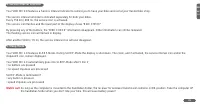
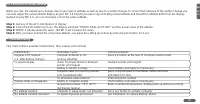
P18 Press ALTI 3sec.to Enter Real Altitude Correction of actual altitude Press MODE 1 to decrease privious value Hold down to quickly scroll Press ALTI 3sec. to end Press MODE 2 to increase privious value Hold down to quickly scroll
Page 17 - INSTALLATION AND OPERATION MANUAL - VDO MC 1.0
1 GB MC 1.0 INSTALLATION AND OPERATION MANUAL - VDO MC 1.0 Index PrefaceImportant information about the altimeter1. Mounting 2.7.1 Presetting the NAVIGATOR 1.1 Handlebar holder 2.7.2 Resetting the NAVIGATOR to zero 1.2 Speed transmitter (sender) 2.8 Presetting / programming the odometer 1.3 Spoke ma...
Page 18 - Preface; We wish you enjoyable trips and rides on your bike with VDO; Important information about the altimeter
GB MC 1.0 2 Preface Thank you very much for buying a VDO MC 1.0 bicycle computer featuring an altimeter. The more familiar you get with this model, the more enjoyable your trips are going to be. Hence, our urgent request:Please read thoroughly all the information provided in this manual. You are get...
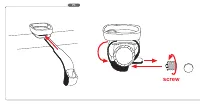
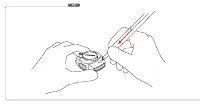
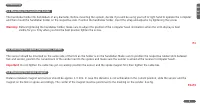
Page 19 - Mounting the handlebar holder
3 GB MC 1.0 1.Mounting 1.1 Mounting the handlebar holder The handlebar holder fits handlebars of any diameter. Before mounting the system, decide if you will be using your left or right hand to operate the computer and then mount the handlebar holder on the respective side. Position the handlebar ho...
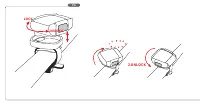
Page 20 - Twist-Click mounting of computer on to holder
GB MC 1.0 4 1.4 Twist-Click mounting of computer on to holder The Twist-Click mounting has been exclusively developed for the new line of VDO CYTEC computers. The VDO MC 1.0 also features the Twist-Click-System.The computerhead is put onto the handlebar and by a right turn of the computerhead (TWIST...
Page 21 - Basic information on how to operate your VDO MC 1.0; ALTI
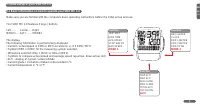
5 GB MC 1.0 2. Initial set-up of your VDO MC 1.0 2.1 Basic information on how to operate your VDO MC 1.0 Make sure you are familiar with the computers basic operating instructions before the initial set-up and use. Your VDO MC 1.0 features 3 keys / buttons Left ...... Center......RightMODE1..... ALT...
Page 22 - Interrogating information
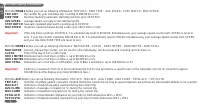
GB MC 1.0 6 2.2 Interrogating information With the MODE1 button you call up following information: TRIP DIST - RIDE TIME - AVG SPEED - STOP WATCH - MAX SPEEDTRIP DIST trip counter for your individual trip, counting to 999.99 km or mi RIDE TIME trip timer featuring automatic start/stop function up to...
Page 23 - Calling up set-up modes for computer / speedometer functions
7 GB MC 1.0 2.3 Calling up set-up modes for computer / speedometer functions Other than calling up various functions and informations, the MODE 1 key calls up any set-up mode. Calling up the set-up modes requires a 3 sec pressing of the MODE 1 key.Set-up modes can be entered from various information...
Page 24 - Selecting your language
GB MC 1.0 8 2.4 Selecting your language After installing the battery or pressing the AC-button your VDO MC 1.0 automatically requests a display language to be selected. After installing the battery, your VDO MC 1.0 first greets you in English (by default) displaying "ENJOY YOUR MC1.0" The VD...
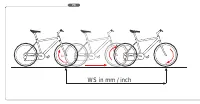
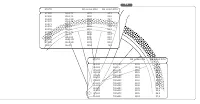
Page 25 - How to determine the precise wheelsize
9 GB MC 1.0 2.5 Selecting the wheel circumference (wheelsize) Your computer VDO MC 1.0 indicates your wheel size as WS (Wheelsize) = wheel circumference. Your VDO MC 1.0 is able to process two different wheelsizes for two different bikes (i.e. road bike and mountainbike) The following default values...
Page 26 - By pressing MODE 1 call TRIP DIST in your display.
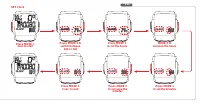
GB MC 1.0 10 2.5.2 Entering (programming) the wheelsize(s) Step 1: By pressing MODE 1 call TRIP DIST in your display. Step 2: Press MODE 1 for 3 sec. In the upper part of the display you see "WS1" and "KMH" or "MPH" flashing. The lower part of the display alternately shows &#...
Page 27 - Setting the clock CLK; To access the clock setup mode proceed as follows:; Step 1: MODE 2 calls the CLK information into your display
11 GB MC 1.0 2.5.3 Switching wheelsizes (changing from WS1 to WS2) To change from wheelsize 1 to wheelsize 2 and vice versa press and hold MODE1 and MODE2 simultaneously for 3 sec. Warning: Once you have switched from wheelsize 1 to wheelsize 2 or vice versa following Tripdata of wheelsize 1 or 2 is...
Page 28 - Step 1: MODE 2 calls NAVIGATOR into display; Your VDO MC 1.0 will be counting on from this preset value.
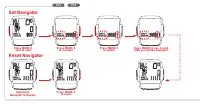
GB MC 1.0 12 2.7 The NAVIGATOR The NAVIGATOR is a second, individual trip distance counter that can be:• manually reset to zero• preset to a certain value, the trip distance is then counted from this value. The NAVIGATOR is very helpful following road book instructions or tour suggestions of bike ma...
Page 29 - MODE 2 calls NAVIGATOR into display
13 GB MC 1.0 2.7.2 Resetting the NAVIGATOR to zero Step 1: MODE 2 calls NAVIGATOR into display Step 2: Press MODE 2 for 3 sec., the value indicated is being reset to zero. Your VDO MC 1.0 will be counting on from zero. Warning: Before resetting to zero, make sure the information NAVIGATOR is called ...
Page 30 - Manual operation of the STOPWATCH; Following data may be individually reset to zero, if desired so:
GB MC 1.0 14 2.9 Manual operation of the STOPWATCH Your VDO MC 1.0 features a manual stopwatch in addition to the ride-timer with automatic Start/Stop function. The manual stopwatch is counting up to 19:59:59 HH:MM:SS There are two ways to call in the stopwatch and simultaneously start it: Direct St...
Page 31 - Service Interval Indicator
15 GB MC 1.0 4. Service Interval Indicator Your VDO MC 1.0 features a Service Interval Indicator to remind you to have your bike serviced at your trusted bike shop. The service interval reminder is indicated separately for both your bikes.Every 750 km / 468 mi, the service icon is activated.The serv...
Page 32 - Altimeter information of your VDO MC 1.0; C or
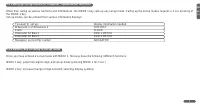
GB MC 1.0 16 6. Altimeter information of your VDO MC 1.0 Your VDO MC 1.0 does permanentely display following altimeter-information:• current altitude in meters of feet• current incline or grade in %• current temperature in ° C or ° F Important: Current incline or grade is displayed in increments of ...
Page 33 - The home altitude or basis altitude of choice
17 GB MC 1.0 6.1. The home altitude or basis altitude of choice 6.1.1. Significance of the home or basis altitude The altitude calculation works by measuring barometric pressure. Your VDO MC 1.0 converts the data of current barometric pressure into the respective altitude. In order for your VDO MC 1...
Page 34 - Step 1: Get TRIP ALTI in display
GB MC 1.0 18 6.1.2. Setting up / entering your home or basis altitude Step 1: By pressing ALTI call TRIP ALTI in the display. Push MODE1 for 3 sec ENTER HOME ALTI TUDE and its previous value will be displayed. Step 2: By pressing MODE2 the previous value is increased. Hold down the button to quickly...
Page 35 - Correction of actual altitude
19 GB MC 1.0 6.2 Correction of actual altitude While you ride, the airpressure changes due to your gain in altitude as well as due to a wether change.To correct that influence of the wether change you can also adjust the actual altitude display at your MC 1.0.Should you see a sign indicating actual ...
Page 36 - Please take care to retain your receipt of purchase.
GB MC 1.0 20 8. Warranty We warranty VDO MC 1.0 (sensor, computer head and handlebar holder) to the original purchaser for five years from date of purchase against defects in material and workmanship. This does not cover the batteries and defects resulting from normal wear and tear, improper care, a...