Page 2 - TYLZA; CONTACT US
THANK YOU FOR YOUR PURCHASE Thank you for your purchase. We know that you have many brands and products to choose from and we are honored to know that you have decided to take one of our products into your home and hope that you enjoy it. TYLZA appliances are designed according to the strictest safe...
Page 3 - Range Hood; TABLE OF CONTENTS; Install a circulating charcoal filter
TYLZA range hoods 2 | E06 VICTORY range hoods Q1 | 3 Important Safety Notice................................................................... 3Electrical Requirements................................................................... 5Venting Requirements..............................................
Page 4 - • DO NOT; To reduce the risk of fire, electric shock, or injury to persons:; power from being switched ON accidentally.; To reduce the risk of a stove top grease fire:; Use high settings on cooking range only when necessary.; IMPORTANT SAFETY NOTICE
VICTORY range hoods | Q1 2 TYLZA range hoods E06 | 3 • The installation in this manual is intended for qualified installers, service technicians or persons with similar qualified background. Installation and electrical wiring must be done by qualified professionals and in accordance with all applica...
Page 5 - • Clean ventilating fan frequently.; tell you what can happen if the instructions are not followed.
TYLZA range hoods 4 | E06 VICTORY range hoods Q1 | 5 • Clean ventilating fan frequently. • Always use appropriate cookware and utensils size. • Always use cookware appropriate for the size of the surface element. To reduce the risk of injury to persons in the event of a stove top grease fire: • Smot...
Page 6 - IMPORTANT: Observe all governing codes and ordinances.; It is the customer’s responsibility:; DO NOT; on; ELECTRICAL REQUIREMENTS
VICTORY range hoods | Q1 4 TYLZA range hoods E06 | 5 IMPORTANT: Observe all governing codes and ordinances. It is the customer’s responsibility: • To contact a qualified electrician • To assure that the electrical installation is adequate and in conformance with National Electrical Code and all loca...
Page 7 - For the most efficient & quiet operation:; USE 6” ROOF OR WALL VENT CAP; mounting height above range.; VENTING REQUIREMENTS
TYLZA range hoods 6 | E06 VICTORY range hoods Q1 | 7 • Vent system must terminate to the outside (roof or side wall). • DO NOT terminate the vent system in an attic or other enclosed area. • DO NOT use 4” (10.2 cm) laundry-type wall caps. • Use metal/aluminum vent only. Rigid metal/aluminum vent is ...
Page 8 - Duct Run Calculation:; Duct Run Calcuation example:; CALCULATING VENT SYSTEM LENGTH
VICTORY range hoods | Q1 6 TYLZA range hoods E06 | 7 To calculate the length of the duct system you require, subtract the equivalent feet for each “Vent piece” (Table Below) used in the system from the “Recommended maximum run” (Table Below). The longest duct run that is acceptable (if completely st...
Page 9 - REQUIRED TOOLS
Putty Knife Marker or Pencil Tape Measure Level Phillips Screwdriver Aluminum Tape Power Drill Utility Knife Drywall Knife TYLZA range hoods 8 | E06 VICTORY range hoods Q1 | 9 REQUIRED TOOLS
Page 10 - PARTS SUPPLIED; but is not included. Please review contents before installation.; Vent
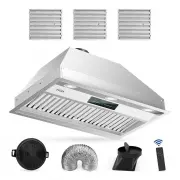
VICTORY range hoods | Q1 8 TYLZA range hoods E06 | 9 PARTS SUPPLIED NOTE: Where necessary, additional screws will be needed for installation and added support, but is not included. Please review contents before installation. Stainless steel baffle filter (x3) (x 2 ) (x 8 ) (x6) Ø - 6” Transition Ø -...
Page 11 - Series; TYLZA range hoods
',0(16,216 A % E 0 6 Series 〞 ò 〞 〞 ò 〞 TYLZA range hoods 1 0 | E06
Page 12 - Excessive Weight; Require two or more persons to; BEFORE INSTALLING THE RANGE HOOD, CHECK FOR PHYSICAL DAMAGES.; If there is a grinding noise coming from the motor,; DO NOT INSTALL IT; Advanced Preparations:; Be familiar with the controls of the range hood.; PREPARATION
Excessive Weight Require two or more persons to move and install this range hood. Spinal or other bodily injurie s could occur if it is not followed. TYLZA range hoods VICTORY range hoods Q1 | 13 BEFORE INSTALLING THE RANGE HOOD, CHECK FOR PHYSICAL DAMAGES. THIS RANGE HOODS COMES WITH A WIRE AND PLU...
Page 13 - Model; Ensure; BACK; Installation Holes; INSTALLATION
TYLZA range hoods 1 2 | E06 VICTORY range hoods Q2 | 15 Model X Y Z E06 -30 28 ½ ” 1 7 ¼ ” Min. 1 ” E06 -36 33 ” 17 ¼ ” Min. 1 ” Y Y X Z (1) Use M4 - 4mm big head screws to fasten on 6”-Ø transition to the opening of the fan motor exit. (2) Cut an opening in the bottom of the cabinet, using the dime...
Page 14 - ” Transition; Side Cabinet; Ceiling; VICTORY range hoods
Centerline Min: 26” Max: 30” Optimal: 28” The designer will determine width and depth of the cabinet housing to encase the range hood model selected. Wall or roof vent may be installed in these areas but not recommended Allow spacing for wood blocking to bottom panel 6” Transition E06-30 Range Hood ...
Page 15 - Counter; binet; Counter; CAUTION: Make certain the range hood is secure before releasing!; binet; Counter
Ca binet Counter Top Ceiling Wall Placement of plywood back support Placement of plywood back support Ca binet Counter Top Ceiling Wall TYLZA range hoods 1 4 | E06 VICTORY range hoods Q2 | 17 (3) Fasten a plywood back support with a depth of 1” using woodscrews to mount into the studs for support. (...
Page 16 - WALL VENT; Cut out hole; OPTIONAL; Duct inserted
*6” - Ø Elbow Duct *6” - Ø Transition Cut out hole in wall to accommodate elbow duct. WALL VENT Counter Top Ceiling Wall Use aluminum foil tape to make all joints secure and air tight Use aluminum foil tape to make all joints secure and air tight *6”- Ø Duct *6”- Ø Transition Cut out hole on the top...
Page 17 - duct; WOODBLOCK; Prior to raising and inserting the range hood for
Ca binet Counter Top Ceiling Wall Placement of plywood back support Placement of plywood back support Counter Top Ceiling Wall TYLZA range hoods 1 6 | E06 VICTORY range hoods Q2 | 19 (3) Fasten a plywood back support with a depth of 1” using woodscrews to mount into the studs for support. (4) Fabric...
Page 18 - CAUTION: Range hood is not fully secure, do; CAUTION: Make certain the range hood is
VICTORY range hoods | Q2 18 TYLZA range hoods E06 | 1 7 (6) Fasten with woodscrews from the inner back panel of the range hood into the easured pre-drilled installation holes. CAUTION: Range hood is not fully secure, do not release. Always maintain hold while preparing to add anchor screws Counter T...
Page 20 - Optional Backdraft Damper; Wall; duct work into spaces between; VENTING METHODS
Motor Optional Backdraft Damper Wrap insulation required for cold climates Minimum 6” Ø Duct Wall Vent Roof Vent 36” typical Min: 24” Max: 30” 18 ¼ ” VICTORY range hoods | Q2 20 TYLZA range hoods E06 | 19 IMPORTANT: • NEVER exhaust air or terminate duct work into spaces between walls, crawl spaces, ...
Page 21 - INSTALL A CIRCULATING CHARCAL FILTER; with Ductless Models.
INSTALL A CIRCULATING CHARCAL FILTER Skip this step if you are installing a Ducted Range Hood. Charcoal Filters are only included with Ductless Models. Capable of Vent-less or recirculation Operation, please install this charcoal carbon filter as picture.(NO NEED TO DISASSEMBLE THE VOLUTE) Warning: ...
Page 22 - WIRING DIAGRAM
VICTORY range hoods | Q1 18 WIRING DIAGRAM TYLZA range hoods E06 | 21
Page 23 - RANGE HOOD OPERATIONS; Minus Button - used to decrease settings.
RANGE HOOD OPERATIONS A. Plus Button - used to increase settings. B. Minus Button - used to decrease settings. C. Timer - only works when the range hood fan is running, touch once, the timer has a default setting of 15 minutes; use button A or B to increase or decrease time durationdepending on how ...
Page 24 - See Replacing the light bulbs page.; For all other inquiries, please contact; TROUBLESHOOTING
VICTORY range hoods Q1 | 21 1. If the range hood or lights do not operate after installation: 2. The range hood vibrates when the blower is on: 3. The blower or fan seems weak: 4. The lights work but the blower is not spinning at all, is stuck or is rattling. 5. The hood is not venting out properly:...
Page 25 - these instructions for future reference.; USE AND CARE INFORMATION
VICTORY range hoods | Q1 20 Operations: • Read and understand all instructions and warnings in this manual before operating the appliance. Save these instructions for future reference. • Always leave safety grills and filters in place. Without these components, operating blowers could catch on to ha...
Page 26 - Cleaning Exterior surfaces:; , to polish and buff out; MAINTENANCE; replaced on a regular basis but are required to be kept clean.
VICTORY range hoods Q1 | 23 SAFETY WARNING: Never put your hand into area housing the fan while the fan is operating! For optimal operation, clean range hood and all baffle/spacer/filter/grease tunnel/oil container regularly. Regular care will help preserve the appearance of the range hood. Cleaning...
Page 27 - Replacing; LED; Light Housing; BULB REPLACEMENT
VICTORY range hoods Q1 | 25 Replacing LED 3W 120V Light Fixture: 1. Make sure the range hood is unplugged or turn OFF breaker and the lights are cool to touch. 2. Place a flat-head screwdriver between light housing and hood body 3. Gently pry up the light housing and search for the metal clip 4. App...
Page 28 - EXPLODED DIAGRAM
1 2 3 8 14 15 17 16 9 10 18 19 20 4 6 5 7 EXPLODED DIAGRAM TYLZA range hoods E06 | 2 7 11 12 13
Page 29 - WARRANTY AND SERVICE; for detailed warranty information.; Warranty Exclusions; or; Contact Card
VICTORY range hoods | Q1 24 WARRANTY AND SERVICE TYLZA range hoods 2 8 | E06 Warranty Period 1. Customers are entitled to replacement or free repair service in case of quality defect(s) found inthe product within 15 days upon receipt of the product.2. Customers are entitled to free repair service fr...
Page 30 - Correct Disposal of this product:; with other household wastes. To prevent possible harm to the
Correct Disposal of this product: This marking indicates that this appliance should not be disposed with other household wastes. To prevent possible harm to the environment or human health from uncontrolled waste disposal, recycle it responsibly to promote the sustainable reuse of material resources...