Page 2 - CONTENTS; English
CONTENTS 1 / English 6 / Български 11 / Čeština 16 / Hrvatski 21 / Latviešu 26 / Lietuvių 31 / Magyar 36 / Polski 41 / Română 46 / Slovenčina 51 / Slovenščina 56 / Srpski jezik/Српски језик 61 / Қазақша 66 / Русский язык 71 / Українська мова 76 / Eesti 81 / Español (Latinoamérica) 86 / Português Br...
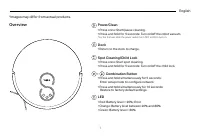
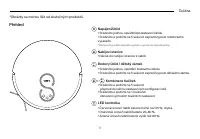
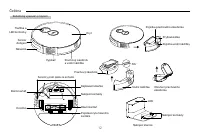
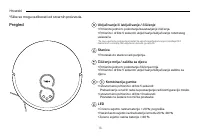
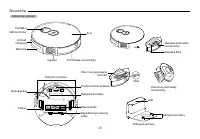
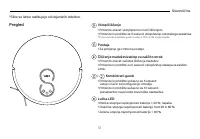
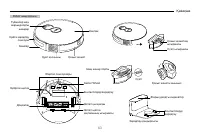
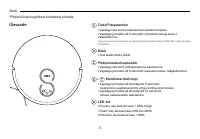
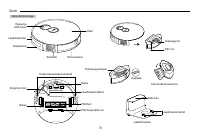
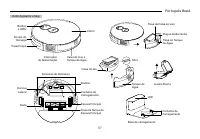
Page 3 - Overview; • Press and hold for 5 seconds: Turn on/off the robot vacuum.; Dock; • Return to the dock to charge.; Spot Cleaning/Child Lock; • Press and hold simultaneously for 5 seconds:; LED
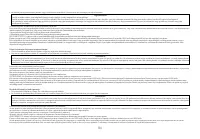
1 English Overview Power/Clean • Press once: Start/pause cleaning. • Press and hold for 5 seconds: Turn on/off the robot vacuum. *For the first use, slide the power switch from OFF to ON to turn on. Dock • Return to the dock to charge. Spot Cleaning/Child Lock • Press once: Start spot cleaning. • Pr...
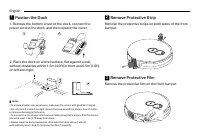
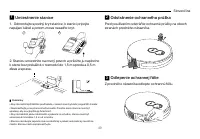
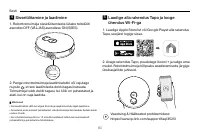
Page 6 - Postion the Dock; Remove the bottom cover of the dock, connect the; Remove Protective Strip; Remove the protective strips on both sides of the front; Remove Protective Film; Remove the protective film on the front bumper.
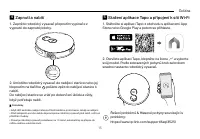
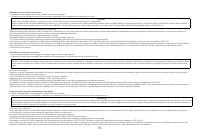
4 English Filter Latch 1 Postion the Dock 1. Remove the bottom cover of the dock, connect the power cord to the dock, and then replace the cover. 1 2 2. Place the dock on a level surface, flat against a wall, without obstacles within 1.5m (4.9ft) in front and 0.5m (1.6ft) on left and right. 1.5 m (4...
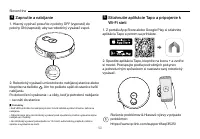
Page 7 - Download the Tapo App and Connect to
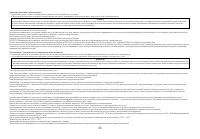
5 English 5 Download the Tapo App and Connect to Wi-Fi 1. Download the Tapo app from the App Store or Google Play, then log in. 2. Open the Tapo app, tap + icon, and select your model. Follow the step-by-step instructions to easily set up your robot vacuum. Troubleshooting & Voice Prompts for Is...
Page 8 - Български; Преглед на продукта; Захранване/Почистване
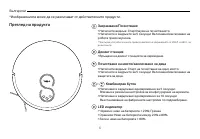
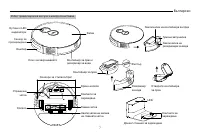
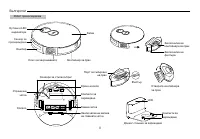
6 Български Преглед на продукта Захранване/Почистване • Натиснете веднъж: Старт/пауза на почистването. • Натиснете и задръжте за 5 секунди: Включване/изключване на робота прахосмукачка. *При първа употреба плъзнете превключвателя на захранването от ИЗКЛ. на ВКЛ., за да включите. Докинг станция • Връ...
Page 11 - Разполагане на докинг станцията; Свалете защитната лента
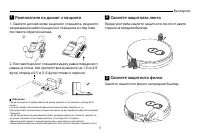
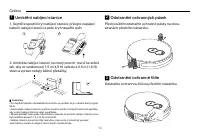
9 Български 1 Разполагане на докинг станцията 1. Свалете долния капак на докинг станцията, свържете захранващия кабел към докинг станцията и след това поставете обратно капака. 1 2 2. Поставете докинг станцията върху равна повърхност, равна на стена, без препятствия в рамките на 1,5 м (4,9 фута) отп...
Page 12 - Изтеглете приложението Tapo и се
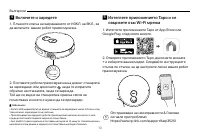
10 Български 5 Изтеглете приложението Tapo и се свържете към Wi-Fi мрежа 1. Изтеглете приложението Tapo от App Store или Google Play, след което влезте. 2. Отворете приложението Tapo, докоснете иконата + и изберете вашия модел. Следвайте инструкциите стъпка по стъпка, за да настроите лесно вашия роб...
Page 13 - Čeština; Přehled; Nabíjecí stanice
11 Čeština Přehled Napájení/úklid • Stiskněte jednou: spuštění/pozastavení úklidu. • Stiskněte a podržte na 5 sekund: zapnutí/vypnutí robotického vysavače. *Před prvním použitím přepněte vypínač z vypnuté do zapnuté polohy. Nabíjecí stanice • Návrat do nabíjecí stanice k nabití. Bodový úklid / dětsk...
Page 16 - Umístění nabíjecí stanice; Odstranění ochranných pásek
14 Čeština Pojistka filtru 1 Umístění nabíjecí stanice 1. Sejměte spodní kryt nabíjecí stanice, připojte napájecí kabel k nabíjecí stanici a poté kryt nasaď te zpět. 1 2 2. Umístěte nabíjecí stanici na rovný povrch, rovně ke stěně tak, aby ve vzdálenosti 1,5 m (4,9 ft) vpředu a 0,5 m (1,6 ft) vlevo ...
Page 17 - Stažení aplikace Tapo a připojení k síti Wi-Fi
15 Čeština 5 Stažení aplikace Tapo a připojení k síti Wi-Fi 1. Stáhněte si aplikaci Tapo z obchodu s aplikacemi App Store nebo Google Play a potom se přihlaste. 2. Otevřete aplikaci Tapo, klepněte na ikonu „+“ a vyberte svůj model. Podle zobrazených pokynů krok za krokem snadno nastavte robotický vy...
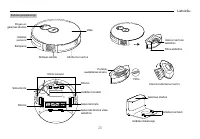
Page 18 - Hrvatski; Pregled; Uključivanje ili isključivanje / čišćenje; • Povratak do stanice radi punjenja.; Čišćenje mrlja / zaštita za djecu; • Pritisnite jednom: pokretanje čišćenja mrlja.; Kombinacija gumba; • Istovremeno pritisnite i držite 5 sekundi:
16 Hrvatski Pregled Uključivanje ili isključivanje / čišćenje • Pritisnite jednom: pokretanje/zaustavljanje čišćenja. • Pritisnite i držite 5 sekundi: uključivanje/isključivanje robotskog usisivača. *Za prvu upotrebu prebacite prekidač za uključivanje/isključivanje iz položaja OFF (isključeno) u pol...
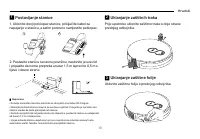
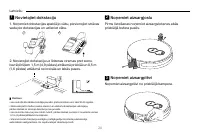
Page 21 - Postavljanje stanice; Uklanjanje zaštitnih traka
19 Hrvatski Utor filtra 1 Postavljanje stanice 1. Uklonite donji poklopac stanice, priključite kabel za napajanje u stanicu, a zatim ponovno namjestite poklopac. 1 2 2. Postavite stanicu na ravnu površinu, naslonite je uza zid i pripazite da nema prepreka unutar 1,5 m ispred te 0,5 m s lijeve i desn...
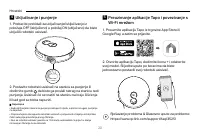
Page 22 - Preuzimanje aplikacije Tapo i povezivanje s
20 Hrvatski 5 Preuzimanje aplikacije Tapo i povezivanje s Wi-Fi mrežom 1. Preuzmite aplikaciju Tapo iz trgovine App Store ili Google Play, a zatim se prijavite. 2. Otvorite aplikaciju Tapo, dodirnite ikonu + i odaberite svoj model. Slijedite upute po koracima da biste jednostavno postavili svoj robo...
Page 23 - Latviešu; Pārskats; • Nospiediet un turiet 5 sekundes: ieslēdziet/izslēdziet robotu; Dokstacija; • Atgriezties pie dokstacijas, lai uzlādētu.; Vietas tīrīšana/Bērnu slēdzene; lai konfigurētu tīklu.
21 Latviešu Pārskats Ieslēgt, izslēgt / tīrīt • Nospiediet vienu reizi: sāciet/pauzējiet tīrīšanu. • Nospiediet un turiet 5 sekundes: ieslēdziet/izslēdziet robotu putekļsūcēju. *Pirmo reizi lietojot, pabīdiet barošanas slēdzi no stāvokļa OFF uz ON, lai ieslēgtu. Dokstacija • Atgriezties pie dokstaci...
Page 26 - Novietojiet dokstaciju; Noņemiet aizsargjoslu
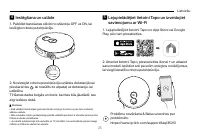
24 Latviešu 1 Novietojiet dokstaciju 1. Noņemiet dokstacijas apakšējo vāku, pievienojiet strāvas vadu pie dokstacijas un uzlieciet vāku. 1 2 2. Novietojiet dokstaciju uz līdzenas virsmas pret sienu, bez šķēršļiem 1,5 m (4,9 pēdas) attālumā priekšā un 0,5 m (1,6 pēdas) attālumā no kreisās un labās pu...
Page 27 - Lejupielādējiet lietotni Tapo un izveidojiet
25 Latviešu 5 Lejupielādējiet lietotni Tapo un izveidojiet savienojumu ar Wi-Fi 1. Lejupielādējiet lietotni Tapo no App Store vai Google Play, pēc tam piesakieties. 2. Atveriet lietotni Tapo, pieskarieties ikonai + un atlasiet savu modeli. Izpildiet soli pa solim sniegtos norādījumus, lai viegli ies...
Page 28 - Lietuvių; Apžvalga; Stotelė
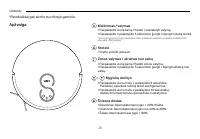
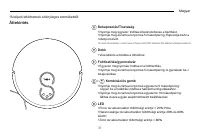
26 Lietuvių Apžvalga Maitinimas / valymas • Paspauskite vieną kartą: Pradėti / sustabdyti valymą. • Paspauskite ir palaikykite 5 sekundes: įjungti / išjungti robotą siurblį. *Kai norite įjungti pirmojo naudojimo metu, paslinkite maitinimo jungiklį iš padėties OFF (išjungta) į ON (įjungta). Stotelė •...
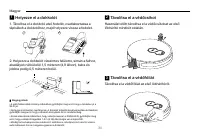
Page 31 - Padėkite stotelę; Nuimkite apsauginę juostelę
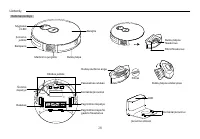
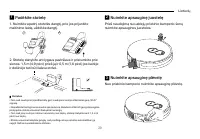
29 Lietuvių Filtro fiksatorius 1 Padėkite stotelę 1. Nuimkite apatinį stotelės dangtį, prie jos prijunkite maitinimo laidą, uždėkite dangtį. 1 2 2. Stotelę statykite ant lygaus paviršiaus ir pristumkite prie sienos. 1,5 m (4,9 pėd.) prieš ją ir 0,5 m (1,6 pėd.) jos kairėje ir dešinėje turi būti lais...
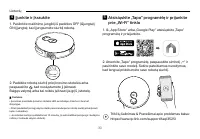
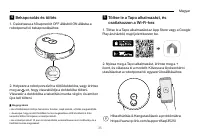
Page 32 - Atsisiųskite „Tapo“ programėlę ir prijunkite
30 Lietuvių 5 Atsisiųskite „Tapo“ programėlę ir prijunkite prie „Wi-Fi“ tinklo 1. Iš „App Store“ arba „Google Play“ atsisiųskite „Tapo“ programėlę ir prisijunkite. 2. Atverkite „Tapo“ programėlę, paspauskite simbolį „+“ ir pasirinkite savo modelį. Sekite pateikiamus nurodymus, kad lengvai pridėtumėt...
Page 33 - Magyar; Áttekintés; Bekapcsolás/Tisztaság
31 Magyar Áttekintés Bekapcsolás/Tisztaság • Nyomja meg egyszer: Indítsa el/szüneteltesse a tisztítást. • Nyomja meg és tartsa lenyomva 5 másodpercig: Kapcsolja be/ki a robotporszívót. *Az első használatkor csúsztassa a főkapcsolót OFF állásból ON állásba a bekapcsoláshoz. Dokk • Visszatérés a dokkb...
Page 36 - Helyezze el a dokkolót; Távolítsa el a védőcsíkot
34 Magyar Szűrő retesz 1 Helyezze el a dokkolót 1. Távolítsa el a dokkoló alsó fedelét, csatlakoztassa a tápkábelt a dokkolóhoz, majd helyezze vissza a fedelet. 1 2 2. Helyezze a dokkolót vízszintes felületre, simán a falhoz, akadályok nélkül elöl 1,5 méteren (4,9 lábon), balra és jobbra pedig 0,5 m...
Page 37 - Töltse le a Tapo alkalmazást, és
35 Magyar 5 Töltse le a Tapo alkalmazást, és csatlakozzon a Wi-Fi-hez 1. Töltse le a Tapo alkalmazást az App Store vagy a Google Play áruházból, majd jelentkezzen be. 2. Nyissa meg a Tapo alkalmazást, érintse meg a + ikont, és válassza ki a modellt. Kövesse a lépésenkénti utasításokat a robotporszív...
Page 38 - Polski; Informacje ogólne; Stacja dokująca
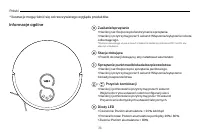
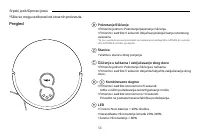
36 Polski Informacje ogólne Zasilanie/sprzątanie • Naciśnij raz: Rozpoczęcie/wstrzymanie sprzątania. • Naciśnij i przytrzymaj przez 5 sekund: Włączenie/wyłączenie robota odkurzającego. *Podczas pierwszego użycia przesuń przełącznik zasilania z położenia OFF na ON, aby włączyć urządzenie. Stacja doku...
Page 41 - Ustawianie stacji dokującej; Zdejmij pasek ochronny
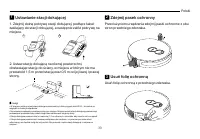
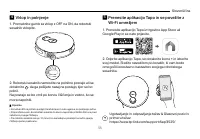
39 Polski Zamek filtra 1 Ustawianie stacji dokującej 1. Zdejmij dolną pokrywę stacji dokującej, podłącz kabel zasilający do stacji dokującej, a następnie załóż pokrywę na miejsce. 1 2 2. Ustaw stację dokującą na równej powierzchni, dostawiając stację do ściany, w miejscu w którym nie ma przeszkód 1,...
Page 42 - Pobierz aplikację Tapo i połącz się z siecią
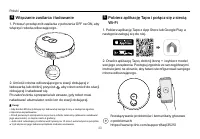
40 Polski 5 Pobierz aplikację Tapo i połącz się z siecią Wi-Fi 1. Pobierz aplikację Tapo z App Store lub Google Play, a następnie zaloguj się do niej. 2. Otwórz aplikację Tapo, dotknij ikonę + i wybierz model swojego urządzenia. Postępuj zgodnie ze szczegółowymi instrukcjami na ekranie, aby łatwo sk...
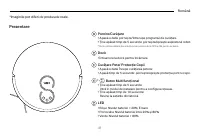
Page 43 - Română; Prezentare
41 Română Prezentare Pornire/Curăţare • Apasă o dată: pornește/ întrerupe programul de curățare. • Ține apăsat timp de 5 secunde: pornește/oprește aspiratorul robot. *Pentru prima utilizare,trece butonul de pornire de la OFF la ON pentru activare. Dock • Întoarcere la dock pentru încărcare. Curățare...
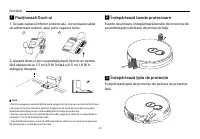
Page 46 - de alimentare la dock, apoi pune capacul la loc.; Îndepărtează banda protectoare; Înainte de utilizare, îndepărtează benzile de protecție de; Îndepărtează țipla de protecție; Îndepărtează țipla de protecție de pe bara de protecție
44 Română Închidere filtru 1 Poziționază Dock-ul 1. Scoate capacul inferior al dock-ului, conectează cablul de alimentare la dock, apoi pune capacul la loc. 1 2 2. Așează dock-ul pe o suprafață plană, lipit de un perete, fără obstacole la 1,5 m (4,9 ft) în față și 0,5 m (1,6 ft) în stânga și dreapta...
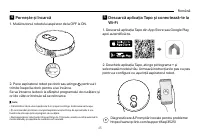
Page 47 - Descarcă aplicația Tapo și conectează-te la
45 Română 5 Descarcă aplicația Tapo și conectează-te la Wi-Fi 1. Descarcă aplicația Tapo din App Store sau Google Play, apoi autentifică-te. 2. Deschide aplicația Tapo, atinge pictograma + și selectează modelul tău. Urmează instrucțiunile pas cu pas pentru a configura cu ușurință aspiratorul robot. ...
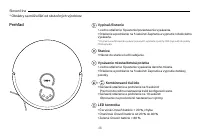
Page 48 - Slovenčina; Prehľad; Stanica
46 Slovenčina Prehľad Vypínač/čistenie • Jedno stlačenie: Spustenie/pozastavenie vysávania. • Stlačenie a podržanie na 5 sekúnd: Zapnutie a vypnutie robotického vysávača. * Pri prvom použití zapnite vysávač posunutím vypínača z polohy OFF (vypnuté) do polohy ON (zapnuté). Stanica • Návrat do stanice...
Page 51 - Umiestnenie stanice; Odstránenie ochranného prúžka
49 Slovenčina Západka filtra 1 Umiestnenie stanice 1. Odmontujte spodný kryt stanice, k stanici pripojte napájací kábel a potom znova nasaď te kryt. 1 2 2. Stanicu umiestnite na rovný povrch a priložte ju naplocho k stene bez prekážok v rozmedzí do 1,5 m spredu a 0,5 m zľava a sprava. 1.5 m (4.9 ft)...
Page 52 - Stiahnutie aplikácie Tapo a pripojenie k
50 Slovenčina 5 Stiahnutie aplikácie Tapo a pripojenie k Wi-Fi sieti 1. Z portálu App Store alebo Google Play si stiahnite aplikáciu Tapo a potom sa prihláste. 2. Spustite aplikáciu Tapo, klepnite na ikonu + a zvoľ te si model. Postupujte podľa podrobných pokynov a jednoduchým spôsobom si nastavte s...
Page 53 - Slovenščina; Postaja
51 Slovenščina Pregled Vklop/čiščenje • Pritisnite enkrat: vklop/premor med čiščenjem. • Pritisnite in pridržite za 5 sekund: vklop/izklop robotskega sesalnika. *Pri prvi uporabi prestavite gumb za vklop z OFF na ON, da ga vklopite. Postaja • Za polnjenje ga vrnite na postajo. Čiščenje madežev/zakle...
Page 56 - Namestite postajo; Odstranite spodnjo zaščito s postaje, priklopite napajalni; Odstranite zaščitni trak; Pred uporabo odstranite zaščitna trakova na obeh; Odstranite zaščitni film; Odstranite zaščitni film na sprednjem odbijaču.
54 Slovenščina 1 Namestite postajo 1. Odstranite spodnjo zaščito s postaje, priklopite napajalni kabel v postajo in nato zaščito vrnite na njeno mesto. 1 2 2. Postajo namestite na ravno površino, ob steno, brez ovir na razdalji 1,5 metra spredaj in 0,5 metra na levi in desni. 1.5 m (4.9 ft) 0.5 m (1...
Page 57 - Prenesite aplikacijo Tapo in se povežite z
55 Slovenščina 5 Prenesite aplikacijo Tapo in se povežite z Wi-Fi omrežjem 1. Prenesite aplikacijo Tapo iz trgovine App Store ali Google Play in se nato prijavite. 2. Odprite aplikacijo Tapo, se dotaknite ikone + in izberite svoj model. Sledite navodilom po korakih, ki vam bodo omogočili enostavno n...
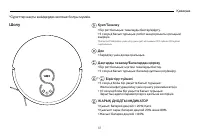
Page 58 - Srpski jezik/Српски језик
56 Srpski jezik/Српски језик Pregled Pokretanje/čišćenje • Pritisnite jednom: Pokretanje/pauziranje čišćenja. • Pritisnite i zadržite 5 sekundi: Uključivanje/isključivanje robotskog usisivača. *Za prvu upotrebu prevucite prekidač za pokretanje iz položaja ISKLJUČIVANJE u položaj UKLJUČIVANJE da bist...
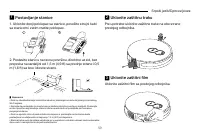
Page 61 - Uklonite donji poklopac sa stanice, povežite strujni kabl; Uklonite zaštitnu traku; Pre upotrebe uklonite zaštitne trake na obe strane; Uklonite zaštitni film; Uklonite zaštitni film sa prednjeg odbojnika.
59 Srpski jezik/Српски језик 1 Postavljanje stanice 1. Uklonite donji poklopac sa stanice, povežite strujni kabl sa stanicom i zatim vratite poklopac. 1 2 2. Postavite stanicu na ravnu površinu, direktno uz zid, bez prepreka na razdaljini od 1,5 m (4,9 ft) sa prednje strane i 0,5 m (1,6 ft) sa leve ...
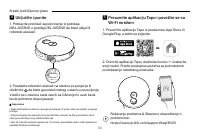
Page 62 - Preuzmite aplikaciju Tapo i povežite se sa
60 Srpski jezik/Српски језик 5 Preuzmite aplikaciju Tapo i povežite se sa Wi-Fi mrežom 1. Preuzmite aplikaciju Tapo iz prodavnice App Store ili Google Play, a zatim se prijavite. 2. Otvorite aplikaciju Tapo, dodirnite ikonicu + i izaberite svoj model. Pratite postupna uputstva za jednostavno podešav...
Page 63 - Қазақша; Шолу; Док
Қазақша 61 Шолу Қуат/Тазалау • Бір рет басыңыз: тазалауды бастау/кідірту. • 5 секунд басып тұрыңыз: робот шаңсорғышты қосыңыз/ өшіріңіз. *Алғаш рет пайдалану үшін қосу үшін қуат қосқышын OFF күйінен ON күйіне сырғытыңыз. Док • Зарядтау үшін докқа оралыңыз. Дақтарды тазалау/Балалардан қорғау • Бір ре...
Page 66 - Докты орналастырыңыз; Қорғаныс жолағын алып тастаңыз
64 Қазақша 1 Докты орналастырыңыз 1. Доктың төменгі қақпағын алыңыз, қуат сымын қондырмаға жалғаңыз, содан кейін қақпақты орнына салыңыз. 1 2 2. Докты қабырғаға қарсы тегіс, алдынан 1,5 м (4,9 фут) және солға және оңға 0,5 м (1,6 фут) қашықтықта кедергісіз тегіс жерге қойыңыз. 1.5 m (4.9 ft) 0.5 m (...
Page 67 - желісіне қосылыңыз
Қазақша 65 5 Tapo қолданбасын жүктеп алып, Wi-Fi желісіне қосылыңыз 1. App Store немесе Google Play дүкенінен Tapo қолданбасын жүктеп алып, жүйеге кіріңіз. 2. Tapo қолданбасын ашыңыз, + белгішесін түртіңіз және үлгіңізді таңдаңыз. Робот шаңсорғышты оңай орнату үшін қадамдық нұсқауларды орындаңыз. Ақ...
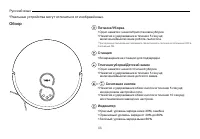
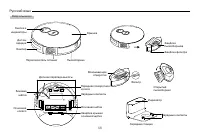
Page 68 - Русский язык; Обзор; Станция
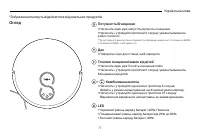
66 Русский язык Обзор Питание/Уборка • Одно нажатие: начало/приостановка уборки. • Нажатие и удерживание в течение 5 секунд: включение/выключение робота-пылесоса. *При первом использовании переведите переключатель питания из положения OFF в положение ON. Станция • Возвращение на станцию для подзаряд...
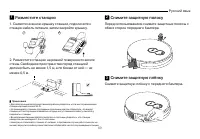
Page 71 - Разместите станцию; Снимите защитную полосу
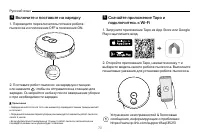
69 Русский язык Защёлка фильтра 1 Разместите станцию 1. Снимите нижнюю крышку станции, подключите к станции кабель питания, затем закройте крышку. 1 2 2. Разместите станцию на ровной поверхности возле стены. Свободное пространство перед станцией должно быть не менее 1,5 м, а по бокам от неё — не мен...
Page 72 - Скачайте приложение Tapo и
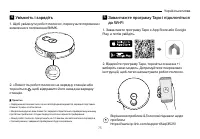
70 Русский язык 5 Скачайте приложение Tapo и подключитесь к Wi-Fi 1. Загрузите приложение Tapo из App Store или Google Play и выполните вход. 2. Откройте приложение Tapo, нажмите иконку + и выберите модель своего робота-пылесоса. Выполните пошаговые указания для установки робота-пылесоса. Устранение...
Page 73 - Українська мова; Огляд
71 Українська мова Огляд Потужність/Очищення • Натисніть один раз: запустіть/зупиніть очищення. • Натисніть і утримуйте протягом 5 секунд: увімкніть/вимкніть робот-пилосос. *Під час першого використання перемістіть перемикач живлення з положення ВИМК. у положення УВІМК., щоб увімкнути. Док • Поверні...
Page 76 - Розміщення Док; Зніміть захисну стрічку; Перед використанням зніміть захисні смуги з обох; Зніміть захисну плівку; Зніміть захисну плівку на передньому бампері.
74 Українська мова Засувка фільтра 1 Розміщення Док 1. Зніміть нижню кришку док-станції, під’єднайте шнур живлення до док-станції, а потім установіть кришку. 1 2 2. Розмістіть док-станцію на рівній поверхні, притиснувшись до стіни, без перешкод у межах 1,5 м (4,9 футів) спереду та 0,5 м (1,6 футів) ...
Page 77 - Завантажте програму Tapo і підключіться
75 Українська мова 5 Завантажте програму Tapo і підключіться до Wi-Fi 1. Завантажте програму Tapo з App Store або Google Play, а потім увійдіть. 2. Відкрийте програму Tapo, торкніться значка + і виберіть свою модель. Дотримуйтеся покрокових інструкцій, щоб легко налаштувати робот-пилосос. Вирішення ...
Page 78 - Eesti; Ülevaade; Dokk
76 Eesti Ülevaade Toide/Puhastamine • Vajutage üks kord: puhastamise käivitamine/paus. • Vajutage ja hoidke all 5 sekundit: robottolmuimeja sisse-/ väljalülitamine. *Esimesel kasutamisel lükake sisselülitamiseks toitelüliti asendist OFF (VÄLJAS) asendisse ON (SEES). Dokk • Tule laadimiseks dokki. Pl...
Page 81 - Pange dokk soovitud kohta; Eemaldage kaitseriba
79 Eesti Filtri riiv 1 Pange dokk soovitud kohta 1. Eemaldage doki alumine kate, ühendage toitejuhe dokiga ja pange kate tagasi. 1 2 2. Pange dokk tasasele pinnale, vastu seina nii, et ei oleks takistusi 1,5 m (4,9 jala) ulatuses ees ja 0,5 m (1,6 jala) ulatuses vasakul ja paremal. 1.5 m (4.9 ft) 0....
Page 82 - Laadige alla rakendus Tapo ja looge
80 Eesti 5 Laadige alla rakendus Tapo ja looge ühendus Wi-Fi-ga 1. Laadige Apple Store'ist või Google Playst alla rakendus Tapo, seejärel logige sisse. 2. Avage rakendus Tapo, puudutage ikooni + ja valige oma mudel. Robottolmuimeja hõlpsaks seadistamiseks järgige üksikasjalikke juhiseid. Veaotsing &...
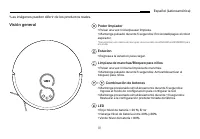
Page 83 - Visión general; Poder limpiador
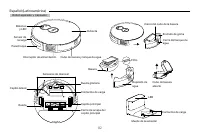
81 Español (Latinoamérica) Visión general Poder limpiador • Pulsar una vez: Iniciar/pausar limpieza. • Mantenga pulsado durante 5 segundos: Encienda/Apague el robot aspirador. *Para el primer uso, deslice el interruptor de encendido de APAGADO a ENCENDIDO para encender. Estacion • Regresa a la estac...
Page 86 - Coloque la estación; Retire la tira protectora
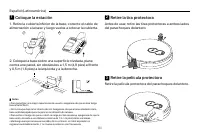
84 Español (Latinoamérica) Cierre del filtro 1 Coloque la estación 1. Retire la cubierta inferior de la base, conecte el cable de alimentación a la base y luego vuelva a colocar la cubierta. 1 2 2. Coloque la base sobre una superficie nivelada, plana contra una pared, sin obstáculos a 1,5 m (4,9 pie...
Page 88 - Português Brasil; Visão Geral; Base
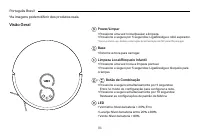
86 Português Brasil Visão Geral Power/Limpar • Pressione uma vez: Iniciar/pausar a limpeza. • Pressione e segure por 5 segundos: Liga/Desliga o robô aspirador. *Para o primeiro uso, deslize o interruptor de alimentação de OFF para ON para ligar. Base • Retorne à doca para carregar. Limpeza Local/Bl...
Page 91 - Posicione a Base; Remova a tampa inferior da base, conecte o cabo de; Remova a Tira de Proteção; Antes de usar, remova as tiras de proteção em ambos; Remova a Película Protetora; Remova a película protetora do para-choque dianteiro.
89 Português Brasil 1 Posicione a Base 1. Remova a tampa inferior da base, conecte o cabo de alimentação à base e recoloque a tampa. 1 2 2. Coloque a base em uma superfície plana, encostada a uma parede, sem obstáculos a 1,5 m (4,9 pés) na frente e 0,5 m (1,6 pés) à esquerda e à direita. 1.5 m (4.9...
Page 92 - Baixe o Aplicativo Tapo e Conecte-se ao
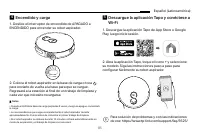
90 Português Brasil 5 Baixe o Aplicativo Tapo e Conecte-se ao Wi-Fi 1. Baixe o aplicativo Tapo na App Store ou Google Play e faça o login. 2. Abra o aplicativo Tapo, toque no ícone + e selecione seu modelo. Siga as instruções passo a passo para configurar facilmente o seu robô aspirador. Solução de...