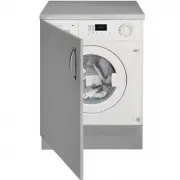
Page 2 - EN; Contents; This appliance is tagged
1 EN Contents 1. Precautions for safety and use 2 2. Installation instructions 5 3. Description of controls 8 4. Using the appliance for washing 9 5. Cleaning and maintenance 15 6. Troubleshooting 17 This appliance is tagged in accordance with European Directive 2002/96/EC on Waste Electrical and E-...
Page 3 - READ THE INSTRUCTIONS; PRECAUTIONS FOR SAFETY AND USE; Disposing of packaging; The manufacturer declines all liability for uses other than
EN 2 READ THE INSTRUCTIONS Attention! You are advised to read all the instructions in this manual carefully; it will inform you about the right conditions for the proper, safe use of your washing machine. It is very important to keep this instruction manual with the appliance for future ref-erence. ...
Page 5 - For Great Britain only; fused plug, to change a fuse in; The manufacturer declines all responsibility
EN 4 For Great Britain only Warning : this appliance must be earthed. Fuse replacement If the mains lead of this appliance is fitted with a BS 1363A 13amp fused plug, to change a fuse in this type of plug use an A.S.T.A . approved fuse to BS 1362 type and proceed as follows: 1. Remove the fuse cover...
Page 6 - all
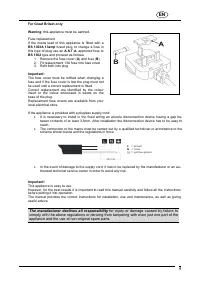
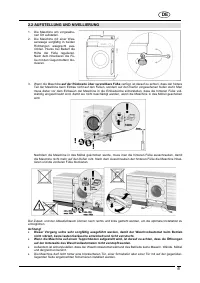
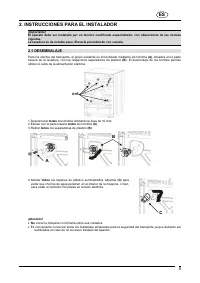
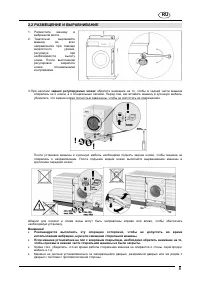
EN 5 2. INSTALLATION INSTRUCTIONS Important! The appliance must be installed by a qualified engineer in compliance with the relevant regulations. The washing machine is heavy. Take care when lifting it. 2.1 UNPACKING The unit on flexible mounts is fixed in place for transport using the screws ( A) o...
Page 7 - POSITIONING AND LEVELLING; adjustable rear feet
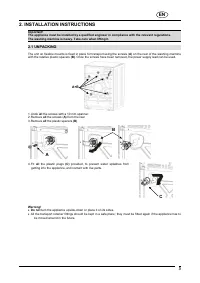
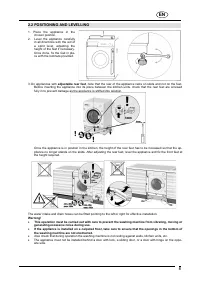
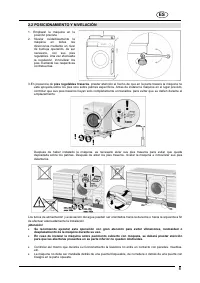
EN 6 2.2 POSITIONING AND LEVELLING 1. Place the appliance in the chosen position. 2. Level the appliance carefully in all directions with the aid of a spirit level, adjusting the height of the feet if necessary. Once done, fix the feet in pla-ce with the locknuts provided. 3. On appliances with adju...
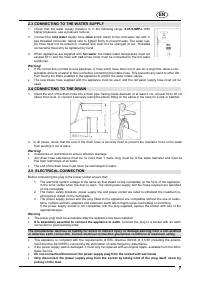
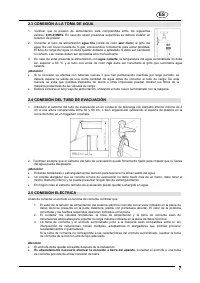
Page 8 - CONNECTING TO THE WATER SUPPLY
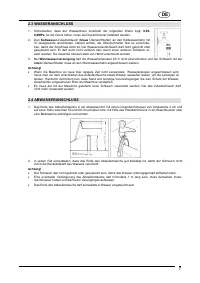
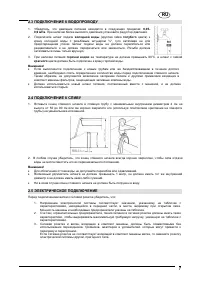
EN 7 2.3 CONNECTING TO THE WATER SUPPLY 1. Check that the water supply pressure is in the following range: 0,05-0,9MPa . With higher pressures, use a pressure reducer. 2. Connect the cold water supply hose ( blue screw collar) to the cold water tap with ¾ gas threaded connector, taking care to tight...
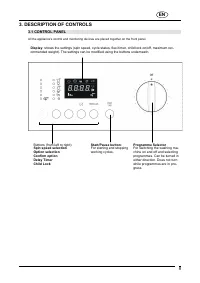
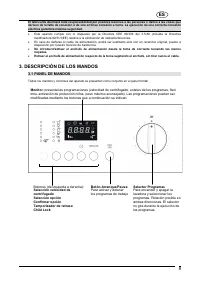
Page 9 - Programme Selector
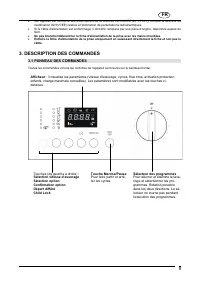
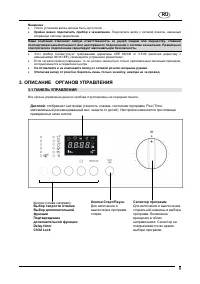
EN 8 3. DESCRIPTION OF CONTROLS 3.1 CONTROL PANEL All the appliance's control and monitoring devices are placed together on the front panel. Programme Selector For switching the washing ma-chine on and off and selecting programmes. Can be turned in either direction. Does not turn while programmes ar...
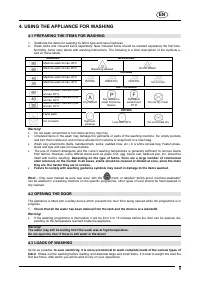
Page 10 - PREPARING THE ITEMS FOR WASHING; Wool; OPENING THE DOOR; LOADS OF WASHING; to save electricity, it is more economical to wash complete
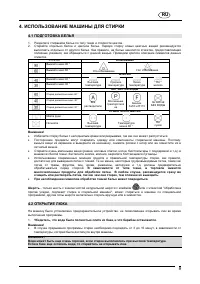
EN 9 4. USING THE APPLIANCE FOR WASHING 4.1 PREPARING THE ITEMS FOR WASHING 1. Subdivide the items for washing by fabric type and colour fastness. 2. Wash white and coloured items separately. New coloured items should be washed separately the first time. Normally, items carry labels with washing ins...
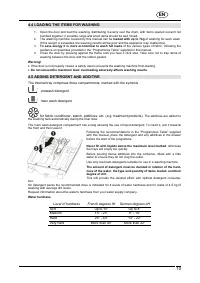
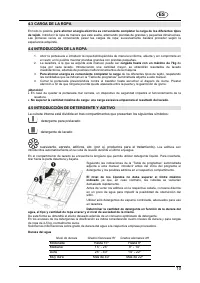
Page 11 - LOADING THE ITEMS FOR WASHING; loaded with up to 7kg; ADDING DETERGENT AND ADDITIVE; Never fill with liquids above the maximum level marked; Level of hardness
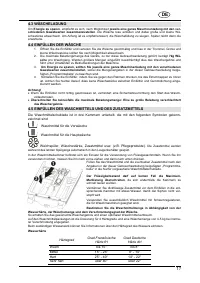
EN 10 4.4 LOADING THE ITEMS FOR WASHING 1. Open the door and load the washing, distributing it evenly over the drum, with items opened out and not bundled together; if possible, large and small items should be well mixed. 2. The washing machine covered by this manual can be loaded with up to 7kg of ...
Page 12 - POWDER DETERGENT DOSES; Laundry with normal dirt; LIQUID DETERGENT DOSES; all programmes without prewash.; PROGRAMMES AND FUNCTIONS
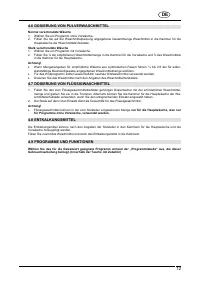
EN 11 4.6 POWDER DETERGENT DOSES Laundry with normal dirt 1. Choose a programme without prewash. 2. Pour the total amount of detergent shown on the pack into the main wash compartment of the detergent dra- wer. Very dirty laundry 1. Choose a programme with prewash. 2. Place ¼ of the recommended amou...
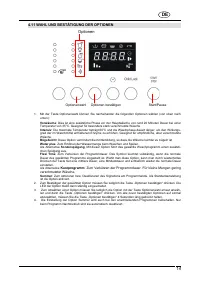
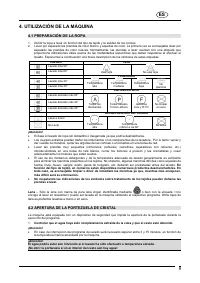
Page 13 - SELECTING AND CONFIRMING OPTIONS; Option selection; Options; Start Pause
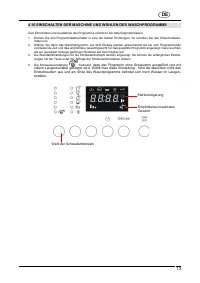
EN 12 4.11 SELECTING AND CONFIRMING OPTIONS 1. The Option Selection button can be used to select the following options in sequence (from the top down): Prewash : adds a stage before the main wash, lasting about 20 minutes at a temperature of 35°C. Suit- able for loads of particularly dirty items. In...
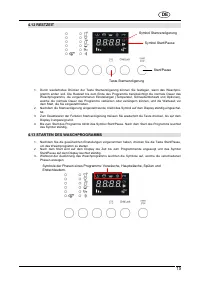
Page 14 - STARTING THE WASHING PROGRAMME; INTERRUPTING OR CHANGING THE WASHING PROGRAMME; Delay Timer button
EN 13 4.12 TIME REMAINING 1. The Delay Timer can be pressed repeatedly to select the time after which the washing programme will end. The time left before the end of the cycle calculates the initial duration of the washing cycle, the set-tings made (temperature, spin speed and options) which may sho...
Page 15 - Switch the appliance off by turning the programmes knob to OFF; OPENING THE APPLIANCE IN AN EMERGENCY; Warning, scolding hazard; Child Lock Symbol
EN 14 4.15 PROGRAMME END Washing programmes are completed automatically. The word END appears on the display and the "Time remain-ing" light goes out. 1. Switch the appliance off by turning the programmes knob to OFF 2. Unload the laundry from the drum. 3. Leave the door ajar to allow the in...
Page 16 - CLEANING THE OUTSIDE OF THE APPLIANCE; CLEANING THE DRUM
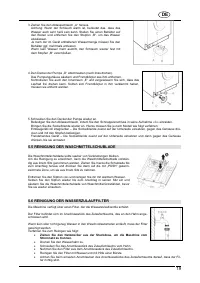
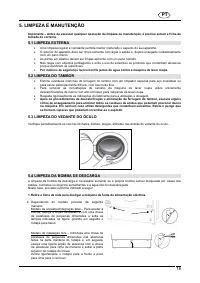
EN 15 5. CLEANING AND MAINTENANCE Important – Before carrying out any cleaning or maintenance procedure, the plug must be disconnected from the power supply socket. 5.1 CLEANING THE OUTSIDE OF THE APPLIANCE • Regular, thorough cleaning will keep your appliance looking good. • Clean the exterior of t...
Page 17 - CLEANING THE DETERGENT DRAWER
EN 16 3. Extract the drain hose ”A”. Warning: if the hose is hot, the water is hot or boiling hot. Place a shallow container on the floor and remove the plug “B” to drain off the water. Depending on the amount of water in the appliance, the container may have to be emptied several times. When no mor...
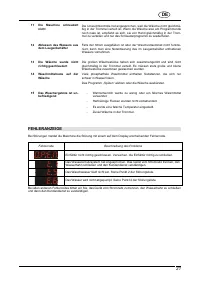
Page 19 - Appliance does not spin; ERROR DISPLAY
EN 18 11 Appliance does not spin Anti-imbalance safety device tripped because laundry not evenly distrib-uted in drum. If laundry is still wet at end of cycle, rearrange it in the drum by hand and repeat spin programme only. 12 Emptying water from drum In the event of a power blackout or appliance f...
Page 20 - FR; Sommaire; Le marquage CE est apposé sur cet appareil
1 FR Sommaire 1. Avertissements pour la sécurité et l’utilisation 2 2. Instructions pour l’installation 5 3. Description des commandes 8 4. Utilisation de la machine pour le lavage 9 5. Nettoyage et entretien 16 6. Anomalies et dysfonctionnement 18 Le marquage CE est apposé sur cet appareil conformé...
Page 21 - LIRE ATTENTIVEMENT LES INSTRUCTIONS !; AVERTISSEMENTS POUR LA SÉCURITÉ ET L’UTILISATION; Élimination de l'emballage; Le fabricant décline toute responsabilité pour
FR 2 LIRE ATTENTIVEMENT LES INSTRUCTIONS ! Avertissement ! Nous vous conseillons de lire attentivement toutes les instructions de ce manuel pour connaître les conditions les plus appropriées pour une utilisation correcte et sûre de l’appareil. Il est très important que ce manuel d'instructions soit ...
Page 23 - Ne pas stocker de liquides inflammables près de l’appareil.; Le fabricant décline toute responsabilité
FR 4 • Les enfants ne doivent pas s'approcher de la machine lorsque le hublot est ouvert ou le bac à dé-tergent est ouvert ; d'éventuels résidus de détergent pourraient causer des dommages irrépara-bles aux yeux, à la bouche et à la gorge et même provoquer la mort par étouffement. • L’appareil ne do...
Page 24 - toutes
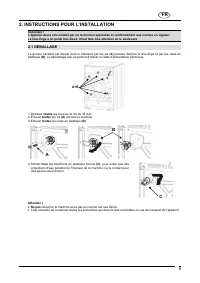
FR 5 2. INSTRUCTIONS POUR L’INSTALLATION Important ! L’appareil devra être installé par un technicien spécialisé et conformément aux normes en vigueur. Le lave-linge a un poids très élevé. Il faut faire très attention en le soulevant. 2.1 DÉBALLAGE Le groupe oscillant est bloqué pour le transport pa...
Page 25 - POSITIONNEMENT ET MISE DE NIVEAU; pieds réglables arrière
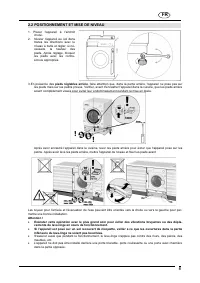
FR 6 2.2 POSITIONNEMENT ET MISE DE NIVEAU 1. Placer l'appareil à l'endroit choisi. 2. Niveler l'appareil au sol dans toutes les directions avec le niveau à bulle et régler, si né-cessaire, la hauteur des pieds. Après réglage, bloquer les pieds avec les contre-écrous appropriés. 3. En présence des pi...
Page 26 - ALIMENTATION EN EAU
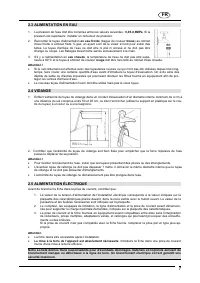
FR 7 2.3 ALIMENTATION EN EAU 1. La pression de l'eau doit être comprise entre les valeurs suivantes : 0,05-0,9MPa . Si la pression est supérieure, installer un réducteur de pression. 2. Raccorder le tuyau d'alimentation en eau froide (bague de couleur bleue ) au robinet d'eau froide à embout fileté ...
Page 27 - PANNEAU DES COMMANDES; Sélecteur des programmes
FR 8 • Cet appareil est conforme aux prescriptions de la directive 89/336/CEE du 3.5.89 (y compris la directive de modification 92/31/CEE) relative à l'élimination de perturbations radioélectriques. • Si le câble d'alimentation est endommagé, il doit être remplacé par une pièce d'origine, disponible...
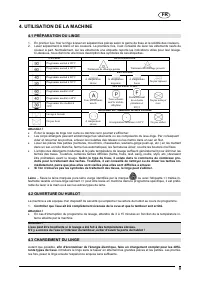
Page 28 - PRÉPARATION DU LINGE; Selon le type de tissu, il existe dans le commerce de nombreux pro-; OUVERTURE DU HUBLOT; CHARGEMENT DU LINGE; afin d'économiser de l'énergie électrique, faire un chargement
FR 9 4. UTILISATION DE LA MACHINE 4.1 PRÉPARATION DU LINGE 1. En premier lieu, trier le linge à laver en séparant les pièces selon le genre de tissu et la solidité des couleurs. 2. Laver séparément le blanc et les couleurs. La première fois, il est conseillé de laver les vêtements neufs de couleur à...
Page 29 - INTRODUCTION DU LINGE; chargé jusqu'à un maximum de 7kg; Pour économiser de l'énergie, compléter la charge; INTRODUCTION DU DÉTERGENT ET DES ADDITIFS; Niveau de dureté
FR 10 4.4 INTRODUCTION DU LINGE 1. Ouvrir le hublot et introduire le linge dans la cuve en le distribuant uniformément, bien ouvert et non pas tassé ; si possible, mélanger les grandes pièces et les petites. 2. Le lave-linge, accompagné du présent manuel, peut être chargé jusqu'à un maximum de 7kg d...
Page 30 - DOSAGE DES DÉTERGENTS EN POUDRE; Linge normalement sale; DOSAGE DE DÉTERGENTS LIQUIDES; uniquement pour le lavage; PROGRAMMES ET FONCTIONS
FR 11 4.6 DOSAGE DES DÉTERGENTS EN POUDRE Linge normalement sale 1. Choisir un programme sans prélavage. 2. Introduire la quantité totale de détergent indiquée sur les emballages dans le compartiment lavage du bac à détergent. Linge très sale 1. Choisir un programme avec prélavage. 2. Introduire ¼ d...
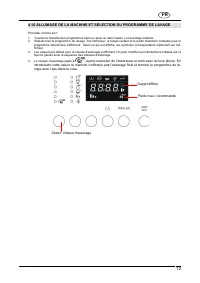
Page 31 - ALLUMAGE DE LA MACHINE ET SÉLECTION DU PROGRAMME DE LAVAGE; exclusion de l'essoreuse et arrêt avec la cuve pleine. En
FR 12 4.10 ALLUMAGE DE LA MACHINE ET SÉLECTION DU PROGRAMME DE LAVAGE Procéder comme suit : 1. Tourner la manette des programmes dans un sens ou dans l'autre. Le lave-linge s'allume. 2. Sélectionner le programme de lavage. Sur l'afficheur, le temps restant et le poids maximum conseillé pour le progr...
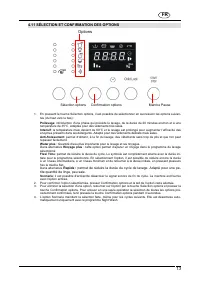
Page 32 - SÉLECTION ET CONFIRMATION DES OPTIONS; permet de réduire la durée du cycle de lavage. Adapté pour une pe-; Marche Pause
FR 13 4.11 SÉLECTION ET CONFIRMATION DES OPTIONS 1. En pressant la touche Sélection options, il est possible de sélectionner en succession les options suivan- tes (du haut vers le bas) : Prélavage : introduction d'une phase qui précède le lavage, de la durée de 20 minutes environ et à une températur...
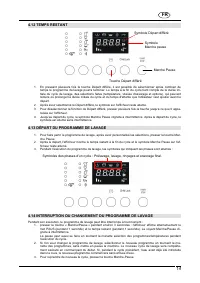
Page 33 - DÉPART DU PROGRAMME DE LAVAGE; INTERRUPTION OU CHANGEMENT DU PROGRAMME DE LAVAGE; Touche Départ différé
FR 14 4.12 TEMPS RESTANT 1. En pressant plusieurs fois la touche Départ différé, il est possible de sélectionner après combien de temps le programme de lavage pourra terminer. Le temps à la fin du cycle tient compte de la durée ini-tiale du cycle de lavage, des sélections faites (température, vitess...
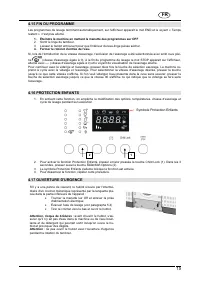
Page 34 - FIN DU PROGRAMME; Éteindre la machine en mettant la manette des programmes sur OFF; PROTECTION ENFANTS; Sélection; Attention, risque de brûlures; Symbole Protection Enfants
FR 15 4.15 FIN DU PROGRAMME Les programmes de lavage terminent automatiquement, sur l'afficheur apparaît le mot END et le voyant « Temps restant » n'est plus allumé. 1. Éteindre la machine en mettant la manette des programmes sur OFF 2. Sortir le linge du tambour. 3. Laisser le hublot entrouvert pou...
Page 35 - NETTOYAGE EXTÉRIEUR
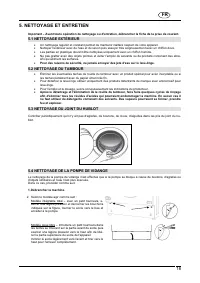
FR 16 5. NETTOYAGE ET ENTRETIEN Important – Avant toute opération de nettoyage ou d'entretien, débrancher la fiche de la prise de courant. 5.1 NETTOYAGE EXTÉRIEUR • Un nettoyage régulier et constant permet de maintenir inaltéré l’aspect de votre appareil. • Nettoyer l'extérieur avec de l'eau et du s...
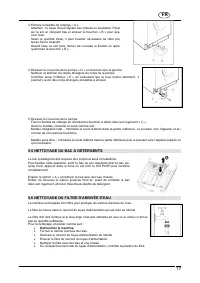
Page 36 - NETTOYAGE DU BAC À DÉTERGENTS; Débrancher la machine.
FR 17 3. Extraire le flexible de vidange « A ». Attention : le tuyau chaud signale eau chaude ou bouillante. Poser sur le sol un récipient bas et enlever le bouchon « B » pour éva-cuer l'eau. Selon la quantité d'eau, il peut s'avérer nécessaire de vider plu-sieurs fois le récipient. Quand l'eau ne s...
Page 37 - Elle ne prend pas l'eau
FR 18 6. ANOMALIES DE FONCTIONNEMENT Ce produit est conforme aux normes de sécurité en vigueur relatives aux appareillages électriques. D'éventuels contrôles techniques ou des réparations doivent être faits pour des raisons de sécurité uniquement par du per-sonnel qualifié afin d'éviter des risques ...
Page 38 - La machine n'essore pas
FR 19 11 La machine n'essore pas La sécurité anti-balourd est intervenue à cause d'une mauvaise répartition du linge dans le tambour. Donc si, en fin de cycle, le linge est encore mouillé, nous conseillons de le mettre à la main dans le tambour et de ré-péter uniquement le programme d'essorage. 12 V...
Page 39 - DE; Inhaltsverzeichnis; Dieses Gerät ist mit der Kennzeichnung
1 DE Inhaltsverzeichnis 1. Hinweise zur Sicherheit und zum Gebrauch 2 2. Installationsanleitung 5 3. Beschreibung der Bedienelemente 8 4. Gebrauch des Geräts zum Waschen 9 5. Reinigung und Pflege 18 6. Hinweise zu Betriebsstörungen 20 Dieses Gerät ist mit der Kennzeichnung gemäß der europäischen Ric...
Page 40 - DIE GEBRAUCHSANLEITUNG AUFMERKSAM DURCHLESEN; HINWEISE ZUR SICHERHEIT UND ZUM GEBRAUCH; Hinweis; Entsorgung des Verpackungsmaterials.; Das Typenschild darf keinesfalls entfernt werden.
DE 2 DIE GEBRAUCHSANLEITUNG AUFMERKSAM DURCHLESEN . Hinweis Wir empfehlen Ihnen, alle in der vorliegenden Gebrauchsanleitung enthaltenen Anweisungen aufmerksam durchzulesen, um sich über die optimalen Bedingungen für den richtigen und sicheren Gebrauch Ihres Geräts zu informieren. Diese Gebrauchsanl...
Page 42 - Halten Sie; Der Hersteller haftet nicht
DE 4 • Das Gerät ist für den Gebrauch durch erwachsene Personen bestimmt. Gestatten Sie Kin- dern nicht, mit dem Waschvollautomaten und seinen Bedienelementen zu spielen. Halten Sie kleine Kinder während des Programmablaufs fern von der Maschine. • Es besteht die Gefahr, dass sich kleine Kinder und ...
Page 43 - ENTFERNEN DER VERPACKUNG; Alle
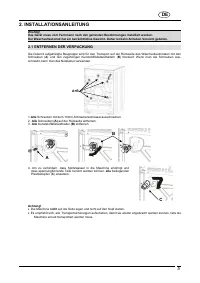
DE 5 2. INSTALLATIONSANLEITUNG Wichtig! Das Gerät muss vom Fachmann nach den geltenden Bestimmungen installiert werden. Der Waschvollautomat hat ein beträchtliches Gewicht. Daher ist beim Anheben Vorsicht geboten. 2.1 ENTFERNEN DER VERPACKUNG Die federnd aufgehängte Baugruppe wird für den Transport ...
Page 44 - AUFSTELLUNG UND NIVELLIERUNG; auf der Rückseite über verstellbare Füße
DE 6 2.2 AUFSTELLUNG UND NIVELLIERUNG 1. Die Maschine am vorgesehe- nen Ort aufstellen. 2. Die Maschine mit einer Was- serwaage sorgfältig in beiden Richtungen waagrecht aus-richten. Hierzu bei Bedarf die Höhe der Füße regulieren. Nach dem Nivellieren die Fü-ße mit den Gegenmuttern blo-ckieren. 3. W...
Page 45 - Kaltwasser; Warmwasserversorgung; ABWASSERANSCHLUSS
DE 7 2.3 WASSERANSCHLUSS 1. Sicherstellen, dass der Wasserdruck innerhalb der folgenden Werte liegt: 0,05- 0,9MPa . Ist der Druck höher, muss ein Druckminderer installiert werden. 2. Den Kaltwasser -Zulaufschlauch ( blaue Überwurfmutter) an den Kaltwasserhahn mit ¾"-Gasgewinde anschließen. Darau...
Page 46 - Das Gerät muss unbedingt geerdet werden.; cker fassen und herausziehen.
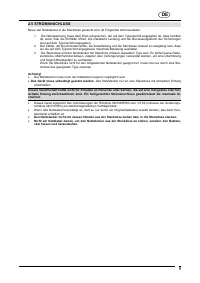
DE 8 2.5 STROMANSCHLUSS Bevor der Netzstecker in die Steckdose gesteckt wird, ist Folgendes sicherzustellen: 1. Die Netzspannung muss dem Wert entsprechen, der auf dem Typenschild angegeben ist, dass sichtbar ist, wenn man die Einfülltür öffnet. Die installierte Leistung und der Bemessungsstrom der ...
Page 47 - Programmwahlschalter
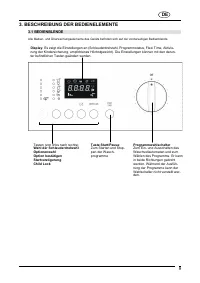
DE 9 3. BESCHREIBUNG DER BEDIENELEMENTE 3.1 BEDIENBLENDE Alle Bedien- und Überwachungselemente des Geräts befinden sich auf der vorderseitigen Bedienblende. Programmwahlschalter Zum Ein- und Ausschalten des Waschvollautomaten und zum Wählen des Programms. Er kann in beide Richtungen gedreht werden. ...
Page 48 - VORBEREITEN DER WÄSCHE; Es gibt im Handel zahlreiche Fleckenentferner für die verschie-; ÖFFNEN DER EINFÜLLTÜR
DE 10 4. GEBRAUCH DES GERÄTS 4.1 VORBEREITEN DER WÄSCHE 1. Sortieren Sie die Wäsche nach Gewebetyp und Farbfestigkeit. 2. Waschen Sie weiße Wäsche getrennt von Buntwäsche. Es empfiehlt sich, neue farbige Wäschestücke beim ersten Mal separat zu waschen. Normalerweise sind die Wäschestücke mit einem P...
Page 49 - EINFÜLLEN DER WÄSCHE; Härtegrad
DE 11 4.3 WÄSCHELADUNG Um Energie zu sparen , empfiehlt es sich, nach Möglichkeit jeweils eine ganze Maschinenladung mit den ver- schiedenen Gewebearten zusammenzustellen . Die Wäsche lose einfüllen und dabei große und kleine Wä- schestücke abwechseln. Am Anfang ist es empfehlenswert, die Wäschefüll...
Page 50 - DOSIERUNG VON PULVERWASCHMITTEL; Normal verschmutzte Wäsche; Stark verschmutzte Wäsche; DOSIERUNG VON FLÜSSIGWASCHMITTEL; nur für die Hauptwäsche, also nur; ENTKALKUNGSMITTEL
DE 12 4.6 DOSIERUNG VON PULVERWASCHMITTEL Normal verschmutzte Wäsche 1. Wählen Sie ein Programm ohne Vorwäsche. 2. Füllen Sie die auf der Waschmittelpackung angegebene Gesamtmenge Waschmittel in die Kammer für die Hauptwäsche der Waschmittelschublade. Stark verschmutzte Wäsche 1. Wählen Sie ein Prog...
Page 51 - EINSCHALTEN DER MASCHINE UND WÄHLEN DES WASCHPROGRAMMS; dass das Programm ohne Schleudern ausgeführt und mit
DE 13 4.10 EINSCHALTEN DER MASCHINE UND WÄHLEN DES WASCHPROGRAMMS Zum Einschalten und Auswählen des Programms verfahren Sie bitte folgendermaßen: 1. Drehen Sie den Programmwahlschalter in eine der beiden Richtungen. So schalten Sie den Waschvollauto- maten ein. 2. Wählen Sie dann das Waschprogramm. ...
Page 52 - WAHL UND BESTÄTIGUNG DER OPTIONEN; Kurzprogramm; : Zum Verkürzen der Programmdauer. Für kleine Mengen gering; Optionenwahl; Optionen
DE 14 4.11 WAHL UND BESTÄTIGUNG DER OPTIONEN 1. Mit der Taste Optionenwahl können Sie nacheinander die folgenden Optionen wählen (von oben nach unten): Vorwäsche : Dies ist eine zusätzliche Phase vor der Hauptwäsche von rund 20 Minuten Dauer bei einer Temperatur von 35°C. Geeignet für besonders star...
Page 53 - STARTEN DES WASCHPROGRAMMS; Taste Startverzögerung
DE 15 4.12 RESTZEIT 1. Durch wiederholtes Drücken der Taste Startverzögerung können Sie festlegen, wann das Waschpro- gramm enden soll. Die Restzeit bis zum Ende des Programms berücksichtigt die normale Dauer des Waschprogramms, die vorgenommenen Einstellungen (Temperatur, Schleuderdrehzahl und Opti...
Page 54 - UNTERBRECHEN ODER ÄNDERN DES WASCHPROGRAMMS
DE 16 4.14 UNTERBRECHEN ODER ÄNDERN DES WASCHPROGRAMMS Das Waschprogramm kann während seiner Ausführung jederzeit unterbrochen werden: 1. Halten Sie die Taste „Start/Pause“ ungefähr 3 Sekunden gedrückt: Auf dem Display werden abwech- selnd das Kürzel PAUS (für 1 Sekunde) und die Restzeit (für 1 Seku...
Page 55 - NOTENTRIEGELUNG; Achtung! Verbrühungsgefahr; Achtung
DE 17 4.17 NOTENTRIEGELUNG Sollte der Strom ausgefallen sein, können Sie die Einfülltür mechanisch entriegeln. Hierzu dient die Notentriegelung auf der Unterseite des Geräts: • Drehen Sie den Schalter auf OFF und ziehen Sie den Netzstecker aus der Steckdose. • Lassen Sie das Waschwasser ab (siehe Ab...
Page 56 - REINIGUNG DER TROMMEL
DE 18 5. REINIGUNG UND PFLEGE Wichtig – Bevor Sie irgendeine Arbeit für die Reinigung oder Pflege des Geräts ausführen, müssen Sie den Netzstecker aus der Steckdose ziehen. 5.1 AUSSENREINIGUNG • Durch die regelmäßige Reinigung des Geräts bewahren Sie auf Dauer sein ursprüngliches Aussehen. • Reinige...
Page 57 - REINIGUNG DER WASCHMITTELSCHUBLADE
DE 19 3. Ziehen Sie den Ablassschlauch „A“ heraus. Achtung: Wenn der Schlauch warm ist, bedeutet das, dass das Wasser auch sehr heiß sein kann. Stellen Sie einen Behälter auf den Boden und entfernen Sie den Stopfen „B“, um das Wasser abzulassen. Je nach der im Gerät enthaltenen Wassermenge müssen Si...
Page 58 - Die Maschine startet nicht
DE 20 6. HINWEISE ZU BETRIEBSSTÖRUNGEN Dieses Gerät entspricht den geltenden Sicherheitsvorschriften für elektrische Geräte. Technische Kontrollen und Reparaturen dürfen aus Sicherheitsgründen ausschließlich vom Fachmann ausgeführt werden, um eine Gefähr-dung des Benutzers zu vermeiden. Wenn das Ger...
Page 59 - FEHLERANZEIGE
DE 21 11 Die Maschine schleudert nicht Die Unwuchtkontrolle hat angesprochen, weil die Wäsche nicht gleichmä-ßig in der Trommel verteilt ist. Wenn die Wäsche also am Programmende noch nass ist, empfiehlt es sich, sie von Hand gleichmäßig in der Trom-mel zu verteilen und nur das Schleuderprogramm zu ...
Page 60 - ES; Índice; Este aparato dispone de marca
1 ES Índice 1. Advertencias sobre seguridad y uso 2 2. Instrucciones para efectuar la instalación 5 3. Descripción de los mandos 8 4. Utilización de la máquina 9 5. Limpieza y mantenimiento 16 6. Advertencias para caso de anomalía y malfuncionamiento 18 Este aparato dispone de marca conforme con lo ...
Page 61 - LÉANSE ATENTAMENTE LAS INSTRUCCIONES; ADVERTENCIAS PARA LA SEGURIDAD Y EL USO; Eliminación del embalaje; El fabricante declinará toda
ES 2 LÉANSE ATENTAMENTE LAS INSTRUCCIONES . ¡Advertencia! Aconsejamos leer atentamente todas las instrucciones expuestas en este manual con el objeto de informarse sobre las condiciones más adecuadas para un correcto uso del aparato. Es muy importante que este manual de instrucciones sea conservado ...
Page 63 - Controlar siempre el interior del cesto antes del uso y; evite que los niños jueguen en la; No conservar líquidos inflamables en proximidad del aparato.; Período de inactividad prolongada; El fabricante declinará toda responsabilidad
ES 4 • Controlar siempre el interior del cesto antes del uso y evite que los niños jueguen en la lavadora. • Mantener alejados a los niños cuando la puerta de la máquina está abierta o el compartimento del detergente está abierto ya que posibles residuos de detergente pueden provocar lesiones graves...
Page 64 - todos
ES 5 2. INSTRUCCIONES PARA EL INSTALADOR ¡Importante! El aparato debe ser instalado por un técnico cualificado especializado, con observancia de las normas vigentes. La lavadora es de notable peso. Elevarla procediendo con cautela. 2.1 DESEMBALAJE Para los efectos del transporte, el grupo oscilante ...
Page 65 - POSICIONAMIENTO Y NIVELACIÓN; pies regulables traseros
ES 6 2.2 POSICIONAMIENTO Y NIVELACIÓN 1. Emplazar la máquina en la posición prevista. 2. Nivelar cuidadosamente la máquina en todas las direcciones mediante un nivel de burbuja operando, de ser necesario, con sus pies regulables. Una vez efectuada la regulación, inmovilizar los pies mediante las res...
Page 66 - CONEXIÓN A LA TOMA DE AGUA; agua fría; CONEXIÓN DEL TUBO DE EVACUACIÓN; Atención
ES 7 2.3 CONEXIÓN A LA TOMA DE AGUA 1. Verificar que la presión de alimentación esté comprendida entre los siguientes valores: 0,05-0,9MPa . En caso de existir presiones superiores se deberá instalar un reductor de presión. 2. Conectar el tubo de alimentación agua fría (virola de color azul claro ) ...
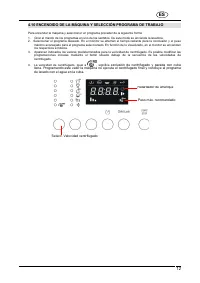
Page 67 - DESCRIPCIÓN DE LOS MANDOS; Selector Programas
ES 8 El fabricante declinará toda responsabilidad por posibles lesiones a las personas o daños a las cosas que deriven de la falta de conexión o de una errónea conexión a tierra. La ejecución de una correcta conexión eléctrica garantiza máxima seguridad. • Este aparato cumple con lo dispuesto por la...
Page 68 - PREPARACIÓN DE LA ROPA; En; APERTURA DE LA PORTEZUELA DE CRISTAL
ES 9 4. UTILIZACIÓN DE LA MÁQUINA 4.1 PREPARACIÓN DE LA ROPA 1. Dividir la ropa a lavar en función del tipo de tejido y la solidez de los colores. 2. Lavar por separado las prendas de color blanco y aquellas de color. La primera vez es aconsejable lavar por separado las prendas de color nuevas. Norm...
Page 69 - CARGA DE LA ROPA
ES 10 4.3 CARGA DE LA ROPA En todo lo posible, para ahorrar energía eléctrica es conveniente completar la carga de los diferentes tipos de tejido . Introducir la ropa de manera que esté suelta, alternando prendas de grandes y pequeñas dimensiones. Las primeras veces es conveniente pesar las cargas d...
Page 70 - DOSIFICACIÓN DE DETERGENTES EN POLVO; Ropa normalmente sucia; DOSIFICACIÓN DE DETERGENTES LÍQUIDOS; sólo para el lavado; DESCALCIFICADORES
ES 11 4.6 DOSIFICACIÓN DE DETERGENTES EN POLVO Ropa normalmente sucia 1. Elegir un programa sin prelavado 2. Introducir en el compartimento del lavado del cajón detergente la cantidad total de detergente indicada en el envase. Ropa muy sucia 1. Elegir un programa con prelavado 2. Introducir ¼ de la ...
Page 71 - ENCENDIDO DE LA MÁQUINA Y SELECCIÓN PROGRAMA DE TRABAJO
ES 12 4.10 ENCENDIDO DE LA MÁQUINA Y SELECCIÓN PROGRAMA DE TRABAJO Para encender la máquina y seleccionar un programa proceder de la siguiente forma: 1. Girar el mando de los programas en uno de los sentidos. De este modo se enciende la lavadora. 2. Seleccionar el programa deseado. En el monitor se ...
Page 72 - SELECCIÓN Y CONFIRMACIÓN DE LAS OPCIONES; Selección opciones; Opciones
ES 13 4.11 SELECCIÓN Y CONFIRMACIÓN DE LAS OPCIONES 1. Mediante el botón Selección Opciones es posible seleccionar en sucesión las siguientes opciones (de arriba hacia abajo): Prelavado : Activación de una fase previa al lavado de unos 20 minutos de duración y con temperatura de 35 °C. Adecuada para...
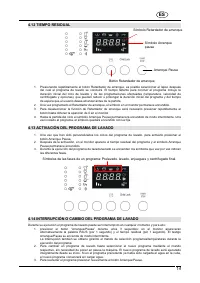
Page 73 - TIEMPO RESIDUAL; ACTIVACIÓN DEL PROGRAMA DE LAVADO; INTERRUPCIÓN O CAMBIO DEL PROGRAMA DE LAVADO; Botón Retardador de arranque
ES 14 4.12 TIEMPO RESIDUAL 1. Presionando repetidamente el botón Retardador de arranque, es posible seleccionar el lapso después del cual el programa de lavado se concluirá. El tiempo faltante para concluir el programa incluye la duración inicial del ciclo de lavado y de las programaciones efectuada...
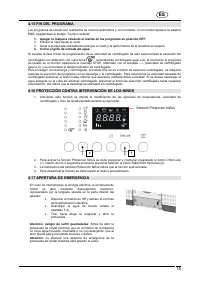
Page 74 - FIN DEL PROGRAMA; Cerrar el grifo de entrada del agua.; PROTECCIÓN CONTRA INTERVENCIÓN DE LOS NIÑOS; Selección; APERTURA DE EMERGENCIA; Atención, peligro de sufrir quemaduras; Símbolo Protección Niños
ES 15 4.15 FIN DEL PROGRAMA Los programas de lavado son realizados de manera automática y, al concluirse, en el monitor aparece la palabra END, apagándose el testigo “Tiempo residual” 1. Apagar la máquina situando el mando de los programas en posición OFF. 2. Extraer la ropa desde el cesto. 3. Dejar...
Page 75 - LIMPIEZA EXTERNA; LIMPIEZA DEL CESTO
ES 16 5. LIMPIEZA Y MANTENIMIENTO Importante. Antes de ejecutar cualquier operación de limpieza o mantenimiento se debe desacoplar el enchufe respecto de la toma de corriente. 5.1 LIMPIEZA EXTERNA • Una limpieza regular y constante permite mantener inalterado el aspecto de su aparato. • El mueble de...
Page 76 - LIMPIEZA DEL CAJÓN DE LOS DETERGENTES
ES 17 3. Extraer el tubo flexible de vaciado ”A”. Atención: el tubito caliente señala la presencia de agua caliente o hirviente. Colocar sobre el pavimento un recipiente bajo y quitar el tapón “B” para descargar el agua. Según la carga de agua presente, vaciar varias veces el recipiente. Una vez que...
Page 78 - VISUALIZACIÓN DE ERRORES
ES 19 11 La máquina no efectúa el centrifugado Ha intervenido el dispositivo de seguridad antidesequilibrio porque la ropa no está uniformemente distribuida en el interior del cesto. Por lo tanto, en caso de que al concluir el programa la ropa quede mojada, aconsejamos distribuirla manualmente en el...
Page 79 - PT; Este aparelho dispõe da marca de conformidade
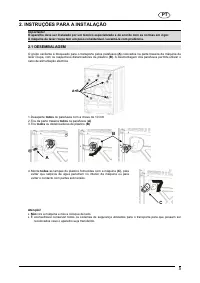
1 PT Índice 1. Advertências para a segurança e uso 2 2. Instruções para a instalação 5 3. Descrição dos comandos 8 4. Utilização da máquina para a lavagem 9 5. Limpeza e manutenção 16 6. Advertências em caso de anomalias e de mau funcionamento 18 Este aparelho dispõe da marca de conformidade nos ter...
Page 80 - LEIA ATENTAMENTE ESTAS INSTRUÇÕES; ADVERTÊNCIAS PARA A SEGURANÇA E USO; Eliminação da embalagem; O fabricante declina toda e
PT 2 LEIA ATENTAMENTE ESTAS INSTRUÇÕES . Advertência! Aconselhamos a ler com muita atenção todas as instruções contidas neste manual, para conhecer as condições mais apropriadas para uma utilização correcta e segura do aparelho. É muito importante que este manual de instruções seja conservado com o ...
Page 82 - Não conservar líquidos inflamáveis perto do aparelho.; Período de inactividade prolongada.; O fabricante declina toda e qualquer responsabilidade
PT 4 • Quando a porta de óculo ou a gaveta para o detergente estiverem abertas, deve-se manter as crianças longe da máquina; no aparelho poderiam estar presentes resíduos de detergente que podem causar danos irreparáveis nos olhos, na boca e na garganta, provocando também a morte por sufocamento. • ...
Page 84 - POSICIONAMENTO E NIVELAMENTO; pés de apoio reguláveis traseiros
PT 6 2.2 POSICIONAMENTO E NIVELAMENTO 1. Coloque a máquina na posição escolhida. 2. Nivele cuidadosamente a máquina em todas as direcções, com auxílio de uma bolha de nível, regulando se necessário a altura dos pés de apoio. Uma vez efectuada a regulação, bloqueie os pés de apoio com as contraporcas...
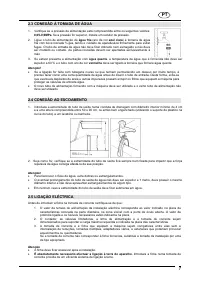
Page 85 - CONEXÃO À TOMADA DE ÁGUA; água fria; CONEXÃO AO ESCOAMENTO; Atenção
PT 7 2.3 CONEXÃO À TOMADA DE ÁGUA 1. Verifique se a pressão de alimentação está compreendida entre os seguintes valores: 0,05-0,9MPa . Se a pressão for superior, instale um redutor de pressão. 2. Ligue o tubo de alimentação de água fria (aro de cor azul clara ) à torneira de água fria com boca rosca...
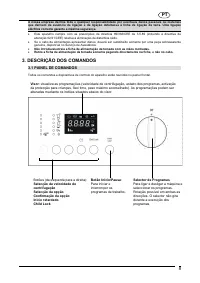
Page 86 - DESCRIÇÃO DOS COMANDOS; PAINEL DE COMANDOS; Selector de Programas
PT 8 A nossa empresa declina toda e qualquer responsabilidade por eventuais danos pessoais ou materiais que derivem da ausência de ligação e da ligação defeituosa à linha de ligação de terra. Uma ligação eléctrica correcta garante a máxima segurança. • Este aparelho cumpre com as prescrições da dire...
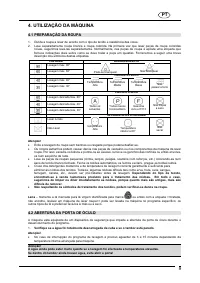
Page 87 - PREPARAÇÃO DA ROUPA; Dependendo do tipo de tecido,; ABERTURA DA PORTA DE ÓCULO
PT 9 4. UTILIZAÇÃO DA MÁQUINA 4.1 PREPARAÇÃO DA ROUPA 1. Divida a roupa a lavar de acordo com o tipo de tecido e resistência das cores. 2. Lave separadamente roupa branca e roupa colorida. Na primeira vez que lavar peças de roupa coloridas novas, sugerimos lavá-las separadamente. Normalmente, nas pe...
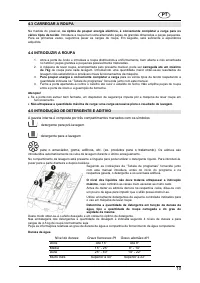
Page 88 - CARREGAR A ROUPA; INTRODUZIR A ROUPA; INTRODUÇÃO DE DETERGENTE E ADITIVO; Nível de dureza
PT 10 4.3 CARREGAR A ROUPA Na medida do possível, na óptica de poupar energia eléctrica, é conveniente completar a carga para os vários tipos de tecido . Introduza a roupa bem solta alternando peças de grandes dimensões e peças pequenas. Para as primeiras vezes, sugerimos pesar as cargas de roupa. E...
Page 89 - DOSAGEM DE DETERGENTES EM PÓ; Roupa normalmente suja; Roupa muito suja; DOSAGEM DE DETERGENTES LÍQUIDOS; somente para a
PT 11 4.6 DOSAGEM DE DETERGENTES EM PÓ Roupa normalmente suja 1. Escolha um programa sem pré-lavagem. 2. Introduza no compartimento para lavagem da gaveta de detergente, a quantidade total de detergente indicada na embalagem. Roupa muito suja 1. Escolha um programa com pré-lavagem. 2. Introduza no c...
Page 90 - LIGAR A MÁQUINA E SELECCIONAR O PROGRAMA DE LAVAGEM
PT 12 4.10 LIGAR A MÁQUINA E SELECCIONAR O PROGRAMA DE LAVAGEM Para ligar e seleccionar os programas proceda conforme indicado a seguir: 1. Rode o manípulo dos programas num dos dois sentidos. Desta maneira, liga-se a máquina de lavar roupa. 2. Seleccione o programa de lavagem. No visor alternam-se ...
Page 91 - SELECÇÃO E CONFIRMAÇÃO DAS OPÇÕES; Selecção das opções; Opções
PT 13 4.11 SELECÇÃO E CONFIRMAÇÃO DAS OPÇÕES 1. Através do botão de Selecção das opções é possível seleccionar em sucessão as seguintes opções (de cima para baixo): Pré-lavagem : activação de uma fase anterior à lavagem, que dura cerca de 20 minutos e é feita com temperatura de 35°C. Adequada para a...
Page 92 - INÍCIO DO PROGRAMA DE LAVAGEM; INTERRUPÇÃO OU ALTERAÇÃO DO PROGRAMA DE LAVAGEM; Botão Início retardado
PT 14 4.12 TEMPO RESIDUAL 1. Premindo repetidamente o botão Início retardado é possível seleccionar depois de quanto tempo o programa de lavagem irá terminar. O tempo para o fim do ciclo leva em conta a duração inicial do ciclo de lavagem, as programações feitas (temperatura, velocidade de centrifug...
Page 93 - FIM DO PROGRAMA; Feche a torneira de entrada de água.; PROTECÇÃO PARA CRIANÇAS; Selecção das; ABERTURA DE EMERGÊNCIA; Atenção, perigo de queimaduras
PT 15 4.15 FIM DO PROGRAMA Os programas de lavagem são concluídos automaticamente, o visor mostra a palavra END e a luz-piloto “Tempo residual” apaga. 1. Desligue a máquina colocando o manípulo dos programas na posição OFF. 2. Descarregue a roupa do tambor. 3. Deixe a porta entreaberta para permitir...
Page 94 - LIMPEZA DO TAMBOR
PT 16 5. LIMPEZA E MANUTENÇÃO Importante – Antes de executar qualquer operação de limpeza ou manutenção, é preciso extrair a ficha da tomada de corrente. 5.1 LIMPEZA EXTERNA • Uma limpeza regular e constante permite manter inalterado o aspecto do seu aparelho. • O exterior do aparelho deve ser limpo...
Page 95 - LIMPEZA DA GAVETA PARA OS DETERGENTES
PT 17 3. Extraia o tubo flexível de escoamento ”A”. Atenção: o tubo quente indica que a água está quente ou muito quente. Coloque sobre o pavimento um recipiente baixo e retire a tampa “B” para descarregar a água. Dependendo da carga de água pode ser necessário esvaziar o recipiente várias vezes. Qu...
Page 97 - A máquina não centrifuga; VISUALIZAÇÃO DE ERROS
PT 19 11 A máquina não centrifuga Activou-se a segurança anti-desequilíbrio porque a roupa não está uniformemente distribuída dentro do tambor. Portanto, se no fim do ciclo a roupa sair molhada, sugerimos distribuí-la à mão dentro do tambor e repetir unicamente o programa de centrifugação. 12 Esvazi...
Page 98 - Содержание; Данное изделие обладает маркировкой
1 RU Содержание 1. Предупреждения по безопасности использования 2 2. Инструкции по установке 5 3. Описание органов управления 8 4. Использование машины для стирки 9 5. Чистка и обслуживание 16 6. Предупреждения на случай неисправностей или поломок 18 Данное изделие обладает маркировкой по европейско...
Page 99 - RU; ВНИМАТЕЛЬНО ПРОЧИТАЙТЕ ИНСТРУКЦИИ И ПРЕДУПРЕЖДЕНИЯ; РЕКОМЕНДАЦИИ ПО БЕЗОПАСНОСТИ И ЭКСПЛУАТАЦИИ; Утилизация упаковки
RU 2 ВНИМАТЕЛЬНО ПРОЧИТАЙТЕ ИНСТРУКЦИИ И ПРЕДУПРЕЖДЕНИЯ Предупреждение! Рекомендуем внимательно прочитать все инструкции, содержащиеся в данном руководстве, чтобы ознакомиться с наиболее пригодными условиями для правильного использования прибора. Чрезвычайно важно, чтобы это руководство по эксплуата...
Page 101 - Прибор предназначен для использования взрослыми людьми.; Изготовитель не несет никакой ответственности
RU 4 • Прибор предназначен для использования взрослыми людьми. Не позволяйте детям выводить из строя органы управления или играть со стиральной машиной и не допускайте нахождение детей рядом с машиной во время работы программы. • Маленькие животные или дети могут залезть внутрь стиральной машины. • ...
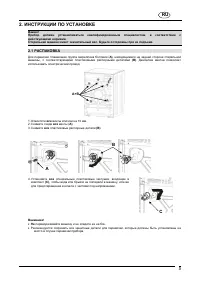
Page 103 - РАЗМЕЩЕНИЕ И ВЫРАВНИВАНИЕ
RU 6 2.2 РАЗМЕЩЕНИЕ И ВЫРАВНИВАНИЕ 1. Разместите машину в выбранном месте. 2. Тщательно выровняйте машину во всех направлениях при помощи жидкостного уровня, регулируя при необходимости высоту ножек. После выполнения регулировки закрепите ножки специальными контргайками. 3. При наличии задних регули...
Page 104 - ПОДКЛЮЧЕНИЕ К ВОДОПРОВОДУ; ПОДКЛЮЧЕНИЕ К СЛИВУ
RU 7 2.3 ПОДКЛЮЧЕНИЕ К ВОДОПРОВОДУ 1. Убедитесь, что давление питания находятся в следующих пределах: 0,05- 0,9 мПа . При наличии более высокого давления установите редуктор давления. 2. Подключите шланг подачи холодной воды (круглая гайка голубого цвета) к крану холодной воды с резьбовым штуцером ¾...
Page 105 - ОПИСАНИЕ ОРГАНОВ УПРАВЛЕНИЯ; ПАНЕЛЬ УПРАВЛЕНИЯ; Селектор программ
RU 8 Внимание • После установки вилка должна быть доступной. • Крайне важно подключить прибор к заземлению. Подключите вилку к сетевой розетке, имеющей исправную систему заземления. Наша компания отклоняет любую ответственность за ущерб людям или имуществу, ставший последствием невыполненного или не...
Page 106 - ПОДГОТОВКА БЕЛЬЯ
RU 9 4. ИСПОЛЬЗОВАНИЕ МАШИНЫ ДЛЯ СТИРКИ 4.1 ПОДГОТОВКА БЕЛЬЯ 1. Разделите стираемое белье по типу ткани и стойкости цветов. 2. Стирайте отдельно белое и цветное белье. Первую стирку новых цветных вещей рекомендуется выполнять отдельно от другого белья. Как правило, на белье наносится этикетка, предо...
Page 107 - ЗАГРУЗКА МОЮЩЕГО СРЕДСТВА И ДОБАВКИ; Уровень жесткости
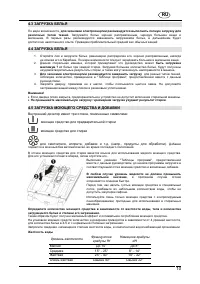
RU 10 4.3 ЗАГРУЗКА БЕЛЬЯ По мере возможности, для экономии электроэнергии рекомендуется выполнять полную загрузку для различных типов тканей . Загружайте белье хорошо расправленным, чередуя большие вещи и маленькие. В первые разы рекомендуется взвешивать загружаемое белье, в дальнейшем будет достато...
Page 108 - ДОЗИРОВКА ПОРОШКОВЫХ МОЮЩИХ СРЕДСТВ; ДОЗИРОВКА ЖИДКИХ МОЮЩИХ СРЕДСТВ; СРЕДСТВА ДЛЯ УДАЛЕНИЯ НАКИПИ
RU 11 4.6 ДОЗИРОВКА ПОРОШКОВЫХ МОЮЩИХ СРЕДСТВ Белье с нормальной степенью загрязнения 1. Выберите программу без предварительной стирки. 2. Загрузите общее количество моющего средства, указанное на упаковках, в отсек стирки дозатора моющего средства. Очень грязное белье 1. Выберите программу с предва...
Page 109 - ВКЛЮЧЕНИЕ МАШИНЫ И ВЫБОР РАБОЧЕЙ ПРОГРАММЫ
RU 12 4.10 ВКЛЮЧЕНИЕ МАШИНЫ И ВЫБОР РАБОЧЕЙ ПРОГРАММЫ Для включения и выбора программы выполните следующее: 1. Поверните ручку программ в одном из двух направлений. Таким образом включится стиральная машина. 2. Выберите программу стирки. На дисплее будет поочередно отображаться остаточное время до к...
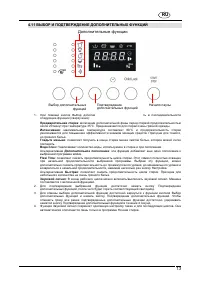
Page 110 - ВЫБОР И ПОДТВЕРЖДЕНИЕ ДОПОЛНИТЕЛЬНЫХ ФУНКЦИЙ; Выбор дополнительных; Дополнительные функции; Начало паузы
RU 13 4.11 ВЫБОР И ПОДТВЕРЖДЕНИЕ ДОПОЛНИТЕЛЬНЫХ ФУНКЦИЙ 1. При помощи кнопок Выбор дополнительных функций можно выбрать в последовательности следующие функции (сверху вниз): Предварительная стирка : включение дополнительной фазы перед стиркой продолжительностью около 20 минут при температуре 35°C. П...
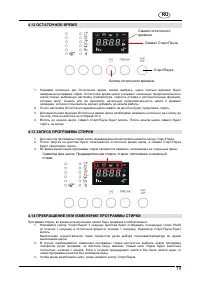
Page 111 - ОСТАТОЧНОЕ ВРЕМЯ; ЗАПУСК ПРОГРАММЫ СТИРКИ; ПРЕКРАЩЕНИЕ ИЛИ ИЗМЕНЕНИЕ ПРОГРАММЫ СТИРКИ; Кнопка остаточного времени
RU 14 4.12 ОСТАТОЧНОЕ ВРЕМЯ 1. Нажимая несколько раз Остаточное время, можно выбрать, через сколько времени будет завершена программа стирки. Остаточное время цикла учитывает начальную продолжительность цикла стирки, выбранную настройку (температура, скорость отжима и дополнительные функции), которы...
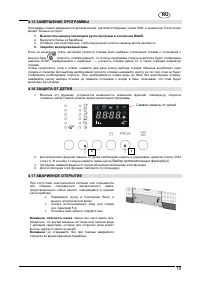
Page 112 - ЗАВЕРШЕНИЕ ПРОГРАММЫ; ЗАЩИТА ОТ ДЕТЕЙ; Выбор дополнительных функций; АВАРИЙНОЕ ОТКРЫТИЕ; Символ защиты от детей
RU 15 4.15 ЗАВЕРШЕНИЕ ПРОГРАММЫ Программы стирки завершаются автоматически, дисплей отображает слово END, а индикатор "Остаточное время" больше не горит. 1. Выключите машину переводом ручки программ в положение ВЫКЛ. 2. Выгрузите белье из барабана. 3. Оставьте люк приоткрытым, чтобы внутренн...
Page 113 - ЧИСТКА УПЛОТНЕНИЯ ЛЮКА
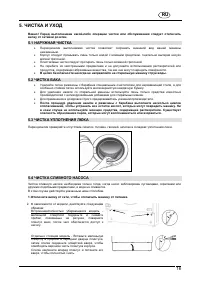
RU 16 5. ЧИСТКА И УХОД Важно! Перед выполнением какой-либо операции чистки или обслуживания следует отключить вилку от сетевой розетки. 5.1 НАРУЖНАЯ ЧИСТКА • Периодически выполняемая чистка позволяет сохранить внешний вид вашей машины неизменным. • Корпус следует промывать лишь только водой с моющим...
Page 114 - ЧИСТКА ДОЗАТОРА МОЮЩЕГО СРЕДСТВА
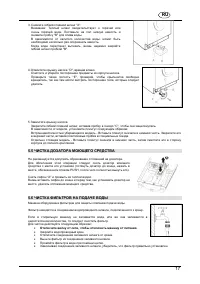
RU 17 3. Снимите гибкий сливной шланг "А". Внимание: Теплый шланг свидетельствует о горячей или очень горячей воде. Поставьте на пол низкую емкость и снимите пробку "В" для слива воды. В зависимости от залитого количества воды, может быть необходимо несколько раз опорожнить емкость. ...
Page 116 - ОТОБРАЖЕНИЕ ОШИБОК
RU 19 11 Машина не отжимает Сработала защита от разбалансированности белья, потому что оно неравномерно расположено в барабане. Поэтому, в случае, если в конце цикла белье остается мокрым, рекомендуем распределить его равномерно вручную в барабане и повторить программу отжима. 12 Слив воды из бака П...