Page 2 - Owner’s Record; FCC Notice; WARNING; NOTICE; Declaration of Conformity
2 Owner’s Record The model and serial numbers are located at the rear of the unit. Record these numbers in the spaces provided below. Refer to them whenever you call upon your dealer regarding this product.Model No. Serial No. To prevent fire or shock hazard, do not expose the unit to rain or moistu...
Page 3 - Setup; To connect to the HD15 input connector; Turning on the monitor and computer; Connect the power cord to the monitor and press the; To select the input signal; Table of Contents
GB 3 • Trinitron â is a registered trademark of Sony Corporation. • Macintosh is a trademark licensed to Apple Computer, Inc., registered in the U.S.A. and other countries. • Windows â and MS-DOS are registered trademarks of Microsoft Corporation in the United States and other countries. • IBM PC/AT...
Page 4 - Adjustments; Navigating the menu; If you want to select another menu; move the control button; Adjusting the picture quality; PROFESSIONAL; On-Screen menu adjustments
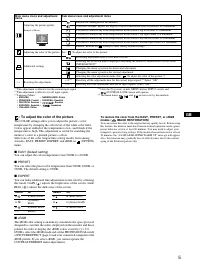
4 Adjustments Navigating the menu 1 Press the MENU button to display the main menu. 2 Move the control button m / M to highlight the main menu you want to adjust and press the control button. 3 Move the control button m / M to highlight the sub menu you want to adjust and press the control button. I...
Page 5 - : To adjust the color of the picture; PRESET
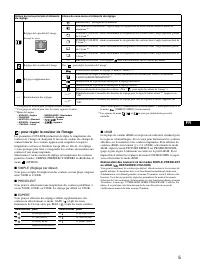
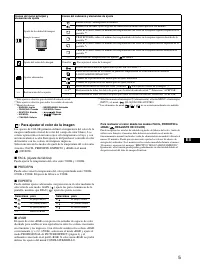
5 GB : To adjust the color of the picture The COLOR settings allow you to adjust the picture’s color temperature by changing the color level of the white color field. Colors appear reddish if the temperature is low, and bluish if the temperature is high. This adjustment is useful for matching the mo...
Page 6 - Troubleshooting
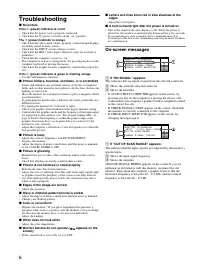
6 Troubleshooting x No picture If the ! (power) indicator is not lit • Check that the power cord is properly connected.• Check that the ! (power) switch is in the “on” position. The ! (power) indicator is orange • Check that the video signal cable is properly connected and all plugs are firmly seate...
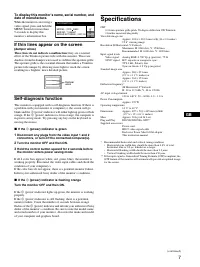
Page 7 - If thin lines appear on the screen; These lines do not indicate a malfunction; they are a normal; Self-diagnosis function; (power) indicator will either light up green or flash; Specifications
7 GB To display this monitor’s name, serial number, and date of manufacture. While the monitor is receiving a video signal, press and hold the MENU button for more than 5 seconds to display this monitor’s information box. If thin lines appear on the screen (damper wires) These lines do not indicate ...
Page 8 - Precautions; For the customers in the UK
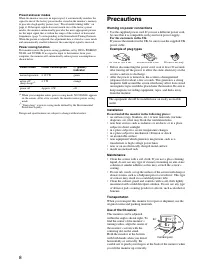
8 Preset and user modes When the monitor receives an input signal, it automatically matches the signal to one of the factory preset modes stored in the monitor’s memory to provide a high quality picture (see “Preset mode timing table” on page i) . If the input signals does not match one of the facto...
Page 9 - Configuration; Raccordement au connecteur d’entrée HD15; Sélection du signal d’entrée; Table des Matières
3 FR • Trinitron â est une marque commerciale déposée de Sony Corporation. • Macintosh est une marque commerciale sous licence d’Apple Computer, Inc., déposée aux Etats-Unis et dans d’autres pays. • Windows â et MS-DOS sont des marques déposées de Microsoft Corporation aux Etats-Unis et dans d’autre...
Page 10 - Réglages; Navigation dans le menu; Réglage de la qualité de l’image; PROFESSIONNEL; Réglages du menu d’écran
4 Réglages Navigation dans le menu 1 Appuyez sur la touche MENU pour afficher le menu principal. 2 Déplacez la touche de commande m / M pour mettre en surbrillance le menu principal que vous souhaitez régler et appuyez sur la touche de commande. 3 Déplacez la touche de commande m / M pour mettre en ...
Page 11 - : pour régler la couleur de l’image; PRESELECT
5 FR : pour régler la couleur de l’image Les paramètres COULEUR permettent de régler la température des couleurs de l’image en changeant le niveau de couleur des champs de couleur blanche. Les couleurs apparaissent rougeâtres lorsque la température est basse et bleuâtres lorsqu’elle est élevée. Ce r...
Page 12 - Dépannage; Messages à l’écran
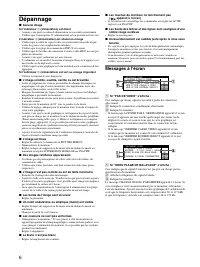
6 Dépannage x Aucune image Si l’indicateur ! (alimentation) est éteint • Assurez-vous que le cordon d’alimentation est raccordé correctement.• Vérifiez que l’interrupteur ! (alimentation) est en position activée (on). L’indicateur ! (alimentation) est allumé en orange • Vérifiez que le câble de sign...
Page 13 - Fonction d’auto-diagnostic; Spécifications
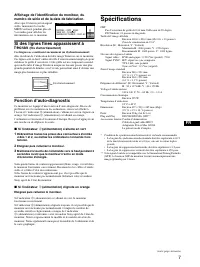
7 FR Affichage de l’identification du moniteur, du numéro de série et de la date de fabrication. Alors que l’écran reçoit un signal vidéo, maintenez la touche MENU enfoncé pendant plus de 5 secondes pour afficher les informations sur ce moniteur. Si des lignes fines apparaissent à l’écran (fils d’am...
Page 14 - Précautions
8 Modes préréglés et personnalisés Lorque le moniteur reçoit un signal d’entrée, il compare automatiquement le signal à l’un des modes préréglés d’usine mémorisés afin de fournir une image de haute qualité (voir le tableau de modes prédéfinis (Preset mode timing table) page i). Si le signal d’entrée...
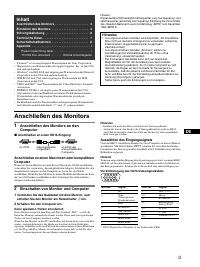
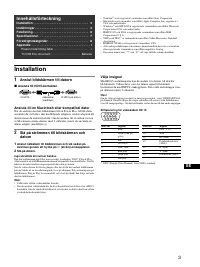
Page 15 - Anschließen des Monitors; Anschließen an einen HD15-Eingang; Einschalten von Monitor und Computer; Schalten Sie den Computer ein.; Auswählen des Eingangssignals; Inhalt; Hinweise
3 DE • Trinitron â ist ein eingetragenes Warenzeichen der Sony Corporation. • Macintosh ist ein Warenzeichen der Apple Computer, Inc., in den USA und anderen Ländern. • Windows â und MS-DOS sind eingetragene Warenzeichen der Microsoft Corporation in den USA und anderen Ländern. • IBM PC/AT und VGA s...
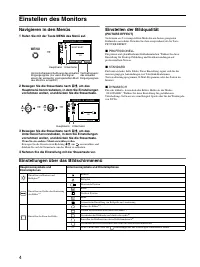
Page 16 - Einstellen des Monitors; Navigieren in den Menüs; Rufen Sie mit der Taste MENU das Menü auf.; Nehmen Sie die Einstellung mit der Steuertaste vor.; Einstellen der Bildqualität; PROFESSIONELL; Einstellungen über das Bildschirmmenü
4 Einstellen des Monitors Navigieren in den Menüs 1 Rufen Sie mit der Taste MENU das Menü auf. 2 Bewegen Sie die Steuertaste nach m / M , um das Hauptmenü hervorzuheben, in dem Sie Einstellungen vornehmen wollen, und drücken Sie die Steuertaste. 3 Bewegen Sie die Steuertaste nach m / M , um das Unte...
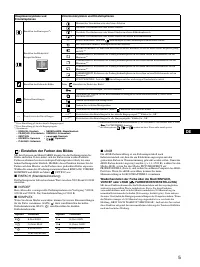
Page 17 - : Einstellen der Farben des Bildes; VORDEF; sRGB
5 DE : Einstellen der Farben des Bildes Mit den Optionen im Menü FARBE können Sie die Farbtemperatur des Bildes einstellen. Dabei ändert sich der Farbwert im weißen Farbfeld. Farben erscheinen bei einer niedrigen Farbtemperatur rötlich, bei einer hohen Farbtemperatur bläulich. Mit Hilfe dieser Funkt...
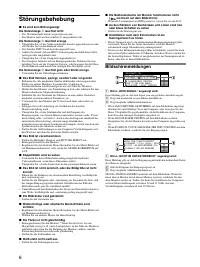
Page 18 - Störungsbehebung; Bildschirmmeldungen
6 Störungsbehebung x Es wird kein Bild angezeigt Die Netzanzeige ! leuchtet nicht • Das Netzkabel muß korrekt angeschlossen sein.• Der Monitor muß am Netzschalter ! eingeschaltet sein. Die Netzanzeige ! leuchtet orange • Überprüfen Sie, ob das Videosignalkabel korrekt angeschlossen ist und alle Stec...
Page 19 - Selbstdiagnosefunktion; Wenn die Netzanzeige; Technische Daten
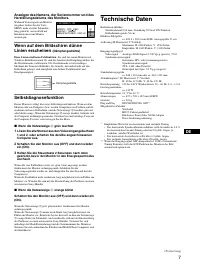
7 DE Anzeigen des Namens, der Seriennummer und des Herstellungsdatums des Monitors. Während Videosignale am Monitor eingehen, halten Sie die Taste MENU mehr als fünf Sekunden lang gedrückt, um ein Feld mit Informationen zum Monitor anzuzeigen. Wenn auf dem Bildschirm dünne Linien erscheinen (Dämpfun...
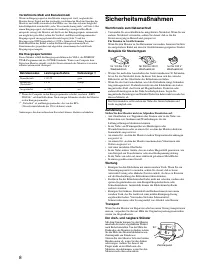
Page 20 - Sicherheitsmaßnahmen
8 Vordefinierte Modi und Benutzermodi Wenn ein Eingangssignal in den Monitor eingespeist wird, vergleicht der Monitor dieses Signal mit den werkseitig vordefinierten Modi im Speicher des Monitors und wählt automatisch den Modus aus, bei dem sich eine möglichst hohe Bildqualität erzielen läßt (siehe ...
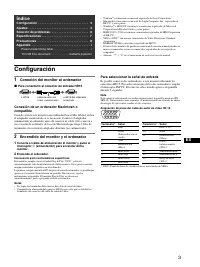
Page 21 - Configuración; Conexión del monitor al ordenador; Para conectarlo al conector de entrada HD15; Encendido del monitor y el ordenador; Para seleccionar la señal de entrada; Índice
3 ES • Trinitron â es una marca comercial registrada de Sony Corporation. • Macintosh es una marca comercial de Apple Computer, Inc., registrada en EE.UU. y otros países. • Windows â y MS-DOS son marcas comerciales registradas de Microsoft Corporation en Estados Unidos y otros países. • IBM PC/AT y ...
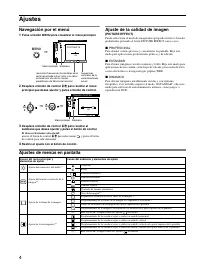
Page 22 - Ajustes; Navegación por el menú; Ajuste de la calidad de imagen; PROFESIONAL; Ajustes de menús en pantalla
4 Ajustes Navegación por el menú 1 Pulse el botón MENU para visualizar el menú principal. 2 Desplace el botón de control m / M para resaltar el menú principal que desee ajustar y pulse el botón de control. 3 Desplace el botón de control m / M para resaltar el submenú que desee ajustar y pulse el bot...
Page 23 - : Para ajustar el color de la imagen; PREDEFIN
5 ES : Para ajustar el color de la imagen Los ajustes de COLOR permiten definir la temperatura del color de la imagen cambiando el nivel de color del campo de color blanco. Los colores aparecerán con un tono rojizo si la temperatura es baja, y con un tono azulado si es alta. Este ajuste es útil para...
Page 24 - Solución de problemas; Mensajes en pantalla
6 Solución de problemas x No aparece la imagen Si el indicador ! (alimentación) no se ilumina • Compruebe que el cable de alimentación está correctamente conectado.• Compruebe que el interruptor ! (alimentación) se encuentra en la posición de encendido. El indicador ! (alimentación) aparece en naran...
Page 25 - Si aparecen líneas finas en pantalla; Función de autodiagnóstico; Especificaciones
7 ES Para visualizar el nombre, número de serie y fecha de fabricación de este monitor. Mientras el monitor recibe una señal de vídeo, pulse y mantenga pulsado el botón MENU durante más de 5 segundos para visualizar el cuadro de información de este monitor. Si aparecen líneas finas en pantalla (hilo...
Page 26 - Precauciones
8 Modos predefinidos y de usuario Cuando el monitor recibe una señal de entrada, hace coincidir automáticamente la señal con uno de los modos predefinidos en fábrica almacenados en la memoria del monitor para mostrar una imagen de alta calidad (consulte la “Tabla de temporización de modo predefinido...
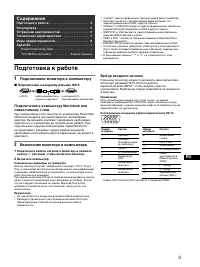
Page 27 - Installazione; Collegamento del monitor al computer; Collegamento al connettore di ingresso HD15; Accensione del monitor e del computer; Selezione del segnale di ingresso; Indice
3 IT • Trinitron â è un marchio di fabbrica registrato di Sony Corporation. • Macintosh è un marchio di fabbrica concesso in licenza a Apple Computer, Inc., registrato negli U.S.A. e in altri paesi. • Windows â e MS-DOS sono marchi di fabbrica registrati di Microsoft Corporation negli U.S.A. e in al...
Page 28 - Regolazioni; Come spostarsi all’interno dei menu; PROFESSIONALE; Regolazione dei menu a schermo
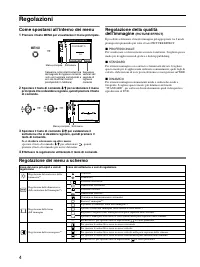
4 Regolazioni Come spostarsi all’interno dei menu 1 Premere il tasto MENU per visualizzare il menu principale. 2 Spostare il tasto di comando m / M per evidenziare il menu principale che si desidera regolare, quindi premere il tasto di comando. 3 Spostare il tasto di comando m / M per evidenziare il...
Page 29 - : Per regolare il colore dell’immagine; PREDEF
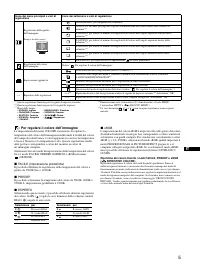
5 IT : Per regolare il colore dell’immagine Le impostazioni del menu COLORE consentono di regolare la temperatura del colore dell’immagine modificando il livello del colore del campo di colore bianco. I colori appaiono rossastri se la temperatura è bassa e bluastri se la temperatura è alta. Questa r...
Page 30 - Messaggi a schermo
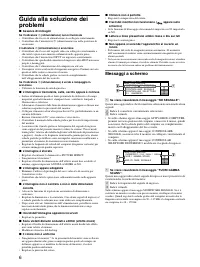
6 Guida alla soluzione dei problemi x Assenza di immagini Se l’indicatore ! (alimentazione) non è illuminato • Controllare che il cavo di alimentazione sia collegato correttamente.• Controllare che l’interruttore ! (alimentazione) sia nella posizione di accensione. L’indicatore ! (alimentazione) è a...
Page 31 - Funzione di autodiagnostica; Caratteristiche tecniche
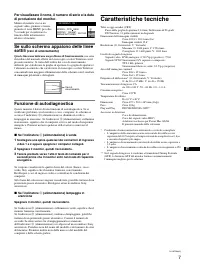
7 IT Per visualizzare il nome, il numero di serie e la data di produzione del monitor. Mentre il monitor riceve un segnale video, premere e tenere premuto il tasto MENU per oltre 5 secondi per visualizzare la finestra delle informazioni relative al monitor. Se sullo schermo appaiono delle linee sott...
Page 32 - Precauzioni
8 Modo preimpostato e modo utente Se il monitor riceve un segnale di ingresso, tale segnale viene fatto corrispondere automaticamente ad uno dei modi preimpostati in fabbrica contenuti nella memoria del monitor allo scopo di ottenere un’immagine di qualità superiore (vedere la sezione “Preset mode t...
Page 33 - Подготовка к работе; Подключение монитора к компьютеру; Подключение к входному разъему HD15; Подключение к компьютеру Macintosh или; Включение монитора и компьютера; Выбор входного сигнала; Coдepжaниe
3 RU • Trinitron â зарегистрированная торговая марка Sony Corporation. • Macintosh является торговой маркой Apple Computer, Inc., зарегистрированной в США и других странах. • Windows â и MS-DOS являются зарегистрированными торговыми марками Microsoft Corporation в США и других странах. • IBM PC/AT и...
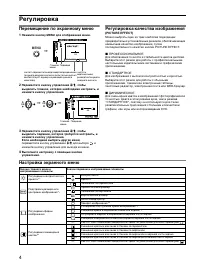
Page 34 - Регулировка; Перемещение по экранному меню; Регулировка качества изображения; ПРОФЕССИОНАЛЬHOE; Настройка экранного меню
4 Регулировка Перемещение по экранному меню 1 Нажмите кнопку MENU для отображения меню. 2 Переместите кнопку управления m / M , чтобы выделить главное, которое необходимо настроить, и нажмите кнопку управления. 3 Переместите кнопку управления m / M , чтобы выделить подменю, которое требуется настрои...
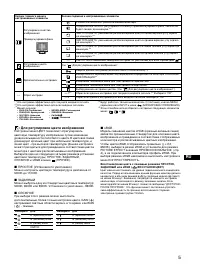
Page 35 - : Для регулировки цвета изображения; ЗАДАННЫЙ
5 RU : Для регулировки цвета изображения Настройки меню ЦВЕТ позволяют отрегулировать цветовую температуру изображения путем изменения уровня насыщенности поля белого цвета. В цветовой гамме доминирует красный цвет при небольшой температуре, и синий цвет - при высокой температуре. Данная настройка м...
Page 36 - Устранение неисправностей; Экранные сообщения
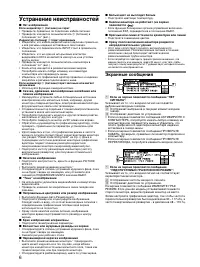
6 Устранение неисправностей x Нет изображения Если индикатор ! (питание) не горит • Проверьте, правильно ли подключен кабель питания. • Проверьте, находится ли выключатель ! (питание) в положении “on” (вкл.). Индикатор (питание) ! горит оранжевым • Убедитесь, что кабель видеосигнала подключен правил...
Page 37 - Демпферные нити; Технические
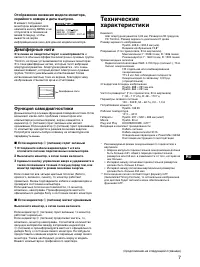
7 RU Отображение названия модели монитора, серийного номера и даты выпуска. В момент получения монитором видеосигнала нажмите кнопку MENU и не отпускайте в течение не менее 5 секунд, чтобы вывести на экран информационное окно для данной модели монитора. Демпферные нити Эти линии не свидетельствуют о...
Page 38 - Меры предосторожности
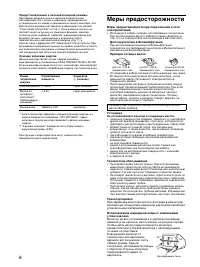
8 Предустановленный и пользовательский режимы При приеме входного сигнала монитор автоматически согласовывает его с одним из режимов, предварительно установленных на заводе и хранящихся в памяти монитора, для обеспечения высококачественного изображения (см. раздел “Preset mode timing table” на стр. ...
Page 39 - Installation; Anslut bildskärmen till datorn; Ansluta till HD15-kontakten; Ansluta till en Macintosh eller kompatibel dator; Välja insignal; Innehållsförteckning
3 SE • Trinitron â är ett registrerat varumärke som tillhör Sony Corporation. • Macintosh är ett varumärke som tillhör Apple Computer, Inc, registrerat i USA och andra länder. • Windows â och MS-DOS är registrerade varumärken som tillhör Microsoft Corporation i USA och andra länder. • IBM PC/AT och ...
Page 40 - Inställningar; Använda menyn; Justera kvaliteten på bilden; Inställningar på skärmmenyn
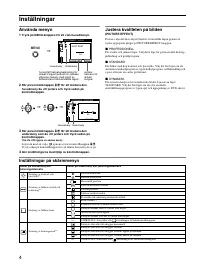
4 Inställningar Använda menyn 1 Tryck på MENU-knappen för att visa huvudmenyn. 2 Rör på kontrollknappen m / M för att markera den huvudmeny du vill justera och tryck sedan på kontrollknappen. 3 Rör på kontrollknappen m / M för att markera den undermeny som du vill justera och tryck sedan på kontroll...
Page 41 - : Justera bildens färg; FÄRGRESET
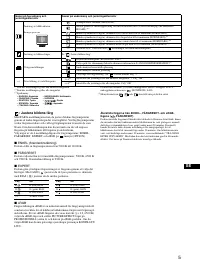
5 SE : Justera bildens färg Med FÄRG-inställningarna kan du justera bildens färgtemperatur genom att ändra färgnivån på det vita färgfältet. Vid låg färgtemperatur verkar färgerna rödare och vid hög färgtemperatur framstår de som blåare. Den här inställningen kan du använda om du vill anpassa färger...
Page 42 - Felsökning; Skärmmeddelanden
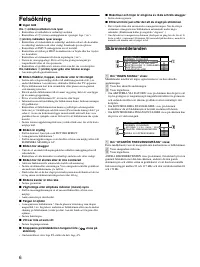
6 Felsökning x Ingen bild Om ! (ström)-indikatorn inte lyser • Kontrollera att nätkabeln är ordentligt ansluten.• Kontrollera att ! (ström)-omkopplaren är i påslaget läge (“on”). ! (ström) indikatorn lyser orange • Kontrollera att videokabeln är ordentligt ansluten och att alla kontakter är ordentli...
Page 43 - Specifikationer
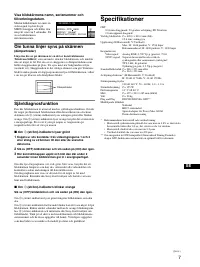
7 SE Visa bildskärmens namn, serienummer och tillverkningsdatum. Medan bildskärmen tar emot en videosignal trycker du på MENU-knappen och håller den intryckt i mer än 5 sekunder. Då visas bildskärmens informationsruta. Om tunna linjer syns på skärmen (dämpartrådar) Linjerna du ser på skärmen är en d...
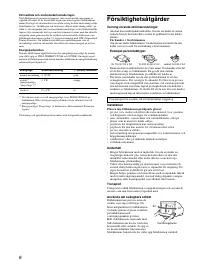
Page 44 - Försiktighetsåtgärder
8 Förinställda och användardefinierade lägen När bildskärmen registrerar en insignal, sker en automatisk anpassning av signalen till något av de förinställda lägen som finns lagrade i bildskärmens minne. Detta gör att skärmen kan visa en bild av hög kvalitet under många olika förhållanden (se “Grafi...
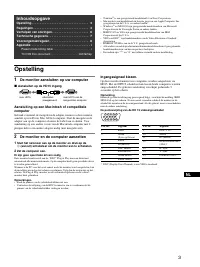
Page 45 - Opstelling; De monitor aansluiten op uw computer; Aansluiten op de HD15 ingang; De monitor en de computer aanzetten; Ingangssignaal kiezen.; Inhoudsopgave
3 NL • Trinitron â is een geregistreerd handelsmerk van Sony Corporation. • Macintosh is een handelsmerk in licentie gegeven aan Apple Computer, Inc., geregistreerd in de U.S.A. en andere landen. • Windows â en MS-DOS zijn geregisteerde handelsmerken van Microsoft Corporation in de Verenigde Staten ...
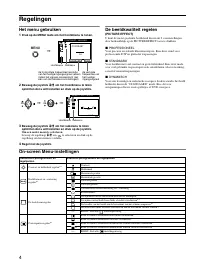
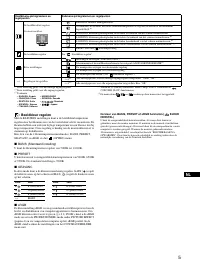
Page 46 - Regelingen; Het menu gebruiken; De beeldkwaliteit regelen; PROFESSIONEEL
4 Regelingen Het menu gebruiken 1 Druk op de MENU toets om het hoofdmenu te tonen. 2 Beweeg de joystick m / M om het hoofdmenu te laten oplichten dat u wilt instellen en druk op de joystick. 3 Beweeg de joystick m / M om het submenu te laten oplichten dat u wilt instellen en druk op de joystick. Om ...
Page 48 - Verhelpen van storingen; Schermberichten
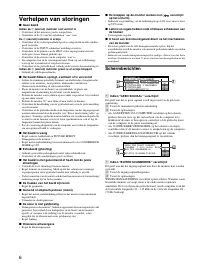
6 Verhelpen van storingen x Geen beeld Indien de ! (aan/uit) indicator niet verlicht is • Controleer of het netsnoer goed is aangesloten.• Controleer of de ! (aan/uit) schakelaar “aan” staat. De ! (aan/uit) indicator is oranje • Controleer of de videosignaalkabel goed is aangesloten en alle stekkers...
Page 49 - Zelfdiagnosefunctie; Technische gegevens
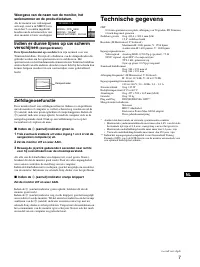
7 NL Weergave van de naam van de monitor, het serienummer en de productiedatum. Als de monitor een videosignaal ontvangt, moet u de MENU toets meer dan 5 seconden ingedrukt houden om de informatiebox van deze monitor te laten verschijnen. Indien er dunne lijnen op uw scherm verschijnen (demperdraden...
Page 50 - Voorzorgsmaatregelen
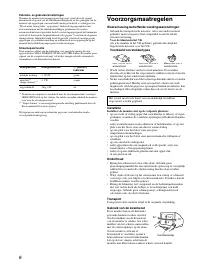
8 Fabrieks- en gebruikersinstellingen Wanneer de monitor een ingangssignaal ontvangt, stemt deze dit signaal automatisch af op één van de fabrieksinstellingen die in het geheugen van de monitor zijn opgeslagen, om een beeld van hoge kwaliteit te verkrijgen (zie “Preset mode timing table” op pagina i...
Page 51 - Appendix; Preset mode timing table
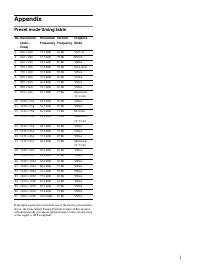
i Appendix Preset mode timing table If the input signal does not match one of the factory preset modes above, the Generalized Timing Formula feature of this monitor will automatically provide an optimal image for the screen as long as the signal is GTF compliant. No. Resolution (dots × lines) Horizo...
Page 52 - * Bio-accumulative is defined as substances which accumulate
TCO’99 Eco-document x Congratulations! You have just purchased a TCO’99 approved and labelled product! Your choice has provided you with a product developed for professional use. Your purchase has also contributed to reducing the burden on the environment and also to the further development of envir...