Smeg SMF13WHAU - User Manual
Smeg SMF13WHAU Mixer – User Manual, read for free online in PDF format. We hope this helps you resolve any issues you may have. If you have further questions, please contact us through the contact form.


Table of Contents:
- Page 2 – Contents; ENEN; Instructions
- Page 3 – Instructions; Instructions
- Page 5 – For this appliance
- Page 6 – Old appliances do not belong in
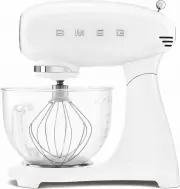
- Page 7 – Description; Product description
- Page 9 – Standard accessories; Aluminium dough hook
- Page 11 – Use; Using the stand mixer; Danger of electrocution
- Page 12 – Moving parts
- Page 14 – When you have finished using the mixer:
- Page 15 – Extract the accessory (
- Page 16 – Fit the pouring shield with the opening (
- Page 17 – Safety lock system
- Page 18 – Speed setting
- Page 20 – General advice
- Page 22 – Cleaning and care; Ordinary daily cleaning; Improper use
- Page 23 – Problem
- Page 24 – The mixer vibrates
- Page 25 – The bowl is too full.
Dear Customer,
Thank you for buying a Smeg 50’s Style Stand Mixer.
By choosing one of our products, you have selected an appliance which combines
iconic style with innovative technical design and attention to detail.
This appliance coordinates perfectly with other Smeg products, or works equally great
as a standalone statement piece in your kitchen.
We hope you enjoy using your new appliance!
For further information about the product please visit: www.smeg50style.com or
www.smeg.com
Model SMF02 - SMF03 - SMF13
Stand Mixer
"Loading the manual" means you need to wait until the file loads and becomes available for online reading. Some manuals are very large, and the time they take to appear depends on your internet speed.
Summary
Contents 29 ENEN 1 Instructions 30 1.1 Introduction 30 1.2 This user manual 30 1.3 Intended use 30 1.4 General safety instructions 31 1.5 Manufacturer liability 33 1.6 Identification plate 33 1.7 Disposal 33 2 Description 34 2.1 Product description 34 2.2 Description of parts 35 2.3 Standard accesso...
Instructions 30 1 Instructions 1.1 Introduction Key information for the user: 1.2 This user manual This user manual is an integral part of the appliance and must therefore be kept in its entirety and within the user’s reach for the whole working life of the appliance. 1.3 Intended use • The applianc...
Instructions 32 For this appliance • Unplug the appliance from the power socket before changing the accessories or approaching moving parts. • Do not insert, remove or replace standard accessories with the safety lock disengaged (motor head lowered). • Do not touch moving parts while the appliance i...