Page 2 - IMPORTANTES INSTRUCCIONES DE SEGURIDAD; CONSERVE ESTE MANUAL DE INSTRUCCIONES
® SINGER es una marca registrada de The Singer Company Ltd o sus afiliados. © 2005 Todos los derechos reservados. IMPORTANTES INSTRUCCIONES DE SEGURIDAD Cuando se usa un aparato eléctrico, debe seguirse unas precauciones básicas y que vienen incluidas a continuación. "Leer las instrucciones ante...
Page 3 - TABLE OF CONTENTS; PREPARATION FOR EMBROIDERY SEWING; For European version
1. GETTING TO KNOW MACHINE Machine identification -------------------------------------------------6---7 Accessories -------------------------------------------------------------8---9 2. GETTING STARTED SEWING Leveling-machine----------------------------------------------------10---11Setting-up-mach...
Page 4 - TABLE DES MATIERES; PRÉPARATIFS POUR LA BRODERIE; Version pour l’Europe
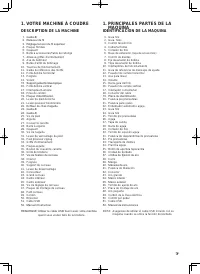
1. VOTRE MACHINE À COUDRE Description de la machine --------------------------------------------6---7 Accessoires --------------------------------------------------------------8---9 2. DÉBUT DE LA COUTURE Équilibrer la machine -----------------------------------------------10---11 Préparation de la ...
Page 5 - PRINCIPALES PARTES DE LA MAQUINA; CONTENIDO; PREPARACION PARA BORDADO; Para versión europea
1. PRINCIPALES PARTES DE LA MAQUINA Identificación de la máquina ----------------------------------------6---7 Accesorios ---------------------------------------------------------------8---9 2. COMENZAR A COSER Ajuste de altura del pie --------------------------------------------10---11 Preparación ...
Page 6 - GETTING TO KNOW MACHINE; MACHINE IDENTIFICATION
1. Thread guide 2. Thread take-up 3. Thread tension control 4. Face cover 5. Thread cutter 6. Extension table (Accessory box) 7. Feed dog control 8. Bobbin winder shaft 9. Bobbin winder stop10. Operation switches11. Pattern reference guide12. Horizontal spool pin13. Handle14. Hand wheel15. Thread gu...
Page 7 - DESCRIPTION DE LA MACHINE; VOTRE MACHINE À COUDRE; IDENTIFICACION DE LA MAQUINA; PRINCIPALES PARTES DE LA
DESCRIPTION DE LA MACHINE 1. VOTRE MACHINE À COUDRE 1. Guide-fil 2. Releveur de fil 3. Réglage tension du fil supérieur 4. Plaque frontale 5. Coupe-fil 6. Boîte à accessoires/Table de rallonge 7. Abaisse-griffes d’entraînement 8. Axe du bobineur 9. Butée d’arrêt du bobinage10. Touches de fonctionnem...
Page 8 - ACCESSORIES; FOR SEWING MACHINE
ACCESSORIES FOR SEWING MACHINE 1. Needles 2. Bobbins 3. Spool pin cap (small) 4. Spool pin cap (large) 5. Buttonhole opener/Brush 6. Screwdriver for needle plate (large) 7. Screwdriver (large) 8. Screwdriver (small) 9. Zipper foot 10. Button sewing foot 11. Blind stitch foot 12. Buttonhole foot 13. ...
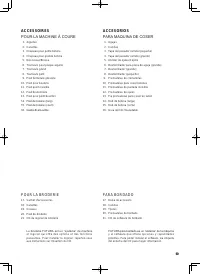
Page 9 - ACCESSOIRES; POUR LA MACHINE À COURE; ACCESORIOS; PARA MAQUINA DE COSER
ACCESSOIRES POUR LA MACHINE À COURE 1. Aiguilles 2. Canettes 3. Chapeau pour petite bobine 4. Chapeau pour grande bobine 5. Découseur/Brosse 6. Tournevis pour plaque aiguille 7. Tournevis grand 8. Tournevis petit 9. Pied fermeture glissière 10. Pied pour boutons 11. Pied point invisible 12. Pied bou...
Page 10 - LEVELING MACHINE; CHECKING; GETTING STARTED SEWING; SETTING UP MACHINE; POWER LINE CORD/FOOT CONTROL
0 (1) LEVELING MACHINE CHECKING Put the machine on a flat table. Check the balance of the machine. ADJUSTMENT Lay machine on its back gently and carefully with both hands. Be careful not to make scratches on both machine and table.Be careful not to drop the machine and not to have your fingers be ca...
Page 11 - PRÉPARATION DE LA MACHINE; PREPARACION DE LA MAQUINA; DÉBUT DE LA COUTURE
ÉQUILIBRER LA MACHINE VERIFICATION Placez la machine sur une table plate.Assurez-vous que l’équilibre de la machine soit parfait. RÉGLAGE Posez la machine doucement et soigneusement sur son dos avec les deux mains. Veillez à ne pas rayer la machine et la table.Veillez à ne pas laisser tomber la mach...
Page 12 - SPOOL PINS; VERTICAL SPOOL PIN for large thread spool
SPOOL PINS HORIZONTAL SPOOL PIN for normal thread spool Place thread spool on the pin and secure with a spool cap to ensure smooth flow of thread. VERTICAL SPOOL PIN for large thread spool 1. Place removable thread guide on the horizontal spool pin as illustrated. 2. Pull down the spool pin and pull...
Page 13 - PORTA CARRETES
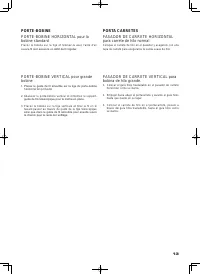
PORTE-BOBINE PORTE-BOBINE HORIZONTAL pour la bobine standard Placez la bobine sur la tige et retenez-la avec l’aide d’un couvre-fil ceci assurera un débit de fil régulier. PORTE-BOBINE VERTICAL pour grande bobine 1. Placez le guide de fil amovible sur la tige du porte-bobine horizontal tel qu’illust...
Page 14 - WINDING BOBBIN
WINDING BOBBIN 1. Place a spool of thread on the spool pin, and secure it with the spool pin cap. Pull the thread out from the spool through thread guide. 2. Pull end of thread through hole in bobbin as shown. 3. Push bobbin winder shaft to the far left position, if it is not already there. Place bo...
Page 15 - PRÉPARATION DE LA CANETTE; DEVANADO DE LA CANILLA
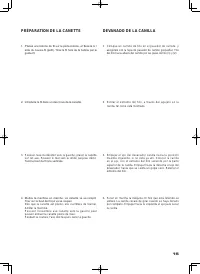
PRÉPARATION DE LA CANETTE 1. Placez une bobine de fil sur le porte-bobine, et fixez-la à l’ aide du couvre-fil (petit). Tirez le fil hors de la bobine par le guide-fil. 2. lntroduire le fil dans un des trous de la canette. 3. Pousser l’axe du dévidoir vers la gauche, placer la canette sur cet axe. P...
Page 16 - INSERTING THE BOBBIN
A A B INSERTING THE BOBBIN 1. Raise the needle to its highest position by rotating the hand wheel toward you. 2. Remove the bobbin cover plate by pushing the release button to the right while pushing the left corner of plate. 3. Insert the bobbin making sure the bobbin rotates counter- clockwise. 4....
Page 17 - ENFILAGE DU FIL DE CANETTE; ENHEBRADO DEL HILO DE LA CANILLA
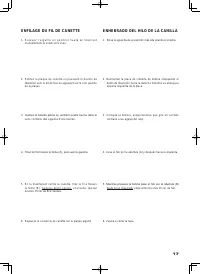
ENFILAGE DU FIL DE CANETTE 1. R e l e v e z l ’ a i g u i l l e e n p o s i t i o n h a u t e e n t o u r n a n t manuellement le volant vers vous. 2. Retirez la plaque de canette en poussant le bouton de libération vers la droite tout en appuyant sur le coin gauche de la plaque. 3. Insérez la canet...
Page 18 - SETTING THE TOP THREAD
SETTING THE TOP THREAD A. Raise the presser foot lifter. Always be sure to raise the presser foot lifter before threading the top thread. (If the presser foot lifter is not raised, correct thread tension cannot be obtained.) B. Turn the hand wheel toward you until the needle is in its highest positi...
Page 19 - ENFILAGE DU FIL SUPÉRIEUR; ENHEBRADO DEL HILO SUPERIOR
ENFILAGE DU FIL SUPÉRIEUR A. E l e v e z l e p i e d p r e s s e u r. Ve i l l e z à t o u j o u r s é l e v e r l e releveur de pied presseur avant d’enfiler le fil supérieur. (Si le releveur de pied presseur n’est pas élevé, vous ne pourrez pas obtenir une tension de fil correcte.) B. Tournez le v...
Page 20 - AUTOMATIC NEEDLE THREADER
0 1 2 3 AUTOMATIC NEEDLE THREADER Raise the needle to its highest position by rotating the hand wheel towards you. 1. Hook thread to thread guide as illustrated. 2. Pull down threader lever until the hooked end passes through the needle eye. Guide thread into hooked end and pull it upward. 3. Releas...
Page 21 - EMPLEO DEL ENSARTADOR AGUJA
UTILISATION DE L’ENFILEUR DE CHAS D’AIGUILLE Elever l'aiguille en position haute en toumant le volant vers vous. 1. Passer le fil dans le crochet de l’enfileur. 2. Pousser le levier complètement vers le bas et le crochet passera dans le chas de l’aiguille. Passer le fil devant l’aiguille et sous le ...
Page 22 - PICKING UP BOBBIN THREAD
PICKING UP BOBBIN THREAD 1. Raise the presser foot lifter. 2. Holding needle thread loosely with your left hand, turn hand wheel toward you with your right hand first lowering the needle and continuing until the needle comes to its highest position. 3. Light pull the top thread to pick up the bobbin...
Page 23 - RAPPEL DU FIL INFÉRIEUR; RECOGIDA DEL HILO DE LA CANILLA
RAPPEL DU FIL INFÉRIEUR 1. Relever le pied presseur. 2. Tenir le fil de l’aiguille et tourner le volant vers vous en faisant remonter l’aiguille à sa position la plus haute. 3. Faire remonter le fil inférieur en tirant légèrement sur le fil supérieur. 4. Placer les deux fils sous le pied presseur ve...
Page 24 - CONTROL PANEL FUNCTIONS; Direct selection buttons; Numerical selection buttons
CONTROL PANEL FUNCTIONS Direct selection buttons Frequently used patterns are available by the direct selection buttons. Turn on power switch and push a desired button until it is lit. Numerical selection buttons Use the buttons located at left of number display to select left digit and the buttons ...
Page 25 - FONCTIONS DU PANNEAU DE COMMANDE; Touches de sélection directe; FUNCIONES DEL PANEL DE CONTROL; Botones de selección directa
FONCTIONS DU PANNEAU DE COMMANDE Touches de sélection directe Les motifs utilisés souvent peuvent être sélectionnés par l e s t o u c h e s d e s é l e c t i o n d i r e c t e . R é g l e r l ’ i n t e r r u p t e u r d ’alimentation sur la position de marche et appuyez sur une touche voulue jusqu’à...
Page 26 - Stitch length and width/needle position controls; *Pattern reference guide
Stitch length and width/needle position controls *Auto/Default settings Your sewing machine will produce most of your stitching requirements at an Auto/Default Stitch Length and Width. When a pattern is selected, it will automatically sew at default settings of stitch length, width and needle positi...
Page 27 - Guide de référence des motifs; Guía de referencia de patrón
Commandes de longueur et de largeur de point/position de l’aiguille *Réglages Auto/Par défaut Votre machine à coudre exécute la plupart de vos nécessités de couture à une longueur et une largeur de point automatique/par défaut. Lorsqu’un motif a été sélectionné, la couture est automatiquement exécut...
Page 29 - Interruptor de modo de aguja doble ( )
Commutateur de mode d’aiguilles jumelées ( ) Lorsque vous utilisez des aiguilles jumelées, appuyez sur l e c o m m u t a t e u r d e m o d e d ’ a i g u i l l e s j u m e l é e s q u e l q u e s o i t l e p o i n t s é l e c t i o n n é . C e c i a u r a p o u r e ff e t d e r é d u i r e automatiqu...
Page 34 - STRAIGHT STITCHING; KEEPING SEAMS STRAIGHT
F E A B C D I 2 3 1 G H STRAIGHT STITCHING The straight stitch is the stitch most frequently used. Let’s set the machine for the basic straight stitch. 1. SETTINGS Presser foot - General Purpose Foot Thread tension control - S A. Thread tension control B. Needle stop position selector switch C. Reve...
Page 35 - POINT DROIT; POUR GARDER LA COUTURE DROITE; PUNTADA RECTA; MANTENIENDO LA PUNTADA DERECHA
POINT DROIT C’est le point le plus utilisé pour toute genre de couture. Apprenez à vous servir correctement de votre machine, en suivant les étapes ci-dessous. 1. RÉGLAGES Pied de biche - Pied universel Réglage tension du fil supérieur - S A. Réglage tension du fil supérieur B. Touche de position d’...
Page 37 - RÉALISATION D’UN ANGLE DROIT; POINT ARRIÈRE; PUNTADA HACIA ATRAS
RÉALISATION D’UN ANGLE DROIT 1. Pour coudre un coin au 16 mm du bord du tissu, toucher la touche de position d’arrêt de l’aiguille pour ce que l’aiguille est à la position basse. Cousez et arrêter quand vous arrivez au guide d’angle comme illustrer. Lever le pied de biche et pivoter le tissu. 2. La ...
Page 38 - INSERTING ZIPPERS AND PIPING; HAND-LOOK QUILT STITCH
STRAIGHT STITCH WITH AUTO TIE-OFF FUNCTION 1. Press the foot control and the machine will sew 4 stitches in forward and then 4 stitches in reverse and continue to sew in forward until the foot control is released. 2. P u s h t h e r e v e r s e s w i t c h a n d t h e m a c h i n e w i l l s e w 4 s...
Page 39 - INSÉRER UNE FERMETURE À; PUNTADA DE ACOLCHADO CONTINUA
POINT DROIT AVEC FONCTION DE NOUAGE AUTOMATIQUE 1. Appuyez sur la pédale; la machine coudra alors 4 points e n m a r c h e a v a n t p u i s 4 p o i n t s e n m a r c h e a r r i è r e , e t continuera à coudre en marche avant jusqu’à ce que vous relâchiez la pédale. 2. Appuyez sur l’interrupteur de...
Page 40 - ZIGZAG STITCHING; ADJUSTING STITCH WIDTH AND LENGTH
0 ZIGZAG STITCHING The top thread may appear on the bottom depending on the thread, fabric, type of stitch and sewing speed, but the bobbin thread must never appear on the top of the fabric. Under sideCôté de dessousReverso Top sideCôté de dessusCara SETTINGS :Presser foot - General Purpose Foot :Th...
Page 41 - POINT ZIGZAG; POSITIONNEMENT DES MOTIFS; UBICACION DE LOS PATRONES; AJUSTE DEL ANCHO Y LARGO DE
POINT ZIGZAG Le fil supérieur peut paraître sur l’envers, en fonction du fil, du tissu et de la vitesse de couture, mais le fil de la canette ne doit jamais paraître sur l’endroit. RÉGLAGES :Pied presseur - Pied universel :Réglage tension du fil supérieur - S - E POSITIONNEMENT DES MOTIFS La largeur...
Page 43 - POINT INVISIBLE; POINT DE LINGERIE; PUNTADA INVISIBLE
POINT INVISIBLE 1. D’abord surfiler les bords avec un zigzag, ensuite plier l’ ourlet sur la largeur désirée et repasser. 2. Maintenant, replier le tissu comme iilustré. 3. Placez le tissu sous le pied. Faites tourner le volant vers vous à la main jusqu’à ce que l’aiguille aille complètement vers la...
Page 44 - FAGOTING
MULTI-STITCH ZIGZAG This is a strong stitch because as its name implies, it makes three short stitches where the normal zig-zag makes only one. For this reason it is highly recommended for overcasting all types of fabrics. I t i s a l s o i d e a l f o r m e n d i n g t e a r s , a p p l y i n g p a...
Page 45 - POINT AJOURÉ; ZIG-ZAG DE TRES PUNTADAS
ZIGZAG MULTI-POINT Pour réparer des déchirures droites ou en angle placez le tissu avec le début de l’accroc sous la partie centrale du pied. Lorsque vous avez un accroc en deux parties, reprisez à partir de chaque extrèmité pour revenir au centre. Pour renforcer votre couture, placez un morceau de ...
Page 46 - STRETCH STITCHES; STRAIGHT STRETCH STITCH; OVEREDGE STITCH; FEATHER STITCH
STRETCH STITCHES Stretch stitches are mainly for use on knit, or stretchable fabrics, but can also be used on ordinary woven materials. SETTINGS :Presser foot - General Purpose Foot :Thread tension control - S - E STRAIGHT STRETCH STITCH Straight stretch stitch is far stronger than an ordinary strai...
Page 47 - POINTS EXTENSIBLE; POINT DROIT EXTENSIBLE; POINT PLUME; PUNTADAS ELASTICAS; PUNTADA RECTA TRIPLE
POINTS EXTENSIBLE Les points extensibles sont généralement utilisés pour les tissus élastiques, mais peuvent ètres utilisès sur tissus tissés. RÉGLAGES :Pied presseur - Pied universel :Réglage tension du fil supérieur - S - E POINT DROIT EXTENSIBLE Ce point est beaucoup plus solide que le point ordi...
Page 48 - SLANT OVEREDGE STITCH
BLANKET STITCH The decorative appearance combined with practical use of this stitch enables it to be used for hemstitching and to applique a quilt. HONEYCOMB STITCH 1. Make several rows of gathers across the fabric that you wish to smock. 2. W i t h a n a r r o w s t r i p o f f a b r i c d i r e c ...
Page 50 - REINFORCED OVEREDGE STITCH; WIZARD STITCH
0 REINFORCED OVEREDGE STITCH Both of these stitches are perfect for attaching flat elastic when making or repairing lingerie. They can also be used for smocking and as a seam finish. WIZARD STITCH Wizard stitch, as well as being a decorative stitch, is ideal for patching stretch fabrics such as jers...
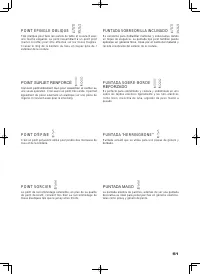
Page 51 - POINT SURJET RENFORCÉ; POINT SORCIER; PUNTADA “HERRINGBONE”
POINT SURJET RENFORCÉ Convient particulièrement bien pour assembler et surfiler en une seule opération. C’est aussi un point très solide. Il permet également de poser aisément un élastique sur une pièce de lingerie. Il convient aussi pour le smocking. POINT SORCIER Le point de raccommodage extensibl...
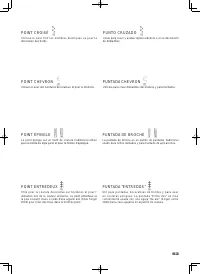
Page 52 - CROSSED STITCH; CHEVRON STITCH; PIN STITCH
CROSSED STITCH Use to sew and finish elastic fabrics or for decoration of borders. CHEVRON STITCH Use to create decorative borders and for embroidery. PIN STITCH The Pin stitch is a traditional stitch pattern used for picot like edges and for applique work. ENTREDEUX STITCH U s e f u l f o r d e c o...
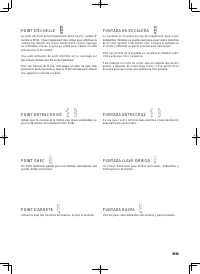
Page 54 - LADDER STITCH; GREEK KEY STITCH; FISHBONE STITCH
LADDER STITCH T h e L a d d e r s t i t c h i s p r i m a r i l y u s e d f o r d r a w n t h r e a d hemstitching. It can also be used for sewing over thin tape in an opposite or same color. Place the stitch in the center and a special effect will be obtained for decoration. Another use for the lad...
Page 56 - DECORATIVE STITCHING; TIPS ON DESIGN STITCHING
DECORATIVE STITCHING 22 different types of decorative stitches are available.F o l l o w i n g a r e e x a m p l e s o f h o w t o u s e a n d s e w t h e s e stitches.You can use other stitches in the same way. * You should carry out a test sewing on a cut-off strip of the fabric being sewn to chec...
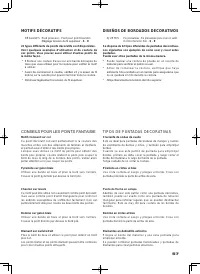
Page 57 - CONSEILS POUR LES POINTS FANTAISIE
MOTIFS DÉCORATIFS 22 types différents de points décoratifs sont disponibles.Voici quelques exemples d’utilisation et de couture de ces points. Vous pouvez aussi utiliser d’autres points de la même façon. * Effectuez une couture d’essai sur une bande découpée du tissu que vous utilisez pour la coutur...
Page 58 - CONTINUOUS PATTERNS
CONTINUOUS PATTERNS The patterns illustrated on the right are continuous patterns. Use whichever pattern suit your needs. SETTINGS :Presser foot - Zigzag foot :Thread tension control - S - E
Page 61 - POSE DE BOUTONS; COSIDO DE BOTONES
MOTIFS SPÉCIALS Ceci peut être utilisé pour coudre des motifs uniques et des motifs continuels. RÉGLAGES :Pied presseur - Pied zigzag :Réglage tension du fil supérieur - S - E PATRONES ACTUALES Estos pueden ser usados para coser patrones de una puntada y patrones continuos. AJUSTES :Pie prensatelas ...
Page 62 - BUTTONHOLE MAKING; USING BUTTONHOLE FOOT
BUTTONHOLE MAKING USING BUTTONHOLE FOOT 1. Insert a button in between tab A and tab B. 2. Buttonholes can be sewn to match the size of the button. PROCEDURE * U s e a n i n t e r f a c i n g i n t h e a r e a o f t h e g a r m e n t w h e r e buttonholes are placed. Stabilizer or regular interfacing...
Page 63 - CONFECTION DES BOUTONNIÈRES; UTILISATION DU PIED BOUTONNIÈRE; CONFECCION DE OJALES; USO DEL PIE DE OJALADORA
CONFECTION DES BOUTONNIÈRES UTILISATION DU PIED BOUTONNIÈRE 1. Introduisez un bouton entre les butées A et B. 2. Les boutonnières peuvent être cousues de manière à correspondre à la taille du bouton. CONFECCION DE OJALES USO DEL PIE DE OJALADORA 1. Inserte un botón entre la lengüeta A y la lengüeta ...
Page 66 - CORDED BUTTONHOLES; FABRICS
SpurSalienteTige CORDED BUTTONHOLES Hook filler cord (crochet thread or buttonhole twist) over the spur and pull both ends of the cord forward under the foot and tie off the cord as shown in the illustration. Sew buttonhole so that zigzag stitches cover the cord. When completed, release the cord fro...
Page 67 - BOUTONNIÈRES GANSEES; OJALES CON CORDON; HACIENDO OJALES EN MATERIALES
BOUTONNIÈRES GANSEES (RENFORCEES) Accrocher le cordonnet (fil de passe ou fil de soie) sur la tige du pied pour boutonnière et tirer les deux extrémitès sous le pied vers le devant.C o u d r e l a b o u t o n n i è r e d e m a n i è r e à c e q u e l a z i g - z a g recouvre le cordonnet.La boutonni...
Page 68 - MANUAL BUTTONHOLE; PROCEDURE
MANUAL BUTTONHOLE * Use the automatic buttonhole foot up to 1 3/4 “(45 mm) in length, but don’t lower the buttonhole lever or a beep will sound. * Use the satin foot to create larger buttonholes. * Carefully mark the buttonhole length on your garment. Place the fabric with the buttonhole marked unde...
Page 69 - BOUTONNIÈRE MANUELLE; PROCÉDURE; OJAL MANUAL; PROCEDIMIENTO
BOUTONNIÈRE MANUELLE * Utilisez le pied pour boutonnière automatique jusqu’à 45 mm (1 3/4") de long, mais n’abaissez pas le levier pour boutonnière, sinon un bip retentira. * Utilisez le pied pour point bourdon pour créer des boutonnières plus grandes. * Marquez soigneusement la longueur de la b...
Page 70 - BEFORE ATTACHING EMBROIDERY UNIT; ATTACHING EMBROIDERY FOOT
0 3. PREPARATION FOR EMBROIDERY SEWING BEFORE ATTACHING EMBROIDERY UNIT ATTACHING EMBROIDERY FOOT * Raise presser foot lifter. * Turn hand wheel toward you until needle is in its highest position. 1. Remove presser foot screw, presser foot and foot holder. 2. Attach the embroidery presser foot behin...
Page 71 - PRÉPARATIFS POUR LA BRODERIE; AVANT DE FIXER L’UNITÉ DE BRODERIE; FIXATION DU PIED BRODERIE; COLOCANDO EL PIE DE BORDADO
3. PRÉPARATIFS POUR LA BRODERIE AVANT DE FIXER L’UNITÉ DE BRODERIE FIXATION DU PIED BRODERIE * Élevez le releveur de pied presseur. * Tournez le volant vers vous jusqu’à ce que l’aiguille soit à sa position la plus haute. 1. Retirez la vis du pied presseur, le pied presseur et le support du pied pre...
Page 72 - SETTING TOP THREAD; FEED DOG CONTROL
1 3 5 2 4 SETTING TOP THREAD Refer to page 18 - 21. NOTE: It is recommended to do the threading before data transferring. PICKING UP BOBBIN THREAD Refer to page 22 - 23. EXTENSION TABLE 1. Turn off power to machine. 2. Slide the extension table to left to remove it from machine. (Refer to page 102 -...
Page 73 - CONTROL DE DIENTES
ENFILAGE DU FIL SUPÉRIEUR Reportez-vous aux pages 18 - 21. REMARQUE: Il est recommandé d’effectuer l’enfilage avant le transfert des donnée. RAPPEL DU FIL INFÉRIEUR Reportez-vous aux pages 22 - 23. PLATEAU DE RALLONGE 1. Eteindre la machine. 2. Faites glisser la table de rallonge vers la gauche pour...
Page 74 - ATTACHING EMBROIDERY UNIT; REMOVING EMBROIDERY UNIT
2 1 Connector capCouvercle de connecteurTapa de conector ConnectorConnecteurConector HandlePoignée Mango ATTACHING EMBROIDERY UNIT 1. Turn off power to machine. Remove connector cap from machine. * R e - i n s t a l l c o n n e c t o r c a p b e f o r e u s i n g m a c h i n e f o r general sewing. ...
Page 75 - FIXATION DE L’UNITÉ DE BRODERIE; COLOCANDO LA UNIDAD DE BORDADO; RETRAIT DE L’UNITÉ DE BRODERIE
FIXATION DE L’UNITÉ DE BRODERIE 1. Eteindre la machine. Retirez le couvercle de connecteur de la machine. * Remettez en place le couvercle de connecteur avant d’ utiliser la machine pour la couture générale. 2. F a i t e s g l i s s e r l ’ u n i t é d e b r o d e r i e s u r l a m a c h i n e e n e...
Page 78 - USING THE MATERIAL AND STABILIZER
USING THE MATERIAL AND STABILIZER MATERIAL Use stabilizer to produce best results when embroidering on the following fabrics. M a t e r i a l s w h i c h l a c k f i r m n e s s o r s t a b i l i t y s u c h a s ligthweight cotton. Thin, soft materials such as hankerchief linens. Because materia...
Page 84 - INSTALLATION OF SOFTWARE
INSTALLATION OF SOFTWARE In order to start using the software on your PC you would have to first install the contents of the CD to your PC. This procedure is refered to as “installation procedure”. Please follow the below listed instructions in order to successfully install FUTURA on your personal c...
Page 85 - INSTALLATION DU LOGICIEL; INSTALACIÓN DEL SOFTWARE
INSTALLATION DU LOGICIEL Afin d’utiliser le logiciel sur votre PC, vous devez d’abord installer les contenus du CD sur votre PC. Il est fait référence à cette procédure par le terme de «procédure d’installation ». Veuillez suivre les instructions reprises dans la liste ci-dessous, afin d’installer a...
Page 87 - DÉMARRAGE APPROPRIÉ POUR LA
Vous êtes, à présent, invité à sélectionner le Dossier de Programmes où le raccourci du logiciel sera mis en mémoire. Cliquez simplement sur «Suivant» pour continuer. Il vous est enfin demandé de confirmer toutes les sélections qui ont été effectuées lors de la préparation de l’installation. Enfonce...
Page 88 - OPERATION SWITCHES; THREAD TENSION CONTROL
OPERATION SWITCHES WHEN EMBROIDERY UNIT IS ATTACHED OPERATION SWITCHES LED INDICATOR Green light indicates machine is ready to start. Red light indicates machine is operating. Flashing red light indicates a problem or an error. * F l a s h i n g f o r 2 - 3 s e c o n d s s h o w s t h a t a n ...
Page 89 - INTERRUPTEURS DE FONCTIONNEMENTO; TÉMOIN A DIODE
TOUCHES DE FONCTIONNEMENT LORSQUE L’UNITÉ DE BRODERIE EST FIXÉE TOUCHES DE FONCTIONNEMENT RÉGLAGE TENSION DU FIL SUPÉRIEUR Régler sur “ E ” pour diminuer la tension du fil pour la broderie. INTERRUPTORES DE CONTROL CUANDO LA UNIDAD DE BORDADO ESTA INSTALADA INTERRUPTEURS DE FONCTIONNEMENTO CONTROL T...
Page 90 - TROUBLESHOOTING
0 TROUBLESHOOTING SKIPPED STITCHES AND THREAD BREAKAGES OCCUR Needle tip is broken. Replace needle. Needle is bent. Replace needle. Needle is not installed correctly. Install the needle correctly.Refer to pages 108 - 109. Upper thread tension is too tight. Adjust the thread tension.Refer to pages 10...
Page 91 - DÉPANNAGE; DES POINTS SAUTÉ; LOCALIZACION DE AVERIAS; SE SALTAN PUNTADAS Y SE ROMPE
DÉPANNAGE DES POINTS SAUTÉ S ET LE FIL SE CASSE La pointe de l’aiguille est épointée Remplacez l’aiguille. L’aiguille est tordue. Remplacez l’aiguille. L’aiguille n’est pas installée correctement. Installez l’aiguille correctement.Reportez-vous aux pages 108 - 109. L e f i l s u p é r i e u r est tr...
Page 92 - EMBROIDERY PATTERN IS MIS-ALIGNED
EMBROIDERY PATTERN IS MIS-ALIGNED Embroidering is continuing when thread is tangled. No stabilizer attached when using light or stretch material. Attach interfacing to the material.Refer to pages 78 - 81. Material has not been tightly fitted into hoop. Tighten the material in the frames so that it m...
Page 94 - with flashing light, beeping sound or “88”
94 1. If stitches are missing If the embroidery machine detects that the thread has broken, it may continue to embroider up to about eight stitches without any thread (blank stitches) before it automatically stops. In such cases, use the following procedure to step back through the embroidering data...
Page 95 - Un message signale que le fil est cassé,
95 1. S’il manque des points S i l a m a c h i n e à b r o d e r d é t e c t e u n e r u p t u r e d u f i l , elle pourra continuer à broder environ huit points au maximum sans utiliser de fil (points vides) avant de s’ arrêter automatiquement. Dans ces cas, procédez comme suit pour reculer dans le...
Page 96 - When resizing a design it is not dense; Vector art vs Bitmapped art
4. When resizing a design it is not dense enough. The Futura software will recalculate the stitch of an imported design when sizing, but only when using the DESIGN>CHANGE SIZE option. It does have a limitation of re-sizing up to 149% and down sizing to 51% and while still being able to re-calcula...
Page 99 - R E D I M E N S I O N A R L E T R A S
6.- ¿La densidad del diseño se ajustará al redimensionarlo? Cuando se dimensiona (cambiar tamaño) un diseño con el software Futura se puede redimensionar éste desde la Biblioteca de Diseños en el bastidor de la pantalla y mantener el diseño íntegro. Cualquier otro f o r m a t o d e b e r á c a m b i...
Page 100 - When sending the whole design at once
00 11. When sending the whole design at once through the option “Send design” in the machine navigator, 1. Block numbers are indicated on the control panel as illustrated. 2. I f y o u w a n t t o s e l e c t a b l o c k , p u s h t h e n u m e r i c a l selection button while the machine is not run...
Page 102 - PRESSER FOOT LIFTER; OTHER THINGS YOU SHOULD KNOW; CONVERTING TO FREE-ARM SEWING
0 PRESSER FOOT LIFTER There are three positions for your presser foot. 1. Lower the presser foot to sew. 2. Raise the lifter to the middle position to insert or remove fabric. 3. Lift it to its highest position to change the presser foot or to remove thick fabric. FEED DOG CONTROL The feed dogs cont...
Page 103 - DEVRIEZ SAVOIR
0 LEVIER DU PIED PRESSEUR Il y a 3 positions pour votre Pied Presseur : 1. Abaisser le levier pour coudre. 2. Soulevez le levier en position médiane pour insérer ou enlever le tissu. 3. Soulever le levier à sa position la plus haute, pour changer le pied ou enlever les tissus épais. PALANCA PIE PREN...
Page 104 - ADJUSTING TOP THREAD TENSION; CHANGING PRESSER FOOT
0 Under sideCôté de dessousReverso Decrease tension Diminuer la tension Disminuir tensión Increase tension Augmenter la tension Aumentar tensión Top sideCôté de dessusCara 1 3 2 Foot release button Presser foot lifter Palanca pie prensatelas Foot holder Support du piedSujetador prensatelas Well bala...
Page 105 - REMPLACEMENT DU PIED PRESSEUR; COSTURA RECTA; CAMBIO DEL PIE PRENSATELAS
0 RÉGLAGE DE LA TENSION DU FIL SUPÉRIEUR POINT DROIT L’aspect de votre point droit dépend surtout du bon équilibre e n t r e l a t e n s i o n s u p é r i e u r e e t l a t e n s i o n i n f é r i e u r e . E l l e est parfaite lorsque les deux fils se nouent entre les deux épaisseurs de tissu. Vous...
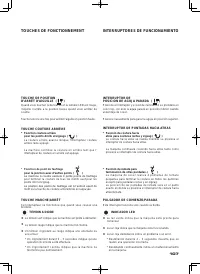
Page 107 - TOUCHES DE FONCTIONNEMENT; INTERRUPTORES DE FUNCIONAMIENTO; INDICADOR LED; TOUCHE COUTURE ARRIÈRE; INTERRUPTOR DE PUNTADAS HACIA ATRAS
0 TOUCHES DE FONCTIONNEMENT TÉMOIN A DIODE Le témoin vert indique que la machine est prête à démarrer. Le témoin rouge indique que la machine fonctionne. Un témoin clignotant au rouge indique une anomalie ou une erreur. * Un clignotement durant 2 - 3 secondes indique qu’une opération incorrect...
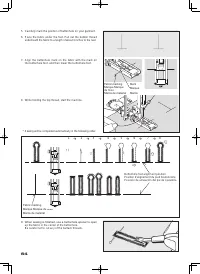
Page 108 - Changing the needle; NEEDLE, THREAD AND FABRIC CHART
0 Changing the needle 1. Raise the needle bar to its highest position by turning the hand wheel toward you. 2. Loosen the needle clamp screw by turning it toward you. 3. Remove the needle by pulling it downward. 4. Insert the new needle into the needle clamp with the flat side toward the back. 5. Pu...
Page 109 - TABLA DE HILO, AGUJA Y MATERIAL
0 Changement d’aiguille 1. Relever la barre à aiguille à sa position la plus haute en tournant le volant vers vous. 2. Desserrer la vis du serre-aiguille. 3. Enlever l’aiguille en la tirant vers le bas. 4. Insérer la nouvelle aiguille dans le serre- aiguille, avec le côté plat à l’arrière. 5. Pousse...
Page 110 - GENERAL PROBLEMS; STITCHING PROBLEMS; THREAD PROBLEMS; PERFORMANCE CHECKLIST
0 GENERAL PROBLEMS Machine does not sew. * Power switch is turned off.- Turn on the switch (see page 10 - 11).* Buttonhole lever is not raised when sewing stitch patterns. – Raise buttonhole lever (see page 62 - 65).* Buttonhole lever is not lowered when sewing buttonhole. – Lower buttonhole lever (...
Page 114 - OILING INSIDE THE FACE COVER
OILING INSIDE THE FACE COVER 1. Remove two screws and face cover. 2. Put one drop of sewing machine oil to the points indicated by arrows. 1 ScrewVisGuia Face cover Plaque frontaleCubierta frontal 2 Helpful Hints : For the machine used frequently : It should be oiled periodically.For the machine use...
Page 115 - ACEITANDO LA CUBIERTA; GRAISSAGE DANS LA PLAQUE FRONTALE
ACEITANDO LA CUBIERTA 1.- Retire los tornillos de la cubierta frontal. 2.- Poner una gota de aceite para máquina de coser en los puntos que indican las flechas. Consejos Útiles:Para la máquina con uso frecuente: Debe aceitarse periódicamente.Para máquinas con uso después de largos intervalos: Debe a...
Page 116 - SATIN STITCH FOOT; TWIN NEEDLE; THREADING THE TWIN NEEDLE; SPECIAL ACCESSORIES
SATIN STITCH FOOT The Satin stitch foot is grooved on the bottom to permit dense stitching to pass under it easily. It is most useful for sewing satin stitches. It can also be used as an alternative to the General Purpose Foot when sewing stretch stitches. Closely spaced zig-zag stitches are called ...
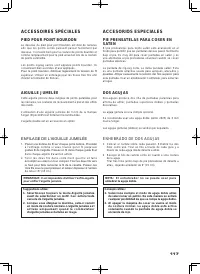
Page 117 - ENFILAGE DE L’AIGUILLE JUMELÉE; DOS AGUJAS; ENHEBRADO DE DOS AGUJAS; ACCESSOIRES SPÉCIALES
PIED POUR POINT BOURDON Le dessous du pied pour point bourdon est doté de rainures afin que les points serrés puissent passer facilement par dessous. Il convient bien pour la couture de points bourdon et comme remplacement pour le pied universel lors de la couture de points extensible. Les points zi...
Page 118 - HELPFUL MESSAGES; SAFTY DEVICE
HELPFUL MESSAGES M e s s a g e s a r e d i s p l a y e d o n n u m b e r d i s p l a y o f c o n t r o l panel and/or PC screen. When a message is displayed, fix the problem following the instruction in the message. The message will disappear, once the problem has been fixed. USB cable is not connec...
Page 119 - MESSAGES D’AIDE; MENSAJES DE AYUDA
MESSAGES D’AIDE Les messages apparaissent sur l’écran numéraire de l’écran de contrôle et/ou l’écran de PC.Lorsqu’un message apparaît, résolvez le problème en suivant les instructions du message. Le message disparaît une fois que le problème a été résolu. Le câble USB est déconnecté. Branchez votr...
Page 124 - “IMPORTANT SAFETY INSTRUCTIONS”; “SAVE THESE INSTRUCTIONS”
“IMPORTANT SAFETY INSTRUCTIONS” “WARNING- To reduce the risk of burns, fire, electric shock, or injury to persons: ” 1. “Do not allow to be used as a toy. Close attention is necessary when this sewing machine is used by or near children.” 2. “Use this sewing machine only for its intended use as desc...