Page 2 - IMPORTANT SAFETY INSTRUCTIONS
When using an electrical appliance, basic safety should always befollowed, including the following:Read all instructions before using this sewing machine. 1. An appliance should never be left unattended when plugged in.2. Always unplug this appliance from the electric outlet immediately after using ...
Page 3 - CONSERVAR ESTAS INSTRUCCIONES; IMPORTANTES INSTRUCCIONES DE SEGURIDAD
Cuando se utiliza un dispositivo eléctrico, debe seguirse siempre de seguridad básica, incluyendo las siguientes: Leer las instrucciones antes de utilizar está máquina de coser. 1. Un dispositivo eléctrico nunca debe dejarse desatendido cuando está conectado. 2. Desenchufar siempre la máquina de la ...
Page 4 - GARDER CE MODE D'EMPLOI; INSTRUCTIONS IMPORTANTES DE SÉCURITÉ
Lors de l'utilisation d'un appareil électrique, il est important de toujourssuivre certaines précautions de sécurité dont certaines sont lessuivantes :Lire toutes les instructions avant d'utiliser votre machine à coudre : 1. Lorsque la machine est branchée, ne jamais la laisser sanssurveillance. 2. ...
Page 6 - List of contents; Machine Basics
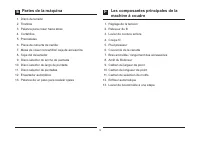
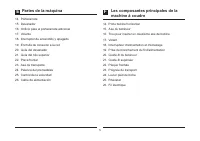
List of contents Machine Basics Sewing General Information Maintenance and Troubleshooting Principle Parts of the Machine ..............................................................................................................................................2/4Connecting Machine to Power Sourc...
Page 7 - Indice; Partes de la máquina
Indice E Partes de la máquina Enhebrado de la máquina Cosiendo Información general Mantenimiento y solución de problemas ...........................................................................................................................................................3/5 .......................
Page 8 - Table des matières; L'essentiel de la machine; Enfilage de la machine
Table des matières F L'essentiel de la machine Les composantes principales de la machine à coudre Levier du Pied double entraînement Pied de surjet coupeur Installer .........................................................................................................3/5 Branchement de la machine...
Page 9 - Principal Parts of the Machine
2 Principal Parts of the Machine 1. Thread tension dial 2. Thread take-up lever 3. Reverse sewing lever 4. Thread cutter 5. Presser foot 6. Needle plate cover 7. Removable extension table/ accessory storage 8. Bobbin stopper 9. Stitch width dial 10. Stitch length dial 11. Pattern selector dial 12. A...
Page 13 - Connecting Machine to Power Source; Foot control
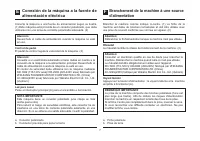
3 Connecting Machine to Power Source 6 Connect the machine to a power source as illustrated. (1)This appliance is equipped with a polarized plug which mustbe used with the appropriate polarized outlet. (2) Unplug power cord when machine is not in use. The foot control pedal regulates the sewing spee...
Page 15 - Two Step Presser Foot Lifter; Elevador del prensatelas de dos tiempos
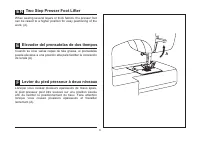
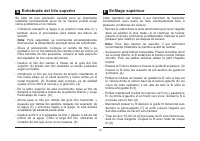
When sewing several layers or thick fabrics, the presser footcan be raised for easy positioning of the work. (A) to a higher position Two Step Presser Foot Lifter Cuando se cose varias capas de tela gruesa, el prensatelaspuede elevarse a una posición alta para facilitar la colocaciónde (A). la tela ...
Page 16 - Accessories
9 Accessories Standard accessories (1) Optional accessories (2) a. All purpose footb. Zipper foot c. Buttonhole foot d. Button sewing foote. Gathering foot f. Darning/ embroidery foot g. Even Feed footh. Side cutter i. Seam ripper/ brushj. Edge/ quilting guide k. Pack of needles l. Spool holders m. ...
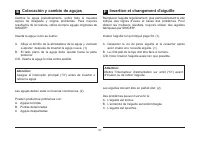
Page 18 - Winding the Bobbin
Winding the Bobbin 11 1 2 4 7 8 9 5 6 3 10 - corresponding . (1/2) - Snap thread into thread guide. (3) - Wind thread clockwise around bobbin winder tension discs. (4) - Thread bobbin as illustrated and place on spindle. (5) - Push bobbin spindle to right. (6) - Hold thread end. (7) - Step on foot c...
Page 20 - Inserting the Bobbin
Inserting the Bobbin 13 When inserting or removing the bobbin, the needle mustbe fully raised. Attention: 1. Insert the bobbin in the bobbin case with the thread running counterclockwise direction (arrow). 2. Pull the thread through the slit (A). 3. Draw the thread clockwise until it slips into the ...
Page 22 - Threading the Upper Thread
Threading the Upper Thread 15 This is a simple operation but it is important to carry out correctlyas by not doing so . - Start by raising the needle to its highest point (1), and continue turning the handwheel counterclockwise until theneedle just slightly begins to descend. Raise the presserfoot t...
Page 24 - Automatic Needle Threader
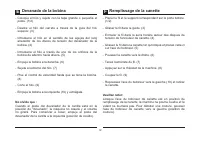
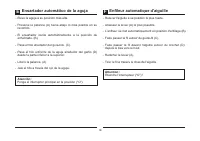
Automatic Needle Threader - Raise the needle to its highest position. - Press lever (A) down as far as it will go. - The threader automatically swings to the threading position (B). - Pass thread around thread guide (C). - Pass the thread in front of the needle around the hook (D) from bottom to top...
Page 25 - Ensartador automático de la aguja; Enfileur automatique d'aiguille
- Relever l'aiguille à sa position la plus haute. - le levier (A) le plus possible. - L'enfileur se met automatiquement en position d'enfilage (B). - Faire passer le fil autour du guide-fil (C). - Faire passer le fil devant l'aiguille autour du crochet (D) depuis le bas vers le haut. - Relâcher le l...
Page 26 - Raising the Bobbin Thread
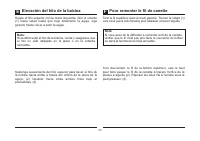
1 2 3 Raising the Bobbin Thread Hold the upper thread with the left hand. Turn the handwheel(1) towards you (counterclockwise) lowering, then raisingneedle. If it is difficult to raise the bobbin thread, check to make surethe thread is not trapped by the hinged cover or theRemovable Extension Table....
Page 28 - Thread Tension; Upper thread tension
Thread Tension 21 B A C D 1 Upper thread tension Lower thread tension Please note: Basic thread tension setting: "4". (1)To increase the tension, turn the dial to the next number up.To reduce the tension, turn the dial to the next number down.A. Normal thread tension for straight stitch sewi...
Page 29 - Tensión del hilo; Tension du fil
E F Tensión del hilo superior Tensión del hilo inferior No olvide que: de la tensión del hilo básica: "4". (1) Para aumentar la tensión, girar el disco al siguiente númeromás alto. Para reducir la tensión, girar el disco al siguientenúmero más bajo.A. Tensión normal del hilo para cosido de p...
Page 30 - How to Choose Your Pattern
How to Choose Your Pattern 23 The diagram on this page display the stitch patterns availableon the machine. Stitches in the top of the diagram are indicated on thePattern Selector Dial in gray. To select the patterns indicatedwith the gray color, turn the Pattern Selector Dial. (d)Use the Stitch Len...
Page 32 - Stitch Width Dial & Stitch Length Dial
Function of stitch width dial Function of stitch length dial while zig-zag stitching Function of stitch length dial for when straight stitching The maximum zigzag stitch width for zigzag stitching is 6mm;however, the width can be reduced on any patterns. Thewidth increases as you move zigzag dial fr...
Page 34 - Sewing Straight Stitch
To begin sewing, set the machine for straight stitch. (1) Place the fabric under the presser foot with the fabric edgelined up with the desired seam guide line on the needle plate.(2) Lower the presser foot lifter, and then step on the footcontroller to start sewing. (3) 1 Sewing Straight Stitch 27 ...
Page 36 - Removing the Work
Turn the handwheel toward you (counterclockwise) to bringthe thread take up lever to its highest position, raise thepresser foot and remove work behind (2) the needle and presser foot. Pull the threads under and behind the presser foot. Guidethe threads to the side of the face plate and into threadc...
Page 38 - Choosing Stretch Stitch Patterns
The Stretch Stitch Patterns are indicated with a blue color onthe Stitch Length Dial to the indicator marked "S1". Though thereare several stretch patterns, here are two examples: The machine sews two stitches forward and one stitchbackwards. Adjust the Stitch Width Dial to between "3�...
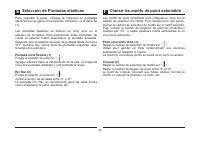
Page 39 - Selección de Puntadas elásticas
Les motifs de point extensible sont indiqués en bleu sur lecadran de sélection de motifs. Pour sélectionner ces points,tourner le cadran de sélection de motifs sur le motif souhaité.Puis, tourner le cadran de longueur de point sur l'indicateurmarqué par "S1". Il existe plusieurs motifs exten...
Page 40 - Blind Hem
For hems on curtains, trousers, skirts, etc. Blind hem for stretch fabrics. Blind hem for firm fabrics. Set the Stitch Width Dial at a setting appropriate for the weight/type of fabric being sewn,within the range shown in the diagram on the right of thepage. Generally, a narrower stitch is used for ...
Page 42 - Sew 1-Step Buttonhole
Buttonhole sewing is a simple process that provides reliableresults. However, it is strongly suggested to always make apractice buttonhole on a sample of your fabric and stabilizer. Making a Buttonhole Making a Buttonhole on Stretch Fabrics (E) 1. Using tailor's chalk, mark the position of the butto...
Page 43 - Ojal de un sólo paso; Couture de boutonnières en 1 étape
E Ojal de un sólo paso Confeccionar ojales es un proceso sencillo que proporcionaresultados fiables. Sin embargo, se recomienda realizar siempreun ojal de práctica en una muestra de tela e intercalar. Confección de un ojal Confección de un ojal en tejidos elásticos (E) 1. Usando una tiza de sastre, ...
Page 44 - Sewing on Buttons
4 3 Sewing on Buttons 37 Install the darning plate. (1)Change the all purpose foot to the button sewing foot. (2)Set the stitch length to "0". Set the machine for zig-zag stitch, then set the width tonumber "3" - "6". Turn the handwheel to check that theneedle goes cleanly in...
Page 46 - Gathering
39 Gathering 1 2 - Remove the presser foot shank. (1) - Attach the gathering foot. - Sew a single row or multiple rows of straight stitches. - If more gathering is required, loosen the upper thread tension to below 2 so that the lower thread lies on theunder side of the material. Setting stitch leng...
Page 48 - Free Motion Darning, Stippling
Free Motion Darning, Stippling Darning: Install the darning plate. (1) Remove the presser foot shank. (2)Attach the darning/ embroidery foot to the presser foot bar.The lever (a) should be behind the needle clamp screw (b).Press the darning/ embroidery foot on firmly from behind withyour index finge...
Page 49 - Zurcido de brazo libre; Matelassage pointillé:; Reprisage et matelassage pointillé
E F Instale la placa de zurcir. (1) Usando el pie de zurcir le ayudará como guía para coser Retire la abrazadera del prensatelas. (2)Fije el prensatelas de zurcir en la barra prensatelas. Lapalanca (a) debe estar detrás del tornillo de sujeción de laaguja (b). Presione el prensatelas zurcidor con fi...
Page 50 - The Even Feed Foot Accessory
43 The Even Feed Foot Accessory Always try to sew first without the Even Feed Foot accessorywhich should be used only when necessary. It is easier to guide the fabric and you have a better view of theseam when using the standard, regular foot on your machine. Yoursewing machine offers excellent stit...
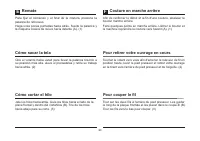
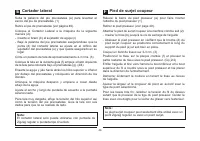
Page 52 - Side Cutter
45 1 2 3 Side Cutter 2~3 cm 4 a f g b c d e Lift the presser foot lifter (a) to raise the presser foot bar. (1) Remove the presser foot. ( ) Attach the Side Cutter to the machine as follows (2):-- Cut an edge of fabric about 2~3 cm. (3) Put fabric on guide plate (f) and push left side of the fabric ...
Page 54 - Installing the Removable Extension Table
1 2 Hold the removable extension table horizontally, and push itin the direction of the arrow. (1) To remove the extension table, pull it toward the left. The inside of the removable extension table can be utilizedas an accessory box. To open, flip cover down as shown. (2) Installing the Removable E...
Page 55 - Instalación de la cubierta removible
Maintenir le bras amovible en position horizontal et lepousser comme indiqué ci-contre. (1) L'intérieur du bras amovible peut être utilisé comme boîte derangement pour les accessoires. Pour ouvrir, tirer vers vous comme indiqué (2) Pour enlever le bras amovible le tirer vers la gauche. page 47. Colo...
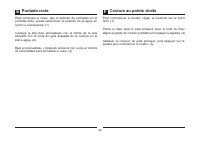
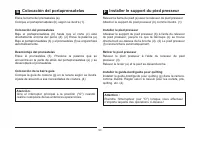
Page 56 - Attaching the Presser Foot Shank; Attaching the presser foot
49 1 2 3 4 a c d e f b b a e g Attaching the Presser Foot Shank Raise the dge/ quilting dge/ quilting presser foot bar (a) with the presser foot lifter. Attach the presser foot shank (b) as illustrated. (1) Lower the presser foot shank (b) using the presser foot lifter,until the cut-out (c) is direc...
Page 57 - Colocación del portaprensatelas
Relever la barre du pied (a) avec le releveur de pied presseur.Attacher le support du pied presseur (b) comme illustré. (1) Abaisser le support du pied presseur (b) à l'aide du releveurde pied presseur, jusqu'à ce que la découpe (c) se trouvedirectement au-dessus de la broche (d). (2) Le pied presse...
Page 58 - EXPLANATION; NEEDLE SIZE; NEEDLE, FABRIC SELECTION; Chart
Heavy woolen, overcoat fabrics, upholstery fabrics, someleathers and vinyls. EXPLANATION Standard sharp needles. Sizes rangethin to large. 9 (70) to 18 (110). Semi-ball point needle, scarfed.9 (70) to 18 (110). Leather needles. 12 (80) to 18 (110). SINGER ® 2020 SINGER ® 2045 SINGER ® 2032 9-11 (70-...
Page 59 - GUÍA DE SELECCIÓN DE AGUJAS/ TELAS/ HILOS; Guía de selección de agujas/ telas/ hilos
GUÍA DE SELECCIÓN DE AGUJAS/ TELAS/ HILOS CALIBRE DE LA AGUJA TELA HILO 9-11 (70-80) 11-14 (80-90) Telas de poco peso - algodones delgados, Voile, sarga, seda,muselina, interlocks (puntadas entrelazadas), tejidos de algodón,tricots, jerseys, crepés, poliester tejido, telas para camisas y blusas. Tel...
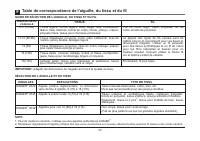
Page 60 - Table de correspondance de l'aiguille, du tissu et du fil
Table de correspondance de l'aiguille, du tissu et du fil GUIDE DE SÉLECTION DE L'AIGUILLE, DU TISSU ET DU FIL 9-11 (70-80) 11-14 (80-90) 14 (90) 16 (100) 18 (110) Tissus légers, cotons légers, voile, serge, soie, mousseline,Qiana, tissu interlock, tricots de coton, tricots, jerseys, crêpes,polyeste...
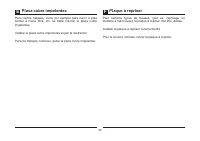
Page 61 - Darning Plate
For certain types of work, (e.g. darning or free-handembroidery), the darning plate must be used. Install the darning plate as illustrated. For normal sewing, remove the darning plate. Darning Plate 54 EN
Page 62 - Placa cubre impelentes
Pour certains types de travaux, (par ex. reprisage oubroderie à main levée), la plaque à repriser doit être utilisée. Installer la plaque à repriser comme illustré. Pour la couture normale, retirer la plaque à repriser. Para ciertos trabajos, como por ejemplo para zurcir o parabordar a mano libre, e...
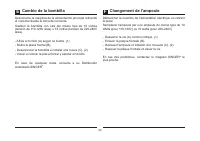
Page 63 - Inserting & Changing Needles
A C B A B C D 1 2 Change the needle regularly, especially if it is showing signsof wear and causing problems. For best sewing resultsalways use SINGER Brand Needles. Insert the needle A. Loosen the needle clamp screw and tighten again after inserting the new needle. (1) B. The flat side of the shaft...
Page 65 - Changing the Bulb
C 1 2 Disconnect the machine from the power supply by removingthe plug from the main socket! Replace bulb with same type rated 10 watts (110-120V area)or 15 watts (220-240V area). - Loosen screw (A) as illustrated. (1) - Remove the face plate (B). - Unscrew the bulb and install a new one (C). (2) - ...
Page 67 - Troubleshooting Guide
Problem Cause Correction Upper thread breaks Lower thread breaks Skipped stitches Needle breaks Loose stitches Seams gatheror pucker Uneven stitches,uneven feed The machine isnoisy The machine jams 1. The machine is not threaded correctly.2. The thread tension is too tight.3. The thread is too thick...
Page 68 - Problemas y soluciones
Problema El hilo superior serompe La aguja se rompe La costura seencoge, la tela sefrunce Puntadas no uniforme La máquina haceruido Máquina obstruida Salto de puntadas Puntadas sueltas desiguales, arrastre Causa 1. La máquina está mal enhebrada.2. La tensión del hilo es demasiado fuerte.3. El hilo e...
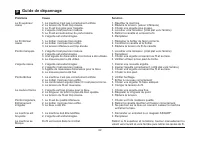
Page 69 - Guide de dépannage
Problème Cause Solution Le fil supérieurcasse Le fil inférieurcasse Points manqués L'aiguille casse Points lâches Entraînementirrégulier La machine seBloque enfilée. du porte bobine. 1. Le boîtier n'est pas bien inséré.2. Le boîtier n'est pas bien enfilé.3. La tension inférieure est trop élevée. Le ...