Page 3 - INDEX
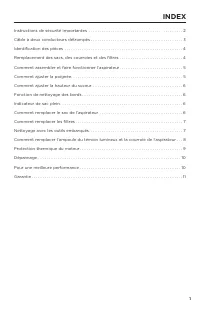
Important Safety Instructions � � � � � � � � � � � � � � � � � � � � � � � � � � � � � � � � � � � � � � � � � � � � � � � � � � 2 Two-Wire Polarized Cord � � � � � � � � � � � � � � � � � � � � � � � � � � � � � � � � � � � � � � � � � � � � � � � � � � � � � 3 Parts Identification � � � � � � � �...
Page 4 - IMPORTANT SAFETY INSTRUCTIONS; READ ALL INSTRUCTIONS BEFORE USING THIS; SAVE THESE INSTRUCTIONS
IMPORTANT SAFETY INSTRUCTIONS When using an electrical appliance, basic precautions should always be followed, including the following: READ ALL INSTRUCTIONS BEFORE USING THIS APPLIANCE. FOR HOUSEHOLD USE ONLY. IMPORTANT: The manufacturer cannot accept responsibility for damage caused when the appli...
Page 5 - POLARIZATION INSTRUCTIONS
POLARIZATION INSTRUCTIONS 3 Power Cord, 2-Wire Polarized Cord To reduce the risk of electric shock, the charger is equipped with a polarized alternating current line plug (a plug having one blade wider than the other)� This plug will fit into the power outlet only one way� This is a safety feature� ...
Page 7 - HOW TO ASSEMBLE AND OPERATE THE VACUUM
How to Attach the Handle to the Vacuum Cleaner The vacuum and the handle are packed separately� 1� Remove the handle screw and slide the handle into the slots on top of the vacuum� 2� Line up the hole on the handle with the hole on top of the vacuum and insert the screw� Make sure the screw is tight...
Page 8 - HOW TO ADJUST THE HEIGHT
Always operate the vacuum with a vacuum bag installed� Bags should be changed when they are 2/3 full� 1� Unplug the vacuum� Remove the bag compartment cover (Fig�1)� 2� Remove the bag by grasping the sides of the bag collar and pulling straight off� Attach a new vacuum bag by pushing the collar onto...
Page 11 - THERMAL MOTOR PROTECTION
This vacuum is equipped with a thermal protector designed to protect it from overheating due to restricted airflow (i�e� clogged hose)� Should this situation occur, the thermal protector will automatically shut off the motor to prevent damage� NOTE: To determine if the thermal protector turned off t...
Page 12 - TROUBLESHOOTING
10 • Keep machine and all accessories clean and in good operating condition� • Replace the bag when it is 2/3 full� • Replace the filters once a year or as needed� • Always use genuine bags, filters and parts, as use of other products may result in poor cleaning or filtration performance� Filtration...
Page 13 - WARRANTY
11 WARRANTY What is Covered: This warranty covers any defects in material and workmanship in your new vacuum and applies exclusively to the original purchaser� How Long Coverage Lasts: Warranty coverage for this vacuum lasts one year� Household models used commercially are only warranted for 90 days...
Page 15 - Manual del Usuario
Page 17 - ÍNDICE
1 Instrucciones de Seguridad Importantes � � � � � � � � � � � � � � � � � � � � � � � � � � � � � � � � � � � � � � � � 2 Cable Polarizado de Dos Patas � � � � � � � � � � � � � � � � � � � � � � � � � � � � � � � � � � � � � � � � � � � � � � � � 3 Identificación de Piezas � � � � � � � � � � � � ...
Page 18 - LEA TODAS LAS INSTRUCCIONES ANTES; CONSERVE ESTAS INSTRUCCIONES
2 INSTRUCCIONES IMPORTANTES DE SEGURIDAD Al utilizar un electrodoméstico, siempre deben tomarse las precauciones básicas, incluidas las siguientes: LEA TODAS LAS INSTRUCCIONES ANTES DE UTILIZAR ESTE ELECTRODOMÉSTICO. SOLO PARA USO EN EL HOGAR. IMPORTANTE: El fabricante no puede aceptar la responsabi...
Page 19 - INSTRUCCIONES DE POLARIZACIÓN
3 INSTRUCCIONES DE POLARIZACIÓN 3 Cable de alimentación de 2 polos Para reducir el riesgo de una descarga eléctrica, el cargador cuenta con un enchufe polarizado para corriente alterna (el enchufe tiene una pata más ancha que la otra)� Esta enchufe entra solo de una forma en el tomacorriente� Esta e...
Page 21 - CÓMO ARMAR Y UTILIZAR LA ASPIRADORA
5 Cómo Colocar el Mango de la Aspiradora La aspiradora y el mango están embalados por separado� 1� Retire el tornillo del mango y deslice el mango en las ranuras ubicadas en la parte superior de la aspiradora� 2� Alinee el orificio del mango con el orificio en la parte superior de la aspiradora e in...
Page 22 - CÓMO AJUSTAR LA ALTURA
Siempre utilice la aspiradora con una bolsa instalada� Las bolsas se deben cambiar cuando se alcancen los dos tercios de su capacidad� 1� Desenchufe la aspiradora� Quite el compartimiento de la bolsa (Fig�1)� 2� Retire la bolsa tomándola de los lados del collar de la bolsa y tirando de la misma� Fij...
Page 25 - PROTECCIÓN TÉRMICA DEL MOTOR
9 Esta aspiradora está equipada con un protector térmico diseñado para proteger la misma del sobrecalentamiento debido a la restricción del flujo de aire (es decir, una obstrucción en la manguera)� En caso de que ocurra esto, el protector térmico apagará el motor de manera automática para evitar dañ...
Page 26 - RESOLUCIÓN DE PROBLEMAS
10 • Mantenga la máquina y todos los accesorios limpios y en buenas condiciones de funcionamiento� • Reemplace la bolsa cuando esté llena a dos tercios de su capacidad� • Reemplace los filtros una vez al año o cuando sea necesario� • Siempre utilice bolsas, filtros y piezas originales, ya que el uso...
Page 27 - GARANTÍA
11 GARANTÍA Qué cubre: Esta garantía cubre cualquier defecto en los materiales y la mano de obra en su nueva aspiradora y solamente le corresponde al comprador original� Cuánto dura la cobertura: La cobertura de la garantía para esta aspiradora dura un año� Los modelos para el hogar que se utilizan ...
Page 29 - Manuel de l’utilisateur
Page 32 - CONSIGNES DE SÉCURITÉ IMPORTANTES; LISEZ TOUTES LES INSTRUCTIONS AVANT; CONSERVEZ CES INSTRUCTIONS
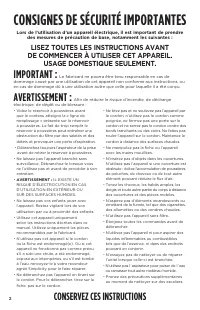
2 CONSIGNES DE SÉCURITÉ IMPORTANTES Lors de l’utilisation d’un appareil électrique, il est important de prendre des mesures de précaution de base, notamment les suivantes : LISEZ TOUTES LES INSTRUCTIONS AVANT DE COMMENCER À UTILISER CET APPAREIL. USAGE DOMESTIQUE SEULEMENT. IMPORTANT : Le fabricant ...
Page 33 - INSTRUCTIONS DE POLARISATION
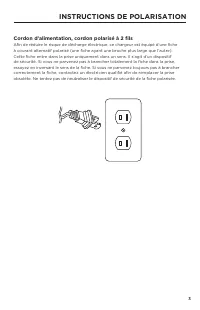
3 INSTRUCTIONS DE POLARISATION 3 Cordon d’alimentation, cordon polarisé à 2 fils Afin de réduire le risque de décharge électrique, ce chargeur est équipé d’une fiche à courant alternatif polarisé (une fiche ayant une broche plus large que l’autre)� Cette fiche entre dans la prise uniquement dans un ...
Page 35 - COMMENT ASSEMBLER ET FAIRE FONCTIONNER
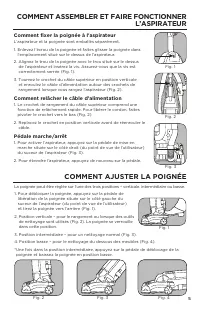
5 Comment fixer la poignée à l’aspirateur L’aspirateur et la poignée sont emballés séparément� 1� Enlevez l’écrou de la poignée et faites glisser la poignée dans l’emplacement situé sur le dessus de l’aspirateur� 2� Alignez le trou de la poignée avec le trou situé sur le dessus de l’aspirateur et in...
Page 36 - COMMENT AJUSTER LA HAUTEUR
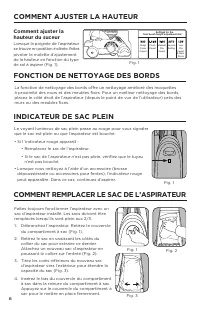
6 Faites toujours fonctionner l’aspirateur avec un sac d’aspirateur installé� Les sacs doivent être remplacés lorsqu’ils sont plein aux 2/3� 1� Débranchez l’aspirateur� Retirez le couvercle du compartiment à sac (Fig� 1)� 2� Retirez le sac en saisissant les côtés du collier du sac pour extraire ce d...
Page 39 - PROTECTION THERMIQUE DU MOTEUR
9 Cet aspirateur est équipé d’un protecteur thermique conçu pour protéger l’aspirateur contre la surchauffe due à un débit d’air restreint (en cas d’obstruction du tuyau)� Si cette situation se produit, le protecteur thermique éteint automatiquement le moteur afin d’éviter tout dommage potentiel� RE...
Page 40 - DÉPANNAGE
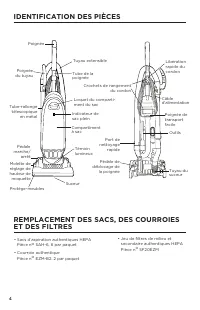
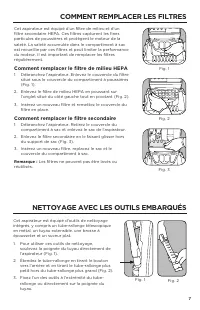
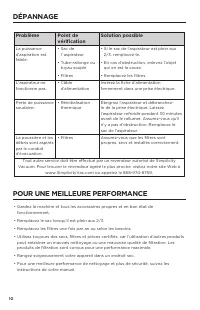
10 • Gardez la machine et tous les accessoires propres et en bon état de fonctionnement� • Remplacez le sac lorsqu’il est plein aux 2/3� • Remplacez les filtres une fois par an ou selon les besoins� • Utilisez toujours des sacs, filtres et pièces certifiés, car l’utilisation d’autres produits peut e...
Page 41 - GARANTIE
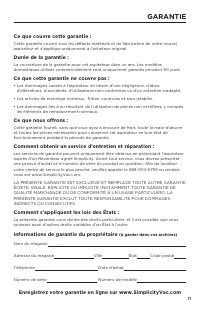
11 GARANTIE Ce que couvre cette garantie : Cette garantie couvre tous les défauts matériels et de fabrication de votre nouvel aspirateur et s’applique uniquement à l’acheteur original� Durée de la garantie : La couverture de la garantie pour cet aspirateur dure un ans� Les modèles domestiques utilis...