Page 3 - INDEX
1 Important Safety Instructions � � � � � � � � � � � � � � � � � � � � � � � � � � � � � � � � � � � � � � � � � � � � � � � � � � 2 Two-Wire Polarized Cord � � � � � � � � � � � � � � � � � � � � � � � � � � � � � � � � � � � � � � � � � � � � � � � � � � � � � 3 Parts Identification and Operation...
Page 4 - IMPORTANT SAFETY INSTRUCTIONS; READ ALL INSTRUCTIONS BEFORE USING THIS; SAVE THESE INSTRUCTIONS
2 IMPORTANT SAFETY INSTRUCTIONS When using an electrical appliance, basic precautions should always be followed, including the following: READ ALL INSTRUCTIONS BEFORE USING THIS APPLIANCE. FOR HOUSEHOLD USE ONLY. IMPORTANT: The manufacturer cannot accept responsibility for damage caused when the app...
Page 5 - POLARIZATION INSTRUCTIONS
3 POLARIZATION INSTRUCTIONS Power Cord, 2-Wire Polarized Cord To reduce the risk of electric shock, the vacuum is equipped with a polarized alternating current line plug (a plug having one blade wider than the other)� This plug will fit into the power outlet only one way� This is a safety feature� I...
Page 6 - PARTS IDENTIFICATION AND OPERATION
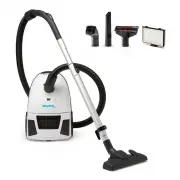
4 PARTS IDENTIFICATION AND OPERATION Telescopic Wand Tool Caddy Handle Hose Inlet • Insert the hose into the inlet until it clicks into place� • When separating the hose from the canister body, pull the hose inlet while pressing the buttons� Suction Control Slide • Full suction power may be too stro...
Page 8 - REPLACING VACUUM BAG AND FILTERS
6 Replacing the Vacuum Bag Always operate the vacuum with a bag installed� The bag compartment lid will not close without a bag properly installed in the bag holder� The bag should be changed when the full bag indicator turns red or suction power is weak� 1� Unplug the vacuum� Open the bag compartme...
Page 9 - TROUBLESHOOTING
7 • Keep your canister clean and in good operating condition� • Change vacuum bag once a month or when the bag is 2/3 full to maximize cleaning performance� • Always use genuine vacuum bags and replacement parts� Use of other products may result in poor cleaning performance, potential vacuum cleaner...
Page 10 - WARRANTY
8 WARRANTY What is Covered: This warranty covers any defects in material and workmanship in your new vacuum and applies exclusively to the original purchaser� How Long Coverage Lasts: Visit Simplicityvac�com for warranty information� What is Not Covered: • Damage to the vacuum which occurs from negl...
Page 11 - What’s the; best; way to be a part of the in crowd?
Simplicityvac�com/register-warranty What’s the best way to be a part of the in crowd? It’s simple: register your Simplicity vacuum today and activate your warranty� How do you like your vacuum? Once you’ve had some time to try out your new Simplicity vacuum, we want to know what you think — leave a ...
Page 13 - TABLE DES MATIÈRES
1 Instructions de sécurité importantes � � � � � � � � � � � � � � � � � � � � � � � � � � � � � � � � � � � � � � � � � � � 2 Cordon polarisé à deux fils � � � � � � � � � � � � � � � � � � � � � � � � � � � � � � � � � � � � � � � � � � � � � � � � � � � � 3 Identification des pièces et utilisatio...
Page 14 - INSTRUCTIONS DE SÉCURITÉ IMPORTANTES; LISEZ TOUTES LES INSTRUCTIONS AVANT DE; CONSERVEZ CES
2 INSTRUCTIONS DE SÉCURITÉ IMPORTANTES Lors de l’utilisation d’un appareil électrique, il est important de prendre des mesures de précaution de base, dont les suivantes : LISEZ TOUTES LES INSTRUCTIONS AVANT DE COMMENCER À UTILISER CET APPAREIL. POUR USAGE DOMESTIQUE SEULEMENT. IMPORTANT: Le fabrican...
Page 15 - INSTRUCTIONS DE POLARISATION
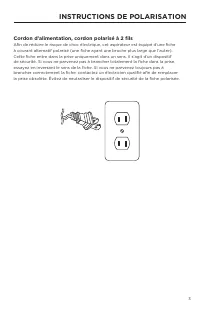
3 INSTRUCTIONS DE POLARISATION Cordon d’alimentation, cordon polarisé à 2 fils Afin de réduire le risque de choc électrique, cet aspirateur est équipé d’une fiche à courant alternatif polarisé (une fiche ayant une broche plus large que l’autre)� Cette fiche entre dans la prise uniquement dans un sen...
Page 16 - IDENTIFICATION DES PIÈCES ET UTILISATION
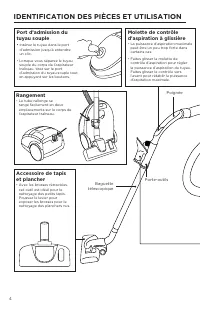
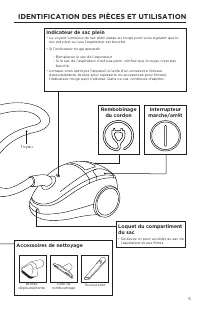
4 IDENTIFICATION DES PIÈCES ET UTILISATION Port d’admission du tuyau souple • Insérez le tuyau dans le port d’admission jusqu’à entendre un clic� • Lorsque vous séparez le tuyau souple du corps de l’aspirateur traîneau, tirez sur le port d’admission du tuyau souple tout en appuyant sur les boutons� ...
Page 18 - REMPLACEMENT DU SAC DE L’ASPIRATEUR ET DES FILTRES
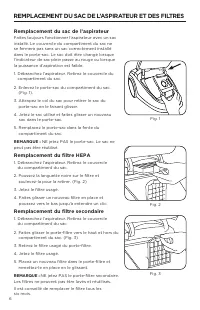
6 Remplacement du sac de l’aspirateur Faites toujours fonctionner l’aspirateur avec un sac installé� Le couvercle du compartiment du sac ne se fermera pas sans un sac correctement installé dans le porte-sac� Le sac doit être changé lorsque l’indicateur de sac plein passe au rouge ou lorsque la puiss...
Page 19 - DÉPANNAGE; POUR UNE MEILLEURE PERFORMANCE
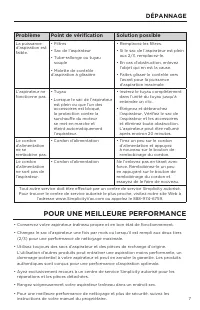
7 DÉPANNAGE • Conservez votre aspirateur traîneau propre et en bon état de fonctionnement� • Changez le sac d’aspirateur une fois par mois ou lorsqu’il est rempli aux deux tiers (2/3) pour une performance de nettoyage maximale� • Utilisez toujours des sacs d’aspirateur et des pièces de rechange d’or...
Page 20 - GARANTIE
8 GARANTIE Ce que couvre cette garantie : Cette garantie couvre tous les défauts matériels et de fabrication du nouvel aspirateur et s’applique uniquement à l’acheteur original� Durée de la garantie : Veuillez visiter Simplicityvac�com pour obtenir des informations sur la garantie� Ce que cette gara...
Page 21 - Enregistrement
9 Simplicityvac�com/register-warranty Quelle est la meilleure façon de faire partie du groupe? C’est simple : il vous suffit d’enregistrer votre aspirateur Simplicity aujourd’hui et d’activer votre garantie� Comment trouvez-vous votre aspirateur? Une fois que vous aurez eu l’occasion d’essayer votre...