Page 2 - About This Manual; All mentions of “the Remote” refer to the remote control unit.; Icon; DVD
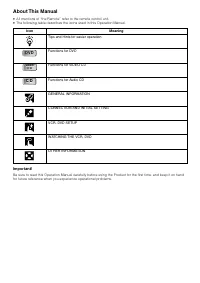
About This Manual • All mentions of “the Remote” refer to the remote control unit. • The following table describes the icons used in this Operation Manual. Icon Meaning Tips and Hints for easier operation Functions for DVD Functions for VIDEO CD Functions for Audio CD GENERAL INFORMATION CONNECTION ...
Page 3 - Laser Diode Properties; SAFETY INFORMATION; Power Cord Protection; Never put any heavy object on the AC power cord.
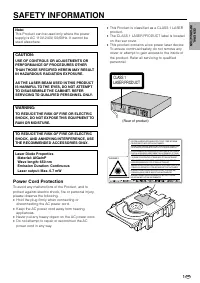
1 GB Note: This Product can be used only where the powersupply is AC 110V-240V, 50/60Hz. It cannot beused elsewhere. CAUTION: USE OF CONTROLS OR ADJUSTMENTS ORPERFORMANCE OF PROCEDURES OTHERTHAN THOSE SPECIFIED HEREIN MAY RESULTIN HAZARDOUS RADIATION EXPOSURE. AS THE LASER BEAM USED IN THIS PRODUCTI...
Page 4 - Do not put any foreign object on the disc tray.
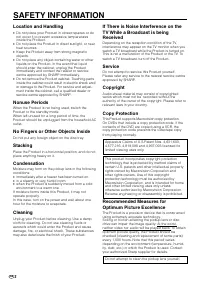
GB 2 SAFETY INFORMATION Location and Handling • Do not place your Product in closed spaces or donot cover it to prevent excessive temperaturesinside the Product. • Do not place the Product in direct sunlight, or nearheat sources. • Keep the Product away from strong magneticobjects. • Do not place an...
Page 5 - Types of Discs that Can Be Played on This Product; ALL
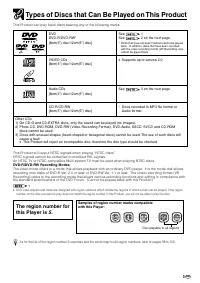
3 GB Types of Discs that Can Be Played on This Product This Product can play back discs bearing any of the following marks: DVD See 1 DVD-R/DVD-RW* See 2 on the next page [8cm(3") disc/12cm(5") disc] VIDEO CDs • Supports up to version 2.0. [8cm(3") disc/12cm(5") disc] Audio CDs See 3...
Page 6 - Region code indicator; Title 1
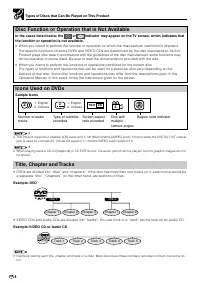
GB 4 Types of Discs that Can Be Played on This Product Disc Function or Operation that is Not Available In the cases listed below, the or indicator may appear on the TV screen, which indicates that the function or operation is not available. • When you intend to perfor m the function or operation on...
Page 7 - Handling Precautions; If the Surface is Soiled (; Maintenance; Disc Handling and Maintenance; Disc tray
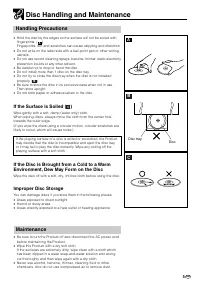
5 GB Handling Precautions • Hold the disc by the edges so the sur face will not be soiled withfingerprints. ( A ) Fingerprints, dir t and scratches can cause skipping and distortion. • Do not write on the label side with a ball-point pen or other writingutensils. • Do not use record cleaning sprays,...
Page 8 - Contents; GENERAL INFORMATION; Types of Discs that Can Be Played on; CONNECTION AND INITIAL SETTINGS; Connecting a TV Equipped with; VCR SETUP; Setting the COMPRESSION; WATCHING THE VCR
GB 6 Contents GENERAL INFORMATION SAFETY INFORMATION ................................ 1 Types of Discs that Can Be Played on This Product .............................................. 3 Disc Handling and Maintenance .................. 5 Features ........................................................
Page 9 - Recording a DVD Disc onto a Video; Recording a DVD disc onto a Video cassette; WATCHING THE DVD; When connecting a TV with the; OTHER INFORMATION
7 GB Contents D VD SETUP CONNECTION AND INITIAL SETTINGS W A TCHING THE VCR VCR SETUP GENERAL INFORMA TION O THER INFORMA TION W A TCHING THE DVD Auto Repeat ................................................. 59 Auto Zero Back ............................................ 60 DPSS (Digital Program Sear...
Page 10 - Features; Common Features; Accessories; Remote control unit; Operation Manual; Disc Features and this Operation Manual; For some operations, the
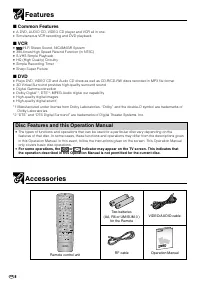
GB 8 Features ■ Common Features • A DVD, AUDIO CD, VIDEO CD player and VCR all in one. • Simultaneous VCR recording and DVD playback. ■ VCR • Hi-Fi Stereo Sound, NICAM/IGR System • 380-times High Speed Rewind Function (in NTSC) • S-VHS Simple Playback • HQ (High Quality) Circuitry • Simple Recording...
Page 11 - Major Components; SEP; L R; VCR Front Panel Display
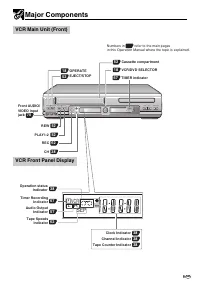
9 GB Major Components VCR Main Unit (Front) OPEN/CLOSE EJECT/STOP REW REC CH VCR/DVD SELECTOR TIMER VCR DVD PLAY STOP AV 2 IN VIDEO L(MONO)-AUDIO-R / SEP VP D VCR L R OPERATE PLAY/ × 2 18 VCR/DVD SELECTOR 62 OPERATE 18 REC 38 Clock Indicator 38 Channel Indicator 38 Tape Counter Indicator 52 PLAY/ × ...
Page 12 - DVD Front Panel Display; You can toggle between; DISPLAY
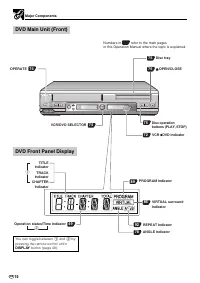
GB 10 OPEN/CLOSE EJECT/STOP REW REC CH VCR/DVD SELECTOR TIMER VCR DVD PLAY STOP AV 2 IN VIDEO L(MONO)-AUDIO-R / OPERATE PLAY/ × 2 75 Disc tray 75 OPEN/CLOSE 74 OPERATE TITLE Indicator 49 Operation status/Time Indicator TRACK Indicator CHAPTER Indicator 75 Disc operation buttons (PLAY, STOP) 89 PROGR...
Page 13 - The explanations on this page use the; VCR/DVD CHANGE Switch; in the; VCR; Loading the Batteries; and
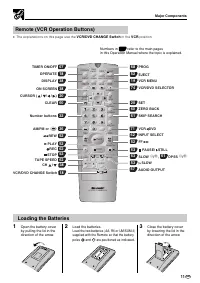
11 GB Remote (VCR Operation Buttons) • The explanations on this page use the VCR/DVD CHANGE Switch in the VCR position. Numbers in refer to the main pages in this Operation Manual where the topic is explained. Loading the Batteries 1 Open the battery coverby pulling the lid in thedirection of the ar...
Page 14 - SKIP
GB 12 REV FWD PLAY STOP OPEN/ CLOSE VCR/ DVD SELECTOR VCR MENU DVD SETUP TAPE SPEED ON SCREEN TITLE DVD MENU DISPLAY FUNCTION CONTROL PROG/ REPEAT CLEAR RETURN OPERATE TIMER ON/OFF EJECT PROG SET ENTER ZERO BACK SKIP SEARCH VCR DVD AM/PM INPUT SELECT PAUSE/STILL REC SLOW CH VCR DVD SKIP DPSS AUDIO O...
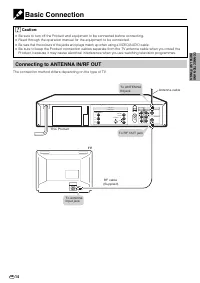
Page 16 - Basic Connection; Connecting to ANTENNA IN/RF OUT; The connection method differs depending on the type of TV.
GB 14 Basic Connection Caution: • Be sure to turn off the Product and equipment to be connected before connecting. • Read through the operation manual for the equipment to be connected. • Be sure that the colours of the jacks and plugs match up when using a VIDEO/AUDIO cable. • Be sure to keep the P...
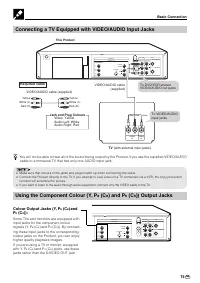
Page 17 - Required cable; Jack and Plug Colours; Connecting a TV Equipped with VIDEO/AUDIO Input Jacks; cable to a monaural TV that has only one AUDIO input jack.; and P
15 GB DVD OUT LINE OUT 2 VCR DVD/VCR ANTENNA IN RF OUT LINE IN 1 AUDIO R L VIDEO AUDIO R L VIDEO LINE OUT 1 DIGITAL AUDIO AUDIO R L S-VIDEO Y P R (C R ) P B (C B ) COMPONENT VIDEO IN AUDIO IN L R Yellow White (L) Red (R) Yellow White (L) Red (R) Required cable VIDEO/AUDIO cable (supplied) Jack and P...
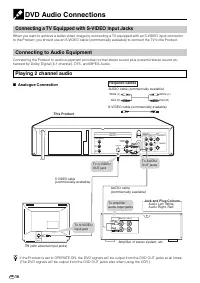
Page 18 - Required cables; DVD Audio Connections; Connecting a TV Equipped with S-VIDEO Input Jacks; Analogue Connection
GB 16 NALOG INPUT L R INPUT S-VIDEO TV (with external input jacks) DVD OUT LINE OUT 2 VCR DVD/VCR ANTENNA IN RF OUT LINE IN 1 AUDIO R L VIDEO DIO EO LINE OUT 1 DIGITAL AUDIO AUDIO R L S-VIDEO Y P R (C R ) P B (C B ) COMPONENT To AUDIOOUT jacks AUDIO cable(commercially available) To amplifieraudio in...
Page 19 - Digital Connection to an MD to Record a CD
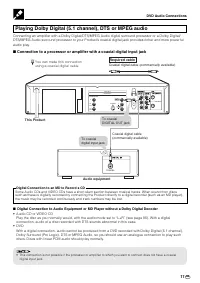
17 GB COAXIAL DVD OUT LINE OUT 2 RF OUT VIDEO AUDIO R L S-VIDEO Y P R (C R ) P B (C B ) COMPONENT Required cable Coaxial digital cable (commercially available) To coaxialDIGITAL OUT jack To coaxialdigital input jack Coaxial digital cable(commercially available) You can make this connectionusing a co...
Page 20 - Preparations Before Using the Product; Preparing to Watch a VCR or a DVD; The product is turned on.; Each time
GB 18 Preparations Before Using the Product Preparing to Watch a VCR or a DVD 1 Turn on the TV and switch the TV channel to the exter nal“VIDEO” or “AV” channel connected to the DVD/VCR sharedoutput jacks. 2 Press OPERATE . • The product is turned on. 3 Press VCR/DVD SELECTOR on the remote control t...
Page 21 - Adjusting the Video Channel
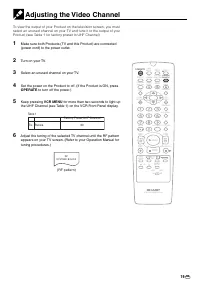
19 GB / PLAY STOP OPEN/ CLOSE OPERATE VCR/ DVD SELECTOR VCR MENU DVD SETUP TAPE SPEED ON SCREEN TIMER ON/OFF TITLE DVD MENU DISPLAY EJECT PROG FUNCTION CONTROL PROG/ REPEAT ANGLE CLEAR RETURN REV FWD SET ENTER ZERO BACK SKIP SEARCH VCR DVD AM/PM INPUT SELECT PAUSE/STILL REC VCR/ DVD COMBINATION SLOW...
Page 22 - SET; to tur n on the power of the Product . Select any
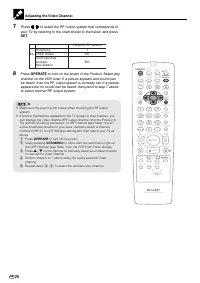
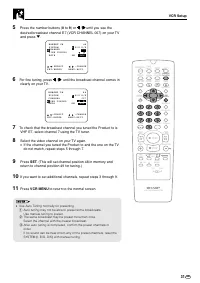
GB 20 Adjusting the Video Channel 7 Press \ \ \ \ \ / | | | | | to select the RF output system that corresponds to your TV by referring to the chart shown to the below, and press SET . 8 Press OPERATE to tur n on the power of the Product . Select any channel on the VCR tuner. If a picture appears an...
Page 23 - Auto Tuning System; to tur n on; SYSTEM; CLOCK; LANGUAGE
21 GB / PLAY STOP OPEN/ CLOSE OPERATE VCR/ DVD SELECTOR VCR MENU DVD SETUP TAPE SPEED ON SCREEN TIMER ON/OFF TITLE DVD MENU DISPLAY EJECT PROG FUNCTION CONTROL PROG/ REPEAT ANGLE CLEAR RETURN REV FWD SET ENTER ZERO BACK SKIP SEARCH VCR DVD AM/PM INPUT SELECT PAUSE/STILL REC VCR/ DVD COMBINATION SLOW...
Page 25 - VCR Setup
23 GB VCR Setup VCR Setup .................................................................................... 24 Menu Screen ............................................................................... 24 Mode Selection ........................................................................... ...
Page 26 - MENU item list; Main Menu; Menu Screen
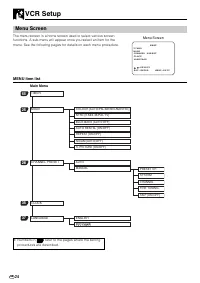
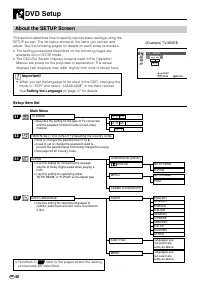
GB 24 VCR Setup • Numbers in refer to the pages where the settingprocedures are described. Menu Screen The menu screen is a home screen used to select various screenfunctions. A sub-menu will appear once you select an item for themenu. See the following pages for details on each menu procedure. MENU...
Page 27 - Mode Selection
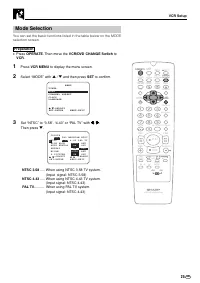
VCR Setup 25 GB Mode Selection You can set the basic functions listed in the table below on the MODEselection screen. Preparation • Press OPERATE . Then move the VCR/DVD CHANGE Switch to VCR . 1 Press VCR MENU to display the menu screen. 2 Select “MODE” with ' / " and then press SET to confirm. ...
Page 28 - Set “NICAM” to “AUTO” or “OFF” with; AUTO; Select “OFF” when your TV does not have good; The screen returns to nor mal.
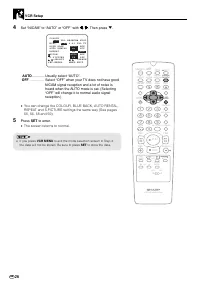
GB 26 VCR Setup 4 Set “NICAM” to “AUTO” or “OFF” with \ \ \ \ \ / | | | | | . Then press " . A U T O R E N T A L O N O F F C O L O U R R E P E A T O N O F F A U T O P A L M E S E C A M N T S C N T S C 3 . 5 8 4 . 4 3 P A L T V B L U E B A C K A U T O O F F N I C A M A U T O O F F S . P I C T U R...
Page 29 - Setting the Channels
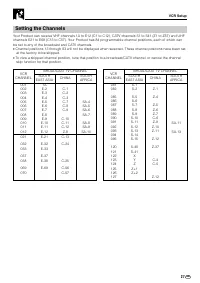
VCR Setup 27 GB Setting the Channels Your Product can receive VHF channels 1A to E12 (C1 to C12), CATV channels S1 to S41 (Z1 to Z37) and UHFchannels E21 to E69 (C13 to C57). Your Product has 84 programmable channel positions, each of which canbe set to any of the broadcast and CATV channels. • Chan...
Page 30 - Auto Tuning
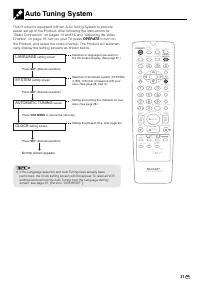
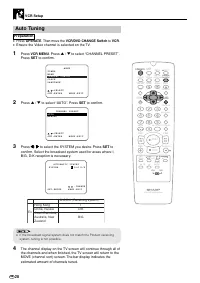
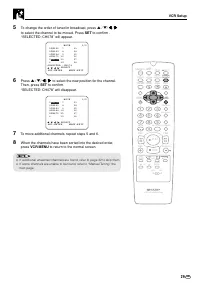
GB 28 VCR Setup Auto Tuning Preparation • Press OPERATE . Then move the VCR/DVD CHANGE Switch to VCR . • Ensure the Video channel is selected on the TV. 1 Press VCR MENU . Press ' / " to select “CHANNEL PRESET”. Press SET to confirm. M O D E M E N U C H A N N E L P R E S E T C L O C K L A N G U ...
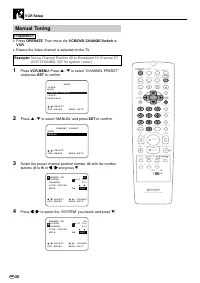
Page 32 - Manual Tuning; Tuning Channel Position 48 to Broadcast TV Channel E7
GB 30 VCR Setup / PLAY STOP OPEN/ CLOSE OPERATE VCR/ DVD SELECTOR VCR MENU DVD SETUP TAPE SPEED ON SCREEN TIMER ON/OFF TITLE DVD MENU DISPLAY EJECT PROG FUNCTION CONTROL PROG/ REPEAT CLEAR RETURN REV FWD SET ENTER ZERO BACK SKIP SEARCH VCR DVD AM/PM INPUT SELECT PAUSE/STILL REC VCR/ DVD COMBINATION ...
Page 34 - Skip channel position 12.
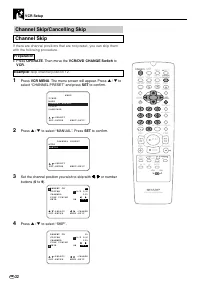
GB 32 VCR Setup Channel Skip/Cancelling Skip Channel Skip If there are channel positions that are not preset, you can skip themwith the following procedure. Preparation • Press OPERATE . Then move the VCR/DVD CHANGE Switch to VCR . Example : Skip channel position 12. 1 Press VCR MENU . The menu scre...
Page 35 - to return to the normal screen.
VCR Setup 33 GB / PLAY STOP OPEN/ CLOSE OPERATE VCR/ DVD SELECTOR VCR MENU DVD SETUP TAPE SPEED ON SCREEN TIMER ON/OFF TITLE DVD MENU DISPLAY EJECT PROG FUNCTION CONTROL PROG/ REPEAT CLEAR RETURN REV FWD SET ENTER ZERO BACK SKIP SEARCH VCR DVD AM/PM INPUT SELECT PAUSE/STILL REC VCR/ DVD COMBINATION ...
Page 36 - Cancelling Skip; Example; Reset channel position 12.
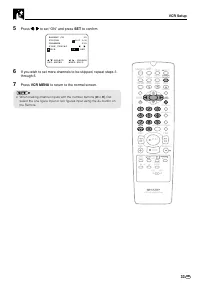
GB 34 VCR Setup Cancelling Skip Example : Reset channel position 12. 1 Follow the steps 1 and 2 from “Channel Skip” on page 32. 2 Select the channel position you wish to unskip with \ \ \ \ \ / | | | | | or number buttons ( 0 to 9 ). F I N E T U N I N G S K I P O N O F F P R E S E T C H 1 2 C H A N ...
Page 37 - Setting the Clock
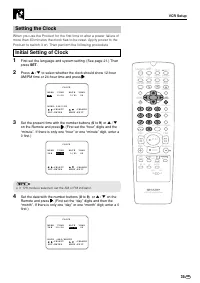
VCR Setup 35 GB Setting the Clock When you use the Product for the first time or after a power failure ofmore than 60 minutes the clock has to be reset. Apply power to theProduct to switch it on. Then perform the following procedure. Initial Setting of Clock 1 First set the language and system setti...
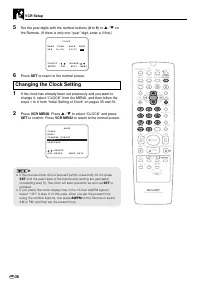
Page 38 - Changing the Clock Setting
GB 36 VCR Setup / PLAY STOP OPEN/ CLOSE OPERATE VCR/ DVD SELECTOR VCR MENU DVD SETUP TAPE SPEED ON SCREEN TIMER ON/OFF TITLE DVD MENU DISPLAY EJECT PROG FUNCTION CONTROL PROG/ REPEAT CLEAR RETURN REV FWD SET ENTER ZERO BACK SKIP SEARCH VCR DVD AM/PM INPUT SELECT PAUSE/STILL REC VCR/ DVD COMBINATION ...
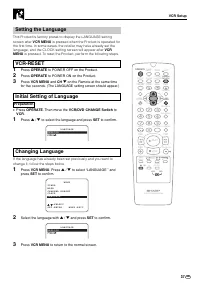
Page 39 - Setting the Language; is pressed when the Product is operated for; Initial Setting of Language; Changing Language
VCR Setup 37 GB / PLAY STOP OPEN/ CLOSE OPERATE VCR/ DVD SELECTOR VCR MENU DVD SETUP TAPE SPEED ON SCREEN TIMER ON/OFF TITLE DVD MENU DISPLAY EJECT PROG FUNCTION CONTROL PROG/ REPEAT CLEAR RETURN REV FWD SET ENTER ZERO BACK SKIP SEARCH VCR DVD AM/PM INPUT SELECT PAUSE/STILL REC VCR/ DVD COMBINATION ...
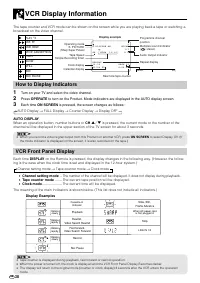
Page 40 - VCR Display Information; How to Display Indicators; Turn on your TV and select the video channel.; Channel setting mode
GB 38 VCR Display Information The tape counter and VCR mode can be shown on the screen while you are playing back a tape or watching abroadcast on the video channel. How to Display Indicators 1 Turn on your TV and select the video channel. 2 Press OPERATE to turn on the Product. Mode indicators are ...
Page 41 - DVD Setup
39 GB DVD Setup DVD Setup ....................................................................................... 40 About the SETUP Screen .............................................................. 40 TV MODE Setting .......................................................................... 41 ...
Page 42 - About the SETUP Screen; • When you set the language to be used in the OSD, changing the; on page 37 for details.; Setup item list
GB 40 About the SETUP Screen This section describes how to specify various basic settings using theSETUP screen. The list below shows all the items you can set andadjust. See the following pages for details on each setup procedure. • The setting procedures described on the following pages areavailab...
Page 43 - TV MODE Setting; or
41 GB / PLAY STOP OPEN/ CLOSE OPERATE VCR/ DVD SELECTOR VCR MENU DVD SETUP TAPE SPEED ON SCREEN TIMER ON/OFF TITLE DVD MENU DISPLAY EJECT PROG FUNCTION CONTROL PROG/ REPEAT CLEAR RETURN REV FWD SET ENTER ZERO BACK SKIP SEARCH VCR DVD AM/PM INPUT SELECT PAUSE/STILL REC VCR/ DVD COMBINATION SLOW CH VC...
Page 44 - PARENTAL Level Setting; The password specification and verification screen appears.
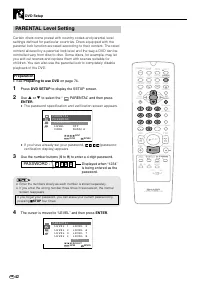
GB 42 DVD Setup / PLAY STOP OPEN/ CLOSE OPERATE VCR/ DVD SELECTOR VCR MENU DVD SETUP TAPE SPEED ON SCREEN TIMER ON/OFF TITLE DISPLAY EJECT PROG FUNCTION CONTROL PROG/ REPEAT CLEAR RETURN REV FWD SET ENTER SKIP SEARCH VCR DVD AM/PM INPUT SELECT PAUSE/STILL REC VCR/ DVD COMBINATION SLOW CH VCR DVD SKI...
Page 46 - AUDIO Setting; digital output when playing a disc.
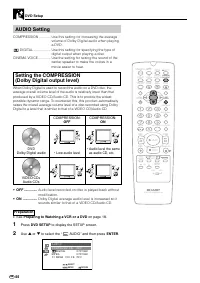
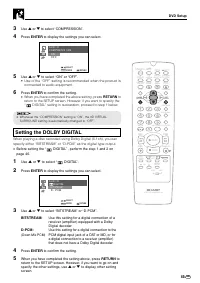
GB 44 DVD Setup AUDIO Setting COMPRESSION ............ Use this setting for increasing the average volume of Dolby Digital audio when playinga DVD. DIGITAL .................. Use this setting for specifying the type of digital output when playing a disc. CINEMA VOICE ............. Use the setting fo...
Page 47 - Setting the DOLBY DIGITAL
45 GB DVD Setup 3 Use ' or " to select “COMPRESSION”. 4 Press ENTER to display the settings you can select. 5 Use ' or " to select “ON” or “OFF”. • Use of the “OFF” setting is recommended when the product is connected to audio equipment. 6 Press ENTER to confirm the setting. • When you have ...
Page 48 - Setting the MPEG; DIGITAL” and “MPEG”.; Setting the CINEMA VOICE
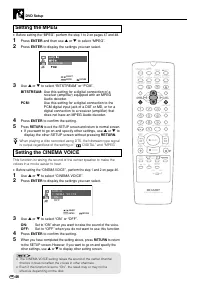
GB 46 Setting the MPEG • Before setting the “MPEG”, perform the step 1 to 2 on pages 47 and 48. 1 Press ENTER and then use ' or " to select “MPEG”. 2 Press ENTER to display the settings you can select. 3 Use ' or " to select “BITSTREAM” or “PCM”. BITSTREAM: Use this setting for a digital con...
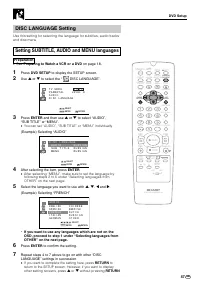
Page 49 - You can set “AUDIO”, “SUB TITLE” or “MENU” individually.
47 GB DVD Setup DISC LANGUAGE Setting Use this setting for selecting the language for subtitles, audio tracksand disc menu. Setting SUBTITLE, AUDIO and MENU languages Preparation • See Preparing to Watch a VCR or a DVD on page 18. 1 Press DVD SETUP to display the SETUP screen. 2 Use ' or " to se...
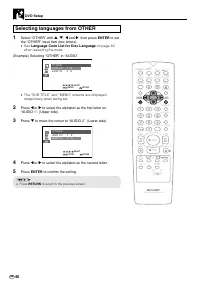
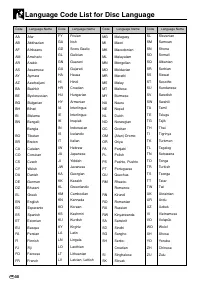
Page 50 - Selecting languages from OTHER; See; Language Code List for Disc Language; when selecting the code.
GB 48 DVD Setup / PLAY STOP OPEN/ CLOSE OPERATE VCR/ DVD SELECTOR VCR MENU DVD SETUP TAPE SPEED ON SCREEN TIMER ON/OFF TITLE DVD MENU DISPLAY EJECT PROG FUNCTION CONTROL PROG/ REPEAT CLEAR RETURN REV FWD SET ENTER ZERO BACK SKIP SEARCH VCR DVD AM/PM INPUT SELECT PAUSE/STILL REC VCR/ DVD COMBINATION ...
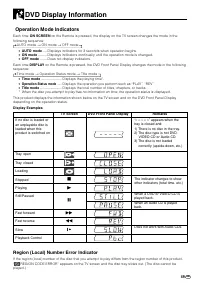
Page 51 - DVD Display Information; Operation Mode Indicators
49 GB DVD Display Information If no disc is loaded oran unplayable disc isloaded when thisproduct is switched on Tray open Tray closed Loading Stopped Playing Still/Paused Fast forward Fast reverse Slow Playback Control TV Screen DVD Front Panel Display Remarks Operation Mode Indicators Each time ON...
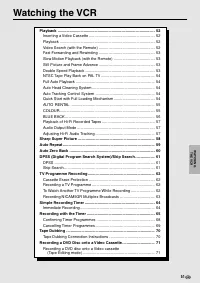
Page 53 - Watching the VCR
51 GB Watching the VCR Playback .......................................................................................... 52 Inserting a Video Cassette ............................................................. 52 Playback ............................................................................
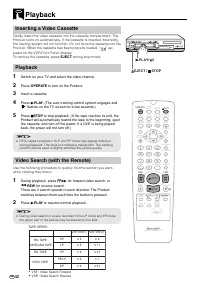
Page 54 - Playback
GB 52 Inserting a Video Cassette Gently insert the video cassette into the cassette compartment. TheProduct turns on automatically. If the cassette is inser ted incorrectly,the loading system will not function. Do not force the cassette into theProduct. When the cassette has been properly loaded, “ ...
Page 55 - REW
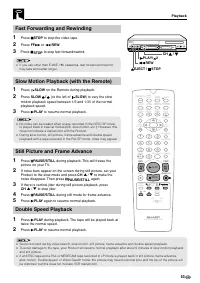
53 GB Fast Forwarding and Rewinding 1 Press Ë STOP to stop the video tape. 2 Press FF è or È REW . 3 Press Ë STOP to stop fast forward/rewind. • If you use other than E-90/E-180 cassettes, fast forward and rewindmay take somewhat longer. Slow Motion Playback (with the Remote) 1 Press SLOW on the Rem...
Page 56 - Auto Head Cleaning System; Quick Start with Full Loading Mechanism
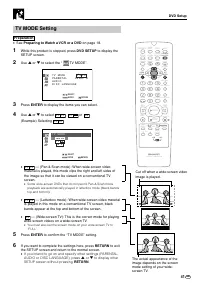
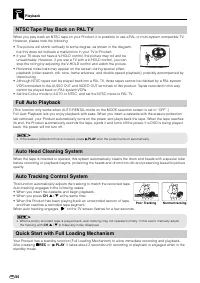
GB 54 NTSC Tape Play Back on PAL TV When you play back an NTSC tape on your Product, it is possible to use a PAL or multi-system compatible TV.However, please note the following: • The picture will shrink vertically to some degree, as shown in the diagram, but this does not indicate a malfunction in...
Page 57 - AUTO RENTAL; COLOUR
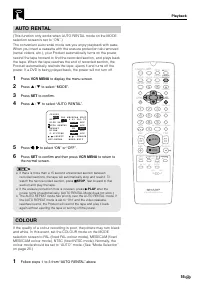
55 GB Playback AUTO RENTAL (This function only works when AUTO RENTAL mode on the MODEselection screen is set to “ON”.)The convenient auto rental mode lets you enjoy playback with ease.When you insert a cassette with the erasure protection tab removed(rental videos, etc.), your Product automatically...
Page 58 - BLUE BACK
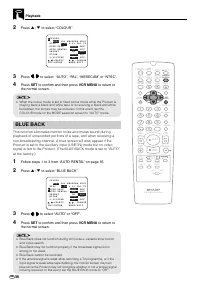
GB 56 / PLAY STOP OPEN/ CLOSE OPERATE VCR/ DVD SELECTOR VCR MENU DVD SETUP TAPE SPEED ON SCREEN TIMER ON/OFF TITLE DVD MENU DISPLAY EJECT PROG FUNCTION CONTROL PROG/ REPEAT CLEAR RETURN REV FWD SET ENTER ZERO BACK SKIP SEARCH VCR DVD AM/PM INPUT SELECT PAUSE/STILL REC VCR/ DVD COMBINATION SLOW CH VC...
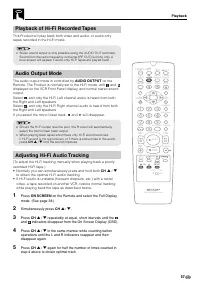
Page 59 - Playback of Hi-Fi Recorded Tapes; The audio output mode is controlled by; Adjusting Hi-Fi Audio Tracking; to obtain the optimal Hi-Fi audio tracking.
57 GB / PLAY STOP OPEN/ CLOSE OPERATE VCR/ DVD SELECTOR VCR MENU DVD SETUP TAPE SPEED ON SCREEN TIMER ON/OFF TITLE DVD MENU DISPLAY EJECT PROG FUNCTION CONTROL PROG/ REPEAT CLEAR RETURN REV FWD SET ENTER ZERO BACK SKIP SEARCH VCR DVD AM/PM INPUT SELECT PAUSE/STILL REC VCR/ DVD COMBINATION SLOW CH VC...
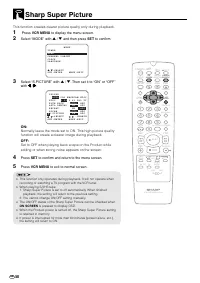
Page 60 - Sharp Super Picture
GB 58 Sharp Super Picture This function creates clearer picture quality only during playback. 1 Press VCR MENU to display the menu screen. 2 Select “MODE” with ' / " and then press SET to confirm. M O D E M E N U S E T : E N T E R M E N U : E X I T C H A N N E L P R E S E T : S E L E C T C L O C...
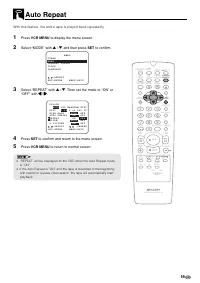
Page 61 - Auto Repeat; With this feature, the entire tape is played back repeatedly.
59 GB Auto Repeat / PLAY STOP OPEN/ CLOSE OPERATE VCR/ DVD SELECTOR VCR MENU DVD SETUP TAPE SPEED ON SCREEN TIMER ON/OFF TITLE DVD MENU DISPLAY EJECT PROG FUNCTION CONTROL PROG/ REPEAT CLEAR RETURN REV FWD SET ENTER ZERO BACK SKIP SEARCH VCR DVD AM/PM INPUT SELECT PAUSE/STILL REC VCR/ DVD COMBINATIO...
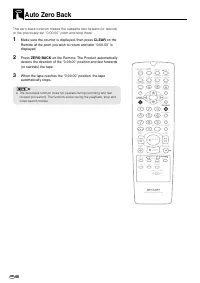
Page 62 - Make sure the counter is displayed, then press; on the; on the Remote. The Product automatically; Auto Zero Back
GB 60 The zero-back function makes the cassette fast forward (or rewind)to the previously set “0:00.00” point and stop there. 1 Make sure the counter is displayed, then press CLEAR on the Remote at the point you wish to return and later “0:00.00” isdisplayed. 2 Press ZERO BACK on the Remote. The Pro...
Page 63 - Index signal; Load a tape containing index signals into the Product.; Skip Search; When; on the Remote is pressed during playback
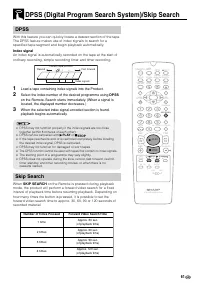
61 GB DPSS With this feature you can quickly locate a desired section of the tape.The DPSS feature makes use of index signals to search for aspecified tape segment and begin playback automatically. Index signal An index signal is automatically recorded on the tape at the start ofordinary recording, ...
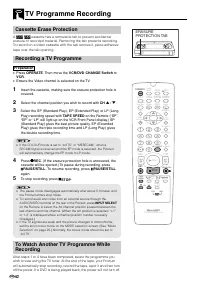
Page 64 - TV Programme Recording; Cassette Erase Protection; cassette has a removable tab to prevent accidental; Recording a TV Programme
GB 62 TV Programme Recording / PLAY STOP OPEN/ CLOSE OPERATE VCR/ DVD SELECTOR VCR MENU DVD SETUP TAPE SPEED ON SCREEN TIMER ON/OFF TITLE DVD MENU DISPLAY EJECT PROG FUNCTION CONTROL PROG/ REPEAT CLEAR RETURN REV FWD SET ENTER ZERO BACK SKIP SEARCH VCR DVD AM/PM INPUT SELECT PAUSE/STILL REC VCR/ DVD...
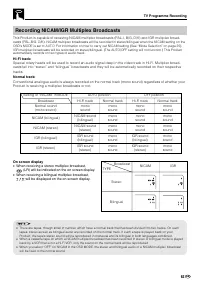
Page 65 - Recording NICAM/IGR Multiplex Broadcasts; When receiving a stereo multiplex broadcast,
63 GB Recording NICAM/IGR Multiplex Broadcasts This Product is capable of receiving NICAM multiplex broadcasts (PAL-I, B/G, D/K) and IGR multiplex broad-casts (PAL- B/G, D/K). NICAM multiplex broadcasts will be recorded in stereo/bilingual when the NICAM setting on the OSD’s MODE is set to AUTO. For...
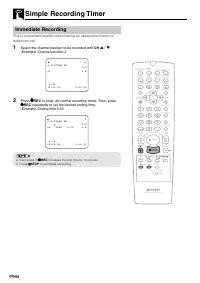
Page 66 - Immediate Recording; Select the channel position to be recorded with; to enter the normal recording mode. Then, press; repeatedly to set the desired ending time.; Simple Recording Timer
GB 64 Immediate Recording This is convenient function when having an unexpected visitor ortelephone call. 1 Select the channel position to be recorded with CH ' / " . (Example) Channel position 2 S . P I C T U R E O N S P L R I / I I 1 5 / 1 2 0 0 0 : 0 0 . 0 0 R E P E A T 2 8 : 0 0 2 Press Æ Æ ...
Page 67 - Recording with the Timer; Preparation; PROG
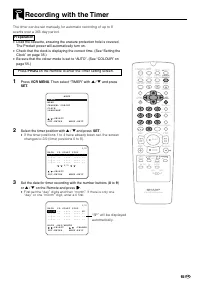
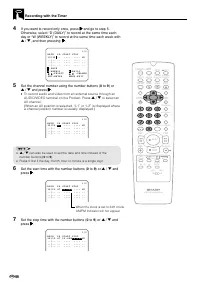
65 GB Recording with the Timer The timer can be set manually for automatic recording of up to 8events over a 365 day period. Preparation • Load the cassette, ensuring the erasure protection hole is covered.The Product power will automatically turn on. • Check that the clock is displaying the correct...
Page 69 - SEPVP D
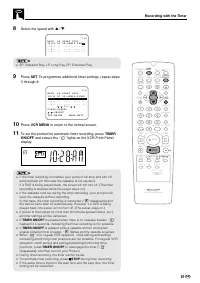
67 GB 8 Select the speed with ' / " . D A T E P R S T A R T S T O P - - / - - - - - : - - - : - - - - - - / - - - - - : - - - : - - - - - - / - - - - - : - - - : - - - - 1 / 2 1 5 / 1 2 4 7 1 2 : 0 0 P M 1 2 : 3 0 P M S P • SP: Standard Play, LP: Long Play, EP: Extended Play 9 Press SET . To pro...
Page 70 - Confirming Timer Programmes
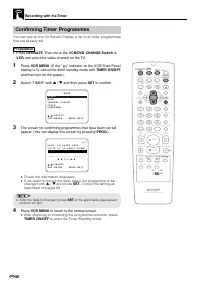
GB 68 Confirming Timer Programmes You can see on the On Screen Display a list of all timer programmesthat are already set. Preparation • Press OPERATE . Then move the VCR/DVD CHANGE Switch to VCR and select the video channel on the TV. 1 Press VCR MENU . (If the “ ” indicator on the VCR Front Panel ...
Page 71 - Cancelling Timer Programmes; Select the programme you wish to cancel with; If there are still some programmes to be set, press
69 GB Cancelling Timer Programmes Perfor m the following procedure to cancel timer programmes thathave already been set. Preparation • Press OPERATE . Then move the VCR/DVD CHANGE Switch to VCR and select the video channel on the TV. 1 Press VCR MENU . (If the “ ” indicator on the VCR Front Panel di...
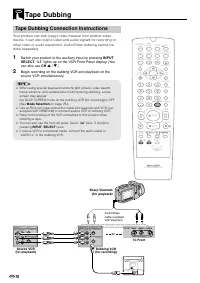
Page 72 - Tape Dubbing; Tape Dubbing Connection Instructions; Switch your product to the auxiliary input by pressing; ” lights up on the VCR Front Panel display. (You
GB 70 Tape Dubbing Tape Dubbing Connection Instructions Your product can dub (copy) video material from another videodevice. It can also output video and audio signals for recording onother video or audio equipment. Audio/Video dubbing cannot bedone separately. 1 Switch your product to the auxiliary...
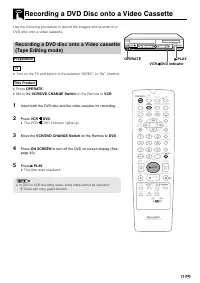
Page 73 - Recording a DVD Disc onto a Video Cassette
71 GB Recording a DVD Disc onto a Video Cassette Use the following procedure to record the images and sounds on aDVD disc onto a video cassette. Recording a DVD disc onto a Video cassette(Tape Editing mode) Preparation TV • Tur n on the TV and switch to the external “VIDEO” or “AV” channel. This Pro...
Page 75 - Watching the DVD
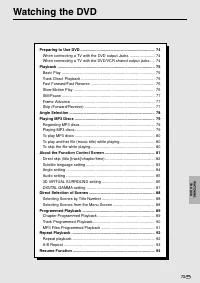
73 GB Watching the DVD W A TCHING THE DVD Preparing to Use DVD ..................................................................... 74 When connecting a TV with the DVD output Jacks ....................... 74 When connecting a TV with the DVD/VCR shared output jacks .... 74 Playback ..................
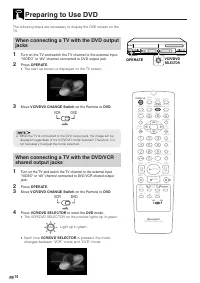
Page 76 - Preparing to Use DVD; The start up screen is displayed on the TV screen.; Light up in green
GB 74 Preparing to Use DVD / PLAY STOP OPEN/ CLOSE OPERATE VCR/ DVD SELECTOR VCR MENU DVD SETUP TAPE SPEED ON SCREEN TIMER ON/OFF TITLE DVD MENU DISPLAY EJECT PROG FUNCTION CONTROL PROG/ REPEAT CLEAR RETURN REV FWD SET ENTER ZERO BACK SKIP SEARCH VCR DVD AM/PM INPUT SELECT PAUSE/STILL REC VCR/ DVD C...
Page 77 - The icons below are used in this Operation Manual:; Basic Play; Track Direct Playback; Disc
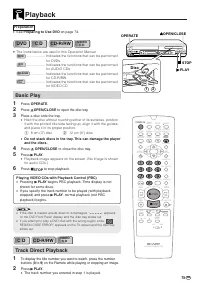
75 GB Playback Preparation • See Preparing to Use DVD on page 74. DVD DVD C D C D CD-R/RW CD-R/RW C D C D VIDEO VIDEO • The icons below are used in this Operation Manual: DVD DVD ................... Indicates the functions that can be per formed for DVDs. C D C D ................... Indicates the fu...
Page 78 - Fast Forward/Fast Reverse; The disc begins fast scan at
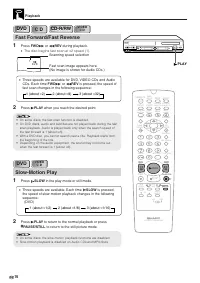
GB 76 Playback DVD DVD C D C D CD-R/RW CD-R/RW Fast Forward/Fast Reverse 1 Press FWD è or È REV during playback. • The disc begins fast scan at × 2 speed (1). • Three speeds are available for DVD, VIDEO CDs and AudioCDs. Each time FWD è or È REV is pressed, the speed of fast scan changes in the foll...
Page 79 - Frame Advance
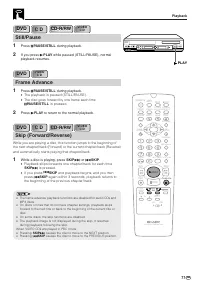
77 GB Playback DVD DVD C D C D CD-R/RW CD-R/RW Still/Pause 1 Press â PAUSE/STILL during playback. 2 If you press û PLAY while paused (STILL/PAUSE), normal playback resumes. DVD DVD Frame Advance 1 Press â PAUSE/STILL during playback. • The playback is paused (STILL/PAUSE). • The disc goes forward by...
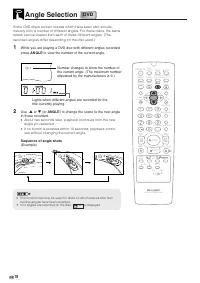
Page 80 - Angle Selection; to view the number of the current angle.; ) to change the scene to the next angle; Sequence of angle shots
GB 78 / PLAY STOP OPEN/ CLOSE OPERATE VCR/ DVD SELECTOR VCR MENU DVD SETUP TAPE SPEED ON SCREEN TIMER ON/OFF TITLE DVD MENU DISPLAY EJECT PROG FUNCTION CONTROL PROG/ REPEAT CLEAR RETURN REV FWD SET ENTER ZERO BACK SKIP SEARCH VCR DVD AM/PM INPUT SELECT PAUSE/STILL REC VCR/ DVD COMBINATION SLOW CH VC...
Page 81 - Regarding MP3 discs; ment and the disc’s recording.; Playing MP3 discs; folders before recording.; CAUTION; Playing MP3 Discs
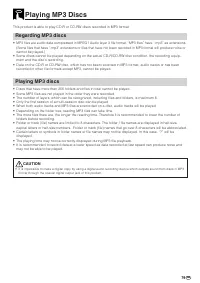
79 GB This product is able to play CD-R or CD-RW discs recorded in MP3 format. Regarding MP3 discs • MP3 files are audio data compressed in MPEG1 Audio layer 3 file format. “MP3 files” have “.mp3” as extensions. (Some files that have “.mp3” extensions or files that have not been recorded in MP3 form...
Page 82 - To skip the file while playing
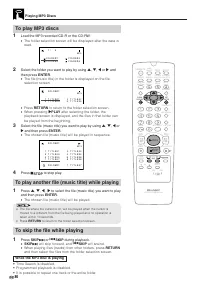
GB 80 Playing MP3 Discs To play MP3 discs 1 Load the MP3 recorded CD-R or the CD-RW. • The folder selection screen will be displayed after the data isread. 2 Select the folder you want to play by using ' , " , \ or | and then press ENTER . • The file (music title) in the folder is displayed on t...
Page 83 - About the Function Control Screen
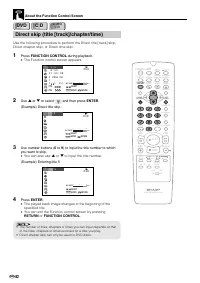
81 GB 2/5 8/3‰‰1:3‰:‰82 ENGLISH11 5 1chONON . T T T C C C G ENTER RETURN SELECT ENTER BIT RATE Mbps 0 5 10 D DVD Using Function control, you can check at a glance and change the current settings of the following items:SUBTITLE, ANGLE, AUDIO, 3D VIRTUAL SURROUND and, DIGITAL GAMMA.Function control al...
Page 85 - Subtitle language setting; The Function control screen appears.; You can set the subtitle setting to “OFF”.; You can exit the Function control screen by pressing
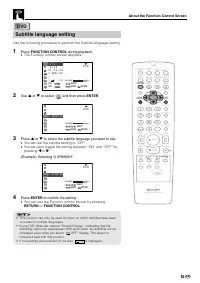
83 GB DVD DVD About the Function Control Screen Subtitle language setting Use the following procedure to per form the Subtitle language setting. 1 Press FUNCTION CONTROL during playback. • The Function control screen appears. 2/5 8/3‰‰1:3‰:‰82 ENGLISH11 5 1chONON . T T T C C C G ENTER RETURN SELECT ...
Page 86 - Angle setting; FUNCTION CONTROL
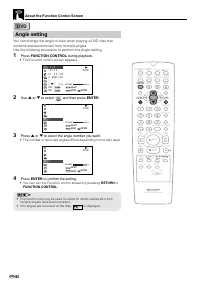
GB 84 DVD DVD About the Function Control Screen Angle setting You can change the angle of view when playing a DVD disc thatcontains scenes recorded from multiple angles.Use the following procedure to perfor m the Angle setting. 1 Press FUNCTION CONTROL during playback. • The Function control screen ...
Page 87 - Audio setting
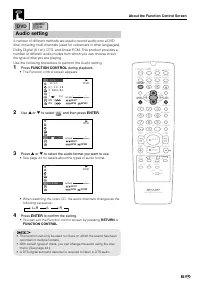
85 GB DVD DVD About the Function Control Screen Audio setting A number of different methods are used to record audio onto a DVDdisc, including multi-channels (used for voiceovers in other languages),Dolby Digital (5.1ch), DTS, and Linear PCM. This product provides anumber of different audio modes fr...
Page 88 - D VIRTUAL SURROUND setting; To use the 3D VIRTUAL SURROUND function
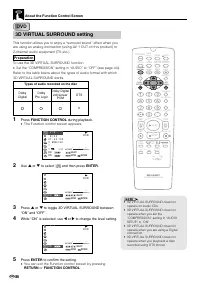
GB 86 DVD DVD 3D VIRTUAL SURROUND setting This function allows you to enjoy a “surround sound” effect when youare using an analog connection (using AV 1 OUT on this product) to2-channel audio equipment (TV, etc.). Preparation To use the 3D VIRTUAL SURROUND function • Set the “COMPRESSION” setting in...
Page 89 - DIGITAL GAMMA setting
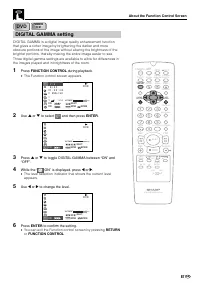
87 GB DVD DVD DIGITAL GAMMA setting DIGITAL GAMMA is a digital image quality enhancement functionthat gives a richer image by brightening the darker and moreobscure portions of the image without altering the brightness of thebrighter portions, thereby making the entire image easier to see.Three digi...
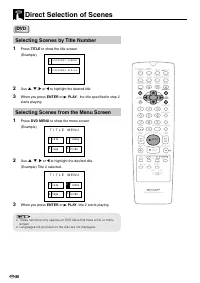
Page 90 - Direct Selection of Scenes; Selecting Scenes by Title Number
GB 88 T I T L E M E N U t a s 1 2 3 4 C s i he s F g o s D r i ds B T I T L E M E N U t a s 1 2 3 4 C s i he s F g o s D r i ds B Direct Selection of Scenes Selecting Scenes by Title Number 1 Press TITLE to show the title screen. (Example) 2 Use ' , " , | or \ to highlight the desired title. 3 W...
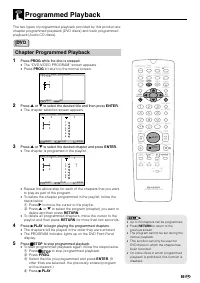
Page 91 - Programmed Playback; Chapter Programmed Playback
89 GB Programmed Playback The two types of programmed playback provided by this product arechapter programmed playback (DVD discs) and track programmedplayback (Audio CD discs). Chapter Programmed Playback 1 Press PROG while the disc is stopped. • The “DVD-VIDEO PROGRAM” screen appears. • Press PROG...
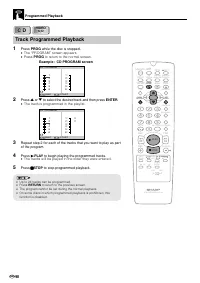
Page 92 - Track Programmed Playback; The “PROGRAM” screen appears.
GB 90 Programmed Playback Track Programmed Playback 1 Press PROG while the disc is stopped. • The “PROGRAM” screen appears. • Press PROG to return to the normal screen. 2 Press ' or " to select the desired track and then press ENTER . • The track is programmed in the playlist. 3 Repeat step 2 fo...
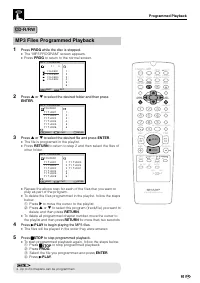
Page 93 - MP3 Files Programmed Playback
91 GB MP3 Files Programmed Playback 1 Press PROG while the disc is stopped. • The “MP3 PROGRAM” screen appears. • Press PROG to return to the normal screen. 2 Press ' or " to select the desired folder and then press ENTER . 3 Press ' or " to select the desired file and press ENTER . • The fi...
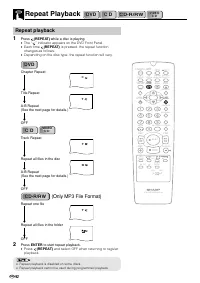
Page 94 - Repeat Playback; Repeat playback
GB 92 Repeat Playback DVD DVD C D C D CD-R/RW CD-R/RW / PLAY STOP OPEN/ CLOSE OPERATE VCR/ DVD SELECTOR VCR MENU DVD SETUP TAPE SPEED ON SCREEN TIMER ON/OFF TITLE DVD MENU DISPLAY EJECT PROG FUNCTION CONTROL PROG/ REPEAT CLEAR RETURN REV FWD SET ENTER ZERO BACK SKIP SEARCH VCR DVD AM/PM INPUT SELECT...
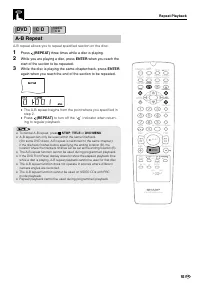
Page 95 - A-B repeat allows you to repeat specified section on the disc.
93 GB Repeat Playback / PLAY STOP OPEN/ CLOSE OPERATE VCR/ DVD SELECTOR VCR MENU DVD SETUP TAPE SPEED ON SCREEN TIMER ON/OFF TITLE DVD MENU DISPLAY EJECT PROG FUNCTION CONTROL PROG/ REPEAT CLEAR RETURN REV FWD SET ENTER ZERO BACK SKIP SEARCH VCR DVD AM/PM INPUT SELECT PAUSE/STILL REC VCR/ DVD COMBIN...
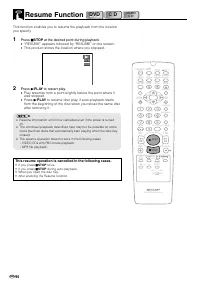
Page 96 - Resume Function; at the desired point during playback.; to resume disc play, if auto-playback starts; This resume operation is cancelled in the following cases.
GB 94 Resume Function DVD DVD This function enables you to resume the playback from the locationyou specify. 1 Press Ë STOP at the desired point during playback. • “RESUME” appears followed by “RESUME” on the screen. • This product stores the location where you stopped. 2 Press û PLAY to restar t pl...
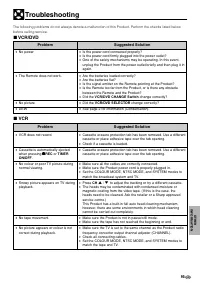
Page 97 - Troubleshooting; Suggested Solution; Problem
95 GB Troubleshooting ■ VCR/DVD ■ VCR Problem • No power • The Remote does not wor k. • No picture • DEW Suggested Solution • Is the power cord connected properly? • Is the power cord firmly plugged into the power outlet? • One of the safety mechanisms may be operating. In this event,unplug the Prod...
Page 99 - Definition of Terms; Enhanced picture quality during playback.; Angle
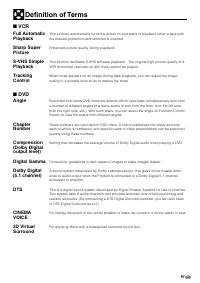
97 GB Definition of Terms This function automatically tur ns the power on and starts to playback when a tape withthe erasure protection tabs removed is inser ted. Enhanced picture quality during playback. This function facilitates S-VHS software playback. The original high picture quality of S-VHS (...
Page 100 - Laser device that reads the data from a disc for playback.; Common names
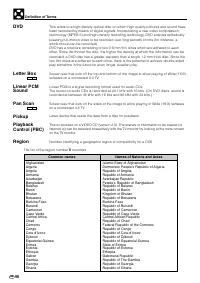
GB 98 DVD Letter Box L B 4 : 3 Linear PCM Sound Pan Scan P S 4 : 3 Pickup Playback Control (PBC) Region Definition of Terms This refers to a high-density optical disc on which high-quality pictures and sound havebeen recorded by means of digital signals. Incorporating a new video compressiontechnolo...
Page 101 - *Represents area name
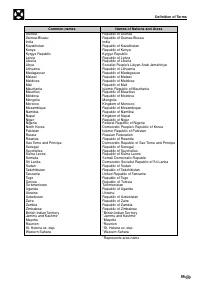
99 GB Common names Names of Nations and Areas GuineaGuinea-BissauIndiaKazakhstanKenyaKyrgyz RepublicLatviaLiberiaLibyaLithuaniaMadagascarMalawiMaldivesMaliMauritaniaMauritiusMoldovaMongoliaMoroccoMozambiqueNamibiaNepalNigerNigeriaNorth KoreaPakistanRussiaRwandaSao Tome and PrincipeSenegalSeychellesS...
Page 102 - The world map for all region numbers
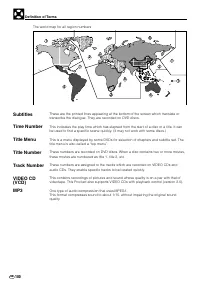
GB 100 Subtitles Time Number Title Menu Title Number Track Number VIDEO CD (VCD) MP3 These are the printed lines appearing at the bottom of the screen which translate ortranscribe the dialogue. They are recorded on DVD discs. This indicates the play time which has elapsed from the star t of a disc o...
Page 103 - Specifications; JACKS
101 GB Signal System NTSC/PAL DVD/VCR shared output jacks VIDEO jack: RCA Pin-jackAUDIO jack: RCA Pin-jack DVD output jacks VIDEO jack: S-Video jackComponent Y jack: RCA Pin-jackComponent P B jack: RCA Pin-jack Component P R jack: RCA Pin-jack AUDIO jack: RCA Pin-jackDIGITAL AUDIO IF: Coaxial digita...
Page 104 - OPERATION MANUAL; MODEL
TINS-A368WJZZ OPEN/CLOSE OPERATE EJECT/STOP REW PLAY/ × 2 REC CH VCR/DVD SELECTOR TIMER VCR DVD PLAY STOP AV 2 IN VIDEO L(MONO)-AUDIO-R / OPERATION MANUAL DV-NC70RU VCR/DVD COMBINATION MODEL NTSC/PAL ENGLISH ...... GB 1 – GB 101 ...... R 1 – R 101 • The region number for this DVD player is 5. • DV-N...