Page 2 - SAFETY & INTERNATIONAL SYMBOLS
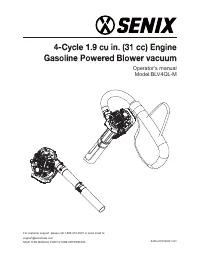
2 WWW.SENIXTOOLS.COM SAFETY & INTERNATIONAL SYMBOLS This operator’s manual describes safety and international symbols and pictographs that may appear on this product. Read the operator’s manual for complete safety, assembly, operating and maintenance and repair information. SAFETY ALERT SYMBOL I...
Page 4 - SAFETY WARNING FOR GAS UNIT
4 WWW.SENIXTOOLS.COM SAFETY Safety is a combination of common sense, staying fueling. 2. Always add fuel in a clean, well-ventilated outdoor area 3. Never operate the unit without the fuel cap securely in place. 4. Avoid creating a source of ignition for spilled fuel. Wipe up any spilled fuel from t...
Page 5 - SPECIFIC RULES FOR THE BLOWER; SAVE THESE INSTRUCTIONS
5 WWW.SENIXTOOLS.COM SAFETY sandals or go barefoot. Secure hair above shoulder level. whenever pulling the starter rope. The operator and unit must be in a stable position while starting. Refer to Starting and Stopping. purpose. steep slopes or inclines. To avoid serious injury, do not operate the u...
Page 6 - KNOW YOUR BLOWER; COMPONENT LOCATION; TECHNICAL DATA
6 WWW.SENIXTOOLS.COM COMPONENT LOCATION KNOW YOUR BLOWER COMPONENT LOCATION 1 fuel cap 2 primer bulb 3 4 air cleaner 5 handle 6 throttle trigger 7 ON/OFF switch 8 air tube 9 10 11 lubricating oil cap 12 starter rope grip 13 lower handle 14 vacuum tube 15 bag 16 curved tube 6 5 8 3 7 42 16 14 12 10 1...
Page 7 - INSTALLING/REMOVE THE BLOWER TUBE; ASSEMBLY
7 WWW.SENIXTOOLS.COM Fig. 1 Fig. 2 Fig. 3 ASSEMBLY INSTALLING/REMOVE THE BLOWER TUBE ASSEMBLY Align the slots on the upper end of the upper blower tube with the bumps on the blower outlet .Insert the upper blower tube into the blower outlet. While holding the into place (Fig. 1). Align the slots on ...
Page 8 - INSTALLING/REMOVE THE VACUUM TUBE
8 WWW.SENIXTOOLS.COM Fig. 4 Fig. 5 Fig. 7 Fig. 6 ASSEMBLY INSTALLING/REMOVE THE VACUUM TUBE of bag. See complete assembly picture in FIG. 4 for Velcro strap. 2. Align the slots in the curved tube (C) with the with the bumps on the blower outlet (D) Slide the tube on and assembled the tube will curve...
Page 9 - ADDING OIL: INITIAL USE
9 WWW.SENIXTOOLS.COM ADDING OIL: INITIAL USE oil. Failure to use clean oil of the correct type can cause premature engine wear and failure. has a four-cycle engine. DO NOT mix oil with gasoline. oil. (Fig. 8) Oil must be added before starting the unit. Fig. 8 CAUTION: WARNING: ASSEMBLY ASSEMBLY
Page 10 - STARTING INSTRUCTIONS; STARTING / STOPPING THE BLOWER
10 WWW.SENIXTOOLS.COM OPERATION STARTING INSTRUCTIONS STOPPING INSTRUCTIONS Operate this unit only in a well-ventilated outdoor area.Carbon monoxide exhaust fumes can be lethal in a avoid serious injury, the operator and the unit must be in a stable position when pulling the starter rope. Clear the ...
Page 11 - HOLDING THE UNIT
11 WWW.SENIXTOOLS.COM Fig. 12 washed cars. Blow debris away safely. Dispose of debris in trash receptacles. OPERATION Stand in the operating position (Fig. 12). Stand up straight. Do not bend over. To prevent serious personal injury or damage to the unit, DO NOT hold the unit at your side (Fig. 12) ...
Page 12 - MAINTENANCE; GENERAL MAINTENANCE; STORING THE PRODUCT
12 WWW.SENIXTOOLS.COM MAINTENANCE MAINTENANCE GENERAL MAINTENANCE FUEL CAP AND TANK AND LINES SPARK PLUG REPLACEMENT CHANGING ENGINE LUBRICANT NOTE: Drain the lubricant while the engine is still warm more completely. NOTE: Used lubricant should be disposed of at an approved disposal site. See your l...
Page 13 - TROUBLESHOOTING
13 WWW.SENIXTOOLS.COM TROUBLESHOOTING TROUBLESHOOTING SYMPTOM POSSIBLE CAUSE RECOMMENDED ACTIONS THE ENGINE WILL NOT START The primer bulb was not pressed enough Press the primer bulb 10 times The fuel is old (over 30 days) The engine is hot Cool the engine down THE ENGINE WILL NOT IDLE The fuel is ...
Page 14 - PARTS
14 WWW.SENIXTOOLS.COM PARTS PARTS EXPLODED VIEW 1 8 9 10 11 12 19 18 17 13 15 16 14 2 3 5 4 7 6 11 207180200023 1 12 202094000239 Lance 2 1 13 202094000224 Bend Tube 1 14 199999001291 1 15 299010000024 Dust Bag 1 16 202154000006 Bend Tube 1 17 202155000025 Blowpipe 1 18 202155000024 Blowpipe 1 19 20...
Page 15 - WARRANTY
15 WWW.SENIXTOOLS.COM WARRANTY WARRANTY LIMITED THREE-YEAR WARRANTY This warranty does not cover normal wear of parts and components such as cutting chain, line or blades nor does this warranty cover product transportation cost for warranty or service. are limited to three years from the date of pur...
Page 16 - Manual del operador
Manual del operador Modelo: BLV4QL-M Para el servicio de atención al cliente, llame al 1-800-261-3981 o envíe un email a:[email protected]GUARDE ESTE MANUAL PARA FUTURAS CONSULTAS.
Page 17 - SEGURIDAD Y SÍMBOLOS INTERNACIONALES
17 WWW.SENIXTOOLS.COM SEGURIDAD Y SÍMBOLOS INTERNACIONALES aparecer en este producto. Lea el manual del operador para obtener información completa sobre seguridad, montaje, operación y mantenimiento y reparación. SÍMBOLO DE ALERTA DE SEGURIDAD Indica peligro, advertencia o precaución. símbolos o pic...
Page 19 - ADVERTENCIA DE SEGURIDAD PARA LA
19 WWW.SENIXTOOLS.COM SEGURIDAD La seguridad es una combinación de sentido común, mantenerse alerta y saber cómo funciona su herramienta. CONSERVE ESTAS INSTRUCCIONES DE SEGURIDAD. antes de llenar el depósito de combustible. Nunca siempre el tapón del depósito de combustible antes de llenarlo. 2. Ag...
Page 20 - REGLAS ESPECIFICAS PARA EL SOPLADOR
20 WWW.SENIXTOOLS.COM SEGURIDAD el cabello si lo tiene a la altura de los hombros. operador y la herramienta deben estar en una posición especial cuidado al trabajar en escaleras, pendientes pronunciadas o inclinaciones. Para evitar lesiones graves, no opere la herramienta mientras esté en una escal...
Page 21 - CONOZCA SU SOPLADOR; UBICACIÓN DE LOS COMPONENTES; DATOS TÉCNICOS
21 WWW.SENIXTOOLS.COM UBICACIÓN DE LOS COMPONENTES CONOZCA SU SOPLADOR UBICACIÓN DE LOS COMPONENTES 1 tapa de combustible 2 perilla de cebado 3 nivel de estrangulación 4 limpiador de aire 5 6 gatillo del acelerador 7 Interruptor de encendido/apagado 8 tubo de aire 9 silenciador 10 bujía 11 tapón del...
Page 22 - INSTALACIÓN/EXTRACCIÓN DEL TUBO; ENSAMBLAJE
22 WWW.SENIXTOOLS.COM Fig. 1 Fig. 2 Fig. 3 ENSAMBLAJE INSTALACIÓN/EXTRACCIÓN DEL TUBO SOPLADOR ENSAMBLAJE Alinee las ranuras en el extremo superior del tubo de soplado superior con las protuberancias en la salida del soplador. Inserte el tubo de soplado superior en la salida del soplador. Mientras s...
Page 23 - INSTALACIÓN/EXTRACCIÓN DEL TUBO DE
23 WWW.SENIXTOOLS.COM Fig. 4 Fig. 5 Fig. 7 Fig. 6 ENSAMBLAJE INSTALACIÓN/EXTRACCIÓN DEL TUBO DE ASPIRADO 1. Inserte el tubo curvo a través de la cremallera de la bolsa. El extremo ranurado del tubo (B) pasa primero a través del área (A) de la bolsa. Vea la imagen completa del ensamblaje en la FIG. 4...
Page 24 - LLENADO DE ACEITE: USO INICIAL
24 WWW.SENIXTOOLS.COM LLENADO DE ACEITE: USO INICIAL Utilice un aceite de peso SAE 30 de alta calidad. NO correcto, puede provocar un desgaste prematuro del motor y un fallo. NO rellene en exceso. Consulte el aparato de de combustible. Esta herramienta tiene un motor de tórica esté en su lugar en el...
Page 25 - INSTRUCCIONES DE ARRANQUE; SOPLADOR
25 WWW.SENIXTOOLS.COM OPERACIÓN INSTRUCCIONES DE ARRANQUE INSTRUCCIONES DE PARADA Utilice esta herramienta solo en un área exterior bien ventilada. Los gases de escape de monóxido de carbono accidentalmente la herramienta. Para evitar lesiones graves, el operador y la herramienta deben estar en una ...
Page 26 - CÓMO SUJETAR LA HERRAMIENTA
26 WWW.SENIXTOOLS.COM Fig.12 pantallas, patios, parrillas, porches y jardines. ventanas abiertas o los coches recién lavados. Sople los escombros de forma segura. suelo. OPERACIÓN Póngase en pie en posición de trabajo (Fig. 12). la entrada de aire. del cuerpo. (Fig. 12) CÓMO SUJETAR LA HERRAMIENTA P...
Page 27 - MANTENIMIENTO; MANTENIMIENTO GENERAL; ALMACENAMIENTO DEL PRODUCTO
27 WWW.SENIXTOOLS.COM MANTENIMIENTO MANTENIMIENTO MANTENIMIENTO GENERAL COMBUSTIBLE REEMPLAZO DE LA BUJÍA CAMBIO DEL LUBRICANTE DEL MOTOR NOTA: Vacíe el lubricante mientras el motor esté tibio pero no caliente. El lubricante tibio se vaciará rápidamente y de forma más completa. NOTA: El lubricante u...
Page 28 - SOLUCIÓN DE PROBLEMAS
28 WWW.SENIXTOOLS.COM SOLUCIÓN DE PROBLEMAS SOLUCIÓN DE PROBLEMAS SÍNTOMA POSIBLE CAUSA ACCIONES RECOMENDADAS EL MOTOR NO ARRANCA El depósito de combustible está vacío Llene el depósito de combustible con combustible nuevo La perilla de cebado no se ha Presione la perilla de cebado 10 veces El combu...
Page 29 - PIEZAS
29 WWW.SENIXTOOLS.COM PIEZAS PIEZAS VISTA EN DESPIECE 1 8 9 10 11 12 19 18 17 13 15 16 14 2 3 5 4 7 6 Nº 11 207180200023 Conmutador basculante 1 12 202094000239 1 13 202094000224 Tubo curvo 1 14 199999001291 Bujía 1 15 299010000024 Bolsa de polvo 1 16 202154000006 Tubo curvo 1 17 202155000025 Cerbat...
Page 30 - GARANTÍA
30 WWW.SENIXTOOLS.COM GARANTÍA GARANTÍA GARANTÍA LIMITADA DE TRES AÑOS defectos de materiales o mano de obra en herramientas alimentadas. Los productos defectuosos serán reparados corte, línea o cuchillas, ni cubre el costo de transporte bajo garantía o servicio. consecuentes. Algunos estados y prov...
Page 31 - Manuel d’instructions
Manuel d’instructions Modèle : BLV4QL-M [email protected]CONSERVEZ CE MANUEL POUR TOUTE CONSULTATION ULTÉRIEURE.
Page 32 - SYMBOLES INTERNATIONAUX DE SECURITE; AVERTISSEMENT
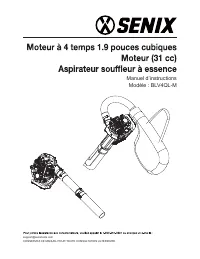
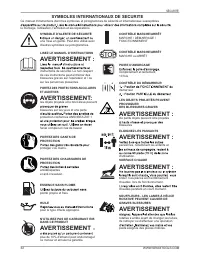
32 WWW.SENIXTOOLS.COM SYMBOLES INTERNATIONAUX DE SECURITE Ce manuel d'instructions décrit les symboles et pictogrammes de sécurité et internationaux susceptibles le montage, l'utilisation, l'entretien et les réparations. SYMBOLE D'ALERTE DE SÉCURITÉ une mise en garde. Peut être utilisé avec d'autres...
Page 34 - AVERTISSEMENTS DE SÉCURITÉ
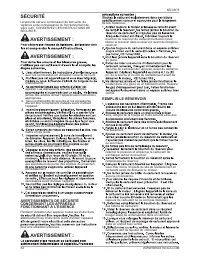
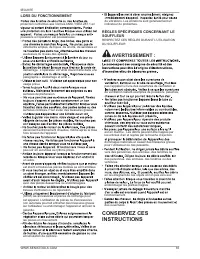
34 WWW.SENIXTOOLS.COM SÉCURITÉ La sécurité est une combinaison de bon sens, de vigilance et de connaissance du fonctionnement de votre outil. CONSERVEZ CES INSTRUCTIONS DE SÉCURITÉ. bouchon du réservoir de carburant lentement pour libérer la pression dans le réservoir avant de remplir le réservoir. ...
Page 35 - LORS DU FONCTIONNEMENT; RÈGLES SPÉCIFIQUES CONCERNANT LE
35 WWW.SENIXTOOLS.COM LORS DU FONCTIONNEMENT SÉCURITÉ protection conformes aux normes ANSI / ISEA Z87.1 en poussière si l'opération est poussiéreuse. vêtements amples, de bijoux, de shorts, de sandales et au-dessus du niveau des épaules. démarrage. L'opérateur et l'unité doivent être dans une paragr...
Page 36 - DESCRIPTION DE VOTRE SOUFFLEUR; EMPLACEMENT DES COMPOSANTS; DONNÉES TECHNIQUES
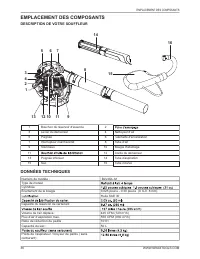
36 WWW.SENIXTOOLS.COM EMPLACEMENT DES COMPOSANTS DESCRIPTION DE VOTRE SOUFFLEUR EMPLACEMENT DES COMPOSANTS 1 Bouchon du réservoir d'essence 2 3 Levier du démarreur 4 Nettoyeur d’air 5 Poignée 6 Gâchette d'accélération 7 Interrupteur marche/arrêt 8 Tube d’air 9 Silencieux 10 Bougie d'allumage 11 12 C...
Page 37 - INSTALLER / ENLEVER LE TUBE DU; ASSEMBLAGE
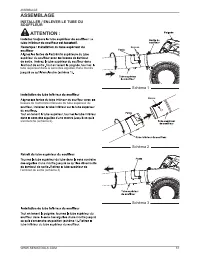
37 WWW.SENIXTOOLS.COM Schéma 1 Schéma 2 Schéma 3 ASSEMBLAGE INSTALLER / ENLEVER LE TUBE DU SOUFFLEUR ASSEMBLAGE tube supérieur dans le sens des aiguilles d'une montre bosses de l'extrémité inférieure du tube supérieur du s'enclenche (schéma 2). Bosse Bosses l’embout de sortie (schéma 3). ATTENTION :
Page 38 - INSTALLER / RETIRER LE TUBE
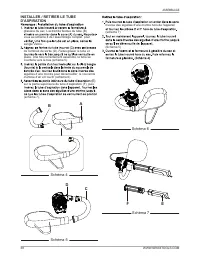
38 WWW.SENIXTOOLS.COM Schéma 4 Schéma 5 Schéma 7 Schéma 6 ASSEMBLAGE INSTALLER / RETIRER LE TUBE D’ASPIRATION glissière du sac. L’extrémité fendue du tube (B) vous au schéma 4 de l’assemblage complet pour sangle Velcro. de l’embout de sortie (D). Faites glisser le tube et place. Une fois correctemen...
Page 39 - UTILISATION; Schéma 8
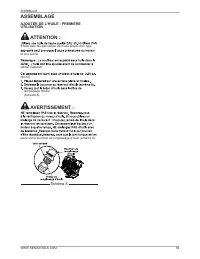
39 WWW.SENIXTOOLS.COM AJOUTER DE L'HUILE : PREMIÈRE UTILISATION d'huile sale. Ne pas utiliser de l’huile propre d’un type et une panne. place sur le bouchon de remplissage d’huile (schéma 8). (60 ml). remplissage d'huile. (Schéma 8) utiliser l'appareil. Schéma 8 ATTENTION : AVERTISSEMENT : ASSEMBLAG...
Page 40 - INSTRUCTIONS DE DÉMARRAGE; DÉMARRER / ARRÊTER LE
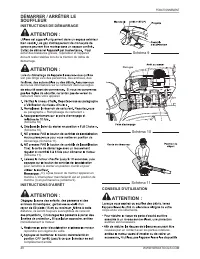
40 WWW.SENIXTOOLS.COM FONCTIONNEMENT INSTRUCTIONS DE DÉMARRAGE INSTRUCTIONS D'ARRÊT éviter des blessures graves, l'opérateur et l'appareil doivent rester stables lors de la traction du câble de démarrage. distance, ils seront toujours susceptibles de recevoir immédiatement le moteur. corps et de vos...
Page 41 - MAINTIEN DE L’APPAREIL
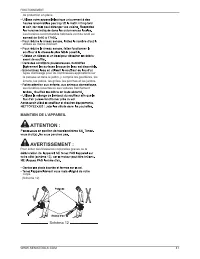
41 WWW.SENIXTOOLS.COM Schéma 12 de protection en place. Les horaires recommandés habituels vont du lundi au utilisés au même moment. tuyau d’arrosage pour de nombreuses applications sur la pelouse et dans le jardin, y compris les gouttières, les écrans, les patios, les grilles, les porches et les ja...
Page 42 - ENTRETIEN
42 WWW.SENIXTOOLS.COM ENTRETIEN ENTRETIEN ENTRETIEN GÉNÉRAL BOUCHON ET RÉSERVOIR DE CARBURANT REMPLACEMENT DE LA BOUGIE CHANGEMENT DE LUBRIFIANT POUR MOTEUR REMARQUE : s'écoulera rapidement et plus complètement. REMARQUE : local pour plus d’informations. détériorées par de nombreux solvants différen...
Page 43 - GUIDE DE DÉPANNAGE
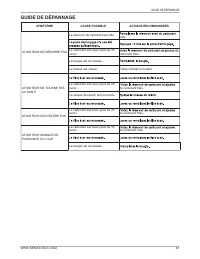
43 WWW.SENIXTOOLS.COM GUIDE DE DÉPANNAGE GUIDE DE DÉPANNAGE SYMPTÔME CAUSE POSSIBLE ACTIONS RECOMMANDÉES LE MOTEUR NE DÉMARRE PAS Le réservoir de carburant est vide. frais. Le carburant est vieux (plus de 30 jours) carburant frais. La bougie est encrassée. Le moteur est chaud. Faites refroidir le mo...
Page 44 - PIÈCES
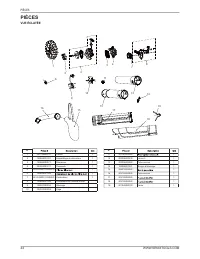
44 WWW.SENIXTOOLS.COM PIÈCES PIÈCES VUE ÉCLATÉE 1 8 9 10 11 12 19 18 17 13 15 16 14 2 3 5 4 7 6 N° 11 207180200023 1 12 202094000239 Lance 2 1 13 202094000224 Tube incurvé 1 14 199999001291 Bougie d'allumage 1 15 299010000024 1 16 202154000006 Tube incurvé 1 17 202155000025 1 18 202155000024 1 19 20...
Page 45 - GARANTIE
45 WWW.SENIXTOOLS.COM GARANTIE GARANTIE GARANTIE LIMITÉE À TROIS ANS cette garantie ne couvre pas les frais de transport du produit pour la garantie ou l'entretien. dommages directs, indirects, accessoires ou consécutifs. Certains états et provinces n'autorisent pas les limitations sur la durée d'un...