Page 3 - CONTENTS
3 CONTENTS Important Warnings 4 Introducing The Appliance 6 Technical Specifications 7 Installation Of Appliance 7 Important Warnings 13 Control Panel 14 Program Types 16 Cooking Recommendations 17 Cooking Table 17 Using The Oven 18 Replacing Oven Lamp 19 Cleaning And Mounting Oven Door 20 Maintenan...
Page 4 - Small children should be kept away.
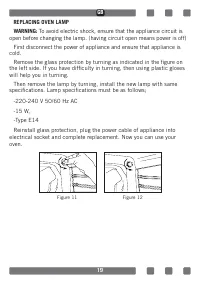
4 IMPORTANT WARNINGS1. WARNING: To avoid electric shock, ensure that the appliance circuit is open before changing the lamp. 2. WARNING: All supply circuit connections must be disconnected before accessing terminals. 3. WARNING: The accessible parts may be hot during use of grid. Children must be ke...
Page 6 - INTRODUCING THE APPLIANCE
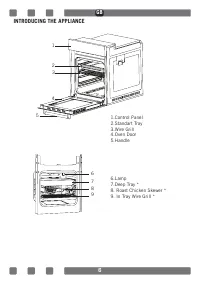
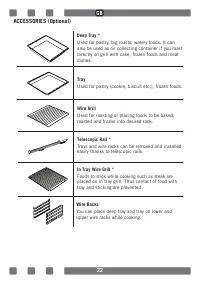
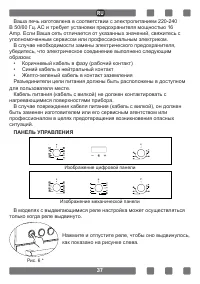
6 INTRODUCING THE APPLIANCE 78 6 9 1.Control Panel 2.Standart Tray 3.Wire Grill 4.Oven Door5.Handle 6.Lamp7.Deep Tray *8. Roast Chicken Skewer *9. In Tray Wire Grill * 1 23 5 4 GB
Page 7 - TECHNICAL SPECIFICATIONS; SPECIFICATIONS; The values provided with the appliance or its accompanying; WARNING: Check for any damage on the product before installing it.
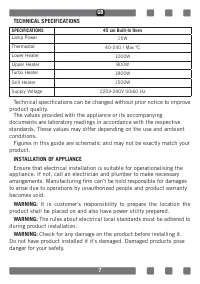
7 TECHNICAL SPECIFICATIONS SPECIFICATIONS 45 cm Built-In Oven Lamp Power 15W Thermostat 40-240 / Max ° C Lower Heater 1000W Upper Heater 800W Turbo Heater 1800W Grill Heater 1500W Supply Voltage 220V-240V 50/60 Hz Technical specifications can be changed without prior notice to improve product qualit...
Page 8 - Important Warnings for Installation:; • Used surfaces, synthetic laminates and adhesives must be heat; WARNING: Do not use door and/or handle to carry or move the product.
8 Important Warnings for Installation: Cooling fan shall take extra steam out and prevent outer surfaces of appliance from overheating during operation of oven. This is a necessary condition for better appliance operation and better cooking.Cooling fan shall continue operation after cooking is finis...
Page 10 - Mounting; Figure 2
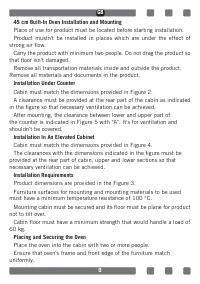
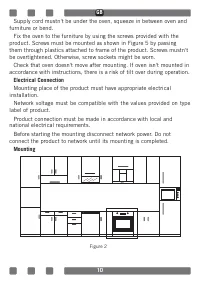
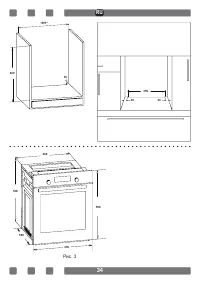
10 Supply cord mustn't be under the oven, squeeze in between oven and furniture or bend. Fix the oven to the furniture by using the screws provided with the product. Screws must be mounted as shown in Figure 5 by passing them through plastics attached to frame of the product. Screws mustn't be overt...
Page 11 - Figure 3
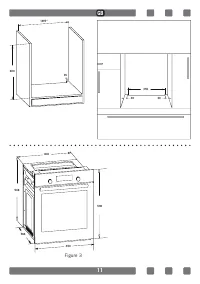
11 560** 415 600 35 355 30 30 Figure 3 408 548 566 450 596 GB
Page 12 - Figure 4
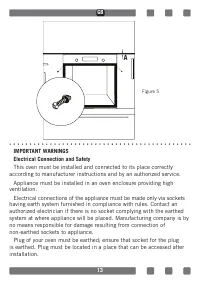
Page 13 - Figure 5
13 IMPORTANT WARNINGSElectrical Connection and SafetyThis oven must be installed and connected to its place correctly according to manufacturer instructions and by an authorized service. Appliance must be installed in an oven enclosure providing high ventilation. Electrical connections of the applia...
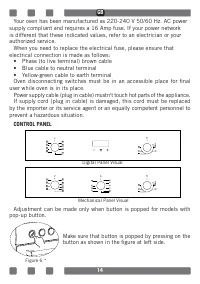
Page 14 - CONTROL PANEL; Digital Panel Visual
14 Your oven has been manufactured as 220-240 V 50/60 Hz. AC power supply compliant and requires a 16 Amp fuse. If your power network is different that these indicated values, refer to an electrician or your authorized service. When you need to replace the electrical fuse, please ensure that electri...
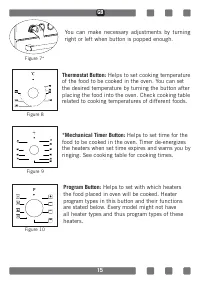
Page 15 - Figure 8
15 You can make necessary adjustments by turning right or left when button is popped enough. Thermostat Button: Helps to set cooking temperature of the food to be cooked in the oven. You can set the desired temperature by turning the button after placing the food into the oven. Check cooking table r...
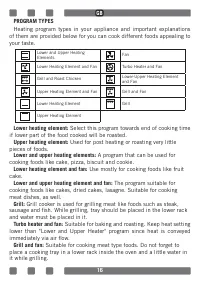
Page 16 - if lower part of the food cooked will be roasted.; Lower and upper heating elements: A program that can be used for
16 PROGRAM TYPESHeating program types in your appliance and important explanations of them are provided below for you can cook different foods appealing to your taste. Lower heating element: Select this program towards end of cooking time if lower part of the food cooked will be roasted. Upper heati...
Page 17 - * Do not preheat. First half of cooking time is recommended to be at
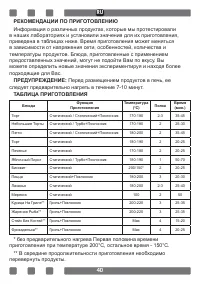
17 COOKING RECOMMENDATIONSYou can find in the following table the information of food types which we tested and identified their cooking values in our labs. Cooking times can vary depending on the network voltage, quality of material to be cooked, quantity and temperature. Dishes to cook by using th...
Page 18 - Remove dust and package residues by wiping inside of the oven; cook the food to start cooking.; You can set cooking time to any desired time by using the button at
18 USING THE OVENInitial Use of OvenHere are the things you must do at first use of your oven after making its necessary connections as per instructions: 1. Remove labels or accessories attached inside the oven. If any, take out the protective folio on front side of the appliance. 2. Remove dust and...
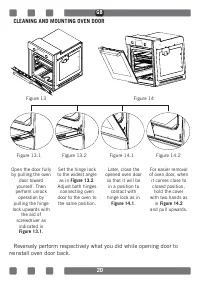
Page 20 - CLEANING AND MOUNTING OVEN DOOR; reinstall oven door back.
20 CLEANING AND MOUNTING OVEN DOOR Reversely perform respectively what you did while opening door to reinstall oven door back. Figure 13 Figure 13.1 Figure 13.2 Figure 14.1 Figure 14.2 Figure 14 Open the door fully by pulling the oven door toward yourself. Then perform unlock operation by pulling th...
Page 24 - Уважаемый покупатель,
24 Уважаемый покупатель, мы благодарим Вас за доверие, оказанное данному продукту. Наша цель - обеспечить для Вас наиболее производительное использование данного продукта, который был произведен в соответствии с нашим пониманием качества, на современных заводах, в чистой рабочей атмосфере и без вред...
Page 25 - СОДЕРЖАНИЕ
25 СОДЕРЖАНИЕ Важные Примечания 26 Описание Прибора 29 Технические Характеристики 30 Установка Прибора 30 Важные Предупреждения 36 Панель Управления 37 Виды Программ 39 Рекомендации По Приготовлению 40 Таблица Приготовления 40 Эксплуатация 41 Замена Лампы 42 Чистка И Установка Дверцы 43 Уход И Чистк...
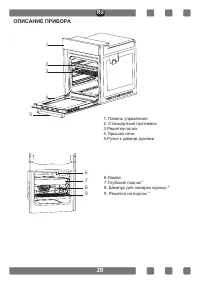
Page 29 - ОПИСАНИЕ ПРИБОРА
29 ОПИСАНИЕ ПРИБОРА 78 6 9 1. Панель управления 2. Стандартный противень 3.Решетка-полка 4. Крышка печи 5.Ручка к дверце духовки 6.Лампа 7.Глубокий поднос* 8. Шампур для зажарки курицы * 9. Решетка на поднос * 1 23 5 4 RU
Page 30 - ТЕХНИЧЕСКИЕ ХАРАКТЕРИСТИКИ; УСТАНОВКА ПРИБОРА
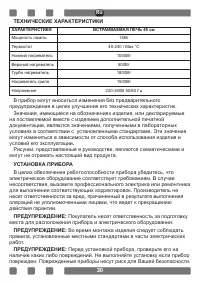
30 ТЕХНИЧЕСКИЕ ХАРАКТЕРИСТИКИ ХАРАКТЕРИСТИКИ ВСТРАИВАЕМАЯ ПЕЧЬ 45 см Мощность лампы 15Вт Термостат 40-240 / Max °C Нижний нагреватель 1000Вт Верхний нагреватель 800Вт Турбо нагреватель 1800Вт Нагреватель гриля 1500Вт Напряжение 220-240B 50/60 Гц В прибор могут вноситься изменения без предварительног...
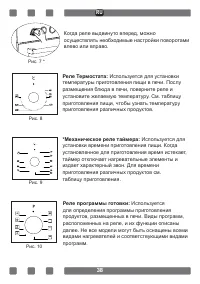
Page 37 - ПАНЕЛЬ УПРАВЛЕНИЯ; Изображение цифровой панели
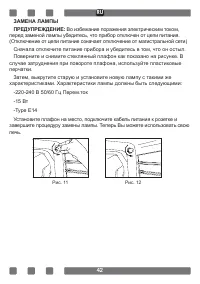
37 Ваша печь изготовлена в соответствии с электропитанием 220-240 B 50/60 Гц. AC и требует установки предохранителя мощностью 16 Amp. Если Ваша сеть отличается от указанных значений, свяжитесь с уполномоченным сервисом или профессиональным электриком. В случае необходимости замены электрического пре...
Page 38 - Реле программы готовки:
38 Когда реле выдвинуто вперед, можно осуществлять необходимые настройки поворотами влево или вправо. Реле Термостата: Используется для установки температуры приготовления пищи в печи. Послу размещения блюда в печи, поверните реле и установите желаемую температуру. См. таблицу приготовления пищи, чт...
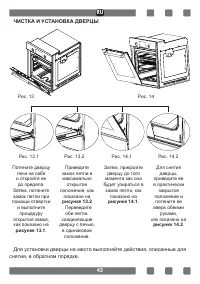
Page 43 - ЧИСТКА И УСТАНОВКА ДВЕРЦЫ; Для установки дверцы на место выполняйте действия, описанные для
43 ЧИСТКА И УСТАНОВКА ДВЕРЦЫ Для установки дверцы на место выполняйте действия, описанные для снятия, в обратном порядке. Рис. 13 Рис. 13.1 Рис. 13.2 Рис. 14.1 Рис. 14.2 Рис. 14 Потяните дверцу печи на себя и откройте ее до предела. Затем, потяните замок петли при помощи отвертки и выполните процеду...
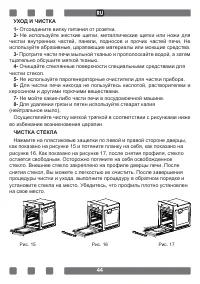
Page 44 - ЧИСТКА СТЕКЛА
44 УХОД И ЧИСТКА1- Отсоедините вилку питания от розетки. 2- Не используйте жесткие щетки, металлические щетки или ножи для чистки внутренних частей, панели, подносов и прочих частей печи. Не используйте абразивные, царапающие материалы или моющие средства. 3- Протрите части печи мыльной тканью и про...