Ryobi AC04152- User Manual
Ryobi AC04152– User Manual, read for free online in PDF format. We hope this helps you resolve any issues you may have. If you have further questions, please contact us through the contact form.
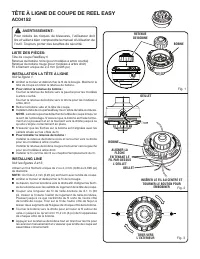


Table of Contents:
- Page 2 – TÊTE À LIGNE DE COUPE DE rEEL Easy; INsTaLLaTION La TÊTE À LIGNE; InstallIng lIne
- Page 3 – CaBeZal del hIlO de Reel easy II; InstalaCIÓn del CaBeZal; InstalaCIÓn del hIlO
- Page 4 – TECHTrONIC INDUsTrIEs NOrTH aMErICa, INC.
Reel easy II stRIng head
aC04152
PaCKIng lIst:
ReelEasy II String Head
Black Spool Retainer (for curved shaft models)
Red Spool Retainer (for straight shaft models)
.095 in. diameter monofilament line
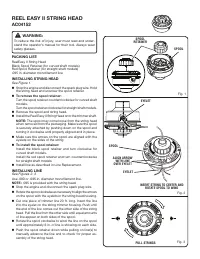
InstallIng stRIng head
See Figure 1.
Stop the engine and disconnect the spark plug wire. Hold
the string head and unscrew the spool retainer.
to remove the spool retainer:
Turn the spool retainer counterclockwise for curved shaft
models.
Turn the spool retainer clockwise for straight shaft models.
Remove the spool and string head.
Install the Reel Easy II String Head onto the trimmer shaft.
nOte:
The spool may come loose from the string head
when removed from the packaging. Make sure the spool
is securely attached by pushing down on the spool and
turning it clockwise until properly aligned and in place.
Make sure the arrows on the spool are aligned with the
eyelets on the sides of the string.
to install the spool retainer:
Install the black spool retainer and turn clockwise for
curved shaft models.
Install the red spool retainer and turn counterclockwise
for straight shaft models.
Install line as described in Line Replacement.
InstallIng lIne
See Figures 2- 3.
Use .080 or .095 in. diameter monofilament line.
nOte:
.095 is provided with the string head.
Stop the engine and disconnect the spark plug wire.
Rotate the spool clockwise as necessary to align the arrows
on the spool with the eyelets in the string head housing.
Cut one piece of trimmer line 20 ft. long. Insert the line
into the eyelet on the string trimmer housing. Push until
the end of the line comes out the other side of the string
head. Pull the line from the other side until equal amounts
of line appear on both sides of the spool.
Rotate the spool clockwise to wind the line on the spool
until approximately 6 in. of line is showing on each side.
Push the spool retainer down while pulling on line(s) to
manually advance the line and to check for proper as-
sembly of the string head.
Fig. 1
Fig. 2
spool
retainer
spool
pUll strinGs
aliGn arrow
witH line
oVer eYelet
insert strinG to center and
rotate spool to wind
eYelet
eYelet
Fig. 3
WaRnIng:
To reduce the risk of injury, user must read and under-
stand the operator’s manual for their tool. Always wear
safety glasses.
spool
"Loading the manual" means you need to wait until the file loads and becomes available for online reading. Some manuals are very large, and the time they take to appear depends on your internet speed.
Summary
TÊTE À LIGNE DE COUPE DE rEEL Easy aC04152 lIste des PIèCes: Tête de coupe RealEasy II Retenue de bobine noire (pour modèles à arbre courbé) Retenue de bobine rouge (pour modèles à arbre droit) Fil à filament unique de 2,4 mm (0,095 po) INsTaLLaTION La TÊTE À LIGNE Voir la figure 1. Arrêter le mot...
CaBeZal del hIlO de Reel easy II aC04152 PaCKIng lIst: Cabezal de hilo ReelEasy IIRetén de carrete negro (para modelos de eje curvo)Retén de carrete rojo (para modelos de eje recto)Línea monofilamento con un diámetro de 2,4 mm (0,095 pulg.) InstalaCIÓn del CaBeZal Vea la figura 1. Apague el motor...
TECHTrONIC INDUsTrIEs NOrTH aMErICa, INC. 1428 Pearman Dairy Road Anderson, SC 29625 Phone 1-800-860-4050 www.ryobitools.com 99000035312-6-12 (REV:01)