Ryobi AC04151T- User Manual

Ryobi AC04151T– User Manual, read for free online in PDF format. We hope this helps you resolve any issues you may have. If you have further questions, please contact us through the contact form.

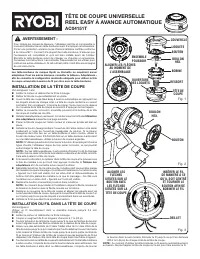


Table of Contents:
- Page 2 – adaptor Chart
- Page 3 – INSTALLATION DE LA TÊTE DE COUPE; INSTALLATION DU FIL DANS LA TÊTE DE COUPE; TÊTE DE COUPE UNIVERSELLE
- Page 4 – dÉpannage; teChtroniC industries; tableau « adaptateurs »
- Page 5 – instalaCiÓn del CaBeZal; instalaCiÓn del hilo; CaBeZal de hilo universal Con
- Page 6 – soluCiÓn de proBleMas; tabla de adaptadores
universal auto feed
reel easy string head
aC04151t
Warning:
To reduce the risk of injury, user must read and understand the
operator’s manual for their string trimmer before using this acces-
sory. Wear eye protection with side shields marked to comply with
Z87.1. Fits most string trimmers. Ensure compatibility and proper
fit before using this accessory. Turn off the string trimmer before
changing or adjusting accessories. Save these instructions. Refer
to them frequently and use them to instruct other users. If you loan
someone this tool, loan them these instructions also.
When using ryobi and homelite string trimmers, no adaptors are
needed. for other brands, see the adaptor Chart for the proper
hardware configuration needed to use the universal Bump feed
string head with your trimmer.
installing string head
See Figures 1 - 2.
Stop the engine and disconnect the spark plug wire.
Remove currently installed string head.
Open the Auto Feed Reel Easy String Head by depressing the
latches on each side. The contents of the string head are spring
loaded, so keep your other hand over the string head cover while
depressing the latches.
Remove the string head cover, knob, lifter assembly, and spool and
set aside.
Install adaptor pieces as needed. See
using the adaptors on the
next page.
Place the string head on the drive shaft. Make sure the string head
is fully seated.
Install the hex bolt into the opening on the drive shaft and secure
using the hex-shaped opening in the knob to tighten. Use the black
bolt if installing on a curved shaft trimmer or silver bolt if installing
on a straight shaft trimmer or brushcutter.
note: Only use the knob to tighten the bolt. The use of other tools
may allow overtightening of the bolt, which could damage the string
head.
note: For the brushcutter, the gear head locking tool can be
inserted through the slot in the flanged washer and gear head
to
help hold the string head still.
If removed, replace the spring into the string head and push down
to seat. See
adaptor Chart for correct spring to use.
Reinstall the spool. For curved shaft trimmers, the spool should be
placed so “This side out for curved shaft” is visible. For straight
shaft trimmers or brushcutters, the spool should be placed so “This
side out for straight shaft” is visible.
Replace the knob and lifter assembly in the spool.
note: When installing, align the arrow molded on the underside
of the knob to the arrow molded on the spool.
Replace the string head cover, aligning latches with openings in
the string head. Press cover and string head together until both
latches snap into openings securely.
Install string as described in the next section.
installing string
See Figure 3.
Use up to .095 in. diameter monofilament string.
Stop the engine and disconnect the spark plug wire.
Cut one piece of string approximately 22 ft. in length.
Rotate knob on string head until arrows on knob align with arrows
on top of string head.
Insert one end of string into eyelet located on the side of the string
head and push until string comes out through eyelet on the other
Fig. 2
Fig. 1
cover
knob
SPooL
SPrInG
StrInG
head
aLIGn arrowS
when aSSembLInG
knob
hex boLt
LatcheS
Latch
oPenInG
hex boLt
aLIGn
arrowS on
knob wIth
arrowS
on StrInG
head
InSert
StrInG to
center
and rotate
knob to
wInd
eyeLet
Fig. 3
side. Continue to push string through the string head until the middle
section of the string is inside the string head and string outside the
string head is evenly divided on each side.
LIfter
aSSembLy
"Loading the manual" means you need to wait until the file loads and becomes available for online reading. Some manuals are very large, and the time they take to appear depends on your internet speed.
Other Manuals for Ryobi AC04151T
Summary
teChtroniC industries north aMeriCa, inC. 1428 Pearman Dairy Road Anderson, SC 29625 Phone 1-800-860-4050 www.ryobitools.com 987000-6253-31-09 (REV:00) Rotate the knob on the string head to wind the string. If using a curved shaft trimmer, knob should be rotated counterclockwise. If using a straig...
avertisseMent : Pour réduire les risques de blessure, l’utilisateur doit lire et comprendre le manuel d’utilisation de son taille-bordures avant d’employer cet accessoire. Porter une protection oculaire munie d’écrans latéraux certifiée conforme à la norme Z87.1. Convient à la plupart des taille-bor...
dÉpannage Si le fil n’avance pas automatiquement, il peut être tordu ou coincé à l’intérieur de la tête de coupe. Arrêter le taille-bordures, retirer le fil et le réinstaller. Si le fil n’avance pas correctement, s’assurer que la bobine et l’ensemble poussoir sont installés correctement et que l...