Page 2 - Rotisserie; Table of Contents; Heat Shield / Silicon Door Tie
Rotisserie Table of Contents Important Safeguards/ Cleaning & Care .................................................................. 3-5 Rotisserie Model Specs ............................................................................................... 6 Unpacking Rotisserie ...................
Page 3 - IMPORTANT SAFEGUARDS; precautions should always be taken, including the following:
5500 Series Rotisserie IMPORTANT SAFEGUARDS These items: Heat Shield, Non-stick Grate Cover and Drip Tray must always be in place when using your Rotisserie. When using electrical appliances, basic safety precautions should always be taken, including the following: 1. VERY IMPORTANT: Read all instru...
Page 4 - THIS PRODUCT IS FOR HOUSEHOLD USE ONLY
5500 Series Rotisserie mum care when removing Drip Tray or disposing of hot grease or other hot liquids. 16. When using the Rotisserie Baskets, be sure no small bones or other food can fall between or extend beyond the wires and catch on the Non-stick Grate Cover or Heating Element or anything else ...
Page 5 - Please read and follow all warranty and instructional materi; ALWAYS USE CAUTION AND CHECK ON YOUR; Cleaning and Caring for your Rotisserie; ance bulb when needed.
5500 Series Rotisserie IMPORTANT: Please read and follow all warranty and instructional materi als carefully. For more tips visit YouTube.com/RoncoProducts. Make sure food safely rotates without touching the Heating Element. ALWAYS USE CAUTION AND CHECK ON YOUR ROTISSERIE FROM TIME TO TIME. It is h...
Page 6 - ROTISSERIE MODEL SPECS; NOTE: The model number is located on the back of your Showtime; UNPACKING ROTISSERIE; ij; Call the Order Desk to order supplies; Visit us online for more information and
5500 Series Rotisserie ROTISSERIE MODEL SPECS 5500 Series • Dimensions: 17. 75" W x 13.75" H x 15 .. 25" D • 12 lb Cooking Capacity• 120 Volts AC / 60 Hz / 1250 Watts NOTE: The model number is located on the back of your Showtime ® Rotisserie. UNPACKING ROTISSERIE FOLO �� ��� t � ucw •:c...
Page 7 - PARTS INCLUDED; How to Assemble; Door is shipped in place. If it is taken off, put; it back on by inserting pin on right side first,
PARTS INCLUDED Glass Door Non-stick Spit Rod Assembly (Gear Wheel and Spit Rods) Carving Platform (Also used to load the Spit Rod Assembly) How to Assemble Rotisserie Non-stick Rotisserie Basket Instructions & Recipes Door is shipped in place. If it is taken off, put f"rJ 5500 Series Rotisse...
Page 8 - Rod Assembly always tilt this end upward so it won't fall off.
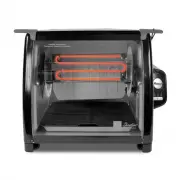
5500 Series Rotisserie INSTRUCTIONS Never operate without Heat Shield in place behind the Heating Element. Insert it from the top. Discoloration over time is normal. From time to time you can remove it and use steel wool to remove and clean any grease buildup. It is also dishwasher safe. Non-stick D...
Page 9 - Rotisserie Basket; Perfect for hamburgers, chicken pieces, vegetables, whole fish
5500 Series Rotisserie CAUTION: Keep at least 8" clearance all around from walls, cabinets and other objects when using the rotisserie to prevent heat damage. Don't put charcoal briquettes, hickory chips or anything else in the machine that is not authorized by HD Schulman lnt'I Trading LLC. Do ...
Page 10 - want to use a thicker oven glove or mitt.; How to Tie Chicken; the Spit Rods. It is very important when using your Showtime
5500 Series Rotisserie Always use CAUTION with Hot Food and Metal Parts. The Food, Basket and the Spit Assembly get HOT! Always wear protective gloves when removing the Basket. If you feel the Oven Gloves are not insulated enough to adequately protect you from the hot surfaces you are handling, set ...
Page 11 - How to tie a chicken using 2 ties; How to Tie Turkey; Stuffing Rotisserie poultry is not recommended.; MAKE FOUR OR FIVE TIES WITH HEAVY STRING OR TWINE!
How to tie a chicken using 2 ties Using two ties, shorten them both and put one over the wings and one over the legs. It's very easy. You can also use several Food Ties to secure any bird. If you run out of Food Ties you can use butcher's twine until you can order more Food Ties. How to Tie Turkey 5...
Page 12 - Placing Poultry on the Spit Rod Assembly; There are two ways to load the Spit Rods.; together when pushing the Spit Rods through the bird.); weight is evenly distributed.
Showtime ® Rotisserie Placing Poultry on the Spit Rod Assembly There are two ways to load the Spit Rods. Keep hands clear of pointed rods as they exit from the meat. Piercing Poultry with Rods Hold the tied poultry or meat down securely with one hand while firmly pushing the Spit Rods into the bird,...
Page 13 - A or B Cooking Position?; INSTRUCTIONS: A or B Cooking Position? 13
5500 Series Rotisserie After the food is held securely on the Spit Rods, put the other Gear Wheel in place. The Spit Assembly can now be placed in the Rest Area just inside the Door. Then move on to A or B. ---......... Rest Area You can rest your loaded Spit Rods and easily adjust your food and add...
Page 14 - Loading the Spit Rod Assembly; Trim off excess fat and skin or loose pieces; Roast; Also put the Spit Rods through meat between the bones.; Rib Bones Always to the Left and Parallel to; When loading a rib roast start through
5500 Series Rotisserie Loading the Spit Rod Assembly IMPORTANT: Food must be centered. Put the Spit Rods through center of the food so it will be balanced and the food does not touch the Heating Element as it rotates. This is important for large foods like turkeys, standing rib roasts, 2 chickens si...
Page 15 - Dial Timer; Red Light Heat Indicator - Timer must be ON for the heat to be; NO HEAT: Rotation without heat. Use for up to
5500 Series Rotisserie Dial Timer 5500 Series Timer Automatically shuts off after the allotted time and a bell sounds. Use the Timer to turn on and off all functions. Always turn to OFF (if the unit is still running) before removing food. Red Light Heat Indicator - Timer must be ON for the heat to b...
Page 17 - Estimated Time and Temperature Chart; POULTRY; LAMB
Showtime e Rotisserie Estimated Time and Temperature Chart The limes and temperatures given in this booklet are only a guide for your reference and are based on foods at room temperature (not cold foods). Times can vary due to differences in meat shape, size, and the amount of fat and bona. Also tim...
Page 18 - AVAILABLE ACCESSORIES; Liquid Flavor Injector; ) Remove the Locking Tip; How to Load Injector; Important Safeguards; If you inject against bone, it will seem; KEEP AWAY FROM CHILDREN.
5500 Series Rotisserie AVAILABLE ACCESSORIES Liquid Flavor Injector (Optional Accessory) For poultry meat and seafood, just add your favorite liquid, or one of Ron's marinades, for the best flavor you've ever had. Mix with water, juice, wine, soy sauce, vinegar, olive oil, etc. Be creative, use the ...
Page 19 - Solid Flavor Injector; Wl; ) Load the Expanding Tip with; don't leave the Insert
5500 Series Rotisserie Solid Flavor Injector (Optional Accessory) This expanding tip injector can be loaded with pieces of garlic or diced onions, herbs, spices, diced peppers, fruit pieces or diced ham for flavoring. For pastries try inserting chocolate chips, sprinkles, nuts and other seasonings. ...
Page 20 - Kabob Rods; Set the Spit Rod Assembly in the Rest Area; Dual Heating Tray with Lid; Defrosts and heats frozen vegetables as
5500 Series Rotisserie Kabob Rods (Optional Accessory) Set the Spit Rod Assembly in the Rest Area Oust inside the machine). Load the Kabobs with food then insert them into the holes on the gear wheels. Start with sharp end on the left side, then load and snap the Kabob with the Auto Turn Mechanism (...
Page 22 - Round BBQ Rib Basket (Optional Accessory); 2 ACCESSORIES; Starting with the C Hook end, attach the
5500 Series Rotisserie Round BBQ Rib Basket (Optional Accessory) � C Hook 22 ACCESSORIES Stair Hook 1. Place baby back or spare ribs in boiling water for 15 minutes. Drain ribs and let them cool. This step makes the ribs more pliable and tender and reduces fat. When cooled, cover both sides of the r...
Page 23 - CAUTIONS
5500 Series Rotisserie CAUTIONS A Never use any aerosol sprays of any kind inside the unit. A Never cook foods larger than recommended in the booklet for your Rotisserie. A Grease Flicker? Foods with high fat content can produce a small flicker of flame as fat spatters off the Heating Element. This ...
Page 24 - Helpful Hints; a roast beef or a whole turkey during; Place foil inside on top
5500 Series Rotisserie Helpful Hints Use a strip of aluminum foil on your counter top under the front door opening to collect any grease or moisture from a roast beef or a whole turkey during cooking. Burnt Edges on Food? You can put a small strip of aluminum foil on the top and bottom edges inside ...
Page 25 - Meal Suggestions; NOTE: The model number is located on
5500 Series Rotisserie Meal Suggestions Here is a list of food that requires little prep to have a fantastic meal with your Showtime ® Rotisserie. Poultry: 1 or 2 Seasoned Chickens Turkey - up to 12 lbs. Cornish Game Hens or Ducks Wild Game - Venison, Goat , Fowl Spicy Chicken Wings (basket) Lemon H...
Page 26 - Recipes
5500 Series Rotisserie Recipes Roast Chicken with Lemon Herb Rub One 3½ to 4 pound Whole Chicken Rind of 2 Lemons, minced 5 Garlic Cloves, minced 1 tablespoon Dried Thyme, finely crumbled 2 teaspoons Dried Rosemary, finely crumbled 2 teaspoons Dried Sage Leaves, finely crumbled Salt and freshly Grou...
Page 30 - Two Original Style Roast Chickens; Two 31⁄2 to 4 pound whole chicken; Easy Steps to Great Rotisserie Chicken; See page 1 O for more
5500 Series Rotisserie Two Original Style Roast Chickens Two 3½ to 4 pound whole chicken 2 teaspoons each of Salt and Paprika 1 teaspoon each of Onion Powder, Dried T hyme, White Pepper ½ teaspoon each of Cayenne Pepper, Black Pepper, Garlic Powder Salt and fresh Ground Pepper 2 Onions, quartered In...
Page 32 - Safety Warning; ROTISSERIE; THE FOLLOWING MUST BE FOLLOWED IN ORDER TO PREVENT YOUR
Safety Warning CAREFULLY FOLLOW THE INSTRUCTIONS FOR SET UP & USE OF YOUR RONCO SHOWTIME ROTISSERIE • Ronco Showtime Rotisserie Product Manuals Can Be Accessed at Ronco.com Using th e Dropdown Menu for “SHOP” or “CUSTOMER CARE” • Customers Should Read the Complete Product Manual Prior to Use • Y...
Page 33 - NINETY DAY LIMITED WARRANTY
HD Schulman Int’l Trading LLC 1108 Lavaca Street Suite 110-101 Austin,TX78701 1(512)609-8276 Copyright@2020 by HD Schulman Int’l Trading LLC. All Rights Reserved. Manufactured under U.S.patents: 09/651,804;09/569,163;09/891,019;10/021,406;10/176,697; 10/945,232;11/274,518;11/274,516;12/025,530 Forei...