Page 3 - TABLE OF CONTENTS
1 TABLE OF CONTENTS RANGE SAFETY ................................................................................................... 2 The Anti-tip Bracket ...................................................................................................... 4 PARTS AND FEATURES .......................
Page 4 - Dual Fuel Range; RANGE SAFETY; Your safety and the safety of others are very important.; DANGER
Dual Fuel Range 2 RANGE SAFETY Your safety and the safety of others are very important. We have provided many important safety messages in this manual and on your appliance. Always read and obey all safety messages. DANGER WARNING CAUTION This is the safety alert symbol.This symbol alerts you to pot...
Page 5 - WARNING; Fire Hazard
3 WARNING Fire Hazard explosion may result causing property damage, personal injury or death. the vicinity of this or any other appliance. - WHAT TO DO IF YOU SMELL GAS • Do not try to light any appliance. • Do not touch any electrical switch. • Do not use any phone in your building. • Clear the roo...
Page 6 - Tip Over Hazard; to children and adults.
Dual Fuel Range 4 THE ANTI-TIP BRACKET WARNING Tip Over Hazard A child or adult can tip the range and be killed.Connect anti-tip bracket to rear range foot.Reconnect the anti-tip bracket, if the range is moved.See the installation instructions for details.Failure to follow these instructions can res...
Page 7 - WARNING: NEVER use this
5 IMPORTANT SAFETY INSTRUCTIONS WARNING: To reduce the risk of fire, elecrical shock, injury to persons, or damage when using the range, follow basic precautions, including the following: • WARNING: TO REDUCE THE RISK OF TIPPING OF THE RANGE, THE RANGE MUST BE SECURED BY PROPERLY INSTALLED ANTI-TIP ...
Page 8 - IMPORTANT SAFETY
Dual Fuel Range 6 IMPORTANT SAFETY INSTRUCTIONS • DO NOT TOUCH SURFACE UNITS OR AREAS NEAR UNITS – Surface units may be hot even though they are dark in color. Areas near surface units may become hot enough to cause burns. During and after use, do not touch, or let clothing or other flammable materi...
Page 9 - For self-cleaning ranges –; READ AND SAVE THESE
7 IMPORTANT SAFETY INSTRUCTIONS • Proper Installation – The range, when installed, must be electrically grounded in accordance with local codes or, in the absence of local codes, with the National Electrical Code, ANSI/NFPA 70. In Canada, the range must be electrically grounded in accordance with Ca...
Page 10 - PARTS AND FEATURES
Dual Fuel Range 8 PARTS AND FEATURES This manual covers several different models. The range you have purchased may have some or all of the items listed. The locations and appearances of the features shown here may not match those of your model. a b cd i j efg h l l k m a Backsplash b Burner Grates c...
Page 11 - Accessory
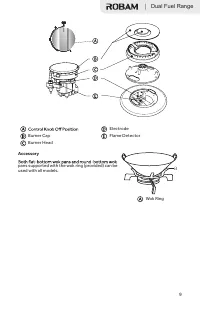
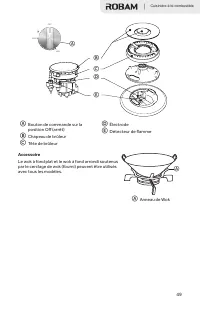
Dual Fuel Range 9 Burner Cap Burner Head ElectrodeFlame Detector Accessory pans supported with the wok ring (provided) can be used with all models. a Wok Ring
Page 12 - CONTROL PANEL; DISPLAY; CANCEL
Dual Fuel Range 10 CONTROL PANEL Front Left BurnerRear Left BurnerCenter BurnerOven ModesCook TimeStartRear Right Burner Front Right BurnerConvection ConversionConvection ModesDisplaySettingsStart TimeCancel DISPLAY appear on the display. See “Clock” in the “Settings” section to set time-of-day. Whe...
Page 13 - START TIME; Food Poisoning Hazard; OVEN LIGHTS; NOTE: The oven lights will not come on during the Self-Clean cycle.
11 NOTES: • Cook Time can be set in hours or minutes up to 11 hours and 59 minutes. • To change the cook time during cooking, press CANCEL. Enter the new cook time and press START. • At the end of the set cook time, the oven will turn off automatically, the alert tone will sound, and “Cooking Comple...
Page 14 - TIMER; FAHRENHEIT AND CELSIUS; Number of Tones
Dual Fuel Range 12 TIMER The Timer can be set in hours or minutes up to 11 hours and 59 minutes, and counts down the set time. NOTES: • The Timer does not start or stop the oven. • A reminder beep will sound until the Timer is canceled. To Set the Timer :1. Press TIMER. “Set TIMER” will appear in th...
Page 15 - To Adjust Sound Volume:; CLOCK
Dual Fuel Range 13 1. Press SETTINGS. Options will appear in the display. 2. Press 3 on the number keypad. 3. Press “1” on the number keypad to turn OFF the sound. 4. Press SET 5. Press SETTINGS, and then follow the display prompts to return the sound to On. To Adjust Sound Volume: CLOCK To Set the ...
Page 16 - SABBATH MODE; NOTE: Sabbath mode cannot be set when the oven is On. The oven will not; Only the Cancel control is functional.
Dual Fuel Range 14 SABBATH MODE The Sabbath function is designed for those whose religious observances require that certain features and modes are disabled. The range is factory preset with Sabbath Mode Off. To Turn On/Off Sabbath mode:1. Make sure the oven is turned Off, and the meat probe is not p...
Page 17 - CONTROL LOCK
15 LANGUAGE The Language is factory preset to English but can be changed to French. To Change the Language to French:1. Press SETTINGS. Options will appear the text display area. Press 10 in the number keypad, and “LANGUAGE” and “ENGLISH1. French 2” will appear in the display. 2. Press “1” in the nu...
Page 18 - COOKTOP USE; IGNITION AND OPERATION OF THE BURNERS; POWER FAILURE; COOKWARE; MATCH PAN DIAMETER TO FLAME SIZE
Dual Fuel Range 16 COOKTOP USE Read the instructions before installing or using this appliance. 1. This appliance shall be installed in accordance with the regulations in force and only used in a well-ventilated space. 2. The use of a gas-cooking appliance results in the production of heat and moist...
Page 19 - Burner
17 USE BALANCED PANS Pans must sit level on the cooktop grate without rocking. Center the pan over the burner. USE A LID THAT FITS PROPERLY A well-fitting lid helps shorten the cooking time. Flat, heavy bottom pans provide even heat and stability. BALANCED PAN UNBALANCED PAN CONVEX (ROUNDED) CONCAVE...
Page 20 - OVEN USE; OVEN TEMPERATURE CONTROL; COOKS FOOD; OVEN MODES; BAKE; General Guidelines
Dual Fuel Range 18 OVEN USE OVEN TEMPERATURE CONTROL The oven provides accurate temperatures; however, it may cook faster or slower than your previous oven. The temperature calibration can be adjusted. It can be changed in degrees Fahrenheit or degrees Celsius. A minus sign means the oven will be co...
Page 21 - Bake Chart
19 • Use metal bake ware (with or without a non stick finish), heatproof glass, glass ceramic, pottery or other utensils suitable for the oven. • When using heatproof glass, reduce temperature by 25°F (15°C) from recommended temperature. • Use baking sheets with or without sides or jelly roll pans. ...
Page 22 - BROIL
Dual Fuel Range 20 NOTES: • The temperature may be changed at any time during cooking. Press CANCEL to clear the settings. Select oven mode, then enter the desired temperature by pressing the number keypad, and then press START. • After selecting an Oven Mode and Temperature, you have the option to ...
Page 23 - Once START has been pressed, “Broil” will appear in the display.; “WARM” will appear in the display, once Start is pressed.
21 6. Once START has been pressed, “Broil” will appear in the display. NOTES: • The broil temperature can be changed at any time during cooking. Press CANCEL to clear the settings. Select oven mode, then enter the desired temperature by pressing the number keypad, and then press START. • After selec...
Page 24 - CONVECTION MODES; CONVECTION FAN
Dual Fuel Range 22 3. Press START, if you wish to Proof dough at 100°F (38°C). OR Enter the desired temperature by pressing the number keypad, and then press START. The temperature can be set from 80°F (27°C) to 120°F (49°C). NOTE: After selecting an Oven Mode and Temperature, you have the option to...
Page 26 - Temperatures have been reduced in this chart.
Dual Fuel Range 24 Temperatures have been reduced in this chart. FOOD ITEM RACK POSITION TEMP. °F (°C) (PREHEATED OVEN) TIME (MIN) CakeCupcakesBundt CakeAngel Food 211 350 (175)350 (175)350 (175) 19-2240-4535-39 Pie2 crust, fresh, 9"2 crust, frozen fruit, 9" 22 375-400 (190-205) 375 (190) 45...
Page 27 - CONVECTION BROIL
25 CONVECTION BROIL General Guidelines • Place rack in the required position needed before turning on the oven. • Use Convection Broil mode with the oven door closed. • When convection broiling, enter your normal broiling temperature. • Do not preheat oven. • Use the 2-piece broil pan. • Turn meats ...
Page 28 - CONVECTION ROAST
Dual Fuel Range 26 • After selecting an Oven Mode and Temperature, you have the option to set a Cook Time and Start Time before pressing START. See “Cook Time” and “Start Time.” 4. Press START. “convect broil” will be displayed.5. Press CANCEL when cooking is finished, and then remove food from the ...
Page 29 - Press CANCEL when finished, and then remove food from the oven.
27 MEATS WEIGHT (lb) OVEN TEMP. °F (°C) RACK POSITION TIME (min. per lb) INTERNAL TEMP. °F (°C) PoultryChicken whole 3-4 375 (190) 2 18-21 180 (82) Turkey, not stuffed 12-15 325 (160) 1 10-14 180 (82) Turkey, not stuffed 16-20 325 (160) 1 9-11 180 (82) Turkey, not stuffed 21-25 325 (160) 1 6-10 180 ...
Page 30 - CONVECTION CONVERSION
Dual Fuel Range 28 CONVECTION CONVERSION When using Convection Conversion, enter your normal cooking temperature and time. The convection conversion will adjust the temperature and time for perfect cooking results. IMPORTANT: • The oven door must be closed before selecting a Convection Conversion ov...
Page 31 - RANGE CARE; GENERAL CLEANING; EXTERIOR PORCELAIN ENAMEL SURFACES
Dual Fuel Range 29 OTHER FOODS1. Press OTHER FOODS among the Convection Conversion controls. 2. Set the oven temperature. NOTE: The temperature can be set from 170°F (77°C) to 500°F (260°C). 3. Press START. “Set cooking time” will appear in the display. 4. Press COOK TIME, and then enter the desired...
Page 32 - OVEN DOOR EXTERIOR
Dual Fuel Range 30 OVEN DOOR EXTERIOR Cleaning Method:Glass cleaner and paper towels or nonabrasive plastic scrubbing pad: Apply glass cleaner to soft cloth or sponge, not directly on panel. PORCELAIN-COATED GRATES AND CAPS • Clean as soon as cooktop, grates and caps are cool. • Food spills containi...
Page 33 - Removing the burners
Dual Fuel Range 31 Removing the burners Refitting the burner crowns and caps Note: When the burner is correctly fitted it will sit level on the hob.If ignition is difficult or fails after cleaning, then either burner parts are not dry or parts havenot been positioned correctly 1. 1. The burner caps and ...
Page 34 - OVEN CAVITY; OVEN RACKS AND ROASTING RACKS; Burn Hazard
32 OVEN CAVITY Food spills should be cleaned when oven cools. At high temperatures, foods react with porcelain, so staining, etching, pitting or faint white spots can result. Cleaning Method: Mild detergent and warm water. NOTE: Do not use oven cleaners. OVEN RACKS AND ROASTING RACKS Cleaning Method...
Page 35 - NOTE: “REMOVE RACKS” will scroll in the display screen.
Dual Fuel Range 3 3 Prepare Oven: • Remove the broiler pan, cookware and bakeware and, on some models, the temperature probe from the oven. • Remove oven racks to keep them shiny and easy to slide. See “General Cleaning” section for more information. • Remove any foil from the oven because it may bu...
Page 36 - REPLACING AN OVEN LIGHT; Electrical Shock Hazard; Make sure the oven and lights are cool and power to the oven has been
3 4 To Delay Start Self-Clean:1. Press START TIME.2. “--:--” will be displayed, and “Set time to delay. Then Press START” will scroll from right to left in the selected oven text area. Use the number keypad to enter the desired time to delay. 3. Press START. “Select cooking/cleaning mode” will scrol...
Page 37 - Remove the bulb cover by pulling it out of the opening.; OVEN DOOR REMOVAL
Dual Fuel Range 3 5 2. Remove the bulb cover by pulling it out of the opening. 3. Remove the burned out bulb from the socket. NOTE: To avoid damage or decreasing the life of the new bulb, do not touch bulb with bare fingers. Wear cotton gloves or use a tissue when replacing the light bulb.4. Replace...
Page 38 - Place the door in a protected location.
3 6 To Remove the Oven Door:1. Open the door completely.2. Flip up the hinge latch on each side. a a a Hinge Bracket 3. Holding the door firmly, close the oven door completely. 4. Grasping both sides, lift up on the oven door while pushing it closed, and then pull it away from the door frame. 5. Pla...
Page 39 - TROUBLESHOOTING; SOLVING BAKING AND ROASTING PROBLEMS
Dual Fuel Range 3 7 TROUBLESHOOTING First try the solutions suggested here to possibly avoid the cost of a service call. SOLVING BAKING AND ROASTING PROBLEMS With any oven setting poor results can occur for many reasons other than a malfunction of the oven. Check the chart below for causes of the mo...
Page 40 - COOKTOP; PROBLEM
3 8 Cakes high in middle with crack on top • Oven temperature too high • Baking time too long • Pans touching each other or oven walls • Incorrect rack position • Pan size too small Piecrust edges too brown • Oven temperature too high • Edges of crust too thin COOKTOP PROBLEM POSSIBLE CAUSE SOLUTION...
Page 41 - OVEN
Dual Fuel Range 3 9 Cooking results are not what expected Using incorrect cookware See the “Cookware” section. The control knob is not set to the proper heat level. See the “Controls” section. OVEN PROBLEM POSSIBLE CAUSE SOLUTION Oven is not heating No power to the range. Check the circuit breaker o...
Page 42 - TABLE DES MATIÈRES
40 TABLE DES MATIÈRES SÉCURITÉ DE LA CUISINIÈRE ............................................................................ 41 La bride antibasculement ............................................................................................ 43 PIÈCES ET CARACTÉRISTIQUES ...........................
Page 43 - SÉCURITÉ DE LA CUISINIÈRE; Votre sécurité et celle des autres est très importante.
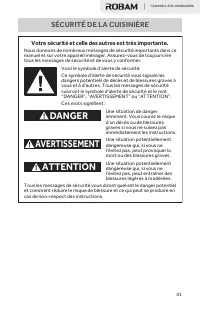
Cuisinière à bi-combustible 41 SÉCURITÉ DE LA CUISINIÈRE Votre sécurité et celle des autres est très importante. DANGER AVERTISSEMENT ATTENTION Voici le symbole d’alerte de sécurité.Ce symbole d’alerte de sécurité vous signale les dangers potentiels de décès et de blessures graves à vous et à d’autr...
Page 44 - AVERTISSEMENT
Cuisinière à bi-combustible 42 Risque d'incendie Si les informations figurant dans ce manuel ne sont pas suivies à la lettre, il peut en résulter un incendie ou une explosion pouvant causer des dégâts matériels, des blessures, voire un décès.- Ne pas ranger et utiliser d’essence ou d’autres vapeurs e...
Page 45 - LA BRIDE ANTIBASCULEMENT; Risque de basculement; brûlures graves aux enfants et aux adultes.
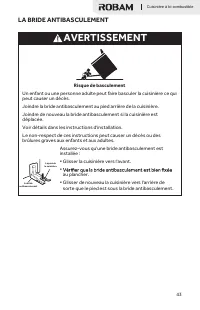
43 LA BRIDE ANTIBASCULEMENT Risque de basculement Un enfant ou une personne adulte peut faire basculer la cuisinière ce qui peut causer un décès.Joindre la bride antibasculement au pied arrière de la cuisinière.Joindre de nouveau la bride antibasculement si la cuisinière est déplacée.Voir détails da...
Page 46 - IMPORTANTES INSTRUCTIONS; AVERTISSEMENT : POUR
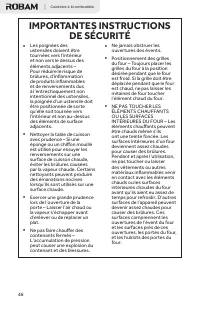
Cuisinière à bi-combustible 44 IMPORTANTES INSTRUCTIONS DE SÉCURITÉ AVERTISSEMENT : Afin de réduire le risque d’incendie, de choc électrique, de blessures corporelles ou de dommage lors de l’utilisation de la cuisinière, il convient d’observer certaines précautions fondamentales, notamment : • AVERT...
Page 49 - National; Pour les cuisinières avec; LIRE ET CONSERVER CES
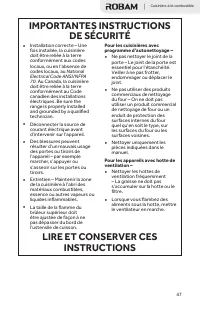
Cuisinière à bi-combustible 47 IMPORTANTES INSTRUCTIONS DE SÉCURITÉ • Installation correcte – Une fois installée, la cuisinière doit être reliée à la terre conformément aux codes locaux, ou en l’absence de codes locaux, au National Electrical Code ANSI/NFPA 70 . Au Canada, la cuisinière doit être re...
Page 50 - PIÈCES ET CARACTÉRISTIQUES
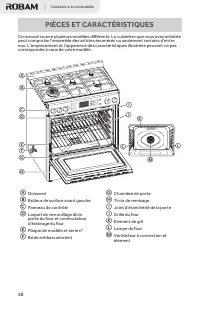
Cuisinière à bi-combustible 48 PIÈCES ET CARACTÉRISTIQUES Ce manuel couvre plusieurs modèles différents. La cuisinière que vous avez achetée peut comporter l’ensemble des articles énumérés ou seulement certains d’entre eux. L’emplacement et l’apparence des caractéristiques illustrées peuvent ne pas ...
Page 52 - TABLEAU DE COMMANDE; AFFICHAGE; DURÉE DE CUISSON; (FONCTION REQUISE POUR CERTAINS MODES DU FOUR)
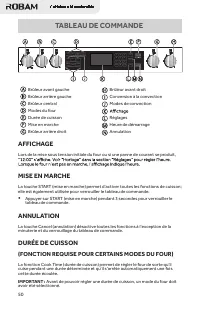
Cuisinière à bi-combustible 50 TABLEAU DE COMMANDE Brûleur avant gaucheBrûleur arrière gaucheBrûleur centralModes du fourDurée de cuissonMise en marcheBrûleur arrière droit Brûleur avant droitConversion à la convectionModes de convection RéglagesHeure de démarrageAnnulation AFFICHAGE Lors de la mise...
Page 53 - HEURE DE DÉMARRAGE; Risque d’intoxication alimentaire; alimentaire ou une maladie.
51 REMARQUES : • La durée de cuisson peut être réglée en heures ou en minutes jusqu’à concurrence de 11 heures et 59 minutes. • Pour modifier cette durée en cours de cuisson, appuyer sur CANCEL (annulation). Entrer la nouvelle durée de cuisson, puis appuyer sur START (mise en marche). • Une fois la ...
Page 54 - LAMPES DU FOUR; FAHRENHEIT ET CELSIUS
Cuisinière à bi-combustible 52 LAMPES DU FOUR Appuyer sur LIGHT (lampe) pour allumer ou éteindre les lampes en gardant les portes des fours fermées. Les deux lampes des fours s’allument à l’ouverture de l’une des portes. REMARQUE : Les lampes des fours ne s’allument pas durant le programme d’autonet...
Page 55 - SIGNAUX SONORES; Nombre de; HORLOGE
Cuisinière à bi-combustible 53 SIGNAUX SONORES Les signaux sonores avertissent l’utilisateur des fonctions de base suivantes : Nombre de signaux sonores Indique 1 Sélection valide Saisie d’une fonction 2 Appui sur une touche non valide 4 Fin de programme Fin de la minuterie Activation/désactivation ...
Page 56 - MODE SABBAT; REMARQUE : Si le four est en mode Sabbat et qu’une panne de courant se; ARRÊT AUTOMATIQUE AU BOUT DE 12 HEURES
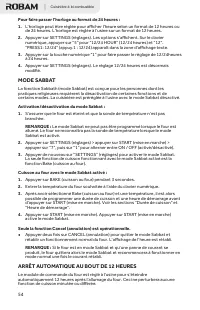
Cuisinière à bi-combustible 54 Pour faire passer l’horloge au format de 24 heures :1. L’horloge peut être réglée pour afficher l’heure selon un format de 12 heures ou de 24 heures. L’horloge est réglée à l’usine sur un format de 12 heures. 2. Appuyer sur SETTINGS (réglages). Les options s’affichent....
Page 57 - VERROUILLAGE DES COMMANDES
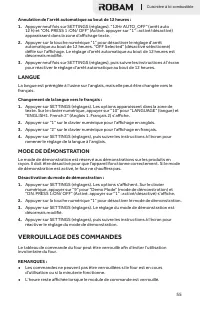
55 Annulation de l’arrêt automatique au bout de 12 heures :1. Appuyer neuf fois sur SETTINGS (réglages). “12Hr AUTO_OFF” (arrêt auto 12 h) et “ON. PRESS 1 :ON/ OFF” (Activé. appuyer sur “1” : activé/désactivé) apparaissent dans la zone d’affichage texte. 2. Appuyer sur la touche numérique “1” pour d...
Page 58 - UTILISATION DE LA TABLE DE CUISSON; ALLUMAGE ET FONCTIONNEMENT DES BRÛLEURS; PANNE DE COURANT
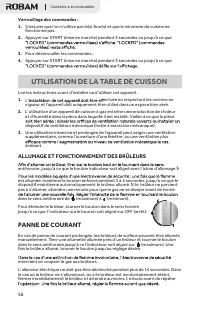
Cuisinière à bi-combustible 56 Verrouillage des commandes :1. S’assurer que l’on n’utilise pas le(s) four(s) et que la minuterie de cuisine ne fonctionne pas. 2. Appuyer sur START (mise en marche) pendant 3 secondes ou jusqu’à ce que 3. Pour déverrouiller les commandes : 4. Appuyer sur START (mise e...
Page 59 - USTENSILES DE CUISINE; LE DIAMÈTRE DE LA CASSEROLE DOIT CORRESPONDRE AU; UTILISER DES RÉCIPIENTS ÉQUILIBRÉS; UTILISER UN COUVERCLE QUI S’ADAPTE PARFAITEMENT SUR LE
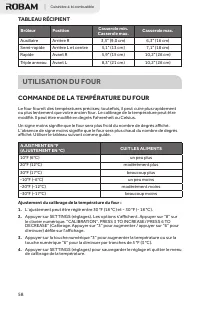
57 Pour une consommation de gaz réduite et un meilleur résultat, utiliser des casseroles à sauce dont le diamètre correspond à celui du brûleur, cela évite également que les flammes atteignent les bords de la casserole à sauce. Voir le tableau Récipient. Utiliser des poêles à fond plat. Dès que les ...
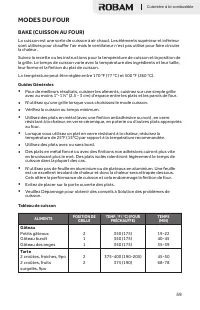
Page 60 - TABLEAU RÉCIPIENT; Brûleur; UTILISATION DU FOUR; COMMANDE DE LA TEMPÉRATURE DU FOUR; AJUSTMENT EN °F
Cuisinière à bi-combustible 58 TABLEAU RÉCIPIENT Brûleur Position Casserole min. Casserole max. Casserole max. Auxiliaire Arrière R 3,5" (9,0 cm) 6,3" (16 cm) Semi-rapide Arrière L et centre 5,1" (13 cm) 7,1" (18 cm) Rapide Avant R 5,9" (15 cm) 10,2" (26 cm) Triple anneau Ava...
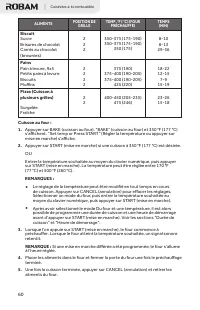
Page 61 - MODES DU FOUR; Guides Générales; Tableau de cuisson; Gâteau
59 MODES DU FOUR BAKE (CUISSON AU FOUR) La cuisson est une sorte de cuisson à air chaud. Les éléments supérieur et inférieur sont utilisés pour chauffer l’air mais le ventilateur n’est pas utilisé pour faire circuler la chaleur. Suivez la recette ou les instructions pour la température de cuisson et...
Page 63 - CUISSON AU GRIL
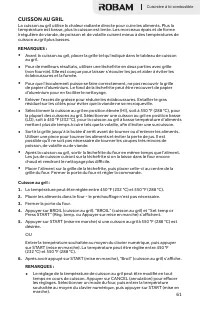
61 CUISSON AU GRIL La cuisson au gril utilise la chaleur radiante directe pour cuire les aliments. Plus la température est basse, plus la cuisson est lente. Les morceaux épais et de forme irrégulière de viande, de poisson et de volaille cuisent mieux à des températures de cuisson au gril plus basses...
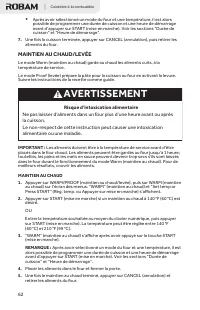
Page 64 - MAINTIEN AU CHAUD/LEVÉE
Cuisinière à bi-combustible 62 • Après avoir sélectionné un mode du four et une température, il est alors possible de programmer une durée de cuisson et une heure de démarrage avant d’appuyer sur START (mise en marche). Voir les sections “Durée de cuisson” et “Heure de démarrage”. 7. Une fois la cui...
Page 65 - MODES DE CONVECTION; VENTILATEUR DE CONVECTION
63 Levée1. Avant la levée, placer la pâte dans un saladier légèrement graissé et couvrir sans serrer avec du papier ciré recouvert de shortening. Poser sur la deuxième grille en partant du bas, puis fermer la porte du four. 2. Appuyer sur WARM/PROOF (maintien au chaud/levée), puis sur PROOF (levée) ...
Page 66 - AVANTAGES DE LA CUISSON PAR CONVECTION; CUISSON AU FOUR PAR CONVECTION
Cuisinière à bi-combustible 64 AVANTAGES DE LA CUISSON PAR CONVECTION • Gains de temps et d’énergie. • Permet de cuire, brunir et faire croustiller de façon homogène. • Durant le rôtissage, les jus et les saveurs sont retenus à l’intérieur tandis que l’extérieur est croustillant. • Les pains à la le...
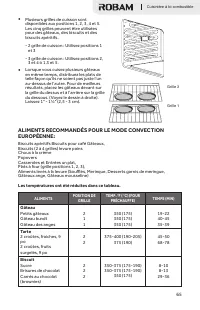
Page 67 - ALIMENTS RECOMMANDÉS POUR LE MODE CONVECTION; Les températures ont été réduites dans ce tableau.
65 • Plusieurs grilles de cuisson sont disponibles aux positions 1, 2, 3, 4 et 5. Les cinq grilles peuvent être utilisées pour des gâteaux, des biscuits et des biscuits apéritifs. - 2 grille de cuisson : Utilisez positions 1 et 3 - 3 grille de cuisson : Utilisez positions 2, 3 et 4 ó 1,3 et 5. • Lor...
Page 69 - GRIL À CONVECTION; Boeuf
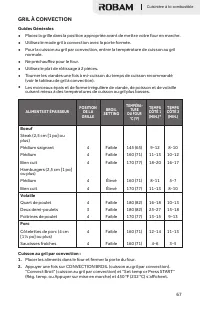
67 GRIL À CONVECTION Guides Générales • Placez la grille dans la position appropriée avant de mettre votre four en marche. • Utilisez le mode gril à convection avec la porte formée. • Pour la cuisson au gril par convection, entrer la température de cuisson au gril normale. • Ne préchauffez pour le f...
Page 70 - RÔTISSAGE PAR CONVECTION
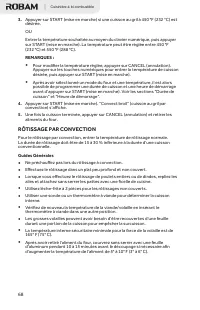
Cuisinière à bi-combustible 68 3. Appuyer sur START (mise en marche) si une cuisson au gril à 450 °F (232 °C) est désirée. OU Entrer la température souhaitée au moyen du clavier numérique, puis appuyer sur START (mise en marche). La température peut être réglée entre 450 °F (232 °C) et 550 °F (288 °...
Page 71 - Porc
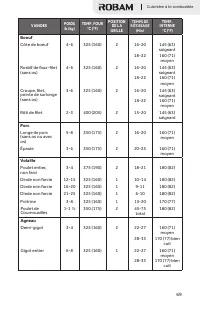
69 VIANDES POIDS lb (kg) TEMP. FOUR °C (°F) POSITION DE LA GRILLE TEMPS DE RÔTISSAGE (Min/ TEMP. INTERNE °C (°F) BoeufCôte de boeuf 4-6 325 (160) 2 16-20 18-22 145 (63) saignant 160 (71) moyen Rosbif de faux-filet(sans os) 4-6 325 (160) 2 16-20 18-22 145 (63) saignant 160 (71) moyen Croupe, filet, p...
Page 72 - CONVERSION À LA CONVECTION
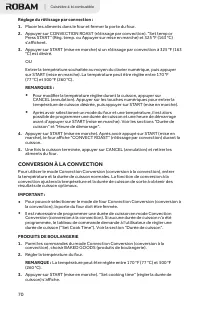
Cuisinière à bi-combustible 70 Réglage du rôtissage par convection :1. Placer les aliments dans le four et fermer la porte du four.2. Appuyer sur CONVECTION ROAST (rôtissage par convection). “Set temp or Press START” (Rég. temp. ou Appuyer sur mise en marche) et 325 °F (163 °C) s’affichent. 3. Appuy...
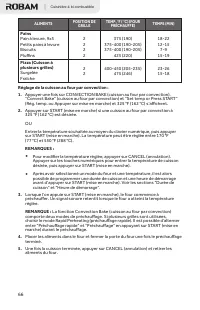
Page 73 - VIANDES
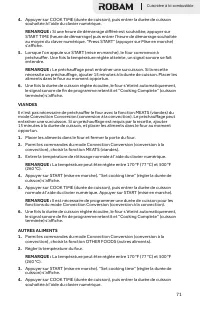
71 4. Appuyer sur COOK TIME (durée de cuisson), puis entrer la durée de cuisson souhaitée à l’aide du clavier numérique. REMARQUE : Si une heure de démarrage différé est souhaitée, appuyer sur START TIME (heure de démarrage) puis entrer l’heure de démarrage souhaitée au moyen du claver numérique. “P...
Page 74 - ENTRETIEN DU FOUR; NETTOYAGE GÉNÉRAL; SURFACES EXTÉRIEURES ÉMAILLÉES; Méthode de nettoyage :; EXTÉRIEUR ACIER INOXYDABLE; Méthodes de nettoyage :
Cuisinière à bi-combustible 72 REMARQUE : Il est nécessaire de programmer une durée de cuisson pour les fonctions du Convection Conversion (conversion à la convection). de démarrage), puis entrer l’heure de démarrage souhaitée au moyen du claver 5. Lorsque l’on appuie sur START (mise en marche), le ...
Page 75 - RÉPARTITEUR DU BRÛLEUR; BOUTONS DE COMMANDE DE LA TABLE DE CUISSON
73 EXTÉRIEUR DE LA PORTE DU FOUR Méthode de nettoyage :Nettoyant à vitre et essuie-tout ou tampon à récurer en plastique non abrasif : Appliquer le nettoyant à vitre sur un chiffon doux ou une éponge, et non directement sur le tableau. GRILLES ET CHAPEAUX ÉMAILLÉS • Nettoyer dès que la table de cuis...
Page 77 - CAVITÉ DU FOUR; GRILLES DE FOUR ET DE RÔTISSAGE; AUTONETTOYAGE DU FOUR; Risque de brûlures
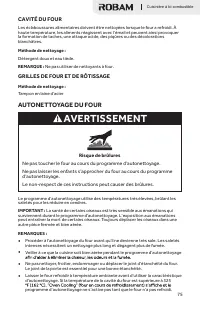
75 CAVITÉ DU FOUR Les éclaboussures alimentaires doivent être nettoyées lorsque le four a refroidi. À haute température, les aliments réagissent avec l’émail et peuvent ainsi provoquer la formation de taches, une attaque acide, des piqûres ou des décolorations blanchâtres. Méthode de nettoyage : Dét...
Page 78 - Préparation du four :
76 • La lampe du four ne fonctionne pas durant le programme d’autonettoyage. Sur certains modèles, les éléments de surface ne fonctionnent pas durant le programme d’autonettoyage. • éviter d’endommager la porte, ne pas forcer l’ouverture de la porte tant que Préparation du four : • Sortir du four la...
Page 80 - REMPLACEMENT DE LA LAMPE DU FOUR; Risque de choc électrique; électrique, des coupures ou des brûlures.
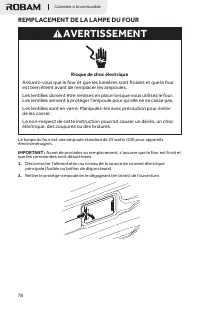
78 REMPLACEMENT DE LA LAMPE DU FOUR Risque de choc électrique Assurez-vous que le four et que les lumières sont froides et que le four est bien éteint avant de remplacer les ampoules.Les lentilles doivent être remises en place lorsque vous utilisez le four. Les lentilles servent à protéger l'ampoule...
Page 81 - DÉPOSE DE LA PORTE DU FOUR
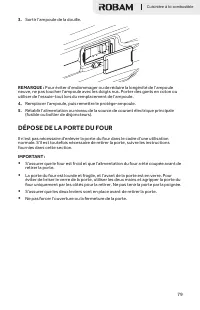
79 3. Sortir l’ampoule de la douille. REMARQUE : Pour éviter d’endommager ou de réduire la longévité de l’ampoule neuve, ne pas toucher l’ampoule avec les doigts nus. Porter des gants en coton ou utiliser de l’essuie-tout lors du remplacement de l’ampoule. 4. Remplacer l’ampoule, puis remettre le pr...
Page 83 - DÉPANNAGE; RÉSOLUTION DE PROBLÈMES CONCERNANT LA
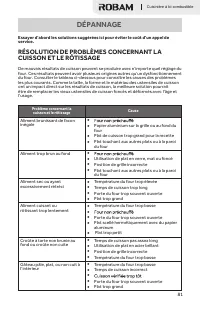
81 DÉPANNAGE Essayer d’abord les solutions suggérées ici pour éviter le coût d’un appel de service. RÉSOLUTION DE PROBLÈMES CONCERNANT LA CUISSON ET LE RÔTISSAGE De mauvais résultats de cuisson peuvent se produire avec n’importe quel réglage du four. Ces résultats peuvent avoir plusieurs origines au...
Page 84 - TABLES DE CUISSON; PROBLÈME CAUSE POSSIBLE
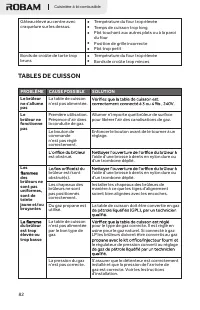
82 Gâteau élevé au centre avec craquelure sur les dessus. • Température du four trop élevée • Temps de cuisson trop long • Plat touchant aux autres plats ou à la paroi du four • Position de grille incorrecte • Plat trop petit Bords de croûte de tarte trop bruns • Température du four trop élevée • Bo...
Page 85 - FOUR; PROBLÈME
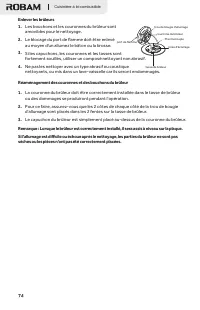
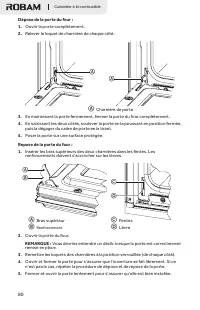
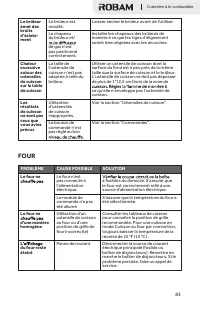
83 Le brûleur émet des bruits d’éclate- ment Le brûleur est mouillé. Laisser sécher le brûleur avant de l'utiliser. Le chapeau du brûleur et/ de gaz n’est pas positionné correctement. Installer les chapeaux des brûleurs de manière à ce que les tiges d’alignement soient bien alignées avec les encoche...