Page 2 - CAUTION; Avoid exposure to moisture.
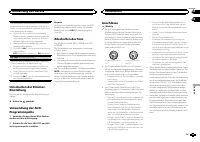
Thank you for purchasing this PIONEER product To ensure proper use, please read through thismanual before using this product. It is especiallyimportant that you read and observe WARN- ING s and CAUTION s in this manual. Please keep the manual in a safe and accessible place forfuture reference. If yo...
Page 3 - c d e; Do not use unauthorized products.; After installation of this unit, turn the
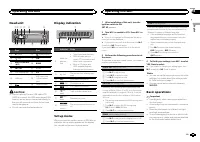
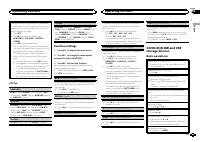
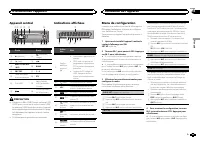
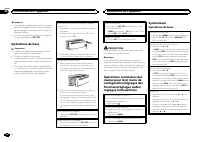
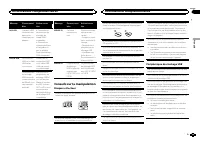
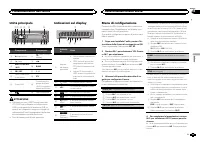
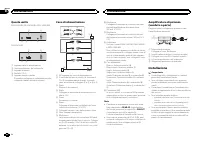
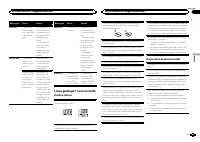
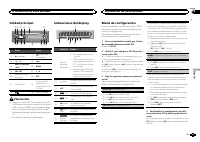
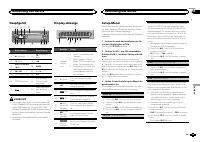
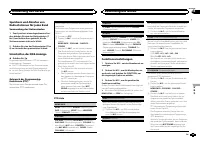
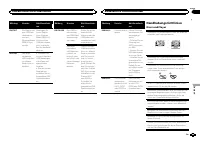
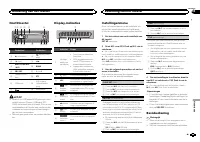
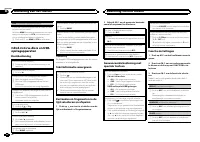
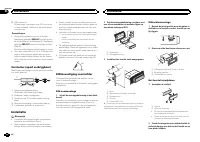
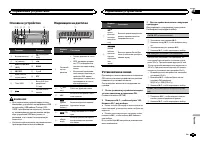
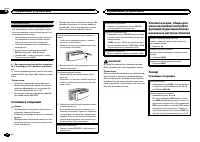
Head unit b c d e a 8 7 12 3 4 5 6 9 Part Part 1 h (eject) 8 (back/display) 2 (list) 9 c / d 3 MULTI-CONTROL ( M.C. ) a BAND 4 SRC / OFF b 1 to 6 5 Disc loading slot c PTY 6 USB port d AUX input jack(3.5 mm stereojack) 7 e Detach button CAUTION ! Use an optional Pioneer USB cable (CD-U50E) to connec...
Page 4 - Tuner; Basic operations; Note; Using preset tuning buttons; When you find a station that you want; Switching the RDS display; Press; Using PTY functions; Operating this unit
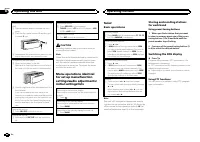
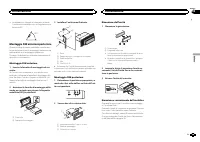
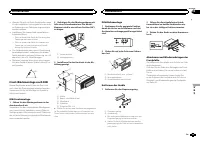
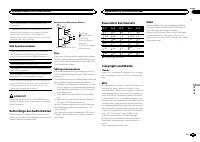
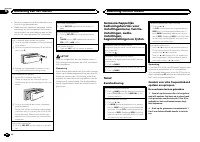
Removing the front panel to protect your unit fromtheft 1 Press the detach button to release the frontpanel. 2 Push the front panel upward ( M ) and then pull it toward ( N ) you. 3 Always keep the detached front panel in a pro-tection device such as a protection case. Re-attaching the front panel 1...
Page 5 - PTY list; Function settings; and press to select FUNCTION.; English
Searching for an RDS station by PTY informationYou can search for general types of broadcastingprograms, such as those listed in the followingsection. Refer to this page. 1 Press PTY . 2 Turn M.C. to select a program type. NEWS/INFO — POPULAR — CLASSICS — OTHERS 3 Press M.C. to begin the search. The...
Page 6 - Displaying text information; Audio adjustments; and press to select AUDIO.
Switching between compressed audio and CD-DA 1 Press BAND . Switching between playback memory devicesYou can switch between playback memory deviceson USB storage devices with more than one MassStorage Device-compatible memory device. 1 Press BAND . ! You can switch between up to 32 differentmemory d...
Page 7 - Initial settings; Important
This unit is equipped with a subwoofer outputwhich can be turned on or off. 1 Press M.C. to select the desired setting. NOR (normal phase) — REV (reverse phase) — OFF (subwoofer off) SUB.W CTRL (subwoofer adjustment) The cut-off frequency and output level can be ad-justed when the subwoofer output i...
Page 8 - This unit
When ever scroll is set to ON , recorded text infor- mation scrolls continuously in the display. Set to OFF if you prefer the information to scroll just once. 1 Press M.C. to turn the ever scroll on or off. TITLE (multi-language) This unit can display the text information of a com-pressed audio file...
Page 9 - Power cord; Notes; Insert the mounting sleeve into the dash-; Installation; Installation
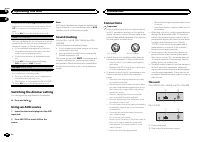
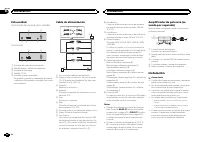
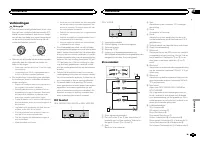
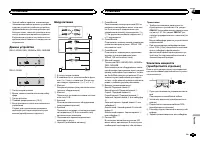
3 Antenna input 4 Fuse (10 A) 5 Wired remote inputHard-wired remote control adaptor can beconnected (sold separately). Power cord 1 3 3 2 4 4 5 5 6 6 b 8 9 7 a e d c 1 To power cord input 2 Depending on the kind of vehicle, the func-tion of 3 and 5 may be different. In this case, be sure to connect ...
Page 10 - Removing the unit; Removing the front panel to; Troubleshooting; Error messages; Additional information
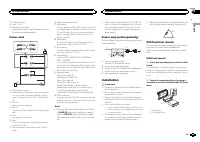
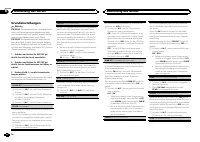
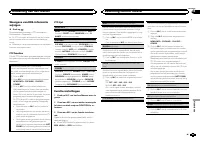
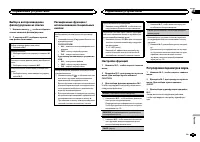
3 Install the unit as illustrated. 1 2 3 4 5 1 Nut 2 Firewall or metal support 3 Metal strap 4 Screw 5 Screw (M4 × 8) # Make sure that the unit is installed securely in place. An unstable installation may cause skippingor other malfunctions. DIN Rear-mount 1 Determine the appropriate position where ...
Page 11 - Handling guidelines; Discs and player
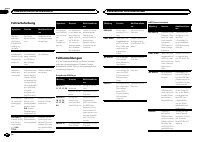
Message Cause Action NO AUDIO The inserteddisc does notcontain anyplayable files. Replace the disc. SKIPPED The inserteddisc containsDRM protectedfiles. Replace the disc. PROTECT All the files onthe inserteddisc are em-bedded withDRM. Replace the disc. USB storage device Message Cause Action NO DEVI...
Page 12 - Sequence of audio files
When using discs that can be printed on label sur-faces, check the instructions and the warnings ofthe discs. Depending on the discs, inserting andejecting may not be possible. Using such discsmay result in damage to this equipment. Do not attach commercially available labels orother materials to th...
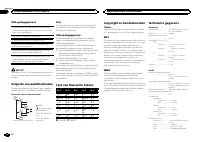
Page 13 - Disc; Put those files into a folder.; Russian character chart; iTunes; Specifications
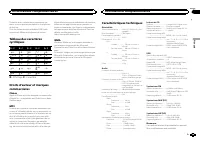
Example of a hierarchy Level 1 Level 2 Level 3 Level 4 01 02 03 04 05 : Folder : Compressed audio file01 to 05: Foldernumber 1 to 6 : Playback sequence Disc Folder selection sequence or other operationmay differ depending on the encoding or writingsoftware. USB storage device Playback sequence is th...
Page 14 - Nous vous remercions; APPAREIL À LASER DE CLASSE 1; PRÉCAUTION; DEMO
Nous vous remercions d ’ avoir acheté cet ap- pareil PIONEER Pour garantir une utilisation correcte, lisez bience mode d ’ emploi avant d ’ utiliser cet appareil. Il est particulièrement important que vous lisiez etrespectiez les indications ATTENTION et PRÉ- CAUTION de ce mode d ’ emploi. Conser ve...
Page 15 - Après avoir installé l
Appareil central b c d e a 8 7 12 3 4 5 6 9 Partie Partie 1 h (éjection) 8 (retour/affi- chage) 2 (liste) 9 c / d 3 MULTI-CONTROL ( M.C. ) a BAND 4 SRC / OFF b 1 à 6 5 Fente de charge-ment des disques c PTY 6 Port USB d Jack d ’ entrée AUX (jack stéréo3,5 mm) 7 e Touche de retraitde la face avant PR...
Page 16 - Remarque; Opérations de base
Remarques ! Vous pouvez configurer les options de menudans les réglages initiaux. Pour des détailssur les réglages, reportez-vous à la page 20, Réglages initiaux . ! Vous pouvez annuler le menu de configura-tion en appuyant sur SRC / OFF . Opérations de base Important ! Lorsque vous enlevez ou remon...
Page 17 - Utilisation des touches de présélection; Changement de l; Utilisation des fonctions PTY; Réglages des fonctions; Français; Utilisation de l
Remarque La fonction AF (recherche des autres fréquencespossibles) de cet appareil peut être mise en ser-vice ou hors service. La fonction AF doit êtrehors service pendant une opération d ’ accord normal (reportez-vous à la page suivante, AF (re- cherche des autres fréquences possibles) ). Enregistr...
Page 19 - Réglages sonores; option de
Utilisation avancée à l ’ aide de touches spéciales Sélection d ’ une étendue de répétition de lecture 1 Appuyez sur 6 / pour parcourir les options disponibles : CD/CD-R/CD-RW ! ALL – Répétition de toutes les plages ! ONE – Répétition de la plage en cours de lecture ! FLD – Répétition du dossier en ...
Page 20 - Réglages initiaux
SLA (réglage du niveau de la source) La fonction SLA (réglage du niveau de la source) permet d ’ ajuster les niveaux sonores de chaque source afin d ’ éviter que ne se produisent de fortes variations d ’ amplitude sonore lorsque vous passez d ’ une source à l ’ autre. ! Les réglages sont basés sur l...
Page 22 - Remarques
Cet appareil DEH-1420UB, DEH-1400UB et DEH-1400UBB 1 3 4 5 2 DEH-1410UB 1 3 4 2 1 Entrée cordon d ’ alimentation 2 Sortie arrière ou haut-parleur d ’ extrêmes gra- ves 3 Entrée antenne 4 Fusible (10 A) 5 Entrée télécommande câbléeUn adaptateur de télécommande câblée(vendu séparément) peut être conne...
Page 23 - Montage avant/arrière DIN; Montage frontal DIN; Retrait de la face
! Consultez votre revendeur si l ’ installation né- cessite le perçage de trous ou d ’ autres modi- fications du véhicule. ! N ’ installez pas cet appareil là où : — il peut interférer avec l ’ utilisation du véhicule. — il peut blesser un passager en cas d ’ arrêt soudain du véhicule. ! Le laser à ...
Page 24 - entretien agréé par Pioneer le plus; Informations complémentaires
Dépannage Symptôme Causes possi-bles Action correc-tive L ’ éclairage de l ’ écran est ac- tivé et désac-tivé de façonaléatoire. Le mode dé-monstration estactivé. Désactivez le ré-glage de l ’ affi- chage dedémonstration. L ’ écran re- vient automa-tiquement àl ’ affichage or- dinaire. Vous n ’ avez...
Page 25 - Conseils sur la manipulation; Disques et lecteur
Message Causes possi-bles Action correc-tive N/A USB L ’ appareil USB connecté n ’ est pas pris encharge par cetappareil. ! Connectez un périphérique destockage demasse USBcompatible. ! Déconnectez votre périphériqueet remplacez-lepar un périphé-rique de stockageUSB compatible. CHECK USB Le connecte...
Page 26 - Séquence des fichiers audio; utilisateur ne peut pas affecter; La séquence de sélection des dossiers ou d
DualDiscs Les DualDiscs sont des disques à deux faces avecun CD enregistrable pour l ’ audio sur une face et un DVD enregistrable pour la vidéo sur l ’ autre. Comme la face CD des DualDiscs n ’ est pas physi- quement compatible avec le standard CD général,la lecture de la face CD sur cet appareil pe...
Page 27 - ne comporte pas de licence ni n; WMA; autres
Toutefois, avec certains environnements sys-tème, vous ne pouvez pas spécifier la séquencede lecture.Pour les lecteurs audio portables USB, la sé-quence est différente et dépend du lecteur. Tableau des caractèrescyrilliques D : C D : C D : C D : C D : C : А : Б : В : Г : Д : Е , Ё : Ж : З : И , Й : ...
Page 28 - PRODOTTO LASER DI CLASSE 1; ATTENZIONE
Grazie per aver acquistato questo prodotto PIONEER Leggere attentamente questo manuale prima diutilizzare il prodotto, per assicurarne il correttoutilizzo. È particolarmente importante leggere eosservare le precauzioni contrassegnate da AV- VERTENZA e ATTENZIONE in questo ma- nuale. Conser vare ques...
Page 29 - Italiano
Unità principale b c d e a 8 7 12 3 4 5 6 9 Componente Componente 1 h (espulsione) 8 (tasto indietro/ display) 2 (lista) 9 c / d 3 MULTI-CONTROL ( M.C. ) a BAND 4 SRC / OFF b 1 - 6 5 Vano d ’ inserimen- to dei dischi c PTY 6 Porta USB d Connettore di in-gresso ausiliario(AUX) (connettorestereo da 3,...
Page 30 - Funzionamento di base; Nota
Note ! È possibile configurare le opzioni di menunelle impostazioni iniziali. Per informazionidettagliate sulle impostazioni, vedere Impo- stazioni iniziali a pagina 33. ! È possibile annullare il menu di configurazio-ne premendo SRC / OFF . Funzionamento di base Importante ! Rimuovere e inserire il...
Page 31 - Uso dei tasti di preselezione sintonia; Quando viene individuata una stazione; Scorrimento del display RDS; Premere; Uso delle funzioni PTY; Impostazioni delle funzioni; opzione di; Funzionamento dell
Memorizzazione e richiamo dellestazioni per ciascuna banda Uso dei tasti di preselezione sintonia 1 Quando viene individuata una stazione che si desidera memorizzare, premere unodei tasti di preselezione sintonia (da 1 a 6),mantenendolo premuto fino a quando il nu-mero di preselezione non cessa di l...
Page 32 - elenco dei nomi
1 Premere M.C. per attivare e disattivare la fun- zione AF. NEWS (interruzione dei programmi per i notiziari) 1 Premere M.C. per attivare o disattivare la fun- zione NOTIZIE. SEEK (impostazione tasto sinistro/destro) È possibile assegnare una funzione ai tasti sinistroe destro dell ’ unità. Selezion...
Page 33 - Importante
3 Ruotare M.C. per selezionare la funzione. Dopo averla selezionata, eseguire la proceduradescritta di seguito per impostare la funzione. REPEAT (riproduzione ripetuta) 1 Premere M.C. per selezione di un intervallo di riproduzione ripetuta.Per ulteriori dettagli, vedere Selezione di un in- ter vallo...
Page 34 - Uso della sorgente AUX; Collegare il cavo mini plug stereo al con-
3 Ruotare M.C. per selezionare l ’ imposta- zione iniziale. Dopo averla selezionata, eseguire la proceduradescritta di seguito per impostare l ’ impostazio- ne iniziale. CLOCK SET (impostazione dell ’ orologio) 1 Premere M.C. per visualizzare la modalità di impostazione. 2 Premere M.C. per seleziona...
Page 35 - Silenziamento del suono; MUTE; Collegamenti; Installazione
Nota Non è possibile selezionare la sorgente AUX senon viene attivata l ’ impostazione dell ’ apparec- chio ausiliario. Per ulteriori dettagli, vedere AUX (ingresso ausiliario) nella pagina precedente. Silenziamento del suono Solo per i modelli DEH-1420UB, DEH-1400UB eDEH-1400UBB . L ’ audio viene s...
Page 37 - Montaggio DIN anteriore/posteriore; Montaggio DIN anteriore; Rimozione del fronta-
! Le prestazioni ottimali si ottengono quandol ’ unità viene installata con un ’ angolazione in- feriore a 60°. 60° Montaggio DIN anteriore/posteriore Questa unità può essere installata correttamen-te sia dalla posizione di montaggio anteriore, siadalla posizione di montaggio posteriore.Durante l ’ ...
Page 38 - Risoluzione dei problemi; Messaggi di errore; Informazioni supplementari
Risoluzione dei problemi Sintomo Causa Azione Il display siaccende e sispegne conpause variabi-li. La modalità di-mostrazione èattiva. Disattivare la mo-dalità dimostra-zione. Il displaytorna automa-ticamente allavisualizzazio-ne normale. Non è stata ese-guita alcunaoperazione per30 secondi. Eseguir...
Page 39 - Linee guida per l; Dischi e lettori
Messaggio Causa Azione N/A USB Il dispositivoUSB collegatonon è supporta-to da questaunità. ! Collegare un di- spositivo USBcompatibile conlo standard MSC(Mass StorageClass). ! Scollegare il di- spositivo e sosti-tuirlo con undispositivo di me-moria USB com-patibile. CHECK USB Il connettoreUSB o il ...
Page 40 - utente non può assegnare i; Inserire tali file in una cartella.
DualDisc I supporti DualDisc sono dischi con due lati: unCD registrabile per l ’ audio su un lato e un DVD re- gistrabile per i video sull ’ altro lato. Poiché il lato CD dei DualDisc non è fisicamentecompatibile con gli standard CD generali, potreb-be non essere possibile riprodurre il lato CD conq...
Page 41 - Dati tecnici
Tabella dei caratteri cirillici D: C D: C D: C D: C D: C : А : Б : В : Г : Д : Е , Ё : Ж : З : И , Й : К : Л : М : Н : О : П : Р : С : Т : У : Ф : Х : Ц : Ч : Ш , Щ : Ъ : Ы : Ь : Э : Ю : Я D : Display C : Carattere Copyright e marchi registrati iTunes Apple ed iTunes sono marchi di fabbrica diApple ...
Page 44 - Gracias; PRODUCTO LASER CLASE 1; PRECAUCIÓN; Evite la exposición a la humedad.
Gracias por haber adquirido este producto PIONEER Lea con detenimiento este manual antes de utili-zar el producto por primera vez para que puedadarle el mejor uso posible. Es muy importanteque lea y cumpla con la información que apare-ce bajo los mensajes de ADVERTENCIA y PRECAUCIÓN en este manual. ...
Page 45 - Unidad principal; No utilice productos no autorizados.; Indicaciones del display; Menú de configuración; Una vez instalada la unidad, gire la llave; Utilización de esta unidad
Unidad principal b c d e a 8 7 12 3 4 5 6 9 Parte Parte 1 h (expulsar) 8 (parte poste- rior/display) 2 (lista) 9 c / d 3 MULTI-CONTROL ( M.C. ) a BAND 4 SRC / OFF b 1 a 6 5 Ranura de cargade discos c PTY 6 Puerto USB d Conector de en-trada AUX (co-nector estéreo de3,5 mm) 7 e Botón de soltar PRECAUC...
Page 46 - Sintonizador; Funcionamiento básico
Notas ! Se pueden configurar las opciones del menúen los ajustes iniciales. Si desea más infor-mación sobre los ajustes, consulte Ajustes iniciales en la página 49. ! Si desea cancelar el menú de configuración,pulse SRC / OFF . Funcionamiento básico Importante ! Proceda con cuidado al retirar o colo...
Page 47 - Cambio de la visualización RDS; Pulse; Uso de las funciones PTY; Ajustes de funciones; menú y pulse para seleccionar FUNCTION.
Almacenamiento y recuperaciónde emisoras para cada banda Uso de los botones de ajuste depresintonías 1 Cuando encuentre la emisora que desea almacenar en la memoria, pulse uno de losbotones de ajuste de presintonías (1 a 6) ymanténgalo pulsado hasta que el número depresintonía deje de parpadear. 2 P...
Page 49 - Ajustes de audio
3 Gire M.C. para seleccionar la función. Una vez seleccionada, siga los siguientes pasospara ajustar la función: REPEAT (repetición de reproducción) 1 Pulse M.C. para seleccionar la gama de repeti- ción de reproducción.Para obtener más información, consulte Selec- ción de una gama de repetición de r...
Page 50 - Uso de una fuente AUX; Inserte el miniconector estéreo en el co-
CLOCK SET (ajuste del reloj) 1 Pulse M.C. para mostrar el modo de ajuste. 2 Pulse M.C. para seleccionar el segmento de la pantalla del reloj que desea ajustar.Hora — Minuto 3 Gire M.C. para ajustar el reloj. CLOCK (visualización del reloj) Se puede activar y desactivar la visualización delreloj.La v...
Page 51 - Silenciamiento del sonido; El sonido se silencia automáticamente cuando:; Conexiones; Español; Instalación
Silenciamiento del sonido Sólo para DEH-1420UB, DEH-1400UB y DEH-1400UBB . El sonido se silencia automáticamente cuando: ! Se realiza o se recibe una llamada con un te-léfono móvil conectado a esta unidad. ! Funciona el sistema de orientación por vozde la unidad de navegación Pioneer conec-tada. El ...
Page 52 - Notas
Esta unidad DEH-1420UB, DEH-1400UB y DEH-1400UBB 1 3 4 5 2 DEH-1410UB 1 3 4 2 1 Entrada del cable de alimentación 2 Salida trasera o salida de subgraves 3 Entrada de la antena 4 Fusible (10 A) 5 Entrada remota conectadaEs posible conectar un adaptador de mandoa distancia físicamente conectado (se ve...
Page 53 - Montaje delantero/posterior de DIN; Montaje delantero DIN; Colocación del panel delantero
! Se logra un rendimiento óptimo si la unidadse instala en un ángulo inferior a 60°. 60° Montaje delantero/posterior de DIN Esta unidad puede instalarse correctamentetanto si se realiza una instalación frontal o trase-ra.En la instalación, emplee piezas disponibles enel mercado. Montaje delantero DI...
Page 54 - Información adicional
Solución de problemas Síntoma Causa Resolución La luz seapaga y en-ciende aleato-riamente. Activado elmodo de de-mostración. Desactive el ajus-te de la visualiza-ción de lademostración. La pantallavuelve auto-máticamentea la visualiza-ción normal. No ha realizadoninguna opera-ción en aproxi-madament...
Page 55 - Pautas para el manejo; Discos y reproductor
Mensaje Causa Resolución CHECK USB El conectorUSB o el cableUSB está corto-circuitado. Compruebe queel conector USB oel cable USB noesté enganchadoen algo ni daña-do. El dispositivo dealmacenamien-to USB conec-tado consumemás de 500 mA(corriente máxi-ma permitida). Desconecte eldispositivo de al-mac...
Page 56 - Secuencia de archivos de audio; Disco; Coloque esos archivos en una carpeta.
La carga y expulsión frecuente de un discoDualDisc puede producir ralladuras en el disco.Las ralladuras graves pueden producir problemasde reproducción en esta unidad. En algunoscasos, un DualDisc puede atascarse en la ranurade carga del disco y no se expulsará. Para evitarlo,recomendamos que no uti...
Page 57 - Especificaciones; Generales
Tabla de caracteres rusos D: C D: C D: C D: C D: C : А : Б : В : Г : Д : Е , Ё : Ж : З : И , Й : К : Л : М : Н : О : П : Р : С : Т : У : Ф : Х : Ц : Ч : Ш , Щ : Ъ : Ы : Ь : Э : Ю : Я D : Visualización C : Carácter Copyright y marcas registradas iTunes Apple e iTunes son marcas comerciales deApple In...
Page 60 - Zu diesem Gerät; LASER KLASSE 1; VORSICHT; Zu dieser Anleitung; Im Störungsfall; Bevor Sie beginnen
Vielen Dank , dass Sie sich für dieses PIONEER-Produkt entschieden haben Bitte lesen Sie diese Anleitung vor der Verwen-dung dieses Produkts zur Gewährleistung seinerordnungsgemäßen Verwendung durch. Lesenund befolgen Sie dabei insbesondere die Hin-weise WARNUNG und VORSICHT . Bewahren Sie die Anlei...
Page 61 - Hauptgerät; Drehen Sie nach der Installation des Ge-; Bedienung des Geräts
Hauptgerät b c d e a 8 7 12 3 4 5 6 9 Bezeichnung Bezeichnung 1 h (Auswurf) 8 (Zurück/Dis- play) 2 (Liste) 9 c / d 3 MULTI-CONTROL ( M.C. ) a BAND 4 SRC / OFF b 1 bis 6 5 Disc-Ladeschacht c PTY 6 USB-Anschluss d AUX-Eingang(3,5-mm-Stereo-anschluss) 7 e Taste zum Entrie-geln der Front-platte VORSICHT...
Page 62 - Wichtig; Hinweis; Hinweis
4 Um die Einstellungen abzuschließen, dre- hen Sie M.C., um YES auszuwählen. DrückenSie den Regler, um die Auswahl zu bestäti-gen. # Möchten Sie Ihre Einstellungen wieder ändern, drehen Sie M.C. , um NO auszuwählen. Drücken Sie den Regler, um die Auswahl zu bestätigen. Hinweise ! Sie können die Menü...
Page 63 - Verwendung der Stationstasten; Zum Speichern eines abgestimmten Sen-; Umschalten der RDS-Anzeige; Drücken Sie; Funktionseinstellungen; Deutsch
Speichern und Abrufen vonRadiostationen für jedes Band Verwendung der Stationstasten 1 Zum Speichern eines abgestimmten Sen- ders drücken Sie eine der Stationstasten (1bis 6) und halten diese gedrückt, bis dieStationsnummer nicht mehr blinkt. 2 Drücken Sie eine der Stationstasten (1 bis 6) zur Auswa...
Page 64 - Anzeigen von Textinformationen
TA (Verkehrsdurchsagebereitschaft) 1 Drücken Sie M.C. , um die Verkehrsdurchsage- bereitschaft ein- oder auszuschalten. AF (Alternativfrequenz-Suchlauf) 1 Drücken Sie M.C. , um den Alternativfrequenz- Suchlauf ein- oder auszuschalten. NEWS (Nachrichtenunterbrechung) 1 Drücken Sie M.C. , um die Nachr...
Page 66 - Grundeinstellungen
Grundeinstellungen Wichtig PW SAVE (Energiesparmodus) wird deaktiviert, wenn die Fahrzeugbatterie abgeklemmt wirdund muss neu aktiviert werden, sobald die Bat-terie wieder angeschlossen wird. Wenn PW SAVE (Energiesparmodus) deaktiviert ist, kann das Gerät je nach Anschlussart Batterie-leistung in An...
Page 67 - Halten Sie; Abschalten des Tons; Der Ton wird abgeschaltet, im Display erscheint; Anschlüsse
Das Gerät kann Textinformationen komprimierterAudiodateien auch dann anzeigen, wenn sie ent-weder in einer europäischen Sprache oder in Rus-sisch aufgezeichnet wurden. ! Falls die für die Aufzeichnung verwendeteSprache und die gewählte Spracheinstellungnicht übereinstimmen, werden die Textinfor-mati...
Page 68 - Hinweise
! Das schwarze Kabel gewährleistet die Er-dung. Dieses Kabel wie auch die Erdungska-bel anderer Produkte (insbesondere vonHochstromprodukten wie Leistungsverstär-ker) müssen separat verdrahtet werden. An-derenfalls kann es zu einem Brand odereiner Funktionsstörung kommen, wenn sichdie Kabel versehen...
Page 69 - Entfernen des Geräts; Entfernen der Frontplatte zum Schutz vor
! Wenden Sie sich an Ihren Fachhändler, wennfür die Installation Löcher gebohrt oder ande-re Änderungen am Fahrzeug vorgenommenwerden müssen. ! Installieren Sie dieses Gerät keinesfalls anfolgenden Orten: — Orte, an denen das Gerät die Steuerung desFahrzeugs behindern könnte. — Orte, an denen das Ge...
Page 70 - Zusätzliche Informationen
Fehlerbehebung Symptom Ursache Abhilfemaßnah-me Die Bild-schirmbe-leuchtungschaltet sichzufällig einund aus. Der Demo-Modus ist akti-viert. Deaktivieren Siedie Demoanzeige-Einstellung. Das Displayschaltet auto-matisch in dienormale An-zeige um. Sie haben kei-nen Bedienvor-gang innerhalbvon 30 Sekun-...
Page 71 - Handhabungsrichtlinien; Discs und Player
Meldung Ursache Abhilfemaßnah-me PROTECT Alle Dateien aufdem USB-Spei-chermediumsind mitWindows MediaDRM 9/10 ge-schützt. Übertragen SieAudio-Dateienohne WindowsMedia DRM 9/10-Schutz auf dasUSB-Speicherme-dium und schlie-ßen Sie das Gerätdann an. N/A USB Das ange-schlosseneUSB-Gerät wirdvon diesemGe...
Page 72 - DualDiscs
Wischen Sie die Discs zum Reinigen mit einemweichen Tuch von der Mitte zum Rand hin ab. Kondensation kann eine vorübergehende Störungder Player-Leistung zur Folge haben. Warten Sie indiesem Fall etwa eine Stunde ab, bis sich derPlayer an die höheren Temperaturen angepassthat. Zudem sollten feuchte D...
Page 73 - Reihenfolge der Audio-Dateien; Russischer Zeichensatz; mand
Datenübertragungen im Paketverfahren: Nichtkompatibel Ungeachtet der Länge der Leerstellen, die die Ori-ginalaufnahme zwischen den einzelnen Musikti-teln aufweist, wird bei der Wiedergabe vonkomprimierten Audio-Discs stets eine kurze Pausezwischen den Titeln eingefügt. USB-Speichermedium Abspielbare...
Page 74 - Technische Daten; Allgemein
Technische Daten Allgemein Stromversorgung ............. 14,4 V Gleichspannung (Tole- ranz 10,8 V bis 15,1 V) Erdungssystem ................ NegativMaximale Leistungsaufnahme ................................... 10,0 A Abmessungen (B × H × T): DIN Einbaugröße ...... 178 mm × 50 mm × 165 mm Frontfläch...
Page 76 - Hartelijk dank; Informatie over dit toestel; LET OP; Demostand; Bij problemen; Vóór u begint
Hartelijk dank voor uw vertrouwen in ons bij de aankoop van dit Pioneer-product Lees deze handleiding voordat u het product ingebruik neemt zodat u het goed leert gebruiken.Lees vooral de gedeelten die met WAARSCHU- WING en LET OP gemarkeerd zijn aandachtig. Bewaar deze handleiding na het lezen op e...
Page 77 - Hoofdtoestel; Instellingenmenu; Zet het contact aan na de installatie van; Basisbediening; Belangrijk; Bediening van het toestel
Hoofdtoestel b c d e a 8 7 12 3 4 5 6 9 Onderdeel Onderdeel 1 h (uitwerpen) 8 (achteruit/dis- play) 2 (lijst) 9 c / d 3 MULTI-CONTROL ( M.C. ) a BAND 4 SRC / OFF b 1 t/m 6 5 Laadsleuf voordisc c PTY 6 USB-poort d AUX-ingang(3,5mm-stereo-plug) 7 e Verwijderen LET OP ! Verbind uw USB-speler/USB-geheug...
Page 78 - Opmerking; De voorkeuzetoetsen gebruiken; Stem af op de zender die u in het geheu-
! Stel het voorpaneel niet bloot aan direct zon-licht en hoge temperaturen. ! Maak eerst alle kabels en apparaten (indienaanwezig) van het voorpaneel los voordat uhet verwijdert om beschadiging aan het toe-stel en het voertuiginterieur te voorkomen. Het voorpaneel tegen diefstal verwijderen 1 Druk o...
Page 80 - Tekstinformatie weergeven; Druk op
SEEK (instelling linker/rechter toets) U kunt een functie toewijzen aan de linker en rech-ter toets van het toestel.Selecteer MAN (handmatig afstemmen) om hand- matig af te stemmen en PCH (voorkeuzezender) om op voorkeuzezenders af te stemmen. 1 Druk op M.C. om MAN of PCH te selecteren. Cd/cd-r/cd-r...
Page 81 - Begininstellingen
S.RTRV (sound retriever) Verbetert automatisch de weergave van gecompri-meerde audio en zorgt voor een vol geluid. 1 Druk op M.C. en selecteer de gewenste instel- ling.Raadpleeg De geluidskwaliteit van gecompri- meerde audio verbeteren (sound retriever) op de vorige bladzijde voor meer informatie. A...
Page 82 - De dimmer in- of uitschakelen; Houd; Uitschakeling van het geluid; Het geluid wordt uitgeschakeld en
Standaard wordt er bij automatisch afstemmeneen FM-afstemstap van 50 kHz gebruikt, en 100kHz als de functie AF of TA is ingeschakeld. Maarsoms krijgt u een beter resultaat als ook bij het af-stemmen op alternatieve frequenties (AF) een af-stemstap van 50 kHz wordt gebruikt. ! Bij handmatig afstemmen...
Page 83 - Verbindingen; Dit toestel; Nederlands; Installatie
Verbindingen Belangrijk ! Als dit toestel wordt geïnstalleerd in een voer-tuig met een contactschakelaar zonder ACC-stand (accessoirestand), kan de accu leeglo-pen als de rode kabel niet wordt aangeslotenop de aansluiting die de bediening van decontactschakelaar herkent. O N S T A R T O F F ACC-stan...
Page 84 - Opmerkingen; Het toestel verwijderen
e ISO-connectorBij sommige voertuigen is de ISO-connectorin twee verdeeld. Verbind in dat geval beideconnectoren. Opmerkingen ! Wijzig de begininstelling van dit toestel.Raadpleeg gedeelte REAR-SP (instelling voor de achteruitgang) op bladzijde 82. Raadpleeg gedeelte PREOUT (preout-instelling) op bl...
Page 85 - Problemen verhelpen; Foutmeldingen; Aanvullende informatie
3 Trek het toestel uit het dashboard. Het voorpaneel verwijderen en terugbevestigen U kunt het voorpaneel verwijderen om het toe-stel tegen diefstal te beveiligen.Druk op de knop om het voorpaneel los temaken, duw het naar boven en trek het naar utoe.Raadpleeg Het voorpaneel tegen diefstal ver wij- ...
Page 86 - Aanwijzingen voor het gebruik; Discs en de player
Melding Oorzaak Actie FRMT READ Na het beginvan het afspelenduurt het somseven totdat ergeluid klinkt. Wacht tot het be-richt verdwijnt ener geluid klinkt. NO AUDIO De geplaatstedisc bevat geenafspeelbare be-standen. Plaats een anderedisc. SKIPPED De geplaatstedisc bevat be-standen diedoor digitaalr...
Page 88 - Plaats de bestanden in een map.; Algemeen
USB-opslagapparaat Mappenhiërarchie: maximaal acht niveaus diep(Voor praktisch gebruik kunt u beter niet meer dantwee niveaus gebruiken). Afspeelbare mappen: maximaal 500 Afspeelbare bestanden: maximaal 15 000 Afspelen van auteursrechtelijk beschermde be-standen: Niet compatibel Gepartitioneerd USB-...
Page 89 - USB
Cd-speler Systeem ........................... Compact Disc AudioBruikbare discs ................ Compact DiscsSignaal-tot-ruisverhouding ................................... 94 dB (1 kHz) (IEC -A-netwerk) Aantal kanalen ................. 2 (stereo)MP3-decoderingsformaat .................................
Page 90 - Благодарим Вас; PIONEER; Держите данное; Сведения об этом устройстве; RDS; ЛАЗЕРНЫЙ ПРОДУКТ КЛАСС 1; ВНИМАНИЕ; Pioneer CarStereo-Pass; Сведения об этом руководстве; ACC; Перед началом эксплуатации
Благодарим Вас за покупку этого изделия компании PIONEER Для обеспечения правильности эксплуата - ции внимательно прочитайте данное руко - водство перед началом использованияизделия . Особенно важно , чтобы Вы прочли и соблюдали инструкции , помеченные в дан - ном руководстве заголовками ПРЕДУПРЕ - ...
Page 91 - Основное устройство; Индикация на дисплее; ON; Управление устройством
Основное устройство b c d e a 8 7 12 3 4 5 6 9 Элемент Элемент 1 h ( извлечение ) 8 ( назад / дисп - лей ) 2 ( список ) 9 c / d 3 MULTI-CONTROL ( M.C. ) a BAND 4 SRC / OFF b 1 до 6 5 Щель для за - грузки диска c PTY 6 Порт USB d Вход AUX ( сте - реоразъем 3,5 мм ) 7 e Кнопка снятияпанели ВНИМАНИЕ ! ...
Page 92 - YES; На; SRC; Основные операции; SEEK
TITLE ( выбор языка ) Данное устройство может отображать тексто - вую информацию сжатого аудиофайла , даже если она записана на русском или одном из за - падноевропейских языков . ! При несовместимости настроек встроенно - го и выбранного языка возможны искаже - ния при выводе текстовых сообщений . ...
Page 93 - Переключение режима; Использование функций; Список; Настройка функций; FUNCTION
Ручная настройка ( пошаговая ) 1 Нажимайте кнопку c или d . ! Если для параметра SEEK выбрано значе - ние PCH ( каналы предварительной на - стройки ), ручная настройка невозможна . Для параметра SEEK нужно выбрать значе - ние MAN ( ручная настройка ). Подробнее об этих настройках см . в разделе SEEK...
Page 94 - Примечание
BSM ( запоминание лучших станций ) Функция BSM ( запоминание лучших станций ) позволяет автоматически сохранять в памятиустройства шесть станций с самым мощнымсигналом в порядке убывания его мощности . 1 Нажмите M.C. , чтобы включить функцию BSM. Для отмены режима нажмите M.C. еще раз . REGION ( рег...
Page 95 - дорожек из списка; Регулировки параметров звука; AUDIO
Выбор и воспроизведениефалов / дорожек из списка 1 Нажмите кнопку , чтобы отобразить список названий файлов / дорожек . 2 С помощью M.C. выберите нужное имя файла ( или папки ). Выбор названия файла или папки 1 Вращайте M.C. Воспроизведение 1 Выберите файл или дорожку и нажмите M. C. Просмотр списка...
Page 96 - Начальные настройки
FAD/BAL ( регулировка уровня сигнала / балан - са ) 1 Для вызова меню настройки нажмите M.C. 2 Нажимайте M.C. для переключения между настройками уровня сигнала ( передние / за - дние ) и баланса ( правые / левые ). 3 Для регулировки баланса громкоговорите - лей вращайте M.C. ! Если настройка выхода ...
Page 98 - AUX; Приглушение звука; Только для; Соединения; Важно; Установка
Примечание Если дополнительное оборудование невключено , выбрать AUX невозможно . Под - робную информацию см . в разделе AUX ( вспомогательный вход ) на стр . 97. Приглушение звука Только для DEH-1420UB, DEH-1400UB и DEH-1400UBB . Звук приглушается автоматически : ! при получении входящего вызова ил...
Page 99 - ISO; Audio Mute; настройка выхода заднего кана; Усилитель мощности
! Черный кабель является заземляющим . Заземляющие кабели данного устройстваи других устройств ( особенно устройств , предназначенных для эксплуатации прибольших токах , таких как усилитель мощ - ности ) должны монтироваться отдельно . В противном случае их случайное отсое - динение может привести к...
Page 100 - Переднее; Переднее крепление стандарта
Установка Важно ! Перед окончательной установкой про - верьте все соединения и системы . ! Не используйте детали , не разрешенные производителем к использованию , по - скольку это может стать причиной неис - правностей . ! Уточните у дилера компании , требует ли установка сверления отверстий или вне...
Page 101 - Pioneer; Дополнительная информация
Устранение неисправностей Признак Причина Действие Подсветкадисплеявключаетсяи выключает - ся случай - ным образ - ом . Включен де - монстрацион - ный режим . Выключите де - монстрацион - ный режим . Дисплей ав - томатическивозвращает - ся в исход - ный режим . В течение 30 секунд небыло выполне - н...
Page 102 - Диски и проигрыватель
Сообщение Причина Действие N/A USB Подключенноеустройство USB не под - держиваетсяданным ус - тройством . ! Подключите запоминающееустройство USB класса Mass Sto- rage. ! Отключите ус - тройство и заме - ните егосовместимымзапоминающимустройством USB. CHECK USB Короткое за - мыкание наразъеме USB ил...
Page 103 - компакт; Не оставляйте диски или запоминающее ус
При движении автомобиля надежно закрепитезапоминающее устройство USB. Не роняйте запоминающее устройство USB на пол , где оно может застрять под педалью тормоза илиакселератора . В зависимости от типа запоминающего устрой - ства USB могут возникнуть следующие про - блемы . ! Управление функциями мож...
Page 104 - Диск; Технические характеристики; Общие; Аудио
Последовательностьвоспроизведенияаудиофайлов Пользователь не может назначать номерапапок и устанавливать последовательностьвоспроизведения с помощью данного ус - тройства . Пример иерархии 12 34 56 01 02 03 04 05 : папка : сжатый ауди - офайлот 01 до 05: Номер папкиот 1 до 6 : после - довательностьв...
Page 107 - Русский