Philips MG7770/49 - User Manual
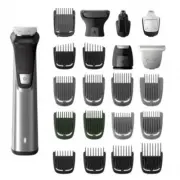
Philips MG7770/49 – User Manual, read for free online in PDF format. We hope this helps you resolve any issues you may have. If you have further questions, please contact us through the contact form.


BC
MG7770
MG777
0
>75 % recycled paper
>75 % papier recyclé
Manufactured for: Philips Personal Health
a division of Philips North America LLC
P.O. Box 10313, Stamford, CT 06904, USA
This symbol on the product’s nameplate
means it is listed by Underwriters’
Laboratories, Inc.
Norelco is a registered trademark of Philips
North America LLC.
PHILIPS and Philips shield are registered
trademarks of Koninklijke Philips N.V.
©2022 Philips North America LLC. All rights
reserved.
4222.002.8948.2 (02/02/2022)
5/64 in.
2 mm
3/16 in.
5 mm
3/64 in.
1 mm
1/8 in.
3 mm
9/32 in.
7 mm
1/8 in – 9/32 in
3 – 7 mm
1/4 in.
6 mm
21/32 in.
16 mm
15/32 in.
12 mm
3/8 in.
9 mm
1/8 in.
3 mm
3/16 in.
5 mm
5/32 in.
4 mm
5/32 in. – 3/8 in.
4 mm – 9 mm
4
1
2
7
3
8
9
10
17
12
14
11
13
15
20
21
22
23
24
25
26
27
18
19
16
6
5
1
2
1
2
= mm
1
2
2
1
5
8
11
14
17
20
23
26
3
6
9
12
15
18
21
24
27
4
7
10
13
16
19
22
25
28
English
IMPORTANT
SAFETY
INSTRUCTIONS
When using an electric product, basic
precautions should always be followed,
including the following:
Read all instructions before using this
product.
DANGER
To reduce the risk of electric shock:
-
Do not reach for a corded product that has
fallen into water. Unplug immediately from
the power outlet.
-
Keep the power cord dry.
-
Do not place or store the product where it
can fall or be pulled into a tub or sink. Do
not place or drop the product into water or
other liquid.
Detaching and attaching cutting elements
1 To detach a cutting element, push upwards
against the teeth of the cutting element
and take it off the handle (Fig. 4).
2 To attach a cutting element, insert the lug
of the cutting element into the guiding
slot at the front and push the back of the
cutting element onto the product (‘click‘)
(Fig. 5).
Detaching the precision shaver and nose
trimmer
1 Place your finger on the arrow at the back
of the attachment and push it off the
handle in the direction of the arrow (Fig. 6).
Attaching and detaching guards
1 To attach any type of guard onto a cutting
element, slide the front part of the guard
onto the teeth and push the projection
at the back of the guard into the product
(‘click‘) (Fig. 7).
2 To detach any type of guard from the
cutting element, carefully pull its back part
off the product and then slide it off the
cutting element (Fig. 8).
Note: When trimming for the first time,
start by using the guard with the maximum
trimming length setting to familiarize
yourself with the product.
Switching the product on and off
1 Press the on/off button once to switch the
product on or off (Fig. 9).
Attachments for use on beard
Full-size hair trimmer
Use the full-size hair trimmer without a guard
to trim hair close to the skin (to a length of
1/32 in./0.5 mm) or to create clean lines
around your beard, neck and sideburns.
1 To trim hair close to the skin, place the flat
side of the cutting element against your
skin and make strokes against the direction
of hair growth (Fig. 10).
2 For contouring, hold the cutting element
perpendicular to the skin and move it
upwards or downwards with gentle
pressure (Fig. 11).
Beard guards
Introduction
Congratulations on your purchase and
welcome to Philips Norelco!
To fully benefit from the support that Philips
Norelco offers, register your product at
www.norelco.com/register
.
General description (Fig. 1)
1 Extra-wide hair trimmer
2 Precision trimmer
3 Nose trimmer
4 Precision shaver
5 Skin protector
6 Body shaver
7 Full-size hair trimmer
8 On/off button
9 Battery status indicator
10 Socket for small plug
11 Stubble guard 3/64in. (1mm)
12 Stubble guard 5/64in. (2mm)
13 Beard guard 1/8in. (3mm)
14 Beard guard 3/16in. (5mm)
15 Beard guard 9/32in. (7mm)
16 Adjustable guard 1/8in. - 9/32 in. (3-7mm)
17 Eyebrow guard 1/4in. (6mm)
18 Power plug
19 Small plug
20 Hair guard 5/32in. (4mm)
21 Hair guard 3/8in. (9mm)
22 Hair guard 15/32in. (12mm)
23 Hair guard 21/32in. (16mm)
24 Fading hair guard 5/32in.-3/8in. (4-9mm)
25 Fading hair guard 5/32in.-3/8in. (4-9mm)
26 Body guard 1/8in. (3mm)
27 Body guard 3/16in. (5mm)
Not shown: cleaning brush, pouch
This symbol indicates that the
product can be used in the bath
or shower.
Charging
Battery status indications
-
When the battery is almost empty, the
battery status indicator lights up orange
(Fig. 2).
-
When the product is charging, the battery
status indicator flashes white slowly.
-
During quick charge, the battery status
indicator flashes white quickly. After
approx. 5 minutes of charging, the battery
indicator flashes white slowly. The product
now contains enough power for one
cordless trimming session.
-
When the battery is fully charged, the
battery status indicator lights up white
continuously.
Note: After approx. 30 minutes, the light goes
out automatically.
Charging
Charge the product before first use and when
the display indicates that the battery is almost
empty. When the product has charged for
3 hours, it has a cordless operating time of up
to 6 hours.
-
Charging, recharging or using the product
at temperatures below 40°F (4.5°C) or
higher than 95°F (35°C) adversely affects
the lifespan of the battery.
-
If the product is subjected to a major
change in temperature, pressure or
humidity, let the product acclimatize for 30
minutes before use.
1 Make sure the product is turned off.
2 Insert the small plug into the product and
put the power plug in any 120V AC outlet
(Fig. 3).
3 After charging, remove the power plug
from the wall outlet and pull the small plug
out of the product.
Note: An adapter plug may be necessary for
cord usage in some foreign countries. Use
an attachment plug adapter of the proper
configuration for the power outlet.
Quick charge
After approx. 5 minutes charging, the product
contains enough power for one cordless
trimming session.
Using the product
Note: This product can only be used without
a cord.
Note: Switch off and clean the product and
attachments after each use.
-
Use this product for its intended household
use as described in this manual.
-
For hygienic reasons, the product should
only be used by one person.
-
This product does not work while it is
connected to the power outlet. Except
when charging, always unplug this product
from the power outlet.
-
Remove power cord from power outlet and
product before cleaning.
WARNING
To reduce the risk of burns, fire, electric
shock, or injury to persons:
-
This product is not intended for use by
persons (including children) with reduced
physical, sensory or mental capabilities,
or lack of experience and knowledge,
unless they have been given supervision or
instruction concerning use of the product
by a person responsible for their safety.
Children should be supervised to ensure
that they do not play with the product.
-
Use this product only for its intended
household use as described in this manual.
Misuse can lead do hazards or serious
injuries. Do not use attachments not
recommended by Philips North America LLC.
-
Never operate this product if it has a
damaged power cord, if it is not working
properly, after it has been dropped or
damaged, or after the product or power
cord has been dropped into water. For
assistance call 1-800-243-3050.
-
Keep the power cord away from heated
surfaces.
-
Never drop or insert any object into any
opening.
-
Do not use the power cord in or near a
power outlet that contains an electric air
freshener to prevent damage to the power
cord.
-
Do not use product outdoors or operate
where aerosol (spray) products are being
used or where oxygen is being administered.
-
Always check cutters, cutting unit and
guards before using the product. Do not
use the product if cutters, cutting unit or
guards are damaged, as injury may occur.
-
Always attach power cord to product first,
then to power outlet. To disconnect, set
all controls to ‘off‘ position. Then remove
power cord from power outlet.
-
Plug power cord directly into power outlet.
Do not use an extension cord.
-
Unplug power cord before plugging in or
unplugging the product.
-
Only use the power cord and other
accessories supplied with the product.
-
The batteries used in this product may
present a fire or chemical burn hazard if
mistreated. Do not disassemble, heat above
100 °C (212 °F) or incinerate.
IMPORTANT
: The power plug contains a
transformer. Do not cut off the power plug to
replace it with another plug as this will cause a
hazardous condition.
-
Only use original Philips accessories or
consumables. Only use detachable power
cord HQ8505.
-
Charge, use and store the product at a
temperature between 40 °F / 4.5 °C and
95 °F / 35 °C.
-
Keep product and batteries away from fire
and do not expose them to direct sunlight
or high temperatures.
-
If the product becomes abnormally hot or
smelly, changes color or if charging takes
longer than usual, stop using and charging
the product and contact Philips.
-
Do not place products and their batteries in
microwave ovens or on induction cookers.
-
Do not open, modify, pierce, damage or
dismantle the product or battery to prevent
batteries from heating up or releasing
toxic or hazardous substances. Do not
short-circuit, overcharge or reverse charge
batteries.
-
If batteries are damaged or leaking, avoid
contact with the skin or eyes. If this occurs,
immediately rinse well with water and seek
medical care.
-
When you handle batteries, make sure that
your hands, the product and the batteries
are dry.
-
To avoid accidental short-circuiting of
batteries after removal, do not let battery
terminals come into contact with metal
objects (e.g. coins, hairpins, rings). Do not
wrap batteries in aluminum foil. Tape
battery terminals or put batteries in a
plastic bag before you discard them.
SAVE THESE
INSTRUCTIONS
MG7770_4222.002.8948.2_LEAFLET_foldesA7_BW.indd 1-4
MG7770_4222.002.8948.2_LEAFLET_foldesA7_BW.indd 1-4
10-02-22 15:43
10-02-22 15:43
"Loading the manual" means you need to wait until the file loads and becomes available for online reading. Some manuals are very large, and the time they take to appear depends on your internet speed.
Was this manual helpful?
About this manual
- Brand
- Philips
- Model
- MG7770/49
- Document type
- User Manual
- Language(s)
- English
- Pages
- 2
- File size
- 1.4 MB
- Format
Ask a question
Related manuals
Popular Philips Other


More Philips Other models
 Philips MG7720/18 User Manual
 Philips MG7730/15 User Manual
 Philips MG7736/15 User Manual
 Philips MG7736/25 User Manual
 Philips MG7745/15 Quick Guide
 Philips MG7750/49 User Manual
 Philips MG7785/20 User Manual
 Philips MG7790/40 User Manual
 Philips MG7796/40 User Manual
 Philips MG7920/15 User Manual
 Philips MG7925/15 User Manual
 Philips MG7930/15 User Manual