Page 4 - IMPORTANT; WARNINGS; ENGLISH
4 Introduction Congratulations on your purchase and welcome to Philips! To fully benefit from the suppor t that Philips offers, register your product at www.philips.com/ welcome . IMPORTANT SAFEGUARDS READ ALL INSTRUCTIONS BEFORE USEDANGERS To reduce the risk of electrocution: 1 Do not place or stor...
Page 6 - MEDICAL WARNINGS; SAVE THESE
15 Do not operate the UV sanitizer without the protective screen in place to avoid contact with the hot bulb. 16 If the sanitizer is used for 3 consecutive UV clean cycles (i.e., 3 times in a row) a minimum of 30 minutes ‘Off Time’ is required before you star t another UV clean cycle. MEDICAL WARNIN...
Page 7 - Note: The contents of the box may vary based on the; Getting started; Align the brush head so the bristles face the
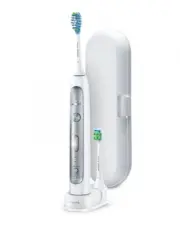
Your Sonicare (Fig. 1) 1 Hygienic travel cap 2 Brush head with unique identifier 3 Handle 4 Power on/off button 5 Intensity level indicator 6 Intensity level button (+ and -) 7 Brushing modes 8 Mode button 9 Batter y level indicator 10 UV sanitizer and base with integrated charger and cord wrap (sel...
Page 8 - Charging your Sonicare; Note: It takes at least 24 hours to fully charge the; Using your Sonicare; Note: Keep the center of the brush in contact with the
Charging your Sonicare 1 Put the plug of the charger or sanitizer in an electrical outlet. 2 Place the handle on the charger. , The flashing light of the battery level indicator shows that the toothbrush is charging. Note: It takes at least 24 hours to fully charge the battery. Using your Sonicare B...
Page 10 - Brushing modes; Prior to turning on the Sonicare, press the
Note: After you have completed the brushing cycle, you can spend additional time brushing the chewing surfaces of your teeth and areas where staining occurs. You may also brush your tongue, with the toothbrush turned on or off, as you prefer. Your Sonicare is safe to use on: - Braces (brush heads ma...
Page 11 - A change in vibration (and a slight change in sound); Battery status (when handle is not on
Intensity levels per mode - Low : 1 LED indicator light. - Medium : 2 LED indicator lights. - High : 3 LED indicator lights. Note: to adjust the intensity level to the next higher or lower level, you can press the + button to increase intensity or the - button to decrease intensity at any time durin...
Page 13 - Smartimer; Note: Each of the first 14 brushings must be at least
Smartimer The Smar timer indicates that your brushing cycle is complete when it automatically turns off the toothbrush at the end of the brushing cycle. Dental professionals recommend brushing at least 2 minutes twice a day. Easy-start The Easy-star t feature gently increases power over the first 14...
Page 14 - Note: UV light can be harmful to the human eye and
Sanitizing (select models) - With the UV sanitizer you can clean your brush head after ever y use. Unplug the sanitizer, discontinue use and call Consumer Care if : - The UV light bulb remains on when the door is open. - The window is broken or missing from the sanitizer. - The sanitizer gives off s...
Page 15 - Cleaning
6 Close the door and press the green power on/off button once to start the UV clean cycle. Note: You can only turn on the sanitizer if the door is properly closed.Note: The sanitizer stops if you open the door during the sanitizing cycle.Note: The sanitizer cycle runs for 10 minutes and then automat...
Page 16 - Brush head; For optimal effectiveness, it is recommended to
Brush head 1 Rinse the brush head and bristles after each use. 2 Remove the brush head from the handle and rinse the brush head connection at least once a week with warm water. UV sanitizer (select models) Do not immerse the sanitizer in water or rinse it under the faucet.Do not clean the sanitizer ...
Page 17 - Storage
7 Reinsert the UV light bulb. To reinser t the light bulb, align the bottom of the light bulb with the metal clasp and push the bulb into the clasp. 8 Reinsert the protective screen. To reinser t the screen, align the pegs on the screen with the slots on the reflective surface near the UV light bulb...
Page 19 - Warranty and support
4 Hold the handle upside down and push down on the shaft to release the internal components of the handle. 5 Insert the screwdriver under the circuit board, next to the battery connections, and twist to break the connections. Remove the circuit board and pry the battery from the plastic carrier. The...
Page 21 - Introducción; PRECAUCIONES; LEA TODAS LAS INSTRUCCIONES ANTES DE; ADVERTENCIAS; ESPAÑOL
21 Introducción Enhorabuena por la compra de este producto y bienvenido a Philips. Para sacar el mayor par tido de la asistencia que Philips le ofrece, registre su producto en www.philips.com/welcome . PRECAUCIONES IMPORTANTES LEA TODAS LAS INSTRUCCIONES ANTES DE USARLOPELIGROS Para reducir el riesg...
Page 23 - ADVERTENCIAS MÉDICAS
13 Sonicare es un dispositivo de higiene personal para uso doméstico y no ha sido concebido para su uso en múltiples pacientes de clínicas o instituciones. 14 Deje de utilizar el higienizador si la lámpara de rayos ultravioleta (UV) permanece encendida cuando la puer ta está abier ta. La luz UV pued...
Page 24 - Nota: El contenido de la caja puede variar en función
Campos electromagnéticos (CEM) Este aparato de Philips cumple los estándares y las normativas aplicables sobre exposición a campos electromagnéticos. CONSERVE ESTAS INSTRUC- CIONES Su Sonicare (fig. 1) 1 Capuchón higiénico 2 Cabezal del cepillo con identificador exclusivo 3 Mango 4 Botón de encendid...
Page 25 - Nota: Los cabezales del cepillo Sonicare Platinum; Uso del Sonicare
Antes de empezar Cómo fijar el cabezal del cepillo 1 Alinee el cabezal del cepillo de manera que las cerdas queden mirando hacia la parte frontal del mango. 2 Presione firmemente hacia abajo el cabezal del cepillo sobre el eje metálico hasta que encaje. Nota: Los cabezales del cepillo Sonicare Plati...
Page 29 - Estado de la batería (cuando el mango no; - 3 LED verdes indican una carga completa.; Características; Este modelo de Sonicare incluye un sensor de
Estado de la batería (cuando el mango no está en el cargador) - 1 LED amarillo indica una carga baja. - 3 LED verdes indican una carga completa. Nota: Si oye un pitido largo y el LED amarillo del indicador de nivel de la batería parpadea, el Sonicare se apagará hasta que lo coloque en el cargador, d...
Page 32 - Nota: La luz UV puede ser perjudicial para los ojos y
Higienización (en algunos modelos) - Con el higienizador por rayos UV puede limpiar el cabezal del cepillo después de cada uso. Desenchufe el higienizador, deje de utilizarlo y llame al Servicio de Atención al Cliente si : - La lámpara de rayos UV permanece encendida cuando la puer ta está abier ta....
Page 33 - Limpieza
5 Asegúrese de que el higienizador esté enchufado a la corriente eléctrica. 6 Cierre la puerta y pulse una vez el botón verde de encendido/apagado para iniciar el ciclo de limpieza de rayos UV. Nota: El higienizador sólo se puede encender si la puerta está bien cerrada.Nota: El higienizador se apaga...
Page 35 - Almacenamiento
7 Vuelva a colocar la lámpara de rayos UV. Para volver a colocar la lámpara, alinee la par te inferior de la misma con el casquillo metálico y empújela para introducirla en el mismo. 8 Vuelva a colocar la pantalla protectora. Para volver a colocar la pantalla, alinee los salientes de la pantalla con...
Page 37 - Garantía y asistencia
3 Coloque el mango en una superficie sólida con los botones orientados hacia arriba y dé un ligero golpe en la carcasa a dos centímetros y medio del borde inferior con un martillo. 4 Sujete el mango boca abajo y presione en el eje para sacar los componentes del mango. 5 Introduzca el destornillador ...
Page 39 - Introduction; MISES EN GARDE; LISEZ TOUTES LES INSTRUCTIONS AVANT; AVERTISSEMENTS
39 Introduction Félicitations pour votre achat et bienvenue dans l’univers Philips! Pour profiter pleinement du soutien de Philips, enregistrez votre produit sur le site : www.philips.com/welcome . MISES EN GARDE IMPORTANTES LISEZ TOUTES LES INSTRUCTIONS AVANT D’UTILISER L’APPAREILDANGER Pour éviter...
Page 41 - MISES EN GARDE D’ORDRE MÉDICAL
12 Les enfants doivent être sur veillés pour s’assurer qu’ils ne s’amusent pas avec l’appareil. 13 Sonicare est un appareil conçu pour un usage domestique et n’est pas destiné à un usage par plusieurs patients dans un cabinet ou une clinique dentaire. 14 Cessez l’utilisation de l’assainisseur si l’a...
Page 42 - Remarque : Le contenu de la boîte peut varier selon le
Champs électromagnétiques (CEM) Cet appareil Philips est conforme à toutes les normes et réglementations relatives à l’exposition aux champs électromagnétiques. CONSERVEZ CES CONSIGNES Votre brosse à dents Sonicare (fig. 1) 1 Capuchon de protection hygiénique 2 Tête de brosse avec système d’identifi...
Page 43 - Remarque : Les têtes de brosse Sonicare Platinum; Utilisation de la brosse à dents Sonicare
Préparation Fixation de la tête de brosse 1 Alignez la tête de brosse de manière à ce que les soies se retrouvent à l’avant du manche. 2 Pressez fermement la tête de brosse sur la tige de métal jusqu’à ce qu’elle s’arrête. Remarque : Les têtes de brosse Sonicare Platinum comportent un symbole facile...
Page 45 - Modes de brossage
7 Commencez par la section 1 (haut à l’extérieur) et brossez pendant 30 secondes (45 secondes en mode nettoyage en profondeur) avant de passer à la section 2 (haut à l’intérieur). Brossez ensuite les dents de la section 3 (bas à l’extérieur) pendant 30 secondes (45 secondes en mode nettoyage en prof...
Page 47 - Remarque : Si vous entendez un long signal sonore; Caractéristiques
Niveau de la batterie (lorsque le manche n’est pas placé sur le chargeur) - 1 voyant à DEL jaune indique un niveau de charge faible. - 3 voyants à DEL ver ts indiquent une charge complète. Remarque : Si vous entendez un long signal sonore et que le voyant DEL jaune d’indicateur de charge clignote, v...
Page 49 - Débranchez l’assainisseur, cessez d’utiliser
La fonction Easy-star t est désactivée par défaut sur ce modèle Sonicare. Pour activer et désactiver la fonction Easy-star t : 1 Fixez la tête de brosse à la poignée. 2 Placez le manche sur le chargeur ou l’assainisseur. 3 Activer ou désactiver Easy-start : , Pour activer Easy-start : appuyez sur le...
Page 51 - Nettoyage
6 Fermez le compartiment et appuyez sur le bouton marche/arrêt vert une fois pour sélectionner le cycle de nettoyage UV. Remarque : Vous ne pouvez mettre en marche l’assainisseur que si le compartiment est correctement fermé.Remarque : L’assainisseur s’arrête si vous ouvrez le compartiment pendant u...
Page 52 - Tête de brosse
Tête de brosse 1 Rincez la tête de brosse et les soies après chaque utilisation. 2 Retirez la tête de brosse du manche et rincez le raccord de la tête de brosse au moins une fois par semaine avec de l’eau tiède. Assainisseur UV (modèles sélectionnés) Ne plongez pas l’assainisseur dans l’eau et ne le...
Page 53 - Remettre l’écran protecteur en place.; Entreposage
8 Remettre l’écran protecteur en place. Pour réinsérer l’écran, alignez les taquets de fixation de l’écran avec les fentes de la surface du réflecteur située près de l’ampoule UV. Appuyez sur l’écran pour qu’il s’enclenche dans les fentes de l’assainisseur. Entreposage Si vous prévoyez ne pas utilis...
Page 55 - Garantie et assistance
3 Posez le manche sur une surface solide et tapez délicatement dessus à un pouce de son extrémité inférieure à l’aide d’un marteau. 4 Tenez le manche sens dessus dessous et poussez sur la tige pour libérer les composantes internes du manche. 5 Insérez le tournevis sous la carte de circuit, à côté de...