Page 2 - ENGLISH
2 ENGLISH Congratulations on your purchase, and welcome to Philips! To fully benefit from the support that Philips offers, register your product at www.Philips.com/welcome. Read this user manual carefully before you install and use the unit. Save it for future reference. What's in the box Shaping di...
Page 3 - Contents; Disassembling and cleaning
ENGLISH 3 Contents What's in the box ����������� 2 Contents ��������������� 3Important �������������� 4Overview ��������������� 6 Disassembling and cleaning before first use ������������ 8 Assembling ������������� 10Using the pasta and noodle maker ���� 12Cleaning �������������� 18 Troubleshooting �...
Page 4 - Important; EMF
4 ENGLISH Important Safety • Read this user manual carefully before you use the appliance, and save it for future reference. • Before you connect the appliance to the power, make sure that the voltage indicated on the bottom of the appliance corresponds to the local power voltage. • Make sure that y...
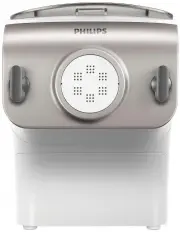
Page 6 - Overview
6 ENGLISH Overview Mixing chamber lid Disc holder Front panel Front panel knobs Shaping discs Disc holder safety switch lever Mixing chamber Mixing paddle
Page 8 - Disassembling and
8 ENGLISH Important 1 Remove the mixing chamber lid from the appliance. 2 Loosen the front panel control knobs. Note: • The front panel is heavy. Take extra caution when removing it. Disassembling and cleaning before first use • Before using the appliance for the first time, remove and safely discar...
Page 10 - Assembling
10 ENGLISH Important Assembling Follow below assembling steps to install the pasta and noodle maker. 1 Push the mixing chamber into the appliance. 2 Point the mixing paddle to the hole in the main unit. Inser t the mixing paddle all the way into the main unit. 3 Attach the disc holder onto the appli...
Page 12 - Using the pasta and; Preparing the ingredients
12 ENGLISH Important Using the pasta and noodle maker Preparing the ingredients 1 Measure one full cup of flour. Scrape off any excessive flour from the cup edge with the supplied flat cleaning tool. One full cup is equivalent to 1-2 ser vings. Note: • Do not shake or hit the flour cup to remove exc...
Page 14 - Pasta/noodle making recipe table
14 ENGLISH Pasta/noodle making recipe table For more information, you can visit www.philips.com/kitchen. Flour/water ratio table Flour Normal pasta/ noodle Egg pasta/noodle Processing time Output Water (marking) Water + egg mixture (marking) 1 flour cup (~250g) Amount of water needed for a cup of fl...
Page 16 - Selecting the pasta/noodle making program
16 ENGLISH Selecting the pasta/noodle making program 1 Connect the power plug to any 240V AC outlet. The pasta and noodle maker will sound once, and all indicators will flash once. Press the power on/off button to switch on the pasta and noodle maker. 2 Based on the amount of flour, press the ser vi...
Page 18 - Cleaning
18 ENGLISH Important 1 Press the power on/off button to turn off the pasta and noodle maker, and then disconnect the plug from the power outlet. 2 Remove the chamber lid from the appliance. Cleaning • Disconnect the power and remove the power cord before cleaning or disassembling this appliance. • D...
Page 20 - Storing the shaping discs and cleaning tools
20 ENGLISH 7 Clean all detachable par ts. 8 Use a dr y cloth to clean the main unit, control panel, and the exterior of the pasta and noodle maker. 9 Store the pasta and noodle maker in a dr y, well ventilated place after use. Note: • After cleaning, make sure all par ts and the shaping disc are com...
Page 21 - Troubleshooting
ENGLISH 21 Troubleshooting The indicators do not light up. After pressing the start/pause button the appliance sounds but it does not work. • The power plug is not connected correctly. Check whether the power plug is plugged correctly and the outlet is working properly. • The on/off button is not pr...
Page 23 - Product; Recycling
ENGLISH 23 Product information Model HR2357/06 Motor power 200W Rated voltage AC240V (50Hz) Dimensions (L x W x H) 215mm x 343mm x 300mm / 8.5 in x 13.5 in x 11.8 in Weight 7.8kg / 17.2 lb • For rated voltage and frequency information, refer to the typeplate on the product. Product information is su...
Page 24 - Warranty and; WARRANTY; Please keep this warranty card; AUSTRALIA
24 ENGLISH Warranty and service 2-YEAR WARRANTY IMPORTANT: Please keep this warranty card together with your proof of purchase for use when claiming. AUSTRALIA Philips Consumer Lifestyle Consumer Care: 1300 363 391 Website: www.philips.com/support NEW ZEALAND Philips Consumer Lifestyle Consumer Care...
Page 26 - Philips Electronics Australia Limited and
26 ENGLISH Philips Electronics Australia Limited and Philips New Zealand Limited Warranty against Defects In this warranty: We or us means Philips Electronics Australia Limited ACN 008 445 743 or Philips New Zealand Limited (Company Number 1723), and our contact details are set out at the end of thi...
Page 28 - 简体中文; 包装盒内物品
28 简体中文 感谢您的惠顾,欢迎光临飞利浦!为充分享受飞利浦提供的支持,请在 www.philips.com/welcome 注册您的产品。 在安装和使用产品之前,请仔细阅读本用户手册。妥善保管以供日后参考。 包装盒内物品 塑形模块 清洁工具 千层面 / 饺子 意式通心粉 意式宽面条 水杯 说明书 食谱 主装置 面粉杯 扁平清洁工具 使用扁平清洁工具 使用扁平清洁工具 意式细面条 - 购买时组装 在产品上
Page 29 - 目录
简体中文 29 目录 包装盒内物品 ……………………………… 28 目录 ………………………………………… 29 重要信息 …………………………………… 30 总体说明 …………………………………… 32 首次使用前的拆卸和清洁 ………………… 34 组装 ………………………………………… 36 使用意面 / 面条机 ………………………… 38 清洁 ………………………………………… 44 故障检修 …………………………………… 47 产品信息 …………………………………… 49 回收 ………………………………………… 49
Page 30 - 重要信息
30 简体中文 重要信息 安全 • 使用本产品之前,请仔细阅读本用户手册,并妥善保管以备日后参考。 • 在将产品连接到电源之前,确保产品底部上标示的电压与当地的电源电压相符。 • 将插头插入电源插座之前,双手要保持干燥。 • 确保插头牢固插入电源插座。 • 切勿将本产品连接到定时开关。 • 将插头插入电源插座之前,确保正确组装产品。 • 如果电源线、插头或其他部件受损,请勿再使用本产品。 • 如果电源线损坏,为避免危险,必须由飞利浦或其授权的服务中心,或类似的专职人员进行更换。 • 请勿自行更换产品部件。 • 本产品不适合由肢体不健全、感觉或精神上有障碍或缺乏相关经验和知识的人(包括儿童)使用...
Page 32 - 总体说明
32 简体中文 总体说明 搅拌容器盖 塑形模块支撑架 前面板 前面板旋钮 塑形模块 塑形模块支撑架 安全开关连杆 搅拌容器 搅拌棒
Page 34 - 首次使用前的
34 简体中文 重要信息 1 从产品上卸下搅拌容器盖。 2 拧松前面板控制钮。 注意: • 前面板很重。取下时要加倍小心。 首次使用前的 拆卸和清洁 • 第一次使用产品前,请拆下并安全弃置任何包装材料和 / 或促销标签。 • 取出所有部件和附件,清洗并彻底干燥所有部件和附件(请参阅 “ 清洁 ” 部分)。 • 请勿用水冲洗或浸泡主装置。 • 请勿使用钢丝绒或类似的清洁工具,以免刮花意面 / 面条机的塑料表面和影 响使用寿命。 • 本产品仅限于家用。
Page 36 - 组装
36 简体中文 重要信息 组装 按照以下组装步骤安装意面 / 面条机。 1 将搅拌容器推入产品。 2 将搅拌棒对准主装置中的孔。将搅拌棒一直插入主装置。 3 将塑形模块支撑架安装到产品上。 ❶ 塑形模块支撑架安全开关 ❷ 塑形模块支撑架安全开关连杆 注意: • 检查安全开关 ❶ 和安全开关杆 ❷ 是否按 右图所示设置完毕。 1 2 • 组装时确保拧紧前面板旋钮。 • 组装时产品不要通电。
Page 38 - 使用意面; 准备原料
38 简体中文 重要信息 使用意面 / 面条机 准备原料 1 量取一满勺面粉。使用提供的扁平清洁工具,沿杯缘刮去多余的面粉。一满勺相当于 1-2 人份。 注意: • 不要晃动或击打面粉杯来去除多余的面粉。这会影响面粉重量。 也可以使用厨房秤来称取面粉。例如,约 250 克面粉可制作 1-2 人份;约 500 克面粉 可制作大约 3-4 人份的新鲜意面 / 面条。 • 确保依照正确的顺序将面粉和水加入搅拌容器。先将面粉放入搅拌容器,然后再盖好搅拌容器盖。启动意面 / 面条机,然后沿着盖的整个开口缓慢注水。 • 切勿将过多原料装入意面 / 面条机。否则会损坏产品。每次可用最大面粉量 为 500 克...
Page 44 - 清洁
44 简体中文 重要信息 1 按电源开 / 关按钮 关闭意面 / 面条机,然 后从电源插座上拔出插头。 2 从产品上卸下搅拌容器盖。 清洁 • 清洁或拆卸本产品之前,请断开电源并拔出电源线。 • 请勿将主装置浸入水中。 • 请勿使用钢丝绒、碱性洗洁剂或磨蚀性清洁剂(例如汽油、酒精和丙醇)清洁产品。 • 每次使用后都要清洁产品,否则产品可能无法正常运行。 • 清洁产品时要加倍小心,以免被任何锋利边缘割伤。
Page 46 - 存储塑形模块和清洁工具
46 简体中文 7 清洁所有可拆卸部件。 8 使用干布清洁主装置、控制面板以及意面 / 面条机的外表面。 9 使用后,将意面 / 面条机存放在干燥、通风 良好的地方。 注意: • 清洁后,确保所有部件和塑形模块都完全干燥,然后再存放起来。重新组装意面 / 面条机以备下次使用。 存储塑形模块和清洁工具 1 将塑形模块 ❶ 和清洁工具 ❷ 插在一起。将 ❶ 和 ❷ 放入存储抽屉中。移动 滑动条 ❸ 固定塑形模块和清洁工具。 确保将清洁工具和塑形模块晾干后再装入存储抽屉。 2 3 1
Page 47 - 故障检修
简体中文 47 故障检修 指示灯未亮起。 按下开始 / 暂停按钮 后,产品发出声音但不工作。 • 电源插头未插好。 检查电源插头是否插好,插座是否可以正常使用。 • 开 / 关按钮未按下。 按下电源开 / 关按钮 。 • 搅拌容器未装好。 塑形模块或前面板未装好。 确保按照用户手册正确组装所有部件。 • 未选择首选份量。 按下开始 / 暂停按钮之前,请确保您已选择了份量。 加工过程中触发了安全开关,产品突然停止或突然重启。 • 前面板旋钮出现松动。 确保牢固组装前面板。 • 意面 / 面条机中装入的原料过多。 每次可用最大面粉量为 500 克。如果加入了 500 克以上的面粉,请减少面粉量再制...
Page 49 - 产品信息; 回收
简体中文 49 产品信息 型号 HR2357/06 电机功率 200 瓦 电压 交流 240 伏( 50 赫兹) 尺寸(长 x 宽 x 高) 215 毫米 x 343 毫米 x 300 毫米 / 8.5 英寸 x 13.5 英寸 x 11.8 英寸 重量 7.8 千克 / 17.2 磅 • 有关额定电压和频率信息,请参阅产品上的铭牌。产品信息如有更改,恕不另行通知。 弃置产品时,请不要将其与一般生活垃圾堆放在一起,应将其交给官方指定的回收中心。这样做有利于环保。 回收