Page 2 - Getting started; Packing List; USB Cable to PC; What else you'll need; RETURN TO TOP OF THE PAGE
• Packing list • Initial setup • Specification Getting started Packing List Digital PhotoFrame™ PhotoFrame™ Stand Quick start guide User manual CD Power adaptor USB Cable to PC (male A type plug) What else you'll need Power outlet Digital Photos, memory card or PC RETURN TO TOP OF THE PAGE ©2005 Kon...
Page 3 - Initial setup; A. Removing the protective bag/film on parts; Place head of stand into socket; C. Connecting to a power source; Use your PhotoFrameTM by pressing the control keys in the back.
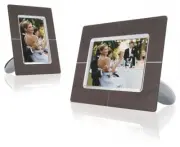
• Packing list • Initial setup • Specification Getting started Initial setup Philips digital PhotoFrame™ can be placed either vertically or horizontally to fit the photos on display. Its internal rechargeable battery provides you the freedom to pass it around and show photos without the power cord. ...
Page 5 - Specification; Connectivity; standards
• Packing list • Initial setup • Specification Getting started Specification Picture/Display - Effective display area: 137 x 91 mm (5.4" x 3.6"), 6.5" diagonal - Vertical dot pitch: 0.1905 mm - Horizontal dot pitch: 0.1905 mm - Resolution: 720 x 480 pixels - Brightness: 200 nits - Viewin...
Page 8 - Enjoying photos; Viewing Photos; Memory stick
• Viewing photos • Copying photos • Viewing photo slideshows • Deleting and Rotating photos Enjoying photos Viewing Photos When there is no memory card in PhotoFrame™, it displays photos stored in local memory. When a memory card is inserted to PhotoFrame™, it will display photos from most recently ...
Page 10 - Viewing photos on PhotoFrameTM; How to remove a memory card:
A Each icon represents the function of the corresponding key in the rear of PhotoFrame™. B Source of photos on screen Memory stick Compact flash SD, MMC PhotoFrame™ C Current Photo number D Total photo count E Resolution of current photo (in pixels) F Date current photo was taken Viewing photos on P...
Page 11 - Copying Photos; Copying from a memory card
• Viewing photos • Copying photos • Viewing photo slideshows • Deleting and Rotating photos Enjoying photos Copying Photos You can copy photos stored on a memory card, or PC to PhotoFrame™. PhotoFrame™ will then internally store a resized copy of the original photo. This resized copy will remain ins...
Page 12 - copying PC Photos to PhotoFrameTM
• Use the or key to move, to add photos to copy list, to remove photos from copy list, and then press the to confirm the copy list. Photos on the copy list are shown with a small copy icon . Do not remove the memory card before the copy screen disappears upon completion. If a warning message shows u...
Page 13 - Viewing Photo Slideshows; Picking photos for slideshow; A menu with specific settings for the selected photo will appear.; Choosing slideshow frequency
• Viewing photos • Copying photos • Viewing photo slideshows • Deleting and Rotating photos Enjoying photos Viewing Photo Slideshows When you set the PhotoFrame™ view mode to Slideshow, it will automatically rotate the PhotoFrame™ed on screen. You may handpick the photos for slideshow and chooseslid...
Page 14 - Choosing transition effects; to photos stored on all media.
• Press the key to select Slideshow settings and use the or key to move to the Frequency item. Next press the key again to select Frequency settings. • Use the or key to highlight the interval a photo remains on screen and press to confirm. • Now your selected setting is confirmed. • Press to leave ...
Page 15 - Choosing photo order; Indicating PhotoFrameTM placement orientation
• Use the or key to highlight the way one photo replaces the next on screen. Press to confirm your selection. Now your selected setting is confirmed. Press to leave this menu. Choosing photo order Note: This function applies to photos stored on all media. • Press the key (the 3 rd key from the left ...
Page 16 - Selecting correct photo orientation for Slideshow
• Press key to select Slideshow settings; press key again to select Orientation. • Use the or key to highlight how you want to place PhotoFrame™. Press to confirm your selection. Now your selected setting is confirmed. • Press to leave this menu. Selecting correct photo orientation for Slideshow Not...
Page 18 - Deleting and Rotating photos; Rotating a photo
• Viewing photos • Copying photos • Viewing photo slideshows • Deleting and Rotating photos Enjoying photos Deleting and Rotating photos Sometimes you may want to delete some photos stored on PhotoFrame™ or change the orientation of photos. Here is how: Rotating a photo Note: This function only appl...
Page 19 - Delete several photos at once in Thumbnail mode
• Use the or key to highlight Delete Photo; Press to confirm. • When you delete a photo, PhotoFrame™ will show status and return to Brose mode after completion. Delete several photos at once in Thumbnail mode • Change view mode to Thumbnail. • Highlight the photo for delete in Thumbnail mode and pre...
Page 20 - Optimizing PhotoFrameTM; Setting a general brightness level; Setting your local time
• Selecting brightness, language and set time functions • Checking PhotoFrame™ status • Taking care of your PhotoFrame™ Optimizing PhotoFrame™ Selecting brightness, language and set time functions Use this section to select PhotoFrame™ brightness levels and on-screen information displa language. You...
Page 21 - Setting evening brightness level
Press the key (the 3 th key from the left on the rear of PhotoFrame™). A menu with general settings for PhotoFrame™ will appear. • Use the or key to highlight Time functions. Next press the key to select. • Press the key again to select Current Time. A clock will appear for you to set Hours, Minute,...
Page 22 - Setting daily automatic turn-off and turn-on time
• Press the key (the 3 rd key from the left on the rear of PhotoFrame™). A menu with general settings for PhotoFrame™ will appear. • Use the or key to highlight Time functions. Next, press the key to select. • Use the or key to highlight 6PM-6AM Brightness and press the key to select. • Use the or k...
Page 23 - Choose on-screen language
• Use the or key to highlight Time functions. Next, press the key to select. • Use the or key to highlight Auto on/off timer. Next, press the key to select. • Select Enabled and press to confirm. • Move to Auto on at and press key to select. • Set the time to turn on PhotoFrame™ everyday and press t...
Page 25 - XX
• Selecting brightness, language and set time functions • Checking PhotoFrame™ status • Taking care of your PhotoFrame™ Optimizing PhotoFrame™ Checking PhotoFrame™ status You may check the status of your PhotoFrame™— whether the system is ON, if the batte is charging, how many more photos can be sto...
Page 26 - Taking care of your PhotoFrameTM; Please use only dry soft cloth to clean your screen.
• Selecting brightness, language and set time functions • Checking PhotoFrame™ status • Taking care of your PhotoFrame™ Optimizing PhotoFrame™ Taking care of your PhotoFrame™ 1) Do not drop PhotoFrame™ is a complicated electronic device and cannot withstand shock from drops 2) Do not expose to moist...
Page 27 - Frequently asked questions; stored on that specific card.; Why doesn't my PhotoFrameTM show some of my photos?
Frequently asked questions 1) Q: Is the LCD screen touch-enabled? A: The LCD screen is not touch-enabled. Please use the keys in the back to control PhotoFrame™. 2) Q: Can I switch between different slideshows photos by using different memory cards? A: Yes. When you connect your memory card to Photo...
Page 29 - Troubleshooting; Troubleshooting your PhotoFrameTM
• Troubleshooting your PhotoFrame™ • Keeping your PhotoFrame™ up to date Troubleshooting Troubleshooting your PhotoFrame™ Please see below for various situations and recommended actions. Situations Recommended actions Warning message: "Low battery" Recharge PhotoFrame™ or turn off PhotoFrame...
Page 30 - Service and Warranty
• International Warranty • For European Countries • USA Service and Warranty z z z z Your Philips Warranty Thank you for purchasing this Philips product. All Philips products are designed and manufactured to high standards and deliver high- quality performance, ease of use and ease of installation. ...
Page 31 - Contact; instructions carefully or go to the; WESTERN EUROPE
z z z z z z z z { { z z z else; Defects caused by abuse or misuse of the product; This warranty does not cover accessories belonging to the product. Product requires modification or adaptation to enable it to comply with local or national technical standards, which apply in countries for which the p...
Page 33 - Consumer Information Centers; Eastern Europe; BELARUS
Consumer Information Centers Antilles • Argentina • Australia • Bangladesh • Brasil • Chile • China • Colombia • Belarus • Bulgaria • Croatia • Czech Republic • Estonia • Dubai • Hong Kong • Hungary • India • Indonesia • Korea • Latvia • Lithuania • Malaysia • Mexico • Morocco • New Zealand • Pakist...
Page 35 - Latin America; Industrias Philips de Colombia
Tel: +7 095 961-1111 Tel: 8-800-200-0880 Website: www.philips.ru TURKEY Türk Philips Ticaret A.S. Yukari Dudullu Org.San.Bolgesi 2.Cadde No:22 34776-Umraniye/Istanbul Tel: (0800)-261 33 02 UKRAINE Comel Shevchenko street 32 UA - 49030 Dnepropetrovsk Tel: +380 562320045 www.csp-comel.com Latin Americ...
Page 36 - Pacific
Phone:(01)-8000 111001 (toll free) Fax : (01)-619-4300/619-4104 MEXICO Consumer Information Centre Norte 45 No.669 Col. Industrial Vallejo C.P.02300, -Mexico, D.F. Phone: (05)-3687788 / 9180050462 Fax : (05)-7284272 PARAGUAY Av. Rca. Argentina 1780 c/Alfredo Seiferheld P.O. Box 605 Phone: (595 21) 6...
Page 37 - Asia; BANGLADESH
2 Wagener Place, Mt.Albert P.O. box 1041 Auckland Phone: 0800 477 999 (toll free) Fax : 0800 288 588 Asia BANGLADESH Philips Service Centre 100 Kazi Nazrul Islam Avenue Kawran Bazar C/A Dhaka-1215 Phone: (02)-812909 Fax : (02)-813062 CHINA SHANGHAI Rm 1007, Hongyun Building, No. 501 Wuning road, 200...
Page 39 - Africa; MOROCCO; Middle East; DUBAI
Accord Customer Care Solutions Ltd Authorized Philips Service Center Consumer Service 620A Lorong 1 Toa Rayoh Singapore 319762 Tel: +65 6882 3999 Fax: +65 6250 8037 TAIWAN Philips Taiwan Ltd. Consumer Information Centre 13F, No. 3-1 Yuan Qu St., Nan Gang Dist., Taipei 115, Taiwan Phone: 0800-231-099...
Page 40 - Philips Pixel Defect Policy; Pixels and Sub pixels; displays a dark pattern. There are the types of bright dot defects:; Two adjacent lit sub pixels:
Philips Pixel Defect Policy Philips strives to deliver the highest quality products. We use some of the industry's most advanced manufacturing processes and practice stringent quality control. However, pixel or sub pixel defects on the TFT LCD panels used in flat panel monitors are sometimes unavoid...
Page 41 - displays a light pattern. These are the types of black dot defects:; Proximity of Pixel Defects; MODEL
Black Dot Defects Black dot defects appear as pixels or sub pixels that are always dark or'off'. That is, a dark dot is a sub-pixel that stands out on the screen when the monitor displays a light pattern. These are the types of black dot defects: One dark sub pixel Two or three adjacent dark sub pix...
Page 42 - Regulatory; For help and service, please read the section of; Recycling Information for Customers
Regulatory Philips establishes technically and economically viable objectives to optimize the environmental performance of the organization's product, service and activities. From the planning, design and production stages, Philips emphasizes the important of making products that can easily be recyc...
Page 43 - Banned Substance Declaration
This product comply with RoHs and Philips BSD (AR17-G04-5010-010) requirements z Philips Consumer Electronics declare under our responsibility that the product is in conformity with the following standards - EN60950:2000 (Safety requirement of Information Technology Equipment) - EN55022:1998 (Radio ...
Page 44 - FCC Declaration of Conformity; Responsible Party: Philips Consumer Electronics North America; Commission Federale de la Communication (FCC Declaration)
THIS CLASS B DIGITAL APPARATUS MEETS ALL REQUIREMENTS OF THE CANADIAN INTERFERENCE-CAUSING EQUIPMENT REGULATIONS. RETURN TO TOP OF THE PAGE This device complies with Part 15 of the FCC Rules. Operation is subject to the following two conditions: (1) this device may not cause harmful interference, an...
Page 45 - Class B ITE; EN 55022 Compliance (Czech Republic Only)
Les raccordements à cet appareil doivent être réalisés avec des câbles blindés à protections métalliques pour les connecteurs RFI/EMI afin de maintenir la conformité avec les Règlements et la Législation du FCC. CET APPAREIL NUMERIQUE DE LA CLASSE B RESPECTE TOUTES LES EXIGENCES DU REGLEMENT SUR LE ...
Page 46 - Polish Center for Testing and Certification Notice; Placering/Ventilation
RETURN TO TOP OF THE PAGE The equipment should draw power from a socket with an attached protection circuit (a three-prong socket). All equipment that works together (computer, monitor, printer, and so on) should have the same power supply source. The phasing conductor of the room's electrical insta...
Page 48 - Waste Electronics and Electrical Equipment (WEEE)
For additional information on recycling contact www.eia.org (Consumer Education Initiative) RETURN TO TOP OF THE PAGE RETURN TO TOP OF THE PAGE Waste Electronics and Electrical Equipment (WEEE) This product is labelled with this symbol in accordance with European Directive 2002/96/EG to indicate tha...