Page 2 - Packing list; Getting started; Packing List; USB Cable to PC; What else you'll need
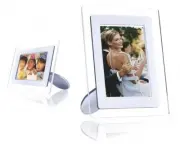
Packing List • Packing list • Initial setup • Specification Getting started Packing List Digital Photo Display Photo display Stand Quick start guide User manual CD Power adaptor USB cable to Digital Camera (female A type plug) USB Cable to PC (male A type plug) What else you'll need file:///D|/EDFU/...
Page 3 - Power outlet; RETURN TO TOP OF THE PAGE
Packing List Power outlet Digital Photos on camera, memory card or PC RETURN TO TOP OF THE PAGE ©2005 Koninklijke Philips Electronics NV All rights reserved. Reproduction, copying, use, modification, hiring, renting, public performance, transmission and/or broadcasting in whole or in part is prohibi...
Page 4 - Initial setup; the room for constant photo display by connecting it to the main.; C. Connecting to a power source
Initial setup • Packing list • Initial setup • Specification Getting started Initial setup Philips digital photo display can be placed either vertically or horizontally to fit the photos on display. Its internal rechargeable battery provides you the freedom to pass it around and show photos without ...
Page 5 - Locate control keys
Initial setup Locate control keys • Use your photo display by pressing the control keys in the back. • LCD display also shows the function icon for each key at the same position. Previous/Left Switch view Setup Next/ Right Show/ Hide icon Photo setting Up Copy Confirm Down Delete Escape C. Turning o...
Page 6 - D. Choose your preferred language; Language
Initial setup D. Choose your preferred language • Press the key (the 3 rd key from the left on the rear of Photo Display) A menu with general settings for Photo Display will appear. • Use the or key to highlight Language and press the key to select. • Use the or key to choose your preferred language...
Page 7 - Specification; Connectivity; standards
Specification • Packing list • Initial setup • Specification Getting started Specification Picture/Display - Effective display area: 137 x 91 mm (5.4" x 3.6"), 6.5" diagonal - Vertical dot pitch: 0.1905 mm - Horizontal dot pitch: 0.1905 mm - Resolution: 720 x 480 pixels - Brightness: 200...
Page 9 - Accessories
Specification Photo menu: OSD languages: English, French, German, Italian, Spanish, Simplified Chinese, Russian, Japanese Plug & Play compatibility: Windows 2000/XP or later, Mac OS X or later, Linux Accessories - Included accessories: AC power adaptor, USB cables, Quick start guide - User manua...
Page 11 - Viewing photos; Enjoying photos; Viewing Photos
Viewing Photos • Viewing photos • Copying photos • Viewing photo slideshows • Deleting and Rotating photos Enjoying photos Viewing Photos When there is no memory card in photo display, and neither a digital camera is connected to photo display, it displays photos stored in local memory. When a memor...
Page 12 - Camera
Viewing Photos A Each icon represents the function of the corresponding key in the rear of Photo Display. B Source of photos on screen Camera Compact flash Memory stick SD, MMC Photo Display C Current Photo D Current Photo number E Slideshow icon (If shown, this photo will be shown in slideshow.) F ...
Page 13 - A Each icon represents the function of the corresponding; C Current Photo number
Viewing Photos BROWSE—Manual viewing of photos one-by-one. (Displays size and date) Each icon represents the function of the corresponding key in the rear of Photo Display. A Each icon represents the function of the corresponding key in the rear of Photo Display. B Source of photos on screen Camera ...
Page 14 - D Total photo count
Viewing Photos D Total photo count E Resolution of current photo (in pixels) F Date current photo was taken RETURN TO TOP OF THE PAGE Viewing photos on Photo Display • Remove any memory card or digital camera connection from photo Display. Photos stored in the Photo Display will appear. Viewing digi...
Page 15 - directory will be copied to Photo Display automatically.); Viewing photos from a digital camera; Connect the supplied; Connect the two USB cables and switch on camera in play mode.; A Supplied
Viewing Photos (If you turn on Photo Display after memory card is inserted, the photos in the root directory will be copied to Photo Display automatically.) • After a few seconds photos in the root directory of your memory card will appear. A CF Card B SD/ MMC/MS Card Viewing photos from a digital c...
Page 16 - B Camera's own USB cable
Viewing Photos B Camera's own USB cable RETURN TO TOP OF THE PAGE file:///D|/EDFU/Digital_photo_Display/edoc/PhotoDisplay/english/b1_view.htm (6 of 6)2005-10-03 下午 04:45:57
Page 17 - Copying Photos; Copying from a digital camera or a memory card; Change view mode to
Copying Photos • Viewing photos • Copying photos • Viewing photo slideshows • Deleting and Rotating photos Enjoying photos Copying Photos You can copy photos stored on a memory card, digital camera or PC to Photo Display. Photo Display will then internally store a resized copy of the original photo....
Page 18 - Copy several photos at once in Thumbnail mode; Thumbnail
Copying Photos • Use the or key to select the desired photo orientation and then press the key. Do not remove the memory card or disconnect the camera before the copy screen disappears upon completion. If a warning message shows up indicating no free space for more photos, you may need to remove som...
Page 19 - Copying from/to PC directly
Copying Photos • Use the or key to move, to add photos to copy list, to remove photos from copy list, and then press the to confirm the copy list. Photos on the copy list are shown with a small copy icon . Do not remove the memory card or disconnect the camera before the copy screen disappears upon ...
Page 20 - To copy from PC to Photo Display; the root directory of Photo Display.; To copy from Photo Display to PC
Copying Photos To copy from PC to Photo Display • Select photos to be transferred to Photo Display and copy these photos directly under the root directory of Photo Display. NOTE: Only JPEG format photos are supported. Sub-directories are not supported. The number of photos accepted in this directory...
Page 21 - Copying from one Photo Display to another Photo Display; USB cable to PC; Copying from Photo Display to a digital camera or a memory card
Copying Photos Copying from one Photo Display to another Photo Display • Turn on both Photo Displays. • Connect the source Photo Display - the one with the photos to be copied - with supplied USB cable to PC . • Connect the destination Photo Display - the one to which you want to transfer photos - w...
Page 23 - Viewing Photo Slideshows; Picking photos for slideshow; Browse
Viewing Photo Slideshows • Viewing photos • Copying photos • Viewing photo slideshows • Deleting and Rotating photos Enjoying photos Viewing Photo Slideshows When you set the Photo Display view mode to Slideshow, it will automatically rotate the photo displayed on screen. You may handpick the photos...
Page 24 - Choosing slideshow frequency; Slideshow settings
Viewing Photo Slideshows • Press to leave this menu. Choosing slideshow frequency Note: This function applies to photos stored on all media. • Press the key (the 3 rd key from the left on the rear of Photo Display). A menu with general settings for Photo Display will appear. • Press the key to selec...
Page 25 - Choosing transition effects; Choosing photo order
Viewing Photo Slideshows Choosing transition effects Note: This function applies to photos stored on all media. • Press the key (the 3 rd key from the left on the rear of Photo Display). A menu with general settings for Photo Display will appear. • Press the key to select Slideshow settings and use ...
Page 26 - Slideshow; Indicating Photo Display placement orientation
Viewing Photo Slideshows • A menu with general settings for Photo Display will appear. • Press the key to select Slideshow settings and use the or key to move to the Order item. Next press the key again to select Order settings. • Use the or key to highlight your preference and press to confirm. Now...
Page 27 - Selecting correct photo orientation for Slideshow
Viewing Photo Slideshows • Press key to select Slideshow settings; press key again to select Orientation. • Use the or key to highlight how you want to place Photo Display. Press to confirm your selection. Now your selected setting is confirmed. • Press to leave this menu. Selecting correct photo or...
Page 28 - Rotate
Viewing Photo Slideshows A menu with specific settings for the selected photo will appear. • Use the or key to highlight Rotate . Next, press the to select. • Use the or key to move the highlight among different rotation angles until the thumbnail image on the left shows the desired orientation for ...
Page 29 - Deleting and Rotating photos; Rotating a photo; Deleting a photo; Browse mode
Deleting and Rotating photos • Viewing photos • Copying photos • Viewing photo slideshows • Deleting and Rotating photos Enjoying photos Deleting and Rotating photos Sometimes you may want to delete some photos stored on Photo Display or change the orientation of photos. Here is how: Rotating a phot...
Page 30 - Delete; Delete several photos at once in Thumbnail mode
Deleting and Rotating photos • Press the key (the 4 th key from the left on the rear of Photo Display). A menu with specific settings for the selected photo will appear. • Use the or key to highlight Delete and press the key to select. • Use the or key to highlight Delete Photo ; Press to confirm. •...
Page 32 - Checking Photo Display status; Optimizing Photo Display; Selecting brightness, language and set time functions; Setting a general brightness level
Selecting brightness, language and set time functions • Selecting brightness, language and set time functions • Checking Photo Display status • Taking care of your photo Display Optimizing Photo Display Selecting brightness, language and set time functions Use this section to select Photo Display br...
Page 33 - Setting your local time; Current Time
Selecting brightness, language and set time functions Now your selected settings is confirmed. • Press to leave this menu. Setting your local time • Press the key (the 3 th key from the left on the rear of Photo Display). A menu with general settings for Photo Display will appear. • Use the or key t...
Page 34 - Setting evening brightness level
Selecting brightness, language and set time functions A clock will appear for you to set Hours, Minute, and AM/PM. • Use the or key to set Hours; next then press the key to move to Minutes and use the or key to set Minute . Use to move back for any changes. • Press to confirm. Now your settings are ...
Page 35 - Current Brightness; Setting daily automatic turn-off and turn-on time
Selecting brightness, language and set time functions • Use the or key to highlight Time functions. Next, press the key to select. • Use the or key to highlight 6PM-6AM Brightness and press the key to select. • Use the or key to modify the brightness level and press to confirm and leave. If you choo...
Page 36 - Auto off; Choose on-screen language
Selecting brightness, language and set time functions • Use the or key to highlight Time functions. Next, press the key to select. • Use the or key to highlight Auto on/off timer. Next, press the key to select. • Select Enabled and press to confirm. • Move to Auto on at and press key to select. • Se...
Page 40 - Taking care of your Photo Display; force or hardware with sharp edges.
Taking care of your Photo Display • Selecting brightness, language and set time functions • Checking Photo Display status • Taking care of your photo Display Optimizing Photo Display Taking care of your Photo Display 1) Do not drop Photo Display is a complicated electronic device and cannot withstan...
Page 42 - Frequently asked questions
Frequently asked questions Frequently asked questions 1) Q: Is the LCD screen touch-enabled? A: The LCD screen is not touch-enabled. Please use the keys in the back to control Digital photo display. 2) Q: Can I switch between different slideshows photos by using different memory cards? A: Yes. When ...
Page 45 - Troubleshooting; Troubleshooting your Photo Display
Troubleshooting • Troubleshooting your Photo Display • Keeping your Photo Display up to date Troubleshooting Troubleshooting your Photo Display Please see below for various situations and recommended actions. Situations Recommended actions Warning message: "Low battery" Recharge Photo Displa...
Page 46 - Keeping your Photo Display up to date
Troubleshooting Keeping your Photo Display up to date At times Philips will provide Software to keep your Photo Display up to date. Please register yourself to www.philips.com/register or visit www.p4c.philips.com for latest support news. RETURN TO TOP OF THE PAGE file:///D|/EDFU/Digital_photo_Displ...
Page 47 - International Warranty; Service and Warranty; Your International Guarantee
Service and Warranty • International Warranty • For European Countries • USA Service and Warranty Your International Guarantee Dear Customer, Thank you for purchasing this Philips product which has been designed and manufactured to the highest quality standards. If, unfortunately, something should g...
Page 48 - dealer cannot answer or any related question please contact the
Service and Warranty In case your Philips product is not working correctly or is defective, please contact your Philips dealer. In the event you require service whilst in another country a dealer address can be given to you by the Philips Consumer Help Desk in that country, the telephone and fax num...
Page 49 - Philips Pixel Defect Policy; This policy is valid worldwide.; Pixels and Sub pixels
Philips Pixel Defect Policy Philips Pixel Defect Policy Philips strives to deliver the highest quality products. We use some of the industry's most advanced manufacturing processes and practice stringent quality control. However, pixel or sub pixel defects on the TFT LCD panels used in flat panel mo...
Page 50 - Types of Pixel Defects; Bright Dot Defects; bright dot; A red or blue; dark dot; One dark sub pixel; Proximity of Pixel Defects
Philips Pixel Defect Policy Types of Pixel Defects Pixel and sub pixel defects appear on the screen in different ways. There are two categories of pixel defects and several types of sub pixel defects within each category. Bright Dot Defects Bright dot defects appear as pixels or sub pixels that are ...
Page 51 - MODEL
Philips Pixel Defect Policy BRIGHT DOT DEFECTS ACCEPTABLE LEVEL MODEL 7FF1 series 1 lit subpixel 2 2 adjacent lit subpixels 1 3 adjacent lit subpixels (one white pixel) 0 Total bright dot defects of all types 2 BLACK DOT DEFECTS ACCEPTABLE LEVEL MODEL 7FF1 series 1 dark subpixel 3 2 adjacent dark su...
Page 53 - Regulatory; Recycling Information for Customers; For help and service, please read the section of
Regulatory Regulatory Recycling Information for Customers • Banned Substance Declaration • CE Declaration Confirmity • FCC Declaration of Conformity • Federal Communications Commission (FCC) Notice (U.S. Only) • Declaration of Conformity for Products Marked with FCC Logo, United States Only • Commis...
Page 54 - Banned Substance Declaration
Regulatory Mr. Maarten ten Houten - Senior Environmental Consultant Philips Consumer Electronics E-mail: [email protected] Tel: +31 (0) 40 27 33402 Ms. Delmer F. Teglas Philips Electronics North America E-mail: [email protected] Tel: +1 865 521 4322 RETURN TO TOP OF THE PAGE Banned Substance Declara...
Page 55 - Reorient or relocate the receiving antenna.; FCC Declaration of Conformity; Responsible Party: Philips Consumer Electronics North America; Declaration of Conformity for Products Marked with FCC Logo,
Regulatory This equipment has been tested and found to comply with the limits for a Class B digital device, pursuant to Part 15 of the FCC Rules. These limits are designed to provide reasonable protection against harmful interference in a residential installation. This equipment generates, uses and ...
Page 56 - Commission Federale de la Communication (FCC Declaration); Réorienter ou déplacer l'antenne de réception.
Regulatory This device complies with Part 15 of the FCC Rules. Operation is subject to the following two conditions: (1) this device may not cause harmful interference, and (2) this device must accept any interference received, including interference that may cause undesired operation. Commission Fe...
Page 57 - EN 55022 Compliance (Czech Republic Only); Class B ITE
Regulatory RETURN TO TOP OF THE PAGE EN 55022 Compliance (Czech Republic Only) RETURN TO TOP OF THE PAGE VCCI Notice (Japan Only) This is a Class B product based on the standard of the Voluntary Control Council for Interference (VCCI) for Information technology equipment. If this equipment is used n...
Page 58 - Polish Center for Testing and Certification Notice; North Europe Information (Nordic Countries)
Regulatory Polish Center for Testing and Certification Notice The equipment should draw power from a socket with an attached protection circuit (a three-prong socket). All equipment that works together (computer, monitor, printer, and so on) should have the same power supply source. The phasing cond...
Page 59 - Placering/Ventilation
Regulatory Placering/Ventilation VARNING: FÖRSÄKRA DIG OM ATT HUVUDBRYTARE OCH UTTAG ÄR LÄTÅTKOMLIGA, NÄR DU STÄLLER DIN UTRUSTNING PÅPLATS. Placering/Ventilation ADVARSEL: SØRG VED PLACERINGEN FOR, AT NETLEDNINGENS STIK OG STIKKONTAKT ER NEMT TILGÆNGELIGE. Paikka/Ilmankierto VAROITUS: SIJOITA LAITE...
Page 60 - Waste Electronics and Electrical Equipment (WEEE)
Regulatory RETURN TO TOP OF THE PAGE End-of-Life Disposal Your new product contains materials that can be recycled and reused. Specialized companies can recycle your product to increase the amount of reusable materials and to minimize the amount to be disposed of. Please find out about the local reg...
Page 62 - Your Philips Warranty
Service and Warranty • International Warranty • For European Countries • USA Service and Warranty Your Philips Warranty Thank you for purchasing this Philips product. All Philips products are designed and manufactured to high standards and deliver high-quality performance, ease of use and ease of in...
Page 63 - number of the product.; Contact
Service and Warranty number of the product. The Philips warranty may not apply if: ● the documents have been altered in any way or made illegible; ● the model or production number on the product has been altered, deleted, removed or made illegible; ● repairs or product modifications and alterations ...
Page 64 - Philips Contact; WESTERN EUROPE
Service and Warranty Philips' customer help desks are located worldwide. Click here to access the Philips Contact Information . Or you can reach us via: Website: http://www.philips.com/support WESTERN EUROPE Country Telephone number Tariff Austria 0820 901115 0.20 Belgium 070 253 010 0.17 Cyprus 800...
Page 66 - PHILIPS LIMITED WARRANTY; PHILIPS CONSUMER ELECTRONICS
Philips, P.O. Box 671539, Marietta, GA. 30006-0026 One (1) Year Free Product Exchange PHILIPS LIMITED WARRANTY PHILIPS CONSUMER ELECTRONICS warrants this product against defect in material or workmanship, subject toany conditions set forth as follows: PROOF OF PURCHASE: You must have proof of the da...
Page 67 - Consumer Information Centers; Eastern Europe; BELARUS
Consumer Infromation Centers Consumer Information Centers Antilles • Argentina • Australia • Bangladesh • Brasil • Chile • China • Colombia • Belarus • Bulgaria • Croatia • Czech Republic • Estonia • Dubai • Hong Kong • Hungary • India • Indonesia • Korea • Latvia • Lithuania • Malaysia • Mexico • M...
Page 68 - CROATIA
Consumer Infromation Centers CROATIA Renoprom d.o.o. Mlinska 5, Strmec HR - 41430 Samobor Tel: +385 1 333 0974 ESTONIA FUJITSU SERVICES OU Akadeemia tee 21G EE-12618 Tallinn Tel: +372 6519900 www.ee.invia.fujitsu.com HUNGARY Serware Szerviz Vizimolnár u. 2-4 HU - 1031 BudapestTel: +36 1 2426331Email...
Page 69 - SLOVAKIA
Consumer Infromation Centers ROMANIA Blue Ridge Int'l Computers SRL 115, Mihai Eminescu St., Sector 2 RO - 020074 Bucharest Tel: +40 21 2101969 SERBIA & MONTENEGRO Tehnicom Service d.o.o. Bulevar Vojvode Misica 37B YU - 11000 Belgrade Tel: +381 11 3060 886 SLOVAKIA Datalan Servisne Stredisko Puc...
Page 70 - TURKEY; Latin America; ANTILLES
Consumer Infromation Centers TURKEY Türk Philips Ticaret A.S. Yukari Dudullu Org.San.Bolgesi 2.Cadde No:22 34776-Umraniye/Istanbul Tel: (0800)-261 33 02 UKRAINE Comel Shevchenko street 32 UA - 49030 Dnepropetrovsk Tel: +380 562320045 www.csp-comel.com Latin America ANTILLES Philips Antillana N.V.Kam...
Page 71 - CHILE
Consumer Infromation Centers CHILE Philips Chilena S.A.Avenida Santa Maria 0760P.O. box 2687Santiago de ChilePhone: (02)-730 2000Fax : (02)-777 6730 COLOMBIA Industrias Philips de ColombiaS.A.-Division de ServicioCARRERA 15 Nr. 104-33Bogota, ColombiaPhone:(01)-8000 111001 (toll free)Fax : (01)-619-4...
Page 72 - PERU; Pacific; AUSTRALIA
Consumer Infromation Centers PERU Philips Peruana S.A.Customer DeskComandante Espinar 719Casilla 1841Limab18Phone: (01)-2136200Fax : (01)-2136276 URUGUAY Rambla O'Higgins 5303 Montevideo Uruguay Phone: (598) 619 66 66 Fax: (598) 619 77 77 Customer Desk: Phone: 0004054176 VENEZUELA Industrias Venezol...
Page 73 - NEW ZEALAND; Asia; BANGLADESH
Consumer Infromation Centers NEW ZEALAND Philips New Zealand Ltd.Consumer Help Desk2 Wagener Place, Mt.AlbertP.O. box 1041AucklandPhone: 0800 477 999 (toll free)Fax : 0800 288 588 Asia BANGLADESH Philips Service Centre100 Kazi Nazrul IslamAvenue Kawran Bazar C/ADhaka-1215Phone: (02)-812909Fax : (02)...
Page 74 - INDIA
Consumer Infromation Centers INDIA Phone: 91-20-712 2048 ext: 2765Fax: 91-20-712 1558 BOMBAYPhilips IndiaCustomer Relation CentreBandbox House254-D Dr. A Besant Road, WorliBombay 400 025 CALCUTTACustomer Relation Centre7 justice Chandra Madhab RoadCalcutta 700 020 MADRASCustomer Relation Centre3, Ha...
Page 75 - KOREA
Consumer Infromation Centers KOREA Philips Korea Ltd.Philips HouseC.P.O. box 3680260-199, Itaewon-Dong.Yongsan-Ku, Seoul 140-202Phone: 080 600 6600 (toll free)Fax : (02) 709 1210 MALAYSIA After Market Solutions Sdn Bhd, Philips Authorised Service Center, Lot 6, Jalan 225, Section 51A, 46100 Petaling...
Page 76 - SINGAPORE; Africa; MOROCCO
Consumer Infromation Centers SINGAPORE Accord Customer Care Solutions Ltd Authorized Philips Service Center Consumer Service 620A Lorong 1 Toa Rayoh Singapore 319762 Tel: +65 6882 3999 Fax: +65 6250 8037 TAIWAN Philips Taiwan Ltd.Consumer Information Centre13F, No. 3-1 Yuan Qu St., Nan Gang Dist., T...
Page 77 - SOUTH AFRICA; Middle East; DUBAI
Consumer Infromation Centers SOUTH AFRICA PHILIPS SA (PTY) LTD Customer Care Center 195 Main Road Martindale, Johannesburg P.O. box 58088 Newville 2114 Telephone: +27 (0) 11 471 5194 Fax: +27 (0) 11 471 5123 E-mail: [email protected] Middle East DUBAI Philips Middle East B.V.Consumer Information Cen...