Page 3 - SYSTEM INSTALLATION AND ELECTRICAL REQUIREMENTS; Electrical Code
3 2021-12-22 #:180-9151-1 SYSTEM INSTALLATION AND ELECTRICAL REQUIREMENTS Electrical Code Note: To the display system installer: This reminder is provided to call attention to Article 820-44 of the National Electric Code that provides guidelines for proper grounding and, in particular, specifies tha...
Page 4 - other peripheral devices.; FCC STATEMENT
4 2021-12-22 #:180-9151-1 Relevant Information Record your display's model and serial number here for future reference. Keep this user manual in an accessible location in the event service is required.Note: Your display's serial number can be found on the box and underneath the rear cover plate. Mod...
Page 5 - Read before operating equipment; GENERAL SAFETY PRECAUTIONS; cord and contact the manufacturer.; WARNING
5 2021-12-22 #:180-9151-1 Read before operating equipment Thank you for purchasing our product. Before using it, please read this user guide carefully and follow the instructions for safe operation. Please keep this manual for future reference and always include it when transferring or transporting ...
Page 6 - Do not install within five feet from a body of water.
6 2021-12-22 #:180-9151-1 WARNING • Never apply pressure to the exterior of the LCD screen.• If monitor or glass is broken, do not come in contact with the liquid crystal and handle with care.• Do not climb on the product.• Do not install within five feet from a body of water. • Do not use if ambien...
Page 7 - CONTENTS
7 2021-12-22 #:180-9151-1 System Installation and Electrical Requirements ..................................................................................2 Electrical Code .................................................................................................................................
Page 8 - Description
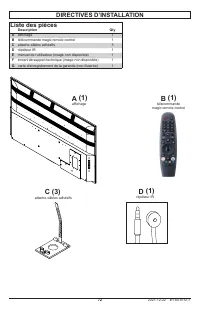
8 2021-12-22 #:180-9151-1 SET UP INSTRUCTIONS Parts List Description Qty A television 1 B magic remote control 1 C adhesive cable holder 3 D IR repeater 1 E user guide (not shown) 1 F technical support insert (not shown) 1 G warranty registration card (not shown) 1 A (1) television B (1) magic remot...
Page 10 - Removing I/O Terminal Cover
10 2021-12-22 #:180-9151-1 Removing I/O Terminal Cover Remove I/O terminal cover and eight screws to access source connection panel. A
Page 11 - Connector
11 2021-12-22 #:180-9151-1 Connecting Cords freePath Technology™ The freePath Technology™ I/O terminal cover allows for better WiFi signal penetration for the network connectivity of the Smart TV. Connect source devices to appropriate display input. Make all connections prior to powering on the disp...
Page 12 - Replacing I/O Terminal Cover; CAUTION
12 2021-12-22 #:180-9151-1 Replacing I/O Terminal Cover 1. Run cables through bottom of I/O terminal cavity across foam gasket. All cables must exit toward bottom of display to retain seal when I/O terminal cover is installed. Do not run cabling through the top or sides of I/O terminal cavity. Leave...
Page 13 - Cable Management; Secure cables to display with adhesive cable holders.
13 2021-12-22 #:180-9151-1 Cable Management Secure cables to display with adhesive cable holders. C (3) C
Page 14 - Four M8 screws; Display Size; Prepare the Display for Mounting; ensure longevity in harsh environments.
14 2021-12-22 #:180-9151-1 B D Required Mounting Screws Four M8 screws (17.4mm long) Display Size A B C D E F 55" 11.81" (300mm) 7.87" (200mm) 18.65" (474mm) 4.61" (117mm) 1.61" (41mm) 3.11" (79mm) 65" 11.81" (300mm) 7.87" (200mm) 22.89" (582mm) 5.42" ...
Page 15 - Connect to the Power Source; Connect power cord to GFCI outlet.
15 2021-12-22 #:180-9151-1 Prepare the Display for Mounting Display Size A B C D E 55" 49.09" (1247mm) 28.54" (725mm) 47.69" (1211mm) 26.85" (682mm) 54.64" (1388mm) 65" 57.59" (1463mm) 33.31" (846mm) 56.24" (1428mm) 31.62" (803mm) 64.53" (1639mm) 75�...
Page 17 - Power On/Off the Display; Point the remote control at the IR sensor located; OPERATING INSTRUCTIONS; Menu Mode; Onboard Controls; Direct Mode
17 2021-12-22 #:180-9151-1 PO WER TV TV/ SPK SPK 1 3 2 4 6 5 7 • 9 LAST 8 0 OK AUX1 AUX2 MUT E VOL ME NU GUID E CH INFO INP UT EX IT Power On/Off the Display Power on your display by using the remote control or the rear power button on the side of the display. The display will power on but image may...
Page 18 - Remote Control Buttons; Button
18 2021-12-22 #:180-9151-1 Remote Control Buttons Button Description Power Turns TV On / Off STB Power You can turn your set-top box on or off by adding the set-top box to the universal remote control for your TV. Search Activates Voice Recognition (network connection required for voice recognition)...
Page 19 - Get Started with webOS TV; Live TV / Antenna Setup; broadcasts such as a cable box instead of an antenna.; Network Connection; Press the ‘settings’ button on the remote control.; MENU OPERATION; that are being tuned in.
19 2021-12-22 #:180-9151-1 Get Started with webOS TV Live TV / Antenna Setup : 1. Connect the Antenna to the Television. You can also connect a device that can receive broadcasts such as a cable box instead of an antenna. Network Connection : Configure the settings for network, such as online conten...
Page 20 - Network settings can be applied using Wi-Fi.; To see more details, click on settings >; Network Configuration Information
20 2021-12-22 #:180-9151-1 MENU OPERATION Network Connection : Network settings can be applied using Wi-Fi. 1. Turn on the router connected to the internet.2. Press the ‘settings’ button on the remote control. 3. Select Connection Settings > Network > Wi-Fi Connection4. When the network search...
Page 21 - How to Operate the TV; Connecting the Magic Remote Control; displayed in the TV screen.; New Registration of the Magic Remote Control; will work like a conventional remote control.
21 2021-12-22 #:180-9151-1 MENU OPERATION How to Operate the TV Connecting the Magic Remote Control : Learn More about the Magic Remote Control; You can select the functions you want easily and conveniently by moving and clicking the cursor on the TV screen, the same way you would use a mouse on a c...
Page 22 - Use of TV Functions Through Voice; Voice Recognition Precautions
22 2021-12-22 #:180-9151-1 MENU OPERATION Use of TV Functions Through Voice You can access various functions of the TV quickly and easily through voice recognition. 1. Press and hold down the button on the remote control and say the function you want to start or the keyword you want to use for searc...
Page 23 - Text Language; Use of Text Language; Press the “Microphone” button on the virtual keyboard.; Precautions when using text language; of the Magic Remote Control's microphone.
23 2021-12-22 #:180-9151-1 MENU OPERATION Text Language Use of Text Language : • You can enter texts in the text fields using the voice recognition function. • Select the "Microphone" button on the keyboard screen to switch to voice input mode. Note: Some models may not be supported. 1. Move...
Page 24 - Start Applications through Quick Access; external input registered for the button.; Quick Access Settings; the Quick Access edit mode.; Verification and Editing Quick Access; You can see a short instruction for this function.
24 2021-12-22 #:180-9151-1 MENU OPERATION Start Applications through Quick Access • Press and hold a number button on the remote control to open an application or to activate an external input registered for the button. Quick Access Settings : 1. Launch the application or select the program or input...
Page 25 - Enjoy Live TV; Using the Recording Features; The configurable elements vary according to the model.
25 2021-12-22 #:180-9151-1 MENU OPERATION Enjoy Live TV Using the Recording Features : 1. Connect a USB hard drive or USB memory to a USB port. It is recommended that you record to a USB hard drive. 2. During the visualization of the live broadcast, press the button (OK).3. Press the "Record"...
Page 26 - Playback of Recorded TV Shows; Manage Recordings; pop-up window of the detailed information.
26 2021-12-22 #:180-9151-1 MENU OPERATION Playback of Recorded TV Shows Manage Recordings : You can view and play recordings stored on storage devices by using the Recordings App.1. Press the "List" button on the remote control select the Recordings tab located on the left side of the screen...
Page 27 - Configurations of Additional Functions
27 2021-12-22 #:180-9151-1 MENU OPERATION Playback of Recorded TV Shows Configurations of Additional Functions : 1. Press the (OK) button during playback of the desired recording.2. Select “All Settings” on the screen. 1. Return to the recording options.2. The list of recordings will be displayed be...
Page 28 - Connection of External Devices; Using the Home Dashboard; Speakers in the User's Guide for more information.
28 2021-12-22 #:180-9151-1 MENU OPERATION Connection of External Devices Using the Home Dashboard : • You can select or control a device (mobile, external device, home IoT devices, etc.) connected to the TV. • Press the (HOME) button on the remote control and select Start Panel. You can also hold do...
Page 29 - Connection of Home IoT Devices; You can check and control the status of connected Home IoT devices.; device will not be supported.
29 2021-12-22 #:180-9151-1 MENU OPERATION Connection of Home IoT Devices You can check and control the status of connected Home IoT devices. 1. Install the ThinQ Application on your smartphone.2. Login to your ThinQ account and register your own ThinQ device.3. Press the (HOME) button on the remote ...
Page 30 - Smart Device Connection; Connecting your Smart Device to a TV using the ThinQ App.
30 2021-12-22 #:180-9151-1 MENU OPERATION Smart Device Connection You can use a variety of functions by connecting the TV to a smart device. Connecting your Smart Device to a TV using the ThinQ App. 1. Download the ThinQ app from your smart device’s app store. You can download the application easily...
Page 31 - Care of the Screen; operation of the product.; Mobile Telephone Caution; possibly causing permanent damage to your display.; End of Life Directives; your display according to local regulations.; MAINTENANCE
31 2021-12-22 #:180-9151-1 Care of the Screen Do not rub or strike the screen with anything hard as this may scratch, mark, or even damage the screen permanently. Ensure that the display is installed in a location where it will be safe from abrasives and flying debris, which could damage the LCD pan...
Page 33 - Guía del Usuario
33 2021-12-22 #:180-9151-1 www.neptuneTV.com ESP Guía del Usuario
Page 35 - Fuente Eléctrica; directa ni de otro voltaje que no sea el especificado.; INSTALACIÓN Y REQUISITOS ELÉCTRICOS DEL SISTEMA; Código Eléctrico
35 2021-12-22 #:180-9151-1 Fuente Eléctrica La pantalla tiene que estar conectada a un tomacorriente de la red de suministro eléctrico que tenga una conexión protectora a tierra.El enchufe de conexión a la red se usa como dispositivo desconector y debe poderse alcanzar con facilidad.La instalación e...
Page 36 - funcionamiento no deseado.; Información pertinente
36 2021-12-22 #:180-9151-1 PRECAUCIÓN DE LA FCC Para garantizar el cumplimiento continuo y evitar la interferencia indeseada, se pueden utilizar núcleos de ferrita al conectar esta pantalla a equipos de video; mantenga un espacio de, por lo menos, 400 mm (15.75 pulgadas) de otros dispositivos perifé...
Page 37 - Lea antes de utilizar el producto; PRECAUCIONES DE SEGURIDAD GENERAL; ocurran rayos o truenos ni cuando tenga las manos mojadas.; ADVERTENCIA
37 2021-12-22 #:180-9151-1 Lea antes de utilizar el producto Gracias por comprar nuestro producto. Antes de utilizarlo, lea esta guía del usuario atentamente y siga las instrucciones para utilizarlo con seguridad. Por favor, guarde esta guía para su referencia e inclúyala cada vez que cambie o trans...
Page 38 - de que funcione bien y con seguridad.
38 2021-12-22 #:180-9151-1 ADVERTENCIA • Nunca aplique presión al exterior de una pantalla de LCD. • Si se quiebra el monitor o el cristal, no toque el cristal líquido y manéjelo con cuidado.• No se trepe en el producto.• No lo instale a una distancia menor de 152 cm (5 pies) de un cuerpo de agua.• ...
Page 39 - Instrucciones de configuración; CONTENIDO
39 2021-12-22 #:180-9151-1 Instalación y requisitos eléctricos del sistema .....................................................................................35 Código eléctrico ...........................................................................................................................
Page 40 - Descripción
40 2021-12-22 #:180-9151-1 INSTRUCCIONES DE CONFIGURACIÓN Lista de piezas Descripción Qty A pantalla 1 B control remoto magic 1 C sujetacables adhesivo 3 D repetidor infrarrojo 1 E guía del usuario (no mostrada) 1 F hoja de apoyo técnico (no ilustrada) 1 G tarjeta de registro de la garantía (no se m...
Page 42 - Retirar la cubierta del terminal de I/O; Retire la cubierta del terminal de I/O y los ocho
42 2021-12-22 #:180-9151-1 Retirar la cubierta del terminal de I/O Retire la cubierta del terminal de I/O y los ocho tornillos para acceder al panel de conexión de las fuentes. A
Page 43 - Wi-Fi para la conectividad de la red del TV inteligente.; Instalar el repetidor infrarrojo (opcional); Conector; audio digital a un amplificador.
43 2021-12-22 #:180-9151-1 Conectar los cables Tecnología freePath™ La cubierta del terminal de I/O de Tecnología freePath® permite una mejor recepción de la señal de Wi-Fi para la conectividad de la red del TV inteligente. Conecte los dispositivos fuente a la entrada apropiada de la pantalla. Haga ...
Page 44 - Volver a colocar la cubierta del terminal de I/O; esté completamente fijada a la parte trasera de la pantalla.; être orientés vers le bas de l’écran afin de préserver; PRECAUCIÓN
44 2021-12-22 #:180-9151-1 Volver a colocar la cubierta del terminal de I/O 1. Pase los cables por la parte inferior de la cavidad del terminal de I/O de un lado a otro de la junta de gomaespuma. Todos los cables tienen que salir hacia la parte inferior de la pantalla para que queden sellados cuando...
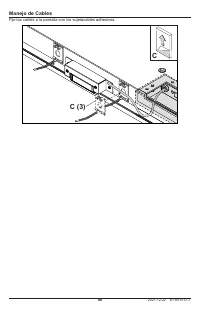
Page 45 - Manejo de Cables; Fije los cables a la pantalla con los sujetacables adhesivos.
45 2021-12-22 #:180-9151-1 Manejo de Cables Fije los cables a la pantalla con los sujetacables adhesivos. C (3) C
Page 46 - Cuatro tornillos de M8; Tamaño de la pantalla:; Preparar la pantalla para instalación; instalar la pantalla.
46 2021-12-22 #:180-9151-1 B D Tornillos de montaje requeridos Cuatro tornillos de M8 (17.4mm de largo) Tamaño de la pantalla: A B C D E F 55" 11.81" (300mm) 7.87" (200mm) 18.65" (474mm) 4.61" (117mm) 1.61" (41mm) 3.11" (79mm) 65" 11.81" (300mm) 7.87" (200mm) ...
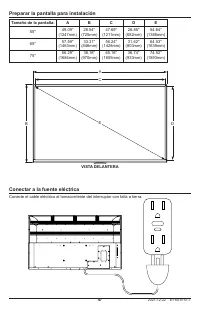
Page 47 - Conectar a la fuente eléctrica
47 2021-12-22 #:180-9151-1 Preparar la pantalla para instalación Tamaño de la pantalla: A B C D E 55" 49.09" (1247mm) 28.54" (725mm) 47.69" (1211mm) 26.85" (682mm) 54.64" (1388mm) 65" 57.59" (1463mm) 33.31" (846mm) 56.24" (1428mm) 31.62" (803mm) 64.53"...
Page 49 - Apunte el control remoto al sensor infrarrojo; Modo Menú; Encender/Apagar la Pantalla; INSTRUCCIONES DE USO; Controles integrados
49 2021-12-22 #:180-9151-1 PO WER TV TV/ SPK SPK 1 3 2 4 6 5 7 • 9 LAST 8 0 OK AUX1 AUX2 MUT E VOL ME NU GUID E CH INFO INP UT EX IT Apunte el control remoto al sensor infrarrojo localizado debajo del logo de Peerless-AV en el centro de la pantalla y presione el botón POWER. Modo Menú Modo Directo E...
Page 50 - Botones del control remoto; Botones
50 2021-12-22 #:180-9151-1 Botones del control remoto Botones Descripción Power Enciende / apaga el TV. STB Power Puede encender o apagar el convertidor y descodificador al añadirlo al control remoto universal del TV. Search Activa el reconocimiento de voz (tiene que estar conectado a la red para el...
Page 51 - Para comenzar con el TV webOS; conexión de internet activa.; UTILIZACIÓN DEL MENÚ; solamente los programas que se sintonicen.
51 2021-12-22 #:180-9151-1 Para comenzar con el TV webOS TV en vivo / configuración de la antena: 1. Conecte la antena al TV. Además, puede conectar un dispositivo que reciba transmisiones en directo, como una caja de cable, en vez de una antena. Conexión a la red: Configure los ajustes de la red, c...
Page 52 - Los ajustes de la red se pueden aplicar utilizando Wi-Fi.; Red > Ajustes de la Conexión en la Guía del usuario.; Información de la configuración de la red:; reajústelo y, entonces, enciéndalo para resolver el problema.
52 2021-12-22 #:180-9151-1 UTILIZACIÓN DEL MENÚ Conexión a la red: Los ajustes de la red se pueden aplicar utilizando Wi-Fi. 1. Encienda el enrutador conectado a la internet.2. Presione el botón ‘’settings’’ del control remoto. 3. Seleccione Ajustes de la Conexión > Conexión a la Red > Conexió...
Page 53 - Cómo utilizar el TV; Conectar el control remoto Magic:; control remoto de nuevo.; Nuevo registro del control remoto Magic:; el control remoto funcionará como un control convencional.
53 2021-12-22 #:180-9151-1 UTILIZACIÓN DEL MENÚ Cómo utilizar el TV Conectar el control remoto Magic: Conozca más acerca del control remoto Magic. Puede seleccionar las funciones que quieras rápida y convenientemente moviendo y haciendo clic en el cursor de la pantalla del TV, de la misma manera en ...
Page 54 - Utilización de las funciones del TV mediante la voz; que quiere utilizar para la búsqueda.; Precauciones para el reconocimiento de voz:; reconocimiento de voz.
54 2021-12-22 #:180-9151-1 UTILIZACIÓN DEL MENÚ Utilización de las funciones del TV mediante la voz Usted puede acceder a varias funciones del TV rápida y fácilmente mediante el reconocimiento de voz. 1. Presione y sujete el botón del control remoto y diga la función que quiere iniciar o la palabra ...
Page 55 - Lenguaje de Texto; Utilizar el lenguaje de texto:; Presione el botón “Micrófono” del teclado virtual.; Precauciones para el lenguaje de texto:; de aproximadamente 10 cm del micrófono del control remoto Magic.
55 2021-12-22 #:180-9151-1 UTILIZACIÓN DEL MENÚ Lenguaje de Texto Utilizar el lenguaje de texto: • Usted puede escribir en los cuadros de texto utilizando la función de reconocimiento de voz. • Seleccione el botón "Micrófono" en el teclado de la pantalla para cambiar el modo de entrada de vo...
Page 56 - Iniciar las aplicaciones mediante el acceso rápido; activar una entrada externa programada en ese botón.; Ajustes de Acceso Rápido:; en el modo de editar de Acceso Rápido.; Verificar y editar el Acceso Rápido:; Puede ver las instrucciones resumidas de esta función.
56 2021-12-22 #:180-9151-1 UTILIZACIÓN DEL MENÚ Iniciar las aplicaciones mediante el acceso rápido • Presione y sujete un botón de número en el control remoto para abrir una aplicación o para activar una entrada externa programada en ese botón. Ajustes de Acceso Rápido: 1. Abra la aplicación o selec...
Page 57 - Disfrutar de transmisiones en Vivo; Utilizar las funciones para grabar:; se haya grabado se selecciona automáticamente.
57 2021-12-22 #:180-9151-1 UTILIZACIÓN DEL MENÚ Disfrutar de transmisiones en Vivo Utilizar las funciones para grabar: 1. Conecte un disco duro USB o una memoria USB al puerto USB. Se recomienda que grabe en un disco duro USB.2. Durante la transmisión en vivo de un programa, presione el botón (OK).3...
Page 58 - Reproducción de programas grabados; Manejar las grabaciones:
58 2021-12-22 #:180-9151-1 UTILIZACIÓN DEL MENÚ Reproducción de programas grabados Manejar las grabaciones: Puede ver y reproducir las grabaciones guardadas en dispositivos de almacenamiento utilizando la aplicación de grabaciones.1. Presione el botón "List" en el control remoto; seleccione ...
Page 59 - Configuración de las funciones adicionales:; variar dependiendo del modelo.
59 2021-12-22 #:180-9151-1 UTILIZACIÓN DEL MENÚ Reproducción de programas grabados Configuración de las funciones adicionales: 1. Presione el botón (OK) durante la reproducción de la grabación que quiera.2. Seleccione “Todos los Ajustes” en la pantalla. 1. Regrese a las opciones de grabación.2. Se m...
Page 60 - Conexión de dispositivos externos; Utilizar el tablero de control del hogar:; Guía del usuario para obtener más información.
60 2021-12-22 #:180-9151-1 UTILIZACIÓN DEL MENÚ Conexión de dispositivos externos Utilizar el tablero de control del hogar: • Puede seleccionar o controlar un dispositivo (teléfono móvil, dispositivo externo, Home IoT (internet de las cosas del hogar), etc.) que esté conectado al TV. • Presione el b...
Page 61 - Conexión de dispositivos Home IoT (internet de las cosas del hogar); conexión del dispositivo de ThinQ.
61 2021-12-22 #:180-9151-1 UTILIZACIÓN DEL MENÚ Conexión de dispositivos Home IoT (internet de las cosas del hogar) Puede revisar y controlar el estado de los dispositivos conectados mediante Home IoT (internet de las cosas del hogar). 1. Instale la aplicación ThinQ en su teléfono inteligente.2. Acc...
Page 62 - Conexión de dispositivos inteligentes; Controlar el TV con la aplicación de ThinQ:; Android
62 2021-12-22 #:180-9151-1 UTILIZACIÓN DEL MENÚ Conexión de dispositivos inteligentes Puede utilizar una variedad de funciones conectando el TV a un dispositivo inteligente. Conectar un dispositivo inteligente a un TV utilizando la aplicación de ThinQ: 1. Descargue la aplicación de ThinQ de la tiend...
Page 63 - que puedan causarle daños permanentes a la pantalla.; Fin del ciclo de vida útil; acuerdo con las regulaciones locales.; MANTENIMIENTO
63 2021-12-22 #:180-9151-1 Cuidado de la pantalla No frote ni golpee la pantalla con objetos duros, ya que puede rayar, marcar y hasta dañar la pantalla permanentemente. Asegúrese de que la pantalla esté instalada en un lugar seguro contra el contacto con abrasivos o escombros impulsados por el aire...
Page 65 - Manuel de l’utilisateur
65 2021-12-22 #:180-9151-1 Manuel de l’utilisateur www.neptuneTV.com FRN
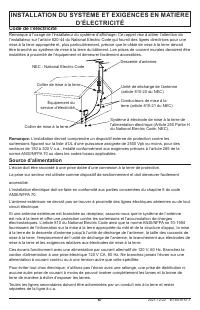
Page 67 - Source d’alimentation; INSTALLATION DU SYSTÈME ET EXIGENCES EN MATIÈRE; Code de l’électricité; Remarque à l’usage de l’installateur du système d’affichage
67 2021-12-22 #:180-9151-1 Source d’alimentation L’écran doit être raccordé à une prise dotée d’une connexion à la terre de protection.La prise sur secteur est utilisée comme dispositif de sectionnement et doit demeurer facilement accessible.L’installation électrique doit se faire en conformité aux ...
Page 68 - effectuant une ou plusieurs des corrections suivantes:
68 2021-12-22 #:180-9151-1 Renseignements Pertinents Inscrire ici le modèle et le numéro de série l'appareil pour consultation future. Conserver ce manuel de l’utilisateur dans un endroit facile d'accès au cas où une réparation serait nécessaire. Remarque: le numéro de série de l’écran se trouve sur...
Page 69 - Lire les instructions avant d'utiliser le matériel; câbles en tirant sur la fiche et non sur le cordon.; AVERTISSEMENT
69 2021-12-22 #:180-9151-1 Lire les instructions avant d'utiliser le matériel Nous vous remercions d’avoir fait l’acquisition de notre produit. Avant utilisation, veuillez lire attentivement ce manuel de l’utilisateur et suivre les instructions pour assurer un fonctionnement en toute sécurité. Veuil...
Page 70 - manipuler l’appareil avec soin.
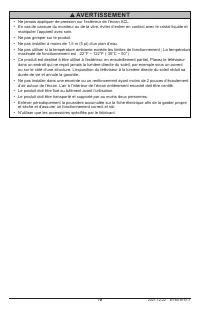
70 2021-12-22 #:180-9151-1 AVERTISSEMENT • Ne jamais appliquer de pression sur l’extérieur de l’écran ACL.• En cas de cassure du moniteur ou de la vitre, éviter d’entrer en contact avec le cristal liquide et manipuler l’appareil avec soin. • Ne pas grimper sur le produit.• Ne pas installer à moins d...
Page 71 - Table des matières
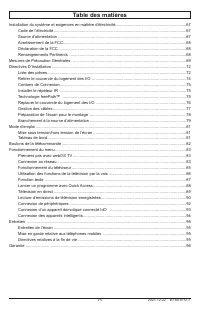
71 2021-12-22 #:180-9151-1 Installation du système et exigences en matière d’électricité ...............................................................67 Code de l’électricité ......................................................................................................................67 So...
Page 74 - Retirer le couvercle du logement des I/O
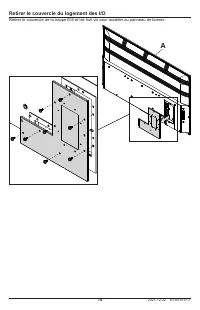
74 2021-12-22 #:180-9151-1 Retirer le couvercle du logement des I/O Retirer le couvercle de la trappe E/S et les huit vis pour accéder au panneau de bornes. A
Page 75 - signal WiFi et améliore la connectivité réseau de la Smart TV.; Connecteur; numérique à un amplificateur.
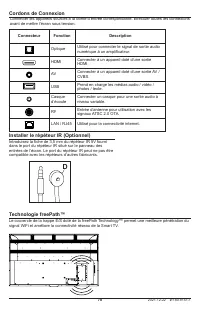
75 2021-12-22 #:180-9151-1 Cordons de Connexion Technologie freePath™ Le couvercle de la trappe E/S doté de la freePath Technology™ permet une meilleure pénétration du signal WiFi et améliore la connectivité réseau de la Smart TV. Connecter les appareils sources à la borne d’entrée correspondante. E...
Page 76 - Replacer le couvercle du logement des I/O; dépasse pas les limites fixées par le fabricant.
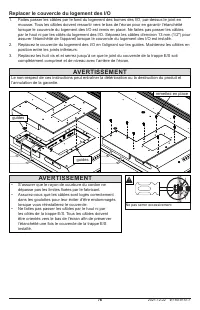
76 2021-12-22 #:180-9151-1 Replacer le couvercle du logement des I/O 1. Faites passer les câbles par le fond du logement des bornes des I/O, par-dessus le joint en mousse. Tous les câbles doivent ressortir vers le bas de l’écran pour en garantir l’étanchéité lorsque le couvercle du logement des I/O ...
Page 77 - Gestion des Câbles; Fixez les câbles à l’écran à l’aide des attaches-câbles adhésifs.
77 2021-12-22 #:180-9151-1 Gestion des Câbles Fixez les câbles à l’écran à l’aide des attaches-câbles adhésifs. C (3) C
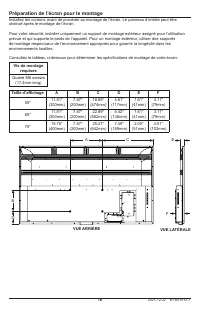
Page 78 - Quatre M8 screws; Taille d’affichage; Préparation de l’écran pour le montage; obstrué après le montage de l’écran.
78 2021-12-22 #:180-9151-1 B D Vis de montage requises Quatre M8 screws (17.4mm long) Taille d’affichage A B C D E F 55" 11.81" (300mm) 7.87" (200mm) 18.65" (474mm) 4.61" (117mm) 1.61" (41mm) 3.11" (79mm) 65" 11.81" (300mm) 7.87" (200mm) 22.89" (582mm) 5.4...
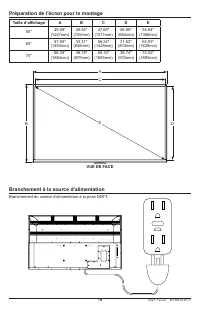
Page 79 - Branchement à la source d’alimentation; Branchement du cordon d’alimentation à la prise DDFT.
79 2021-12-22 #:180-9151-1 Préparation de l’écran pour le montage Taille d’affichage A B C D E 55" 49.09" (1247mm) 28.54" (725mm) 47.69" (1211mm) 26.85" (682mm) 54.64" (1388mm) 65" 57.59" (1463mm) 33.31" (846mm) 56.24" (1428mm) 31.62" (803mm) 64.53" (1...
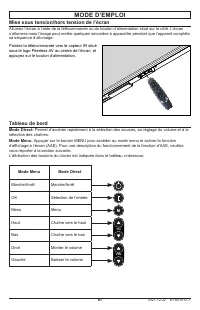
Page 81 - Mise sous tension/hors tension de l’écran; Pointez la télécommande vers le capteur IR situé; MODE D’EMPLOI; Mode Menu; Tableau de bord
81 2021-12-22 #:180-9151-1 PO WER TV TV/ SPK SPK 1 3 2 4 6 5 7 • 9 LAST 8 0 OK AUX1 AUX2 MUT E VOL ME NU GUID E CH INFO INP UT EX IT Mise sous tension/hors tension de l’écran Allumez l’écran à l’aide de la télécommande ou du bouton d’alimentation situé sur le côté. L’écran s’allumera mais l’image pe...
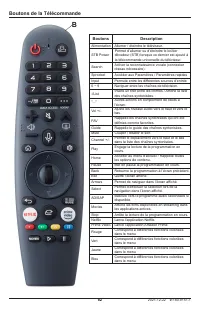
Page 82 - Boutons de la Télécommande; Boutons
82 2021-12-22 #:180-9151-1 Boutons de la Télécommande Boutons Description Alimentation Allumer / éteindre le téléviseur. STB Power Permet d’allumer ou d’éteindre le boîtier décodeur (STB) lorsque ce dernier est ajouté à la télécommande universelle du téléviseur. Search Activer la reconnaissance voca...
Page 83 - Premiers pas avec webOS TV; Programmation télévisée en direct / Configuration de l’antenne:; connexion active à l’internet.; FONCTIONNEMENT DU MENU; programmes que vous captez.
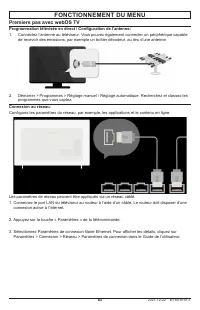
83 2021-12-22 #:180-9151-1 Premiers pas avec webOS TV Programmation télévisée en direct / Configuration de l’antenne: 1. Connectez l’antenne au téléviseur. Vous pouvez également connecter un périphérique capable de recevoir des émissions, par exemple un boîtier décodeur, au lieu d’une antenne. Conne...
Page 84 - Connexion au Réseau; Instructions pour la configuration du réseau:; est utilisée, mais elles sont moins probables.
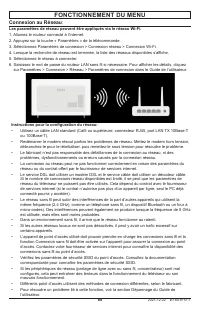
84 2021-12-22 #:180-9151-1 FONCTIONNEMENT DU MENU Connexion au Réseau : Les paramètres de réseau peuvent être appliqués via le réseau Wi-Fi. 1. Allumez le routeur connecté à l’internet.2. Appuyez sur la touche « Paramètres » de la télécommande. 3. Sélectionnez Paramètres de connexion > Connexion ...
Page 85 - Fonctionnement du téléviseur; Comment connecter la télécommande Magic Remote Control:; fournie avec l’équipement.; Jumelage de la Magic Remote Control:; jumelage s’affichera sur l’écran du téléviseur.; Réenregistrez la Magic Remote Control:; commande fonctionne alors comme une télécommande classique.
85 2021-12-22 #:180-9151-1 FONCTIONNEMENT DU MENU Fonctionnement du téléviseur Comment connecter la télécommande Magic Remote Control: Plus d’informations sur la télécommande Magic Remote Control. Pour sélectionner les fonctions souhaitées, il suffit de déplacer le curseur sur l’écran du téléviseur ...
Page 86 - Utilisation des Fonctions de la Télévision par la Voix; fonctions du téléviseur.; compatible avec tous les modèles.
86 2021-12-22 #:180-9151-1 FONCTIONNEMENT DU MENU Utilisation des Fonctions de la Télévision par la Voix La reconnaissance vocale permet aussi d’accéder rapidement et facilement à diverses fonctions du téléviseur. 1. Maintenez enfoncée la touche de la télécommande et énoncez la fonction souhaitée ou...
Page 87 - Fonction texte; Utilisation du langage textuel:; Sélectionnez le bouton « Micro » du clavier virtuel.; Précautions à prendre lors de l’utilisation du langage textuel:; Vérifiez la connexion réseau avant de lancer la fonction Texte.
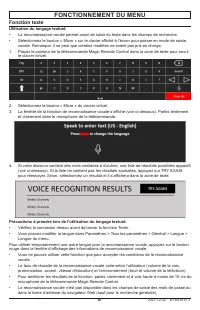
87 2021-12-22 #:180-9151-1 FONCTIONNEMENT DU MENU Fonction texte Utilisation du langage textuel: • La reconnaissance vocale permet aussi de saisir du texte dans les champs de recherche. • Sélectionnez le bouton « Micro » sur le clavier affiché à l’écran pour passer en mode de saisie vocale. Remarque...
Page 88 - Lancer un programme avec Quick Access; activer la saisie correspondant à la touche.; Paramétrage de Quick Access:; pas encore été programmé dans le mode Modifier les accès rapides.; Afficher et modifier les accès rapides:; L’écran Modifier les accès rapides apparaît.
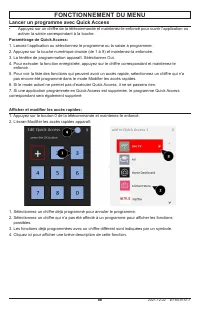
88 2021-12-22 #:180-9151-1 FONCTIONNEMENT DU MENU Lancer un programme avec Quick Access • Appuyez sur un chiffre de la télécommande et maintenez-le enfoncé pour ouvrir l’application ou activer la saisie correspondant à la touche. Paramétrage de Quick Access: 1. Lancez l’application ou sélectionnez l...
Page 89 - Télévision en Direct; Utilisation des fonctions d’enregistrement:; La durée de la vidéo peut être définie avant de lancer la fonction.
89 2021-12-22 #:180-9151-1 FONCTIONNEMENT DU MENU Télévision en Direct Utilisation des fonctions d’enregistrement: 1. Connectez un disque dur ou une clé USB à un port USB. Il est recommandé d’enregistrer sur un disque dur USB.2. Pendant le déroulement en direct de l’émission, appuyez sur le bouton (...
Page 90 - Lecture d’émissions de télévision enregistrées; le type d’affichage.
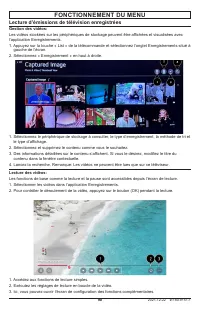
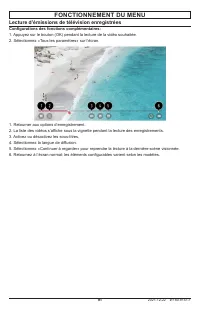
90 2021-12-22 #:180-9151-1 FONCTIONNEMENT DU MENU Lecture d’émissions de télévision enregistrées Gestion des vidéos: Les vidéos stockées sur les périphériques de stockage peuvent être affichées et visualisées avec l’application Enregistrements.1. Appuyez sur la touche « List » de la télécommande et ...
Page 91 - Configurations des fonctions complémentaires:; Retourner aux options d’enregistrement.
91 2021-12-22 #:180-9151-1 FONCTIONNEMENT DU MENU Lecture d’émissions de télévision enregistrées Configurations des fonctions complémentaires: 1. Appuyez sur le bouton (OK) pendant la lecture de la vidéo souhaitée.2. Sélectionnez «Tous les paramètres» sur l’écran. 1. Retourner aux options d’enregist...
Page 92 - Connexion de périphériques; Utilisation du Tableau de bord domotique:; Guide de l’utilisateur pour plus d’informations.
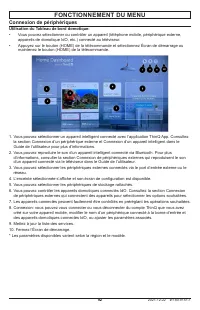
92 2021-12-22 #:180-9151-1 FONCTIONNEMENT DU MENU Connexion de périphériques Utilisation du Tableau de bord domotique: • Vous pouvez sélectionner ou contrôler un appareil (téléphone mobile, périphérique externe, appareils de domotique IdO, etc.) connecté au téléviseur. • Appuyez sur le bouton (HOME)...
Page 93 - Connexion d’un appareil domotique connecté IdO; supprimer que certains appareils.
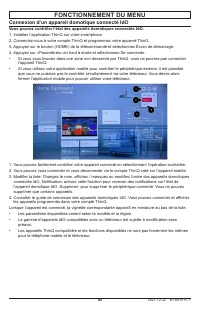
93 2021-12-22 #:180-9151-1 FONCTIONNEMENT DU MENU Connexion d’un appareil domotique connecté IdO Vous pouvez contrôler l’état des appareils domotiques connectés IdO. 1. Installez l’application ThinQ sur votre smartphone.2. Connectez-vous à votre compte ThinQ et programmez votre appareil ThinQ.3. App...
Page 94 - Connexion des appareils intelligents; Connecter votre appareil intelligent à un téléviseur avec ThinQ:; modification sans préavis.; Contrôler votre téléviseur avec ThinQ:
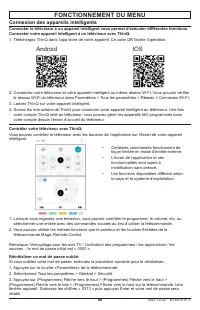
94 2021-12-22 #:180-9151-1 FONCTIONNEMENT DU MENU Connexion des appareils intelligents Connecter le téléviseur à un appareil intelligent vous permet d’exécuter différentes fonctions. Connecter votre appareil intelligent à un téléviseur avec ThinQ: 1. Téléchargez ThinQ dans l’app store de votre appar...
Page 95 - qui pourrait endommager votre écran de façon permanente.; Directives relatives à la fin de vie; à la réglementation locale.; ENTRETIEN
95 2021-12-22 #:180-9151-1 Entretien de l’écran Évitez de frotter ou de frapper l’écran avec un objet dur, car cela pourrait rayer, marquer ou même endommager l’écran de façon permanente. Assurez-vous que l’écran est installé dans un endroit où il sera à l’abri des abrasifs et des débris volants, ce...