Page 8 - Contents
Contents Chapter 1 Hardware Overview of the Access Point About NETGEAR Insight....................................................................14Related documentation.....................................................................14Unpack the access point........................................
Page 14 - About NETGEAR Insight; Related documentation
About NETGEAR Insight The access point supports the NETGEAR Insight app, which lets you set up and managethe access point from your iOS or Android mobile device and connects to the Insightcloud-based management platform. For Insight Premium or Insight Pro subscribers, theaccess point also supports t...
Page 17 - Back panel
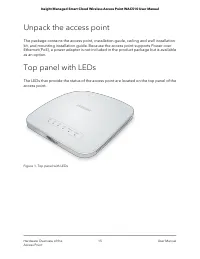
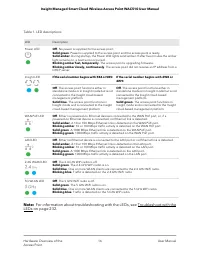
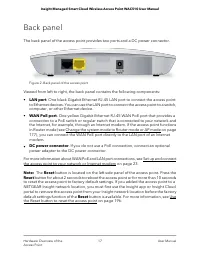
Back panel The back panel of the access point provides two ports and a DC power connector. Figure 2. Back panel of the access point Viewed from left to right, the back panel contains the following components: • LAN port. One black Gigabit Ethernet RJ-45 LAN port to connect the access pointto Etherne...
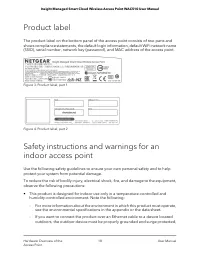
Page 18 - Product label
Product label The product label on the bottom panel of the access point consists of two parts andshows compliance statements, the default login information, default WiFi network name(SSID), serial number, network key (password), and MAC address of the access point. Figure 3. Product label, part 1 Fi...
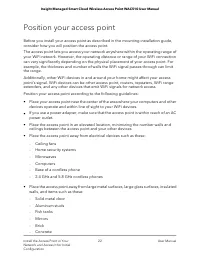
Page 22 - Position your access point
Position your access point Before you install your access point as described in the mounting installation guide,consider how you will position the access point. The access point lets you access your network anywhere within the operating range ofyour WiFi network. However, the operating distance or r...
Page 23 - Set up the access point with a PoE network connection
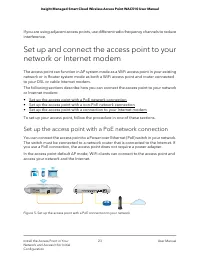
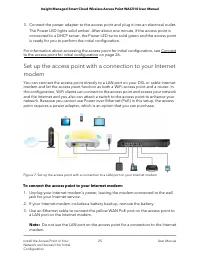
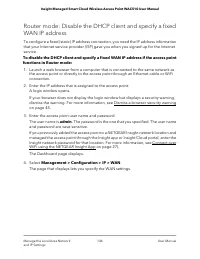
If you are using adjacent access points, use different radio frequency channels to reduceinterference. Set up and connect the access point to yournetwork or Internet modem The access point can function in AP system mode as a WiFi access point in your existingnetwork or in Router system mode as both ...
Page 24 - Set up the access point with a non-PoE network connection
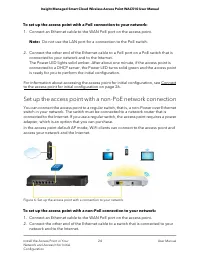
To set up the access point with a PoE connection to your network: 1. Connect an Ethernet cable to the WAN PoE port on the access point. Note: Do not use the LAN port for a connection to the PoE switch. 2. Connect the other end of the Ethernet cable to a PoE port on a PoE switch that is connected to ...
Page 27 - Connect over WiFi using the NETGEAR Insight App
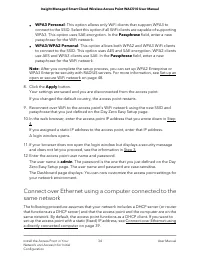
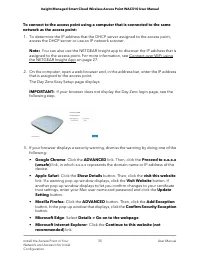
If you use the local browser interface to connect to the access point, follow the procedurein one of these sections: • Connect over WiFi using a WiFi-enabled computer or mobile device on page 30 • Connect over Ethernet using a computer connected to the same network on page34 • Connect over Ethernet ...
Page 39 - Connect over Ethernet using a directly connected computer
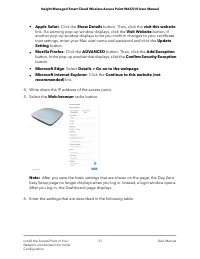
8. If the Dashboard does not display automatically, do the following: a. Take one of the following actions: • If you assigned a static IP address to the access point, enter that IP addressin the address bar of the web browser. • If you did not assign a static IP address, reenter the IP address that ...
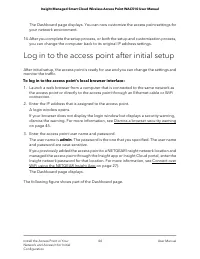
Page 44 - Log in to the access point after initial setup
The Dashboard page displays. You can now customize the access point settings foryour network environment. 14. After you complete the setup process, or both the setup and customization process, you can change the computer back to its original IP address settings. Log in to the access point after init...
Page 45 - Dismiss a browser security warning
The Dashboard page displays various panes that let you see the status of your accesspoint at a glance. For more information about the Dashboard page and its variouspanes, see Monitor the Access Point and the Network on page 202. Dismiss a browser security warning When you enter the IP address that i...
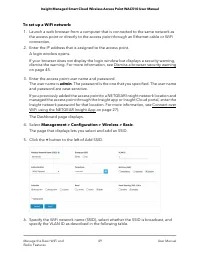
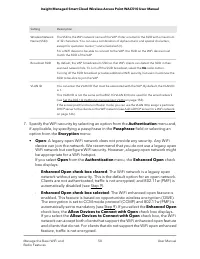
Page 48 - Set up and manage WiFi networks; Set up an open or secure WiFi network
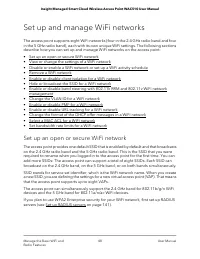
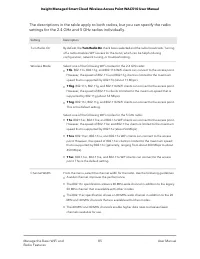
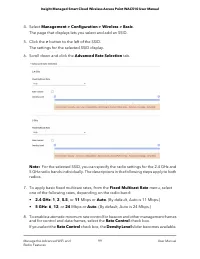
Set up and manage WiFi networks The access point supports eight WiFi networks (four in the 2.4 GHz radio band and fourin the 5 GHz radio band), each with its own unique WiFi settings. The following sectionsdescribe how you can set up and manage WiFi networks on the access point: • Set up an open or ...
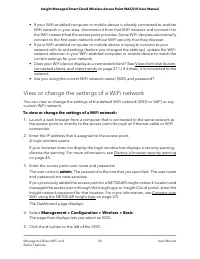
Page 56 - View or change the settings of a WiFi network
• If your WiFi-enabled computer or mobile device is already connected to another WiFi network in your area, disconnect it from that WiFi network and connect it tothe WiFi network that the access point provides. Some WiFi devices automaticallyconnect to the first open network without WiFi security th...
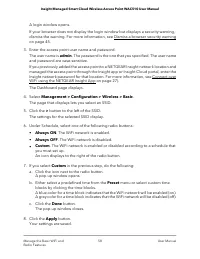
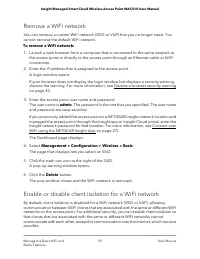
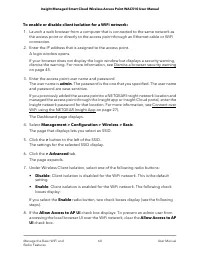
Page 59 - Remove a WiFi network; Enable or disable client isolation for a WiFi network
Remove a WiFi network You can remove a custom WiFi network (SSID or VAP) that you no longer need. Youcannot remove the default WiFi network. To remove a WiFi network: 1. Launch a web browser from a computer that is connected to the same network as the access point or directly to the access point thr...
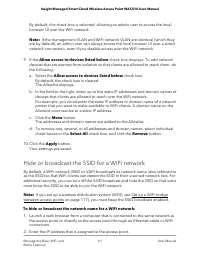
Page 61 - Hide or broadcast the SSID for a WiFi network
By default, this check box is selected, allowing an admin user to access the localbrowser UI over the WiFi network. Note: If the management VLAN and WiFi network VLAN are identical (which theyare by default), an admin user can always access the local browser UI over a wirednetwork connection, even i...
Page 64 - Change the VLAN ID for a WiFi network
7. Click the Apply button. Your settings are saved. Change the VLAN ID for a WiFi network If the access point functions in Router mode, you can use the VLAN ID to assign aparticular DHCP server to the WiFi clients on the SSID (see Add a DHCP server for aWiFi network on page 166). By default, the VLA...
Page 65 - Enable or disable PMF for a WiFi network
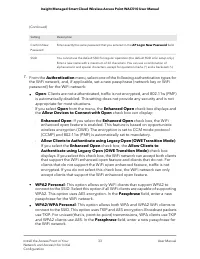
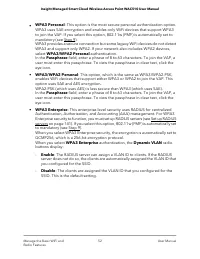
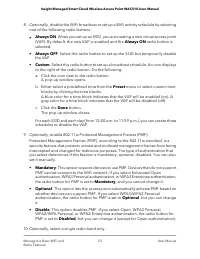
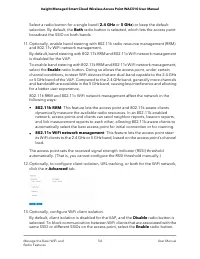
Your settings are saved. Enable or disable PMF for a WiFi network Protected Management Frames (PMF), according to the 802.11w standard, is a securityfeature that protects unicast and multicast management frames from being interceptedand changed for malicious purposes. This feature is disabled by def...
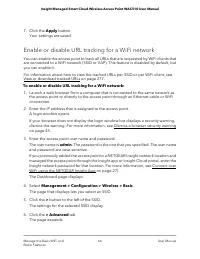
Page 66 - Enable or disable URL tracking for a WiFi network
7. Click the Apply button. Your settings are saved. Enable or disable URL tracking for a WiFi network You can enable the access point to track all URLs that are requested by WiFi clients thatare connected to a WiFi network (SSID or VAP). This feature is disabled by default, butyou can enable it. For...
Page 68 - Select a MAC ACL for a WiFi network
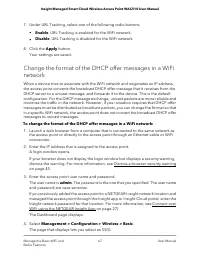
5. Click the > button to the left of the SSID. The settings for the selected SSID display. 6. Click the > Advanced tab. The page expands. 7. Under DHCP Offer Broadcast to Unicast, select one of the following radio buttons: • Enable. The access point forwards DHCP offer messages as unicast pack...
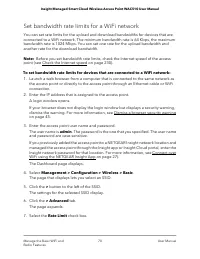
Page 70 - Set bandwidth rate limits for a WiFi network
Set bandwidth rate limits for a WiFi network You can set rate limits for the upload and download bandwidths for devices that areconnected to a WiFi network. The minimum bandwidth rate is 64 Kbps, the maximumbandwidth rate is 1024 Mbps. You can set one rate for the upload bandwidth andanother rate fo...
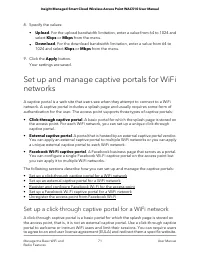
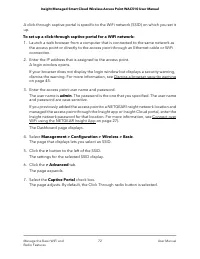
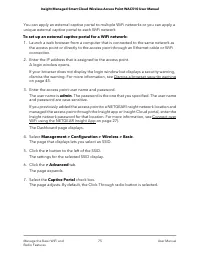
Page 71 - Set up a click-through captive portal for a WiFi network
8. Specify the values: • Upload. For the upload bandwidth limitation, enter a value from 64 to 1024 andselect Kbps or Mbps from the menu. • Download. For the download bandwidth limitation, enter a value from 64 to1024 and select Kbps or Mbps from the menu. 9. Click the Apply button. Your settings ar...
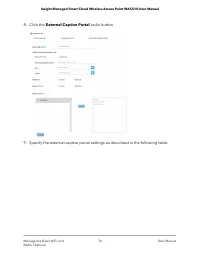
Page 74 - Set up an external captive portal for a WiFi network
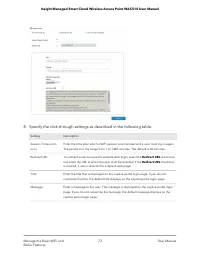
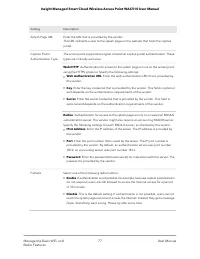
(Continued) Description Setting To customize the image that is displayed on the captive portal login page, click the Browse button and navigate to and select an image. If you do not customize the image, the default image displays on the captive portal login page. JPEG/JPG Image (Max 500KB) The field...
Page 78 - Register and configure Facebook Wi-Fi for the access point
(Continued) Description Setting Select one of the following radio buttons: • Enable. Before authentication occurs, secure HTTP (HTTPS) traffic is allowed to pass through. • Disable. This is the default setting. HTTPS traffic is allowed only after authentication occurs. Allow HTTPS The walled garden ...
Page 81 - Set up a Facebook Wi-Fi captive portal for a WiFi network
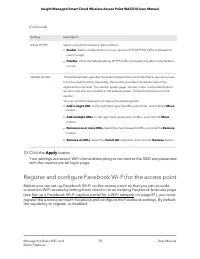
By default, the Allow HTTPS Disable radio button is selected and clients that areconnected to the Facebook captive portal cannot establish an HTTPS session untilafter the captive portal authentication occurs. 15. Click the Apply button. Your settings are saved. Set up a Facebook Wi-Fi captive portal...
Page 82 - Unregister the access point from Facebook Wi-Fi
The page adjusts. By default, the Click Through radio button is selected. 8. Select the Facebook Wi-Fi radio button. The page adjusts again because you do not need to specify any further settings onthe page. Customers receive WiFi access by checking in to a Facebook business page. To usethis option,...
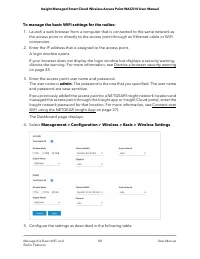
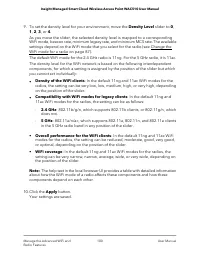
Page 83 - Manage the basic radio features; Manage the basic settings for the radios
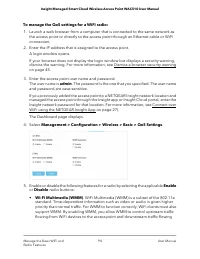
Insight network password for that location. For more information, see Connect overWiFi using the NETGEAR Insight App on page 27). The Dashboard page displays. 4. Select Management > Configuration > Wireless > Basic > Facebook Wi-Fi. The Facebook Wi-Fi page displays. 5. Select the No radi...
Page 86 - Turn a radio on or off
(Continued) Description Setting From the menu, select the value that protects radio transmissions from interference. An Auto guard interval (which is the default) improves performance, but some legacy devices can operate only with a long –800ns guard interval. The guard interval and channel width de...
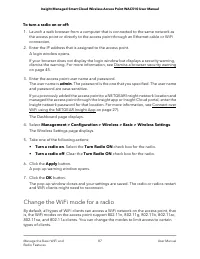
Page 87 - Change the WiFi mode for a radio
To turn a radio on or off: 1. Launch a web browser from a computer that is connected to the same network as the access point or directly to the access point through an Ethernet cable or WiFiconnection. 2. Enter the IP address that is assigned to the access point. A login window opens. If your browse...
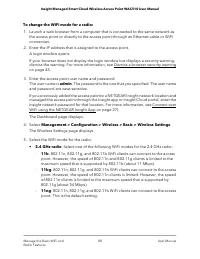
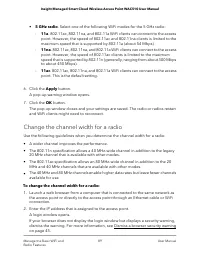
Page 89 - Change the channel width for a radio
• 5 GHz radio. Select one of the following WiFi modes for the 5 GHz radio: - 11a. 802.11ac, 802.11na, and 802.11a WiFi clients can connect to the accesspoint. However, the speed of 802.11ac and 802.11na clients is limited to themaximum speed that is supported by 802.11a (about 54 Mbps). - 11na. 802....
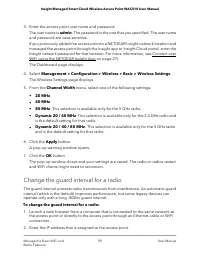
Page 90 - Change the guard interval for a radio
3. Enter the access point user name and password. The user name is admin. The password is the one that you specified. The user nameand password are case-sensitive. If you previously added the access point to a NETGEAR Insight network location andmanaged the access point through the Insight app or In...
Page 91 - Change the output power for a radio
A login window opens. If your browser does not display the login window but displays a security warning,dismiss the warning. For more information, see Dismiss a browser security warningon page 45. 3. Enter the access point user name and password. The user name is admin. The password is the one that ...
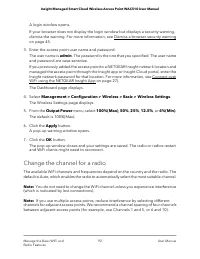
Page 92 - Change the channel for a radio
A login window opens. If your browser does not display the login window but displays a security warning,dismiss the warning. For more information, see Dismiss a browser security warningon page 45. 3. Enter the access point user name and password. The user name is admin. The password is the one that ...
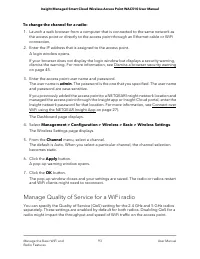
Page 93 - Manage Quality of Service for a WiFi radio
To change the channel for a radio: 1. Launch a web browser from a computer that is connected to the same network as the access point or directly to the access point through an Ethernet cable or WiFiconnection. 2. Enter the IP address that is assigned to the access point. A login window opens. If you...
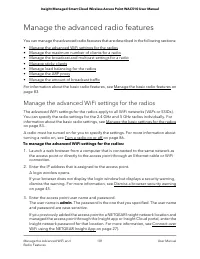
Page 101 - Manage the advanced radio features; Manage the advanced WiFi settings for the radios
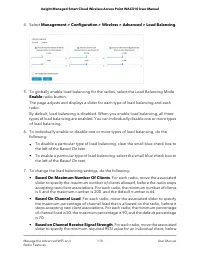
Manage the advanced radio features You can manage the advanced radio features that are described in the following sections: • Manage the advanced WiFi settings for the radios • Manage the maximum number of clients for a radio • Manage the broadcast and multicast settings for a radio • Manage sticky ...
Page 104 - Manage the maximum number of clients for a radio
(Continued) Description Setting By default, the MU-MIMO Enable radio button is selected and multiuser MIMO (MU-MIMO) is enabled. To disable MU-MIMO, select the MU-MIMO Disable radio button. 802.11ac Wave 2 supports MU-MIMO, which enables multiple users to receive data from the access point simultane...
Page 105 - Manage the broadcast and multicast settings for a radio
A login window opens. If your browser does not display the login window but displays a security warning,dismiss the warning. For more information, see Dismiss a browser security warningon page 45. 3. Enter the access point user name and password. The user name is admin. The password is the one that ...
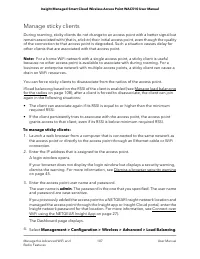
Page 107 - Manage sticky clients
Manage sticky clients During roaming, sticky clients do not change to an access point with a better signal butremain associated with (that is, stick to ) their initial access point, even though the quality of the connection to that access point is degraded. Such a situation causes delay forother cli...
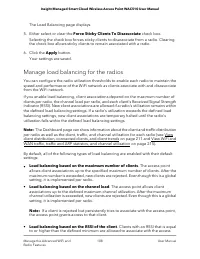
Page 108 - Manage load balancing for the radios
The Load Balancing page displays. 5. Either select or clear the Force Sticky Clients To Disassociate check box. Selecting the check box forces sticky clients to disassociate from a radio. Clearingthe check box allows sticky clients to remain associated with a radio. 6. Click the Apply button. Your s...
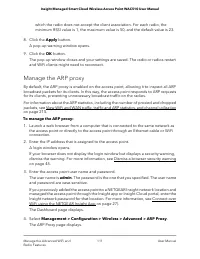
Page 111 - Manage the ARP proxy
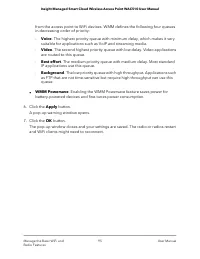
which the radio does not accept the client association. For each radio, theminimum RSSI value is 1, the maximum value is 50, and the default value is 23. 8. Click the Apply button. A pop-up warning window opens. 9. Click the OK button. The pop-up window closes and your settings are saved. The radio ...
Page 112 - Manage the amount of broadcast traffic
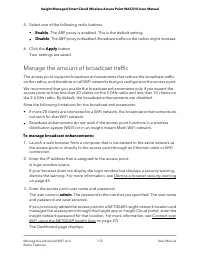
5. Select one of the following radio buttons • Enable. The ARP proxy is enabled. This is the default setting. • Disable. The ARP proxy is disabled. Broadcast traffic on the radios might increase. 6. Click the Apply button. Your settings are saved. Manage the amount of broadcast traffic The access po...
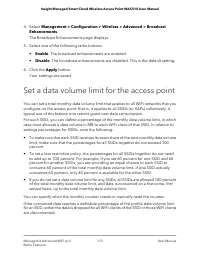
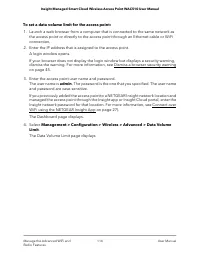
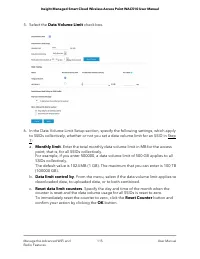
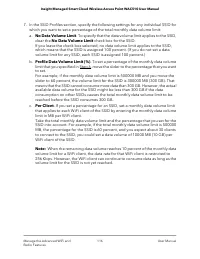
Page 113 - Set a data volume limit for the access point
4. Select Management > Configuration > Wireless > Advanced > Broadcast Enhancements.The Broadcast Enhancements page displays. 5. Select one of the following radio buttons • Enable. The broadcast enhancements are enabled. • Disable. The broadcast enhancements are disabled. This is the def...
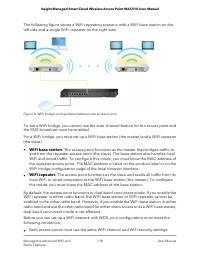
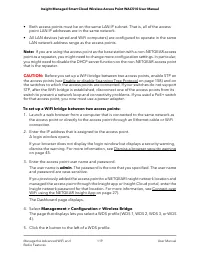
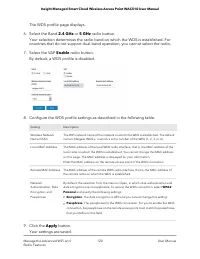
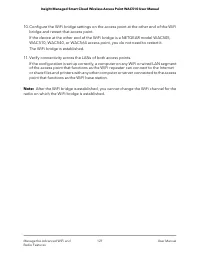
Page 117 - Set up a WiFi bridge between access points
8. In the Data Volume Limit Policy on SSID Profile section, specify the following settings that apply to each individual SSID for which you set a profile data volume limit inStep 7: a. Pop-up a warning message. Specify the percentage of the profile data volume limit for an SSID that, if exceeded, ca...
Page 122 - Manage Access and Security
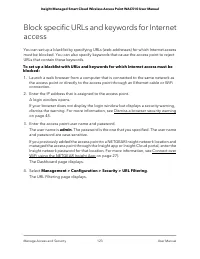
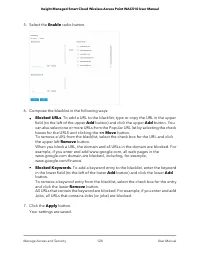
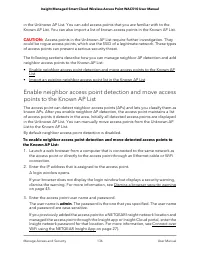
5 Manage Access and Security This chapter describes how you can manage access and security features and useraccounts. The chapter includes the following sections: • Block specific URLs and keywords for Internet access • Manage local MAC access control lists • Manage user accounts • Manage neighbor A...
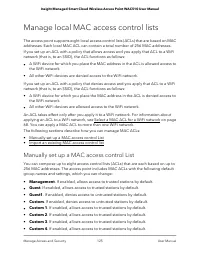
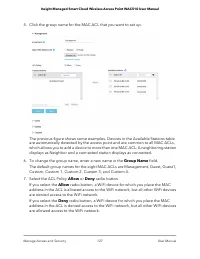
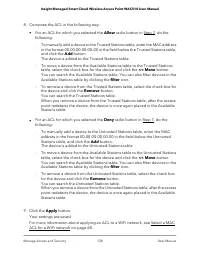
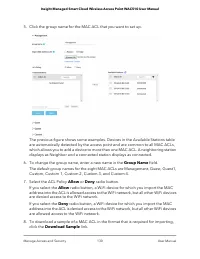
Page 125 - Manage local MAC access control lists; Manually set up a MAC access control List
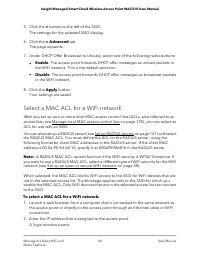
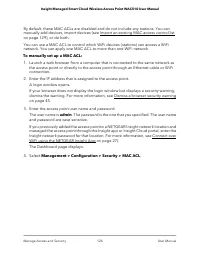
Manage local MAC access control lists The access point supports eight local access control lists (ACLs) that are based on MACaddresses. Each local MAC ACL can contain a total number of 256 MAC addresses. If you set up an ACL with a policy that allows access and you apply that ACL to a WiFinetwork (t...
Page 129 - Import an existing MAC access control list
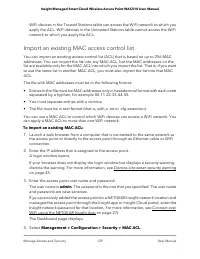
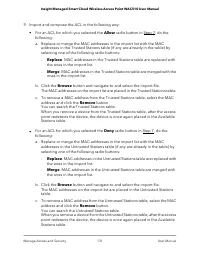
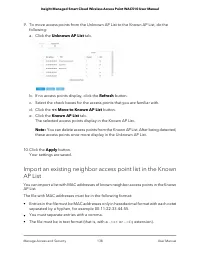
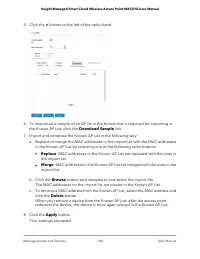
WiFi devices in the Trusted Stations table can access the WiFi network to which youapply the ACL. WiFi devices in the Untrusted Stations table cannot access the WiFinetwork to which you apply the ACL. Import an existing MAC access control list You can import an existing access control list (ACL) tha...
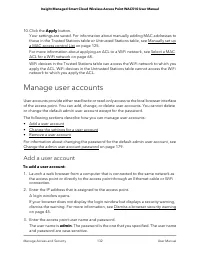
Page 132 - Manage user accounts; Add a user account
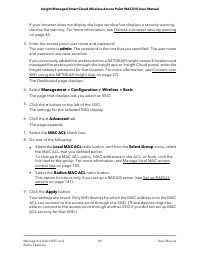
10. Click the Apply button. Your settings are saved. For information about manually adding MAC addresses tothose in the Trusted Stations table or Untrusted Stations table, see Manually set upa MAC access control List on page 125. For more information about applying an ACL to a WiFi network, see Sele...
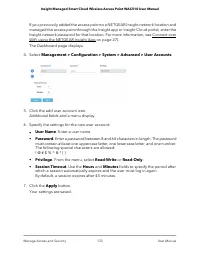
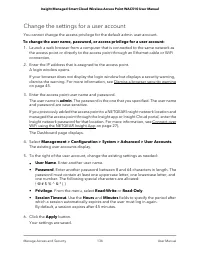
Page 134 - Change the settings for a user account
Change the settings for a user account You cannot change the access privilege for the default admin user account. To change the user name, password, or access privilege for a user account: 1. Launch a web browser from a computer that is connected to the same network as the access point or directly t...
Page 135 - Remove a user account; Manage neighbor AP detection
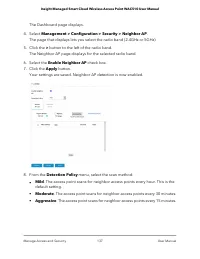
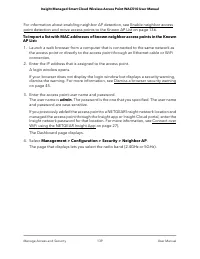
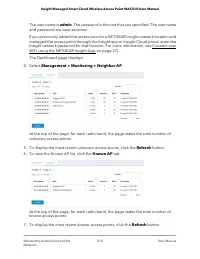
Remove a user account You can remove a user account that you no longer need. You cannot remove the defaultadmin user account. To remove a user account: 1. Launch a web browser from a computer that is connected to the same network as the access point or directly to the access point through an Etherne...
Page 141 - Set up RADIUS servers
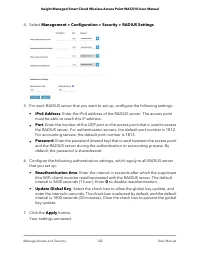
Set up RADIUS servers If you use WPA2 Enterprise security or a RADIUS MAC ACL, you must set up RADIUSservers for authentication, accounting, or both authentication and accounting usingRADIUS. You must set up primary IPv4 servers and you can set up secondary IPv4 servers.These RADIUS server settings ...
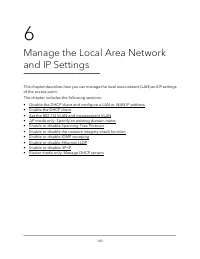
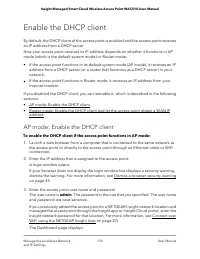
Page 150 - Enable the DHCP client; AP mode: Enable the DHCP client
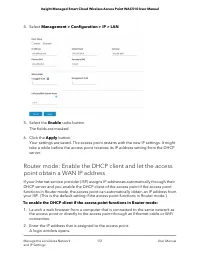
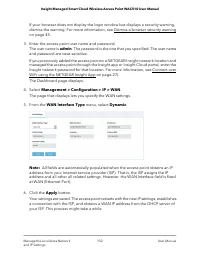
Enable the DHCP client By default, the DHCP client of the access point is enabled and the access point receivesan IP address from a DHCP server. How your access point receives its IP address depends on whether it functions in APmode (which is the default system mode) or Router mode: • If the access ...
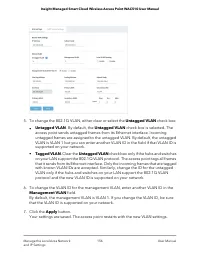
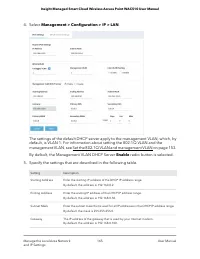
Page 153 - AP mode: Set the 802.1Q VLAN and management VLAN
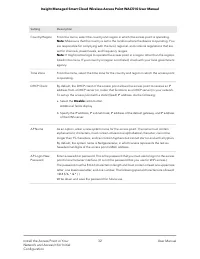
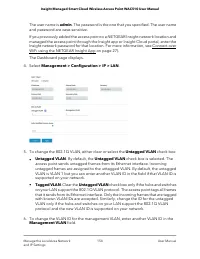
Set the 802.1Q VLAN and managementVLAN The 802.1Q VLAN protocol on the access point logically separates traffic on the samephysical (wired) network. This protocol can work with tagged and untagged VLANs, asfollows: • Untagged VLAN. The access point sends untagged frames from its Ethernet interface.I...
Page 155 - Router mode: Set the 802.1Q VLAN and management VLAN
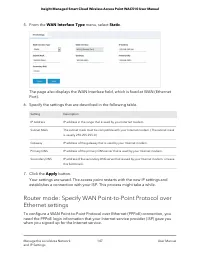
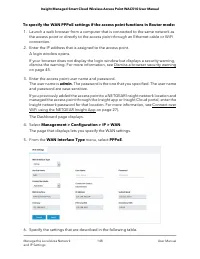
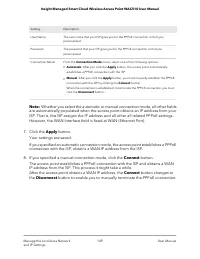
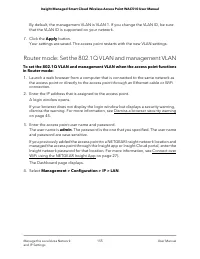
By default, the management VLAN is VLAN 1. If you change the VLAN ID, be surethat the VLAN ID is supported on your network. 7. Click the Apply button. Your settings are saved. The access point restarts with the new VLAN settings. Router mode: Set the 802.1Q VLAN and management VLAN To set the 802.1Q...
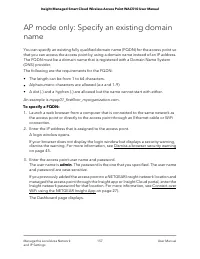
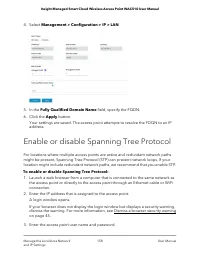
Page 158 - Enable or disable Spanning Tree Protocol
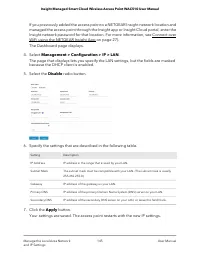
4. Select Management > Configuration > IP > LAN. 5. In the Fully Qualified Domain Name field, specify the FQDN. 6. Click the Apply button. Your settings are saved. The access point attempts to resolve the FDQN to an IPaddress. Enable or disable Spanning Tree Protocol For locations where mul...
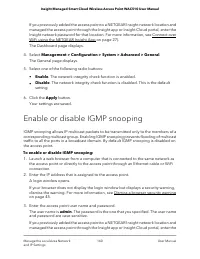
Page 160 - Enable or disable IGMP snooping
If you previously added the access point to a NETGEAR Insight network location andmanaged the access point through the Insight app or Insight Cloud portal, enter theInsight network password for that location. For more information, see Connect overWiFi using the NETGEAR Insight App on page 27). The D...
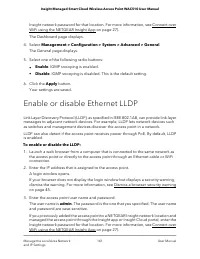
Page 161 - Enable or disable Ethernet LLDP
Insight network password for that location. For more information, see Connect overWiFi using the NETGEAR Insight App on page 27). The Dashboard page displays. 4. Select Management > Configuration > System > Advanced > General. The General page displays. 5. Select one of the following rad...
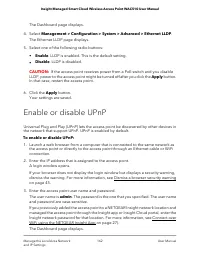
Page 162 - Enable or disable UPnP
The Dashboard page displays. 4. Select Management > Configuration > System > Advanced > Ethernet LLDP. The Ethernet LLDP page displays. 5. Select one of the following radio buttons: • Enable. LLDP is enabled. This is the default setting. • Disable. LLDP is disabled. CAUTION: If the acces...
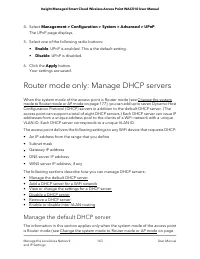
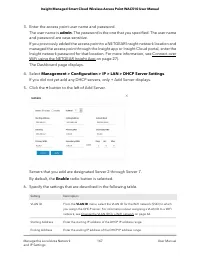
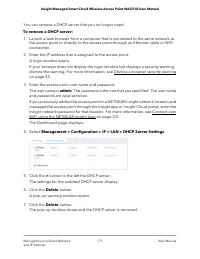
Page 163 - Router mode only: Manage DHCP servers; Manage the default DHCP server
4. Select Management > Configuration > System > Advanced > UPnP. The UPnP page displays. 5. Select one of the following radio buttons: • Enable. UPnP is enabled. This is the default setting. • Disable. UPnP is disabled. 6. Click the Apply button. Your settings are saved. Router mode only...
Page 166 - Add a DHCP server for a WiFi network
(Continued) Description Setting The IP address of the primary Domain Name System (DNS) server that is used by your Internet modem. By default, the address is 8.8.8.8. Primary DNS The IP address of the secondary DNS server that is used by your Internet modem. By default, the address is 8.8.4.4. Secon...
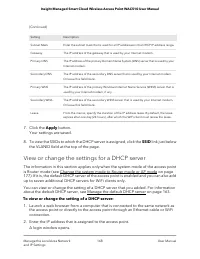
Page 168 - View or change the settings for a DHCP server
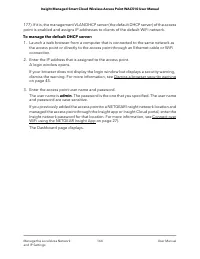
(Continued) Description Setting Enter the subnet mask that is used for all IP addresses in the DHCP IP address range. Subnet Mask The IP address of the gateway that is used by your Internet modem. Gateway The IP address of the primary Domain Name System (DNS) server that is used by your Internet mod...
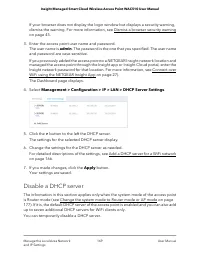
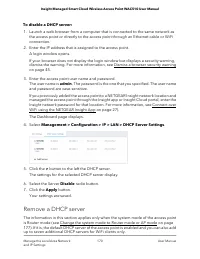
Page 169 - Disable a DHCP server
If your browser does not display the login window but displays a security warning,dismiss the warning. For more information, see Dismiss a browser security warningon page 45. 3. Enter the access point user name and password. The user name is admin. The password is the one that you specified. The use...
Page 170 - Remove a DHCP server
To disable a DHCP server: 1. Launch a web browser from a computer that is connected to the same network as the access point or directly to the access point through an Ethernet cable or WiFiconnection. 2. Enter the IP address that is assigned to the access point. A login window opens. If your browser...
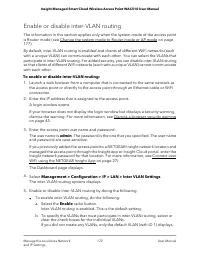
Page 172 - Enable or disable inter-VLAN routing
Enable or disable inter-VLAN routing The information in this section applies only when the system mode of the access pointis Router mode (see Change the system mode to Router mode or AP mode on page177). By default, inter-VLAN routing is enabled and clients of different WiFi networks (eachwith a uni...
Page 178 - Change the country or region of operation
4. Select Management > Configuration > System > Basic. The General page displays the basic system settings. 5. Select one of the following radio buttons: • AP. The access point functions in AP mode. This is the default setting. • Router. The access point functions in Router mode. WARNING: T...
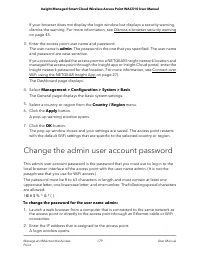
Page 179 - Change the admin user account password
If your browser does not display the login window but displays a security warning,dismiss the warning. For more information, see Dismiss a browser security warningon page 45. 3. Enter the access point user name and password. The user name is admin. The password is the one that you specified. The use...
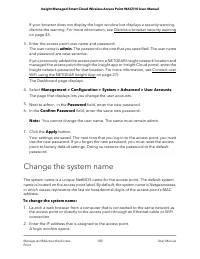
Page 180 - Change the system name
If your browser does not display the login window but displays a security warning,dismiss the warning. For more information, see Dismiss a browser security warningon page 45. 3. Enter the access point user name and password. The user name is admin. The password is the one that you specified. The use...
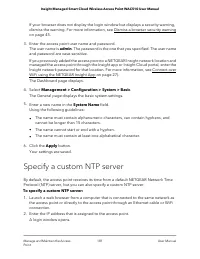
Page 181 - Specify a custom NTP server
If your browser does not display the login window but displays a security warning,dismiss the warning. For more information, see Dismiss a browser security warningon page 45. 3. Enter the access point user name and password. The user name is admin. The password is the one that you specified. The use...
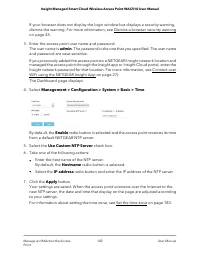
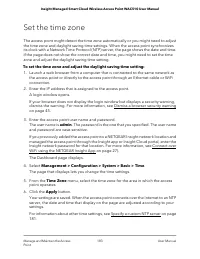
Page 183 - Set the time zone
Set the time zone The access point might detect the time zone automatically or you might need to adjustthe time zone and daylight saving time settings. When the access point synchronizesits clock with a Network Time Protocol (NTP) server, the page shows the date and time.If the page does not show th...
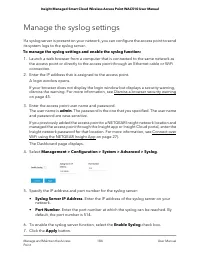
Page 184 - Manage the syslog settings
Manage the syslog settings If a syslog server is present on your network, you can configure the access point to sendits system logs to the syslog server. To manage the syslog settings and enable the syslog function: 1. Launch a web browser from a computer that is connected to the same network as the...
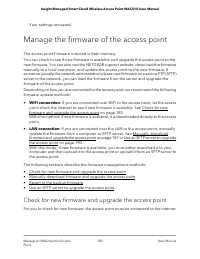
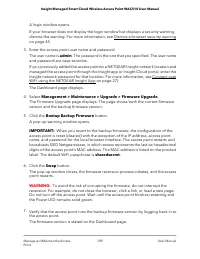
Page 185 - Manage the firmware of the access point; Check for new firmware and upgrade the access point
Your settings are saved. Manage the firmware of the access point The access point firmware is stored in flash memory. You can check to see if new firmware is available and upgrade the access point to thenew firmware. You can also visit the NETGEAR support website, download the firmwaremanually to a ...
Page 187 - Manually download firmware and upgrade the access point
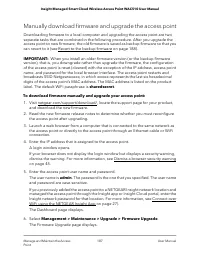
Manually download firmware and upgrade the access point Downloading firmware to a local computer and upgrading the access point are twoseparate tasks that are combined in the following procedure. After you upgrade theaccess point to new firmware, the old firmware is saved as backup firmware so that ...
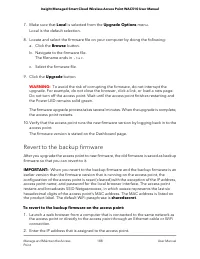
Page 188 - Revert to the backup firmware
7. Make sure that Local is selected from the Upgrade Options menu. Local is the default selection. 8. Locate and select the firmware file on your computer by doing the following: a. Click the Browse button. b. Navigate to the firmware file. The filename ends in .tar . c. Select the firmware file. 9....
Page 190 - Use an SFTP server to upgrade the access point
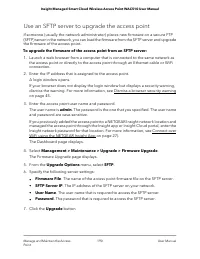
Use an SFTP server to upgrade the access point If someone (usually the network administrator) places new firmware on a secure FTP(SFTP) server in the network, you can load the firmware from the SFTP server and upgradethe firmware of the access point. To upgrade the firmware of the access point from ...
Page 191 - Back up the access point configuration
WARNING: To avoid the risk of corrupting the firmware, do not interrupt the upgrade. For example, do not close the browser, click a link, or load a new page.Do not turn off the access point. Wait until the access point finishes restarting andthe Power LED remains solid green. The firmware upgrade pr...
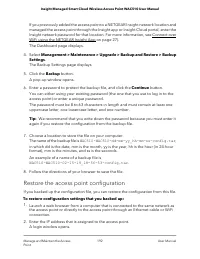
Page 192 - Restore the access point configuration
If you previously added the access point to a NETGEAR Insight network location andmanaged the access point through the Insight app or Insight Cloud portal, enter theInsight network password for that location. For more information, see Connect overWiFi using the NETGEAR Insight App on page 27). The D...
Page 195 - Schedule the access point to reboot
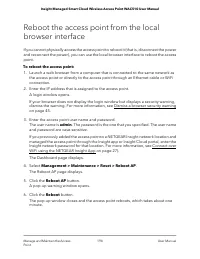
Schedule the access point to reboot You can schedule the access point to reboot at a time that is more convenient for thenetwork, for example, when you do not expect any WiFi clients (or only a few) to beconnected to the access point. To schedule the access point to reboot: 1. Launch a web browser f...
Page 196 - Use the Reset button to reset the access point
Return the access point to its factory defaultsettings Under some circumstances (for example, if you lost track of the changes that you madeto the access point settings or you move the access point to a different network), youmight want to erase the configuration and reset the access point to factor...
Page 197 - Use the local browser interface to reset the access point
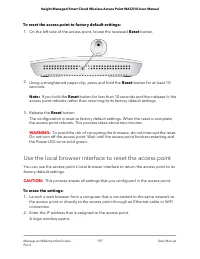
To reset the access point to factory default settings: 1. On the left side of the access point, locate the recessed Reset button. 2. Using a straightened paper clip, press and hold the Reset button for at least 10 seconds. Note: If you hold the Reset button for less than 10 seconds and then release ...
Page 200 - Manage the LEDs
6. Specify the following settings: • Read-Only Community Name. The community string that allows the SNMPmanager to read the access point’s MIB objects. The default is public. • Read-Write Community Name. The community string that allows the SNMPmanager to read and write the access point’s MIB object...
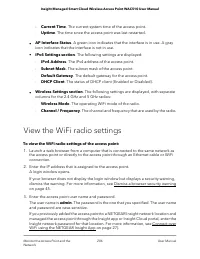
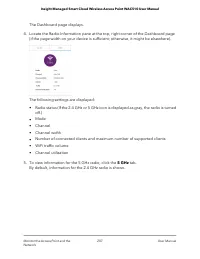
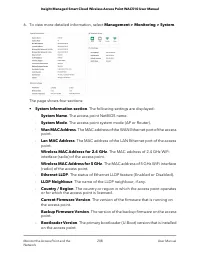
Page 206 - View the WiFi radio settings
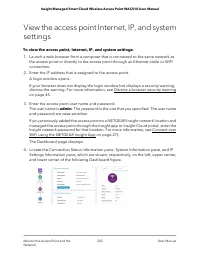
- Current Time. The current system time of the access point. - Uptime. The time since the access point was last restarted. • AP Interface Status. A green icon indicates that the interface is in use. A grayicon indicates that the interface is not in use. • IPv4 Settings section. The following setting...
Page 217 - View or download tracked URLs
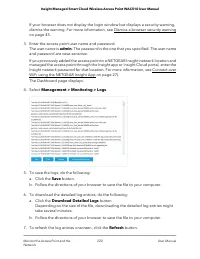
View or download tracked URLs If you enabled URL tracking for a WiFi network (see Enable or disable URL tracking fora WiFi network on page 66), you can view the tracked URLs by URL, WiFi client, andSSID. You can also download a URL tracking report as a .csv file. To view or download tracked URLs: 1....
Page 221 - View a WiFi bridge connection
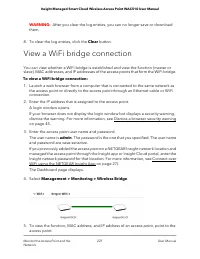
WARNING: After you clear the log entries, you can no longer save or download them. 8. To clear the log entries, click the Clear button. View a WiFi bridge connection You can view whether a WiFi bridge is established and view the function (master orslave), MAC addresses, and IP addresses of the acces...
Page 222 - View the data volume consumption
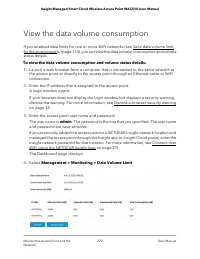
View the data volume consumption If you enabled data limits for one or more WiFi networks (see Set a data volume limitfor the access point on page 113), you can view the data volume consumption and volumestatus details. To view the data volume consumption and volume status details: 1. Launch a web b...
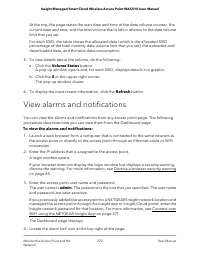
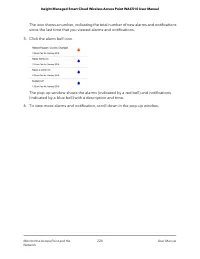
Page 223 - View alarms and notifications
At the top, the page states the start date and time of the data volume counter, thecurrent date and time, and the total volume that is left in relation to the data volumelimit that you set. For each SSID, the table shows the allocated data (which is the allocated SSIDpercentage of the total monthly ...
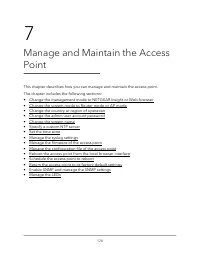
Page 225 - Diagnostics and Troubleshooting
9 Diagnostics and Troubleshooting This chapter describes how you can capture WiFi packets and troubleshoot the accesspoint and network. The chapter includes the following sections: • Capture WiFi and Ethernet packets • Perform a ping test • Check the Internet speed • Quick tips for troubleshooting •...
Page 226 - Capture WiFi and Ethernet packets
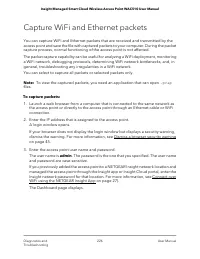
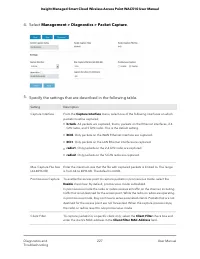
Capture WiFi and Ethernet packets You can capture WiFi and Ethernet packets that are received and transmitted by theaccess point and save the file with captured packets to your computer. During the packetcapture process, normal functioning of the access point is not affected. The packet capture capa...
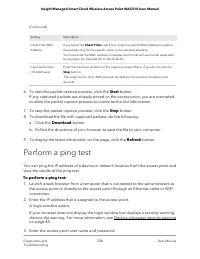
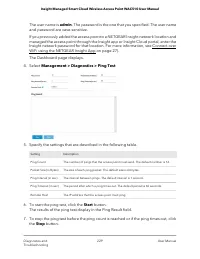
Page 228 - Perform a ping test
(Continued) Description Setting If you select the Client Filter check box, enter the client’s MAC address to capture the packets only for the specific client on the selected interface. You must enter the MAC address in hexadecimal format with each octet separated by a hyphen, for example 00-11-22-33...
Page 230 - Check the Internet speed
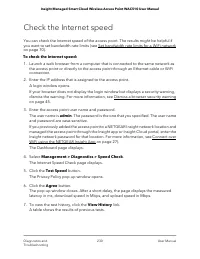
Check the Internet speed You can check the Internet speed of the access point. The results might be helpful ifyou want to set bandwidth rate limits (see Set bandwidth rate limits for a WiFi networkon page 70). To check the Internet speed: 1. Launch a web browser from a computer that is connected to ...
Page 231 - Quick tips for troubleshooting
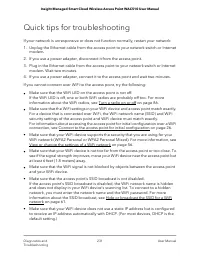
Quick tips for troubleshooting If your network is unresponsive or does not function normally, restart your network: 1. Unplug the Ethernet cable from the access point to your network switch or Internet modem. 2. If you use a power adapter, disconnect it from the access point. 3. Plug in the Ethernet...
Page 232 - Troubleshoot with the LEDs
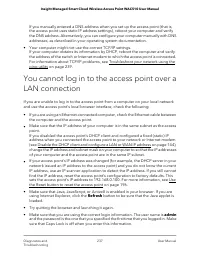
If you cannot connect over an Ethernet cable to the access point, try the following: • Make sure that the Ethernet cables are securely plugged in. • Make sure that your network includes a DHCP server that can issue an IP address tothe access point or, if your access point requires a fixed (static) I...
Page 235 - G or 5G WLAN LED is off; WAN PoE LED or LAN LED is off while a device is connected
If you use a power adapter with the access point, disconnect and reconnect thepower adapter and wait five minutes to see if the Insight LED lights solid blue. 6. Use the Reset button to return the access point to its factory default settings. For more information, see Use the Reset button to reset t...
Page 238 - Changes are not saved
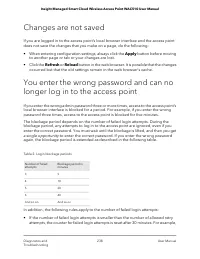
Changes are not saved If you are logged in to the access point’s local browser interface and the access pointdoes not save the changes that you make on a page, do the following: • When entering configuration settings, always click the Apply button before movingto another page or tab or your changes ...
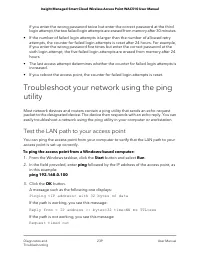
Page 239 - Test the LAN path to your access point
if you enter the wrong password twice but enter the correct password at the thirdlogin attempt, the two failed login attempts are erased from memory after 30 minutes. • If the number of failed login attempts is larger than the number of allowed retryattempts, the counter for failed login attempts is...
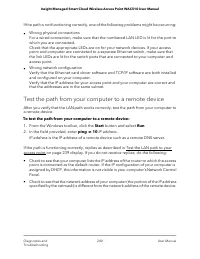
Page 240 - Test the path from your computer to a remote device
If the path is not functioning correctly, one of the following problems might be occurring: • Wrong physical connectionsFor a wired connection, make sure that the numbered LAN LED is lit for the port towhich you are connected.Check that the appropriate LEDs are on for your network devices. If your a...
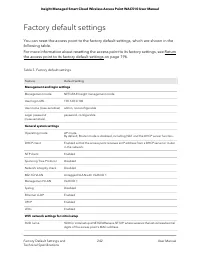
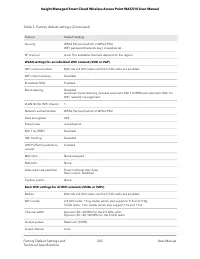
Page 242 - Factory default settings
Factory default settings You can reset the access point to the factory default settings, which are shown in thefollowing table. For more information about resetting the access point to its factory settings, see Returnthe access point to its factory default settings on page 196. Table 3. Factory defa...
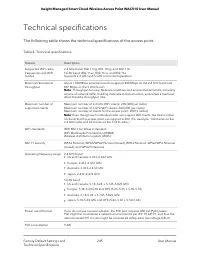
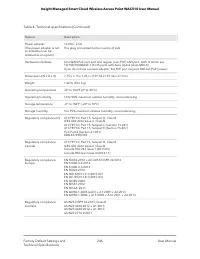
Page 245 - Technical specifications
Technical specifications The following table shows the technical specifications of the access point. Table 4. Technical specifications Description Feature 2.4 GHz band: 802.11ng, 801.11bg, and 802.11b5 GHz band: 802.11ac, 802.11na, and 802.11aSupports 2.4 GHz and 5 GHz concurrent operation Supported...