Mongoose EMS 1.9R - User Manual
Mongoose EMS 1.9R Car Alarm – User Manual, read for free online in PDF format. We hope this helps you resolve any issues you may have. If you have further questions, please contact us through the contact form.
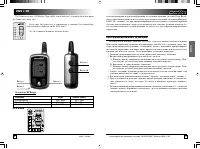
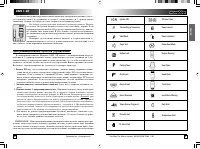
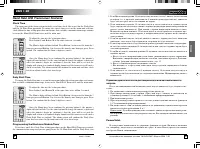

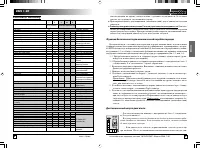
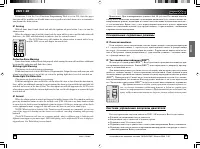
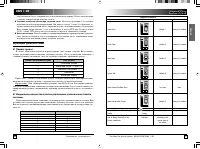
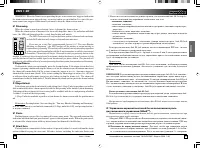

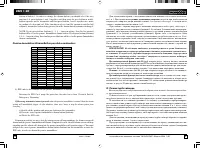
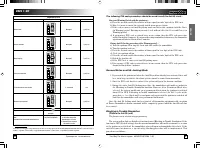

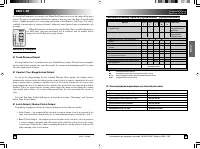
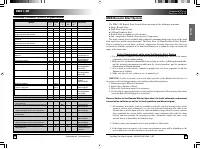
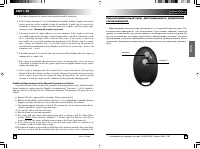
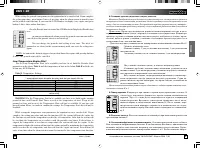
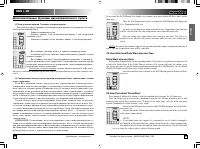
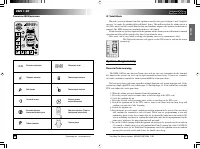
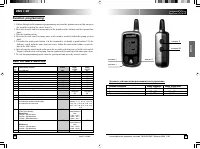
Table of Contents:
- Page 2 – Transceiver RF Range; Conditions; Open Air within City Area; LCD Icons; Программирование функций.
- Page 3 – На дисплее пульта управления включится индикатор режима.; Программирование пультов управления.; Введите PIN; После звукового сигнала дождитесь двойной
- Page 4 – Hand Held LCD Transceiver Features; Clock Time; зажигание, этот запуск будет пропущен, но режим не будет отменен.
- Page 5 – чится индикатор режима.; 4-часовой запуск двигателя и ежедневный запуск в заданное время; На дисплее пульта включится индикатор режима.
- Page 6 – Button Lock; Запуск двигателя при понижении температуры
- Page 7 – One Way Transmitter; Автоматические режимы запуска двигателя; Периодический запуск двигателя; Таблице А; (индикатор режима на дисплее
- Page 8 – Command Summary; Функция безопасности для механической коробки передач
- Page 9 – Smart LED. System Status Indication; Disarming procedure depends on PIN Code you have set.; If you have set One-Digit PIN Code; operation for two minutes.; Directions for Use; Main Alarm Functions; Pager Function; Дистанционный запуск двигателя возможен только в режиме охраны.
- Page 10 – Arming; Defective Zone Warning; Dome Light Car Detection; This feature can be selected using programming.; Armed; Специальные сервисные режимы; Тестовый режим пейджера (RRE; Система управления запуском двигателя
- Page 11 – Triggered Indication; Количество вспышек в серии; Функции диагностики; Индикация количества пультов управления, записанных в память
- Page 12 – Disarming; and the LCD indication will change to disarmed state indication.; Stage Disarm; Panic; обязательно; Управление охранной системой без использования пульта; включенном режиме турбо таймера.; Постановка на охрану штатным ключом.
- Page 13 – Silent Disarm; Arming the Alarm with Engine Running with Ignition/ACC Support; 0 секундная пауза для ввода отключающего кода.; режима блокировки с; SSDA
- Page 14 – Turbo Timer Mode; С помощью переключателя 2-6 в таблице программирования
- Page 15 – The Turbo Timer mode can be interrupted before timer has elapsed; Если при одновременном включенных пассивном иммобилайзере и
- Page 16 – Automatic Functions; Автоматическое запирание дверей при включении зажигания.; двушагового отпирания дверей; Дистанционное управление центральным замком.; двушагового отпирания
- Page 17 – Passive Immobiliser; При включенном режиме пассивного иммобилайзера; чения пассивного иммобилайзера или; Использование дополнительных охранных функций; Автоматическая перепостановка на охрану (защита от случайного; Функция может быть программно отключена
- Page 18 – Passive Immobiliser Disarm Button possible combination:; If the wrong transmitter button is pressed; режиме двушагового отпирания; При активированной функции пассивного иммобилайзера,; Режим турбо таймера; ся программированием.
- Page 19 – ния предупредительной зоны; ISF; затяните ручной тормоз; На дисплее пульта появится индикация режима.
- Page 20 – LED will start to flash, this is a 30-second; Grace period; to allow you to enter units digit; включится
- Page 21 – Grace and Warning Periods with the ignition on: -; General Notes on all Hi-Jacking Mode
- Page 22 – Arm/Disarm without the Remote Control; Self-Diagnostics Functions; Intrusion Warning; Постановка на охрану.; Предупреждение о неисправности при постановке на охрану
- Page 23 – Flashes; Trigger memory; Необходимая информация.; Аварийное отключение сигнализации.; Правила пользования; Управление основными режимами охраны
- Page 24 – Auxiliary Outputs; Trunk Release Output; Светодиодная индикация состояний системы.
- Page 25 – EMS Remote Start System; Safety Requirements while using the Remote Start System; motor the Brake/Clutch Output is to be selected.; Таблица команд пульта управления.
- Page 26 – running after a remote start.; Additional Requirements to the Manual Transmission Vehicle; cylinder without the engine being shut down.; кнопка 1
- Page 27 – Remote Engine Start; Automatic Engine Start modes; Periodic Engine Start; Table A; Индикатор разряда элемента питания.
- Page 28 – and the periodic start icon will switch off.; Low-Temperature Engine Start; Установка времени ежедневного запуска двигателя:; довательно кнопки М и 3.; Отключение виброзвонка и звукового сигнала.
- Page 29 – 4-Hour Start and Daily Start at preset time; Daily Start at preset time; start engine immediately.; Дополнительные функции двунаправленного пульта; Часы реального времени. Установка текущего времени:; вого сигнала кнопки M и S.
- Page 30 – 4-Hour Periodical Timed Start Timing Control
- Page 31 – Valet Mode; operation and this will be indicated by three beeps from the siren.; System Programming; Remote Code Learning; confirm entering the Code Learning.; Символы ЖКИ дисплея
- Page 32 – User Software Switches; Дальность действия двунаправленного пульта управления; Условия измерений; Городская застройка вне прямой видимости
- Page 33 – Приобретая стандартный комплект Mongoose EMS 1.9R Вы получаете:; с полным комплектом для установки.; Пульты дистанционного управления.
- Page 34 – Вступление
Two Way Car Alarm System MONGOOSE EMS 1.9R
1
ENGLISH
User’s Guide
Introduction
Thank you for purchasing our Car alarm system.
Mongoose EMS 1.9R is a modern car security system, designed and manufactured to ensure
the highest level of security for your car and provide you with a number of convenience features.
Please carefully read this manual and follow its instructions while using different features and
functions of the Mongoose EMS 1.9R.
We are not responsible for any injuries or damages resulting from your wrong use of our
system.
Do not change the Installer’s Functions while using the alarm system. These functions are
to be adjusted by professional installation staff, and to tailor the alarm system for reliable and
safety operation along with the different equipment installed on your car.
If you find any problems while using the alarm system, contact your installation shop for
repairing or re-adjusting. Do not try to repair the alarm system yourself.
After reading this Guide you will be able to make good use of your alarm system and get as full
as possible protection for your car.
The Mongoose EMS 1.9R monitors the status of the doors, hood and trunk, two-stage shock
sensor and the optional e.g. space disturbance sensor (if installed). A power siren, light
indicators, and a pager system will warn you about any intrusion into your car.
Enhanced anti-theft facilities are ensured by a powerful built-in blocking relay and an
additional universal output available to connect an extra blocking relay with either normally
closed or normally opened contacts. The Passive Immobiliser function and programmable
disarm authorization procedure are included to enhance the protective abilities of the
alarm system.
Variable functions of the inputs and outputs add flexibility to the installation procedure and
daily usage of the alarm system; optional sensors and other equipment can be connected.
Built-in relays are used to connect high-current circuits.
The alarm system allows adjustment through programming a number of features to tailor the
system to particular car and extra installed equipment.
The self-diagnostics feature helps to identify and quickly remove all possible faults.
The alarm system includes an engine start facility, which allows safety and reliable starting
the engine on both gasoline and diesel as well as on both automatic and manual transmission
vehicles.
Remote Control
Two Way Hand Held LCD Transceiver
5-button LCD Transceiver. The Transceiver has four buttons for controlling the alarm system
and the remote start system and one button (Button S) for configuring the display. The transceiver
radio remote control incorporates random encryption technology so that the control code is
changed each time the transmitter is used. Once the transceiver receives a status change or
alarm triggered signal from the main alarm unit the LCD indication will change accordingly
and audible/vibration warning will turn on to warn you the alarm is triggered.
Руководство пользователя
EMS 1.9R
68
Таблица пользовательских функций
Функция переключателя
Заводская
Кнопка 1
Кнопка 2
установка
1-1
Автопостановка на охрану
ВЫКЛ.
ВКЛ.
ВЫКЛ.
1-2
Запирание дверей при автопостановке на охрану
ВЫКЛ.
ВКЛ.
ВЫКЛ.
1-3
Автоматическая перепостановка на охрану
ВКЛ
ВКЛ.
ВЫКЛ.
1-4
Запирание дверей при включении зажигания
ВКЛ
ВКЛ.
ВЫКЛ.
1-5
Звуковые сигналы подтверждения выполнения команд
ВКЛ.
ВКЛ.
ВЫКЛ.
2-2
Функция предупреждения о снятии с охраны
ВЫКЛ.
ВКЛ.
ВЫКЛ.
2-3
Передача сигналов на все пульты управления известные системе
ВЫКЛ.
ВКЛ.
ВЫКЛ.
2-4
Пассивный иммобилайзер
ВЫКЛ.
ВКЛ.
ВЫКЛ.
2-6
Активизация Anti Hi-jack при открытии двери
Дистанционно
Автоматическая
Дистанционно
включаемая
активизация при
включаемая
активизация
каждом
активизация
открытии двери
2-7
Индикация срабатывания предупредительной зоны
ВКЛ.
ВКЛ.
ВЫКЛ.
датчика на двунаправленном пульте управления
3-1
Изменение PIN кода 1
÷
9 (только кнопка 2).
Изменение PIN кода 11
÷
99 (кнопка 1+кнопка 2)
1
Нажать требуемое
Нажать требуемое
число раз для
число раз для
ввода десятков
ввода единиц
3-2
Стирание кодов всех пультов кроме используемого
-
Нажать кнопки 1&2 вместе
3-3
Возврат к заводским установкам
-
Нажать кнопки 1&2 вместе
3-4
Кнопка (кнопки) отключения пассивного иммобилайзера.
Кнопка 1
(
DAPS
TM
)
Для входа в режим программирования нажать кнопки 1 и 2
одновременно. По окончании установки нажать обе кнопки
еще раз для выхода из режима.
3-5
Включение тревоги при не отключении пассивного
ВЫКЛ.
Для выбора
ВЫКЛ.
иммобилайзера после снятия с охраны (
ASL
TM
).
длительности
задержки
включения
Светодиодная индикация:
тревоги нажать:
15 секунд – одиночные вспышки
1 раз – 15 сек
30 секунд – двойные вспышки
2 раза – 30 сек
60 секунд – тройные вспышки
3 раза – 60 сек
3-6
Задержка включения тревоги при открытии двери
ВЫКЛ.
Для выбора
ВЫКЛ.
длительности
задержки
включения
Светодиодная индикация:
тревоги нажать:
15 секунд – одиночные вспышки
1 раз – 15 сек
30 секунд – двойные вспышки
2 раза – 30 сек
4-6
Переход к установочному программированию
-
Нажать кнопки 1&2 вместе
Нажать кнопки в выбранной
последовательности: 1; 2; 3; M; 1
⇒
1;
1
⇒
2 ; 1
⇒
3 ; 1
⇒
M ; 2
⇒
1 ; 2
⇒
2 ; 2
⇒
3 ;
2
⇒
M ; 3
⇒
1 ; 3
⇒
2 ; 3
⇒
3 ; 3
⇒
M ; M
⇒
1 ;
M
⇒
2 ; M
⇒
3 ; M
⇒
M;
* ВНИМАНИЕ! При стирании кодов пультов система также удаляет коды централь-
ного блока из памяти пультов управления (если они находятся в пределах зоны связи).
Это занимает примерно 8 секунд. После этого система заново прописывает код цент-
рального блока в память пульта, используемого при стирании. Если Вы не хотите ждать
окончания процедуры стирания, запрограммируйте используемый пульт как описано
выше для восстановления функции пейджера.
"Loading the manual" means you need to wait until the file loads and becomes available for online reading. Some manuals are very large, and the time they take to appear depends on your internet speed.
Summary
User’s Guide EMS 1.9R 2 The Transceiver uses 1,5V Battery (Type AAA), which lasts for 2-6 months dependent upon the Transceiver usage rate. Every time the transceiver is transmitting a command the transmitting indicator will be displayed on the LCD panel. See the Command Summary for more details. Bu...
Two Way Car Alarm System MONGOOSE EMS 1.9R 3 ENGLISH Shock Sensor Triggered 24-Hour Clock Doors Locked Doors Unlocked Power Save Mode Engine Running Door Open Hood Open Trunk Open Low Battery Warning Ignition ON Transmitting a Command Valet Mode Pager Test Button Lock Parking Timer Anti Hi-jack Alar...
User’s Guide EMS 1.9R 4 Hand Held LCD Transceiver Features Clock Time The main unit of the alarm system includes a real time clock; this is used for the Daily Start and the 24-Hour Start operation. To ensure the correct time is set on the main unit real timeclock follow the time setting procedure an...