Mikrotik LtAP mini 4G kit (RB912R-2nD-LTm R11e-4G) - User Manual

Mikrotik LtAP mini 4G kit (RB912R-2nD-LTm R11e-4G) Router – User Manual, read for free online in PDF format. We hope this helps you resolve any issues you may have. If you have further questions, please contact us through the contact form.
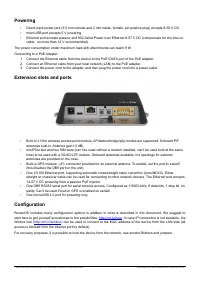
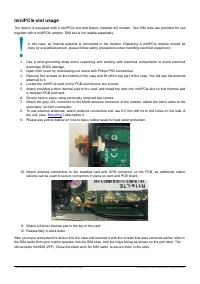
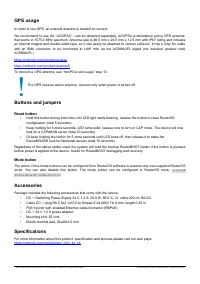


Table of Contents:
- Page 2 – Powering; microUSB port accepts 5 V powering.; Extension slots and ports; . In case IP connection is not available, the
- Page 3 – miniPCIe slot usage; is between PCB and card.
- Page 4 – GPS usage; In order to use GPS, an external antenna is needed to connect.; Buttons and jumpers; Reset button; routerboard mode-button; Accessories; DC; Specifications
- Page 5 – Operating system support; . Other operating systems have not been tested.; MikroTik mobile app; configuration settings in a couple of easy steps.
- Page 6 – Federal Communication Commission Interference Statement; Reorient or relocate the receiving antenna.; Industry Canada; IMPORTANT: Exposure to Radio Frequency Radiation.
- Page 7 – Frequency bands terms of use
LtAP mini 4G kit
The LtAP mini 4G kit is a wireless access point with two SIM card slots for 3G/LTE data. The LtAP mini 4G kit
comes with factory-installed a 4G card.
Connecting
If the intent is to use GPS, an external antenna is required (see “
”).
Choose your powering solution (see “
”).
Connect your Internet cable to the Ethernet port.
Set your computer IP configuration to
automatic
(DHCP).
Connect your direct input power jack if not using PoE, to start up the device.
The device will boot up and Wireless network will be available for connecting.
Open network connections on your PC, mobile phone or other device and search for MikroTik wireless
network and connect to it.
Once connected to the wireless network, open http://192.168.88.1 in your web browser to start
configuration, since there is no password by default, you will be logged in automatically. The configuration
also can be done using the mobile app (see “
”), and WinBox configuration tool
We recommend clicking the “Check for updates” button and updating your RouterOS software to the latest
version to ensure the best performance and stability.
Choose your country, to apply country regulation settings and set up your password in the screen that
loads.
Mounting
1. It is possible to attach the device to a wall, using
the provided screw holes on the sides of the unit.
The device should be mounted in a way that the
cable openings are pointing downward as shown
in the picture.
2. The ports are protected with a small door, that is
held in place with one screw. Use Philips PH2
screwdriver to access the ports.
3. The door has cut-out places for all available ports,
but please only break out the openings that you
will use. The device can be used both indoors and outdoors. The IP rating scale for this device is IP54.
4. The device enclosure has places where you can drill openings for external LTE and GPS antennas. Use a
drill to make holes that are appropriate for the antenna cable used.
Alternatively, you can obtain “DINrail Pro” - mounting bracket, designed to fit standard 35 mm x 7.5 mm DIN rails.
https://mikrotik.com/product/dinrail_pro
When mounting outdoors, please ensure that any cable openings is directed downwards. Use PoE injector
and proper grounding. Recommended using Cat6 cable.
Warning! This equipment should be installed and operated with a minimum distance of 20 cm between the
device and your body. Operation of this equipment in the residential environment could cause radio
interference.
Mounting and configuration of this device should be done by a qualified person.
See mikrotik.com/products for the latest version of this document.
Document #51656 Modified on: 28.AUG.2019
"Loading the manual" means you need to wait until the file loads and becomes available for online reading. Some manuals are very large, and the time they take to appear depends on your internet speed.
Summary
Powering • Direct-input power jack (5.5 mm outside and 2 mm inside, female, pin positive plug) accepts 8-30 V DC. • microUSB port accepts 5 V powering. • Ethernet port accepts passive and 802.3af/at Power over Ethernet 8-57 V DC (compensate for the loss on cable, so more than 12 V recommended). The ...
miniPCIe slot usage The device is equipped with a miniPCIe slot and factory installed 4G modem. Two SIM slots are provided for usetogether with a miniPCIe modem. SIM slot is not usable separately. In this case, an internal antenna is connected to the modem. Replacing a miniPCIe module should bedone ...
GPS usage In order to use GPS, an external antenna is needed to connect. We recommend to use the “ACGPSA” - can be obtained separately. ACGPSA is standalone active GPS antenna,that works in 1575.4 MHz spectrum. Antenna size is 46.5 mm x 26.5 mm x 12.5 mm with IP67 rating and includesan internal magn...